0
0 Created: Jan 31,2026 | ARC Raiders
ARC Raiders Trophy Display Project Guide: Rewards, Locations & The Reset Trap

At first look, ARC Raiders Trophy Display project seems incredible. You get a guaranteed path to some of the most sought-after ARC Raiders items in the game, such as the Snap Hook and Bobcat blueprints, and best of all, the project survives the wipe. You even get the ability to keep completing the project as the Expeditions reset.
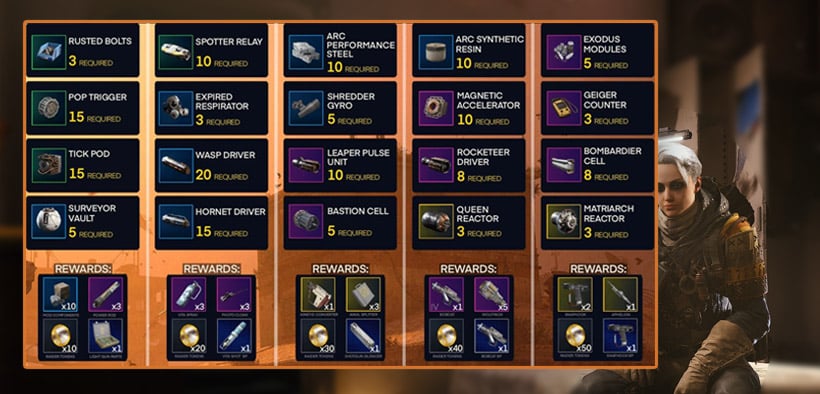
But, before you rush to complete all five pages, there is something you need to consider early on. In the long run, completing this project now may not be best.
The downside is how quickly you can run into issues after the reset. You may not lose your progress on the project, but you will lose every item from your inventory, including blueprints you have collected.
The Scenario:
If you finish the project now and learn the Bobcat blueprint, the project page gets marked as Claimed.
The Problem:
Doing the Expedition causes you to lose the blueprint from the inventory. Because the project is Claimed, you can't use the project to instantly re-learn the blueprint after the wipe.
Our Recommendation:
If you unlocked these blueprints through regular gameplay, do not progress this project yet. Set it aside until after the Expedition. This is your insurance policy to regain your high-tier gear after the reset. If you are not losing any sleep searching for these blueprints and simply wish to enjoy the remaining weeks of the season, absolutely go for it.
Reward Breakdown
The rewards are significant for those who are really ready to grind. The developers seem to be balancing the lower drop rates of exclusive event blueprints and giving us this guaranteed unlock path.
Let's go through what you are working towards page by page.
| Page | Key Rewards | Notable Blueprints |
|---|---|---|
| 1 | 10 Mod Components, 3 Power Rods, 10 Currency | Light Gun Parts BP |
| 2 | 20 Currency, 3 Photoelectric Cloaks, 3 Viter Sprays | Vitershot BP |
| 3 | Kinetic Converter, 3 Anvil Splitters, Shotgun Silencer | (None) |
| 4 | Bobcat 4, 5 Wolf Packs, 40 Currency | Bobcat BP |
| 5 | 2 Snap Hooks, 1 Aelion, 50 Currency | Snap Hook BP |
How to Clear All 5 Pages.
We chance to optimize the farming route to help you clearing these requirements fastes and easiest. Rather than looking at it page by page, we will divide it by Location and the Type of Enemy as there are multiple overlapping requirements.
1. The Stella Montes Run (Best for Efficiency)
For the early pages, Stella Montes is your best friend. You can clear a huge chunk of the requirements in just a few raids.
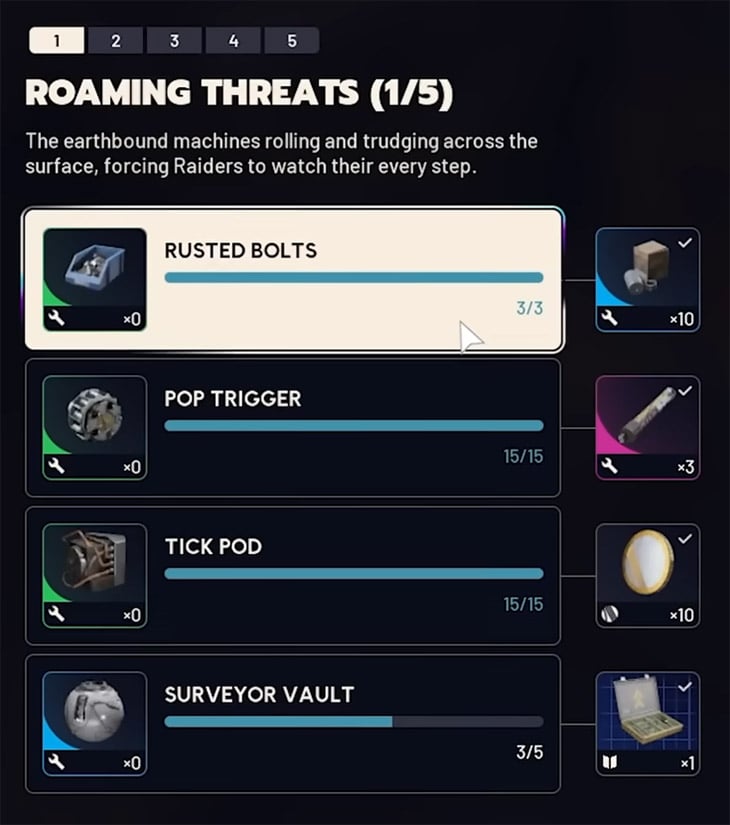
- Pops & Ticks (Page 1): You will need 15 of each. Both Seed Vault and Cultural Archives are infested with Ticks. You can find Pops everywhere.
- Expired Respirators (Page 2): While here, go to Medical Research. Medical containers here have high respawn rates for respirators.
- Geiger Counters & Exodus Modules (Page 5): Go to Assembly Workshop. This area is filled with containers that loot both of these specific tech items.
- Magnetic Accelerators (Page 4): Also plentiful at the Assembly Workshop.
2. The Enemy Grind (Combat Tactics)
Some items require specific defeats. Here's how this process can be made to happen in less time.
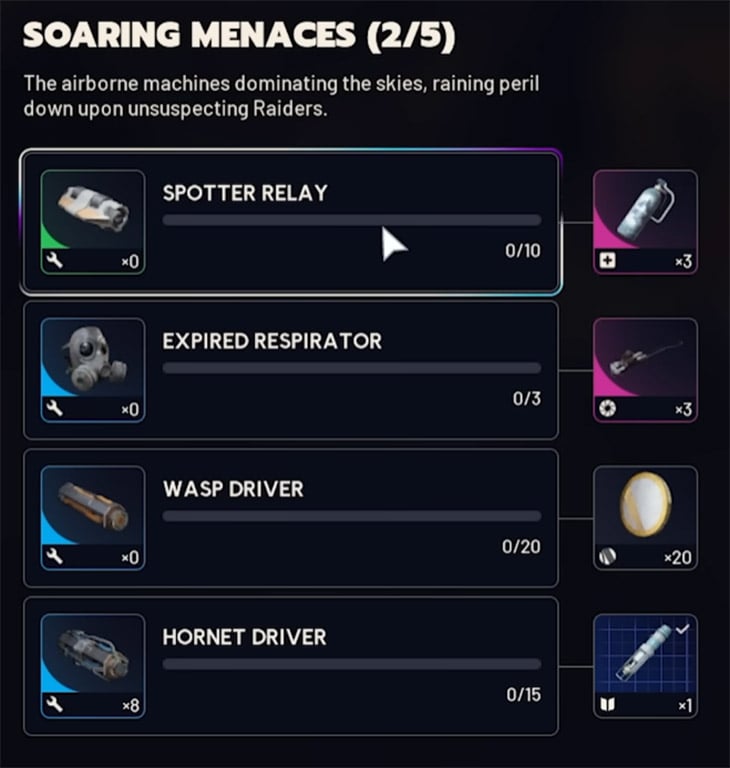
Spotter Relays (Page 2):
The Trick: Locate a Bombardier, but don't clear it right away. Let it spawn Spotter drones, seek cover, and farm the Spotters until they respawn. When you have 10 Spotter Relays, you can finish off the Bombardier.
Bombardier Cells (Page 2 & 5):
You require a total of 8 cells. As it is, drop rates are stingy, so expect to take down several Bombardiers. Combine this with your Spotter farming.
Wasps & Hornets (Page 2):
You have to kill 20 Wasp Drivers and 15 Hornet Drivers. Don't hunt these items down; kill them when you come across them on your other runs. Arc Husks and Couriers also drop these drivers.Rocketeers (Page 4):
You need 8 Rocketeers Drivers. We consider Blue gate (Head House area specifically) to be the most secure farming location. Use Wolf Packs to eliminate them without exposing yourself to their barrage.
3. The Big Game Hunting (Bosses & Elites)
This is the part of the farming cycle where it gets grindy. You will need high-tier ammunition along with plenty of patience.
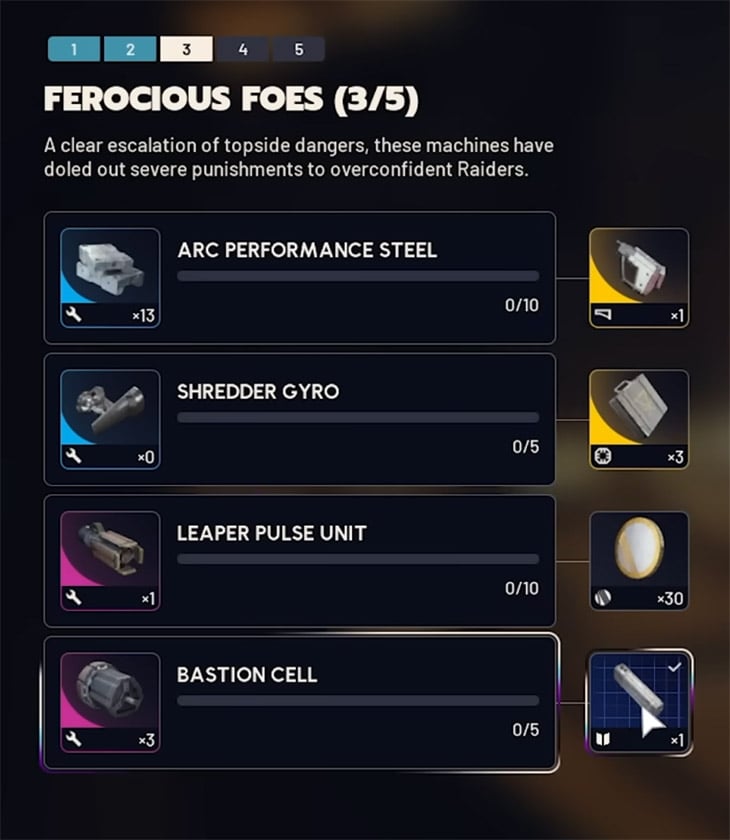
Leaper Pulse Units (Page 3):
- Requirement: 10 Units.
- Location: We prefer The Dam. You can check Water Treatment, Testing Annex, or the Hydroponics Dome.
- Warning: Leapers often drop only 1 to 2 units. You will need to make several raids.
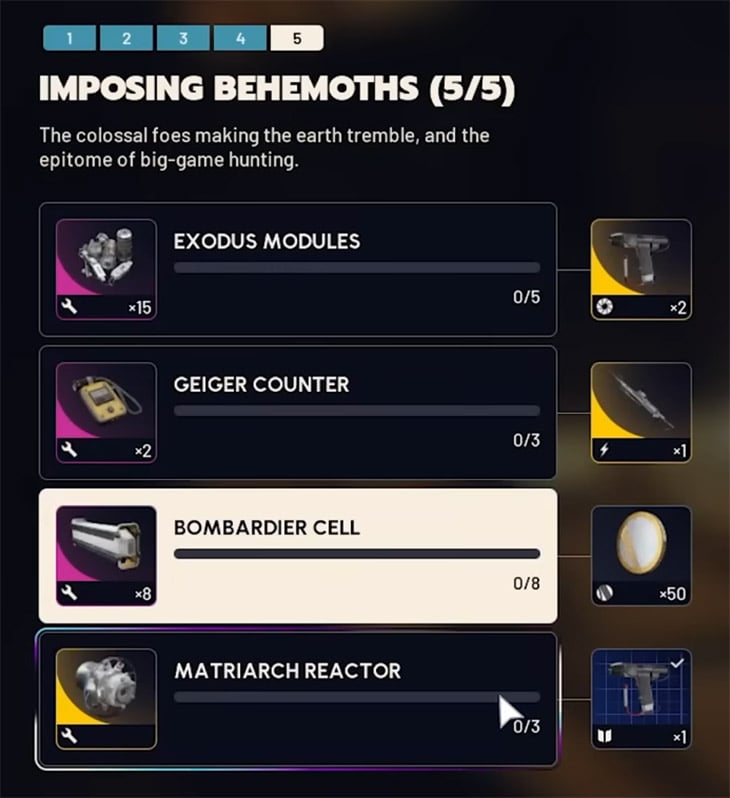
Queen & Matriarch Reactors (Page 4 & 5):
Strategy: Do not focus on defeating the boss quickly. Focus on the legs.
Even If you don't secure the kill, breaking the armor on the legs will drop the Reactors. In public lobbies, if you wait until the boss dies, other players will probably grab the loot before you. Make sure you're the first to break the part, take the reactor, and leave.
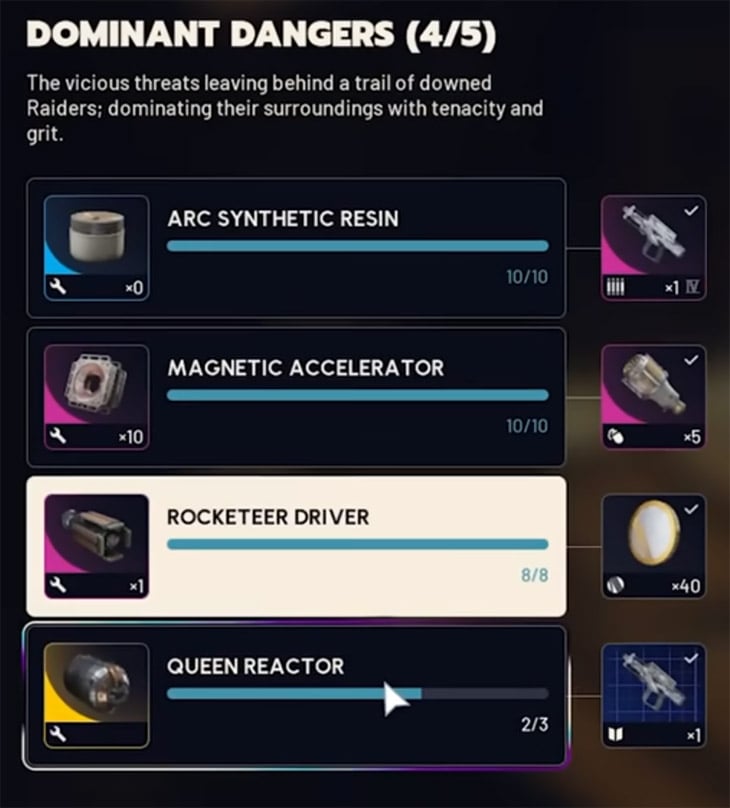
Synthetic Resin (Page 4):
While farming reactors, keep a look out for it. The drop chance is lower, but the quantities add up and it's a drop from higher-tier ARC (Queens, Matriarchs, Turrets).
4. Scavenging Specifics
Rusted Bolts (Page 1): Visit Buried City Loading Bay. Loot all red lockers and shipping containers and you will be done in one run.
Surveyor Vaults (Page 1): These are complicated. So are Surveyors. If you are stuck, attempt to breach Arc Corers (usually located in electromagnetic storms) as they also have a chance to contain these vaults.
FAQ
Q: If I complete the project now, can I reset it later?
A: No. Your project progress is permanent. Once you claim a page, it is done forever. This is why we recommend being careful if you intend to do the Expedition reset soon.
Q: Where is the most optimal place to get Shredder Gyros?
A: We suggest using Anvil weapon on generic enemies while farming Stella Montes. You only need 5 and they drop quite a lot from normal mechanical enemies when you are using heavy impact weapons.
Q: Has the drop rate for Queen Reactors been nerfed?
A: There are rumors of a nerf, but in our recent runs, we still receive them consistently when removing the leg armor. The trick is to be the one removing the piece and not just part of the team that defeats them.
Summary
The Trophy Display Project within ARC Raiders is a wonderful way to receive the Bobcat and Snap Hook, which are great power items, though prize withdrawals require a project time to be completed. If you're preparing for the Expedition, think of this project as a savings account—do not withdraw the rewards until the wipe has occurred. If you're not moving, use the location guide we provided to power through the trophies and upgrade your arsenal right away. Good Luck Raiders!

Most Popular Posts
- ARC Raiders Update 1.42: Phantom Targets Farming Guide (Glitched Wasps, Rewards, Regional Conditions)
- ARC Raiders Hullcracker Blueprints: Fastest Way to Complete The Major's Footlocker
- ARC Raiders Best Pop Trigger Strategy: Fast Phantom Targets Damage Guide
- ARC Raiders Subway Skin Guide: Unlock the Subterranean Outfit
- ARC Raiders Looting Mk. 3 Survivor Blueprint Guide: Best Blue Gate Route and Drop Locations
- ARC Raiders Medium & Heavy Gun Parts Blueprint Guide: Best Farm Route, Locations, and Refiner Crafting
Popular Category Lists
- ARC Raiders / (343)
- Grow a Garden / (292)
- CoD: Black Ops 7 / (167)
- Star Citizen / (160)
- MLB 26 / (159)
- Monopoly Go / (152)
- ARK Survival Ascended / (126)
- Steal a Brainrot / (98)
- Blox Fruits / (74)
- Adopt Me / (73)
- Forza Horizon 6 / (72)
- Sailor Piece / (68)
- Grow a Garden 2 / (68)
- Diablo IV / (62)
- CoD: BLACK OPS 6 / (55)
- Path of Exile 2 / (48)
- Monster Hunter Wilds / (46)
- Aion 2 / (45)
- Windrose / (44)
- Donut SMP / (41)