0
0ARC Raiders Weapon Case Loot Route in Buried City Guides
- KITE
- Share
- ARC Raiders
- 01/31/26
- 1428
Have you been ignoring the ARC Raiders weapon cases, tired of the same rusty Beretta? Start changing strategies as we've been testing the spawn rates and it has been game changing. The loot pool shifted after the last patch and we have documented it. While you will get a common sidearm every now and then, Arpeggios, Anvils, and Iluros are now being more common in drops.
The big news here is that Standard weapon cases can now drop Epic (Purple) weapons.
To confirm this, we mapped out a specific loot run in an area with Buried City weapon cases. The goal was to hit as many weapon cases as we could in a single raid.
To our surprise, we extracted multiple Rare and Epic weapons, especially considering that this was an update to a previously statiscially impossible feature.
Below, we cover the route we took, the relevant mechanics, and the best ways to deal with your loot in case you haven't figured out how to manage a high-tier loot run.
- Phase 1: The Ascent (Gas Station to Hospital)
- Phase 2: Morano Station and the Bus Stop
- Phase 3: Grandioso and the Residential Rooftops
- Phase 4: Santa Maria and the No Fall Damage Trick
- Phase 5: The Finale (Red Tower and Raiders Refuge)
- Loot Breakdown: What to Expect
- FAQ
- Summary
↖ Phase 1: The Ascent (Gas Station to Hospital)
Your route may vary a bit, depending on your spawn. We prefer running the Gas Station and Hospital area.
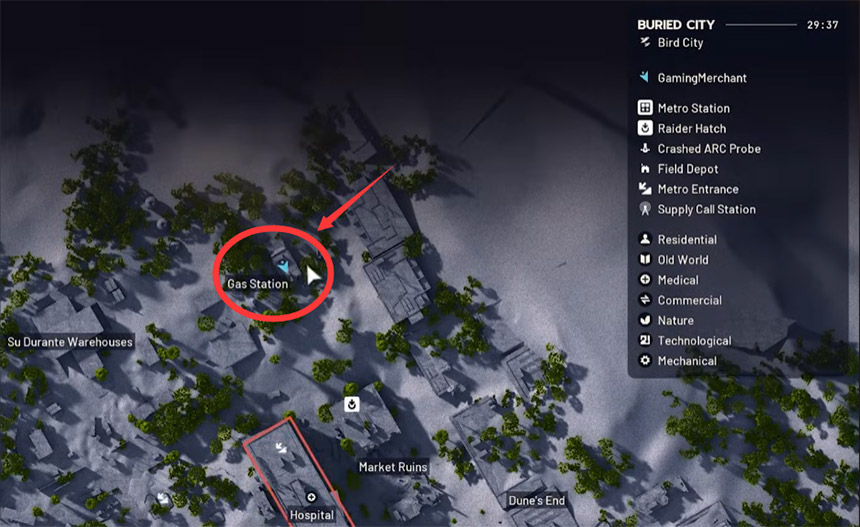
If your spawn is close to the gas station, your first stop is the hospital. We feel this area gives you the best chances of weapon case spawns. Although guaranteed isn't a word we see often in an ARC Raiders run.
The Snap Hook Shortcut.
Use your Snap Hook to skip the stairs, and climb the side of the building. It gets you off the streets and saves a bit of time. When you arrive at the top, check the ledge.
Loot potential:
The first box is where we set the standard. From our test run we got an Arpeggio and medium gun parts right away.
Tactical Note:
There is also residential suitcase loot in this area. If you run a night raid be careful as the loot pool can get mixed with other items. If you run a daytime raid concentrate on the weapon cases.
↖ Phase 2: Morano Station and the Bus Stop
We leave the Hospital, and head towards the Library, and drop down. Look out for a central map wrecked bus. The back of this bus is a potential spawn. It doesn't always show up but it is always worth a quick check as you rotate.
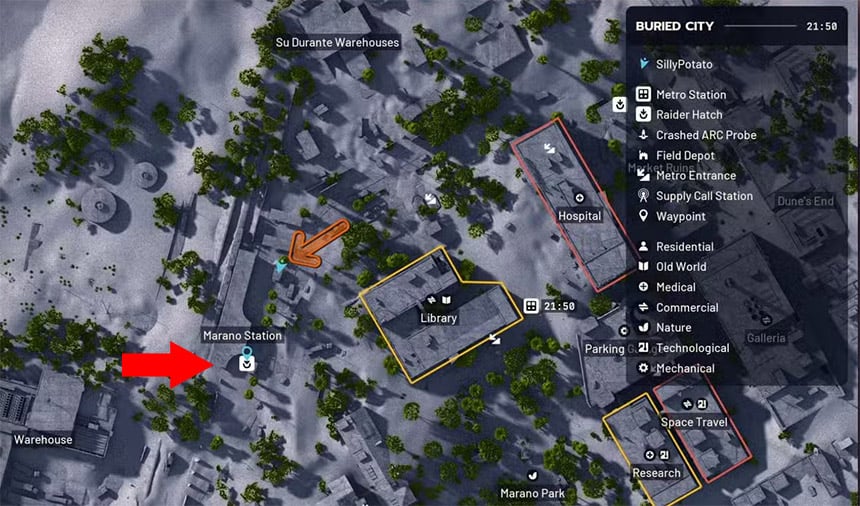
Then we push to Morano Station. This area is important as it has two different opportunities:
1. Inside the Breachable Room: For this you will need a breach tool or something explosive. Even if the weapon case doesn't spawn, these rooms frequently have good loot in the grenade cases, or rusty ones.
2. Top of the Station: Jump on to the lower part of the train and climb up. This high-ground spot is a good area for weapon case spawns.While running, we received our first Blue (Rare) weapon of the raid, a Ventor.
↖ Phase 3: Grandioso and the Residential Rooftops
As you move to the Grandioso location, verticality is your best option. If you're playing during an event with zip lines (like the Bird City event), going from one roof to another is super easy. If you're not, then you'll have to use your snap hook and do a little bit of parkour.

Important Locations:
- The Roof Hatch: Look for one of the buildings that has a roof hatch window. If you drop in there, you might find a hidden weapon case.
- The Beretta Building: There is a building across from here that used to have low-tier loot, but after the buff, the boxes even with the curse are worth opening.
- Grandioso Roof: Don't be a slacker and get to the top. Here, we found yet another Arpeggio.
Safety Tip: If you stumble upon other players (Raiders), gauge how hostile they're being. For example, we were able to defuse a really dramatic situation when we dropped a friendly item (a rubber duck) for one of the players. Sometimes, when you have chosen the long, tedious way, it is better to keep your meds for a possible fight instead of having to fight during the long way.
↖ Phase 4: Santa Maria and the No Fall Damage Trick
As we move to the Santa Maria houses, you might be perched on a ledge. A very important movement mechanic is the Following:
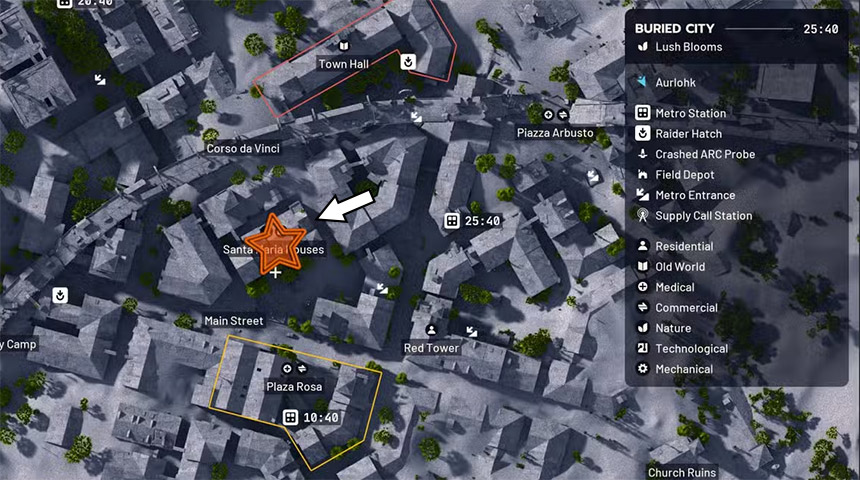
Fall Damage Cancel:
If you ever sprint off a ledge and repeatedly click jump before your feet touch the ground, you can sometimes get rid of the fall damage. This means you can rotate quickly without getting leg injuries.
Santa Maria is a little treasure, more so the Attics
These houses have have almost security breach attics. It always feels like the developers have buffed the the contents, along with the security breach spawn rate.
The Loot:
Once in a single attic, we located a weapon case with a Bobcat (Epic) and Anvil. It is also a hot spot for residential containers that drop attachment blueprints (for players who haven't got everything unlocked in the work bench yet).
↖ Phase 5: The Finale (Red Tower and Raiders Refuge)
By now, you are probably heavy. We had more than 100kg of loot and the run wasn't done.
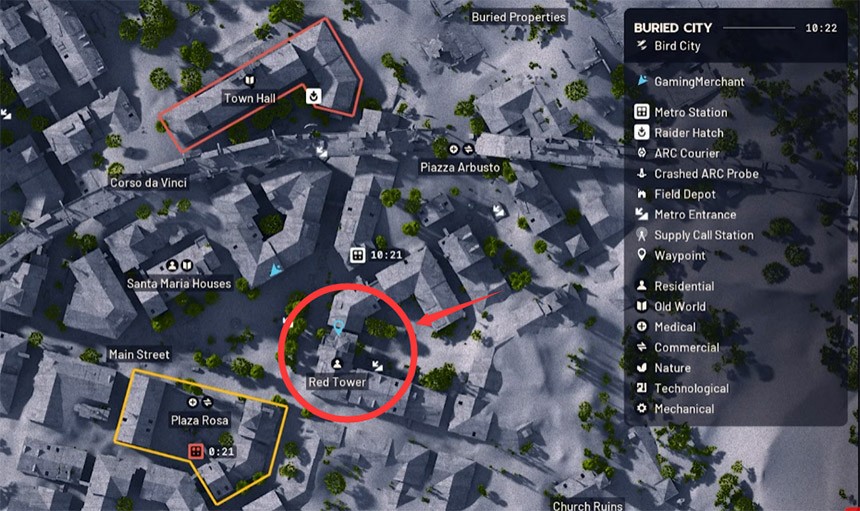
1. Red Tower: Inspect the base and the nearby short walls.
2. Raiders Refuge (Parking Garage): This is the last area with the most buildings. Make sure you review the bottom level. There is a spawn on top of the car and one inside the cage you can breach.
During our last check at the Refuge, we got a Tempest. This shows the strength of the new patch. Getting a Bobcat and a Tempest in the same day raid is great value.
↖ Loot Breakdown: What to Expect
Here is how our inventory looked like after a single run on this route for the most part. We would like to show you a realistic example of the yield.
| Item Category | Quantity Found | Notable Drops |
|---|---|---|
| Epic Weapons | 2 | Bobcat, Tempest |
| Rare (Blue) Weapons | 3 | Ventor, Anvil, Arpeggio |
| Uncommon Weapons | 6 | Various (Arpeggios, etc.) |
| Common Weapons | 2 | Beretta (Only 2!) |
| Gun Parts | 15+ | Simple, Medium, and Complex parts |
Note: In the middle of the raid we had to dismantle many lower-tier weapons to create room for Epic weapons.
↖ FAQ
Q: Do I need to use a Snap Hook for this route?
A: Not necessarily, but I recommend it. You can access almost all the Grandioso and Hospital roof spawns by stairs, but using a Snap Hook saves a lot of time and keeps you safe from street-level threats like Rocketeers.
Q: Can I do night raids using this route?
A: You can, but it's a bit of a trade-off. Different loot pools are available during night raids, and they may be more focused on materials and blueprints. You can still find weapon casings, but competition may be stiffer and you may come across different enemy types. The route outlined above was used during a Day Raid.
Q: What will I do if I am overweight with loot?
A: It's not uncommon for this to happen on this route now. Focus on the Epic and Rare weaponry. Don't hesitate to dismantle (recycle) uncommon and common weapons like the Beretta or basic Arpeggio into Gun Parts. Gun parts are lighter and will allow you to carry home the value without the weight penalty.
Q: Is there a guarantee to spawning the weapon cases?
A: No spawn is 100% guaranteed. That said, this route hits a lot of locations with a high probability, and even if 20% of them are completely empty, you will still backpack full.
↖ Summary
There have been considerable recent buffs to weapon cases, which have positively impacted the way we loot in Buried City. The scope has now extended beyond just player hunting or resource farming. For players who are yet to level up their gear building in the crafting process, this is a very worthy strategic approach.
Make sure you remember the stops: Hospital, Morano Station, Santa Maria Attics, and Raiders Refuge. Manage your stamina, bring a breach tool, and be ready to ditch that heavy rusty pistol for a Tempest when you find one.

Most Popular Posts
- ARC Raiders Riven Tides Key Room Guide: Best Hotel Keys, Loot Routes, Secure & Crane Storage
- ARC Raiders Bettina Guide: Best Build, Buffs, and How to Use It Against ARC
- Best ARC Raiders Attachments for Every Weapon: Complete Weapon Mod Guide
- ARC Raiders Turbine Boss Guide: Spawn Time, Weak Points, Best Weapons, and Loot
- Arc Raiders Patch 1.27: Regional Pricing, Augment Rework, and Expedition Catch-Up
- ARC Raiders Update Guide: Best Nomadic Envoy Trades, Rascal Grenade Launcher, Durability Buffs
Popular Category Lists
- ARC Raiders / (291)
- Grow a Garden / (286)
- CoD: Black Ops 7 / (166)
- MLB 26 / (150)
- Monopoly Go / (148)
- Star Citizen / (129)
- ARK Survival Ascended / (91)
- Steal a Brainrot / (90)
- Sailor Piece / (68)
- Forza Horizon 6 / (67)
- Diablo IV / (62)
- Blox Fruits / (62)
- Adopt Me / (58)
- Grow a Garden 2 / (57)
- CoD: BLACK OPS 6 / (55)
- Path of Exile 2 / (48)
- Monster Hunter Wilds / (46)
- Windrose / (44)
- Path of Exile / (40)
- Bee Swarm Simulator / (37)