


 0
0ARC Raiders Ultimate Guide: Loot, Augments, Crafting, Trials, Projects And More
- KIVRI
- Share
- ARC Raiders
- 12/02/25
- 3348
One of the biggest struggles for new players is figuring out what loot to hang onto and what to toss in ARC Raiders. We've all had that moment of panic — "What if I just trashed something super important?" Don't worry, we've got your back.
- What Loot Should You Keep?
- Augments
- Best Loot
- Best Workbenches & Workshops
- Best Trader Tips & Strategies
- ARC Raiders Trials
- Projects
This guide will walk you through the essentials: Managing Your Inventory, Understanding Augments, Crafting Smarter, And Making The Most Of Traders And Trials. By the end, you'll feel confident and ready to tackle the ARC Raiders universe like a pro. So, let's dive right in!
↖ What Loot Should You Keep?
When in doubt, don't throw it out—at least not right away. Here's why:
- Many items you pick up early on are vital for crafting, upgrading weapons, or repairing shields.
- Some materials might not seem useful now but will become essential as you progress.
Loot Prioritization Table
| Item Type | Keep It? | Why? |
|---|---|---|
| Crafting Materials | Always | Needed for upgrades and repairs |
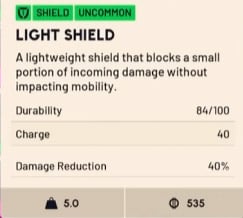
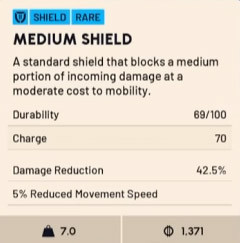
| Shields (Green/Blue/Purple) | Yes, especially Purple | Higher-tier shields offer better protection for tougher missions |
| Augments | Keep all for now | Different augments suit different missions—more on this below |
| Healing Items | Stock up | Essential for survival during intense battles |
Note: Organize your inventory regularly to avoid clutter and ensure you're carrying mission-critical items.
↖ Augments
Augments are game-changers in ARC Raiders, and understanding them can significantly boost your gameplay. So, what are they exactly? Augments determine the type of shield you can use and often come with additional perks to enhance your performance.
Types:
| Augment Type | Shield Compatibility | Perks |
|---|---|---|
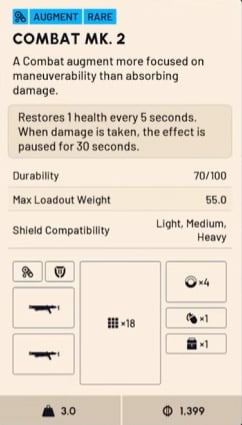
| Combat Augment | Light, Medium, Heavy | Restores health every 5 seconds when damaged (paused for 30 seconds after taking damage) |
| Looting MK1 | Light only | Basic augment for beginners—compatible with green shields |
| Looting MK2 | Light only | Allows you to carry three extra trinkets—ideal for money runs |
| Looting MK3 Survivor | Medium | Increases survivability by adding extra healing item slots |
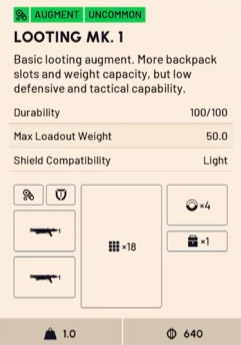
How to Choose the Right Augment?
- Survivability: If you're heading into a tough mission, opt for augments like Looting MK3 Survivor that give you extra healing capacity.
- Resource Runs: For missions focused on looting and earning cash, go with Looting MK2 for additional trinket slots.
- Flexibility: Combat Augments are versatile and work with all shield types—perfect for general use.
Note: Always check the "Shield Compatibility" section before equipping an augment. Some augments restrict your shield options, which could leave you vulnerable.
↖ Best Loot
The first and most important step is expanding your stash as much as possible, as quickly as possible. A larger stash allows you to store more valuable items without making tough choices mid-game.
Once your stash is expanded, here's what you need to focus on:
Weapons
- Priority: Always prioritize extracting stronger weapons over other items like shields or common materials.
- Why: Weapons not only help you progress faster but also provide valuable materials when recycled. For example, recycling a Level 3 Volcano gives you advanced mechanical components, heavy gun parts, and modifications.
- Tip: Legendary gear is a no-brainer—extract it every time.
Shields
- What to Keep? Focus on blue and purple shields. Even damaged blue shields can be extracted for arc circuitry, which is essential for repairing and upgrading shields.
- What to Leave: Green shields can be left behind unless you're desperate for space.
Modifications
- Green Mods: Extract green modifications early in the game as they're harder to craft initially.
- White Mods: These are easily craftable and can be left behind if space is tight.
Fruits (Yes, Fruits!)
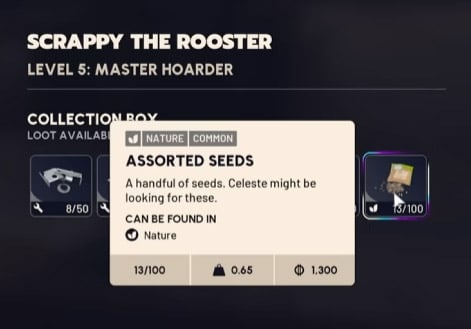
- Why Keep Them? Fruits are crucial for upgrading Scrappy, your in-game helper. Upgrading Scrappy allows him to generate free materials like metal parts, fabric, plastic parts, and assorted seeds over time.
- Tip: Don't delete fruits! Over time, Scrappy's upgrades can provide consistent income by selling excess materials for cash.
Crafting Materials: What's Worth Keeping?
| Materia | Why It's Important? | Keep or Sell? |
|---|---|---|
| Simple Gun Parts | Frequently used for upgrading guns | Always Keep |
| Mechanical Components | Needed for weapon and shield repairs | Always Keep |
| Advanced Components | Essential for high-level upgrades | Always Keep |
| Electrical Components | Used in crafting advanced gear | Always Keep |
| Duct Tape | Crucial for crafting weapon attachments | Always Keep |
| Batteries & Magnets | Necessary for crafting and upgrades | Always Keep |
Enemy Drop Items
- Cores & Drivers (e.g., Sentinel Firing Core): These drop from tougher enemies like big snipers or flying units. Keep them for quests or crafting needs early on. Once used up, you can sell extras.
- Arc Power Cells: Use these during battles to recharge your shield or save them to craft stronger shield chargers later.
Why Scrappy Upgrades Are a Game-Changer?
Upgrading Scrappy isn't just about getting free materials—it's about long-term efficiency. As Scrappy levels up with fruits, he'll bring in more valuable resources over time, reducing your reliance on scavenging for basic materials like plastic parts or fabric. This also means more opportunities to sell excess materials for profit.
Example:
After a few Scrappy upgrades, you might find yourself with an abundance of plastic parts worth 10K or more in-game currency. That's free money just from letting Scrappy do his thing!
↖ Best Workbenches & Workshops
Workbenches are your lifeline in ARC Raiders. They're essential for upgrading weapons, crafting items, and keeping your gear in top shape.
1. Refiner:
The refiner is hands-down the most crucial workbench to upgrade. Why? It allows you to craft essential components like mechanical parts and arc circuitries, which are vital for repairing and upgrading your gear.
- Level 2: Unlocks advanced components for crafting.
- Level 3: Enables crafting of arc circuitries (used for repairing shields) and power rods (needed for purple shields).
Always aim to level up your refiner as quickly as possible. It's a no-brainer for crafting high-value items that will keep you ahead in the game.
2. Gear Bench:
Augments are game-changers, allowing you to customize your playstyle. Whether you're focusing on survivability, tactical runs, or money farming, the gear bench is your go-to for crafting shields and other augment-related items.
- Example: Crafting a blue shield requires one arc circuitry and batteries.
- Tip: Never delete batteries—they're indispensable for shield crafting.
3. Gunsmith:
If you're a fan of powerful weapons, upgrading your gunsmith is a must.
- Level 2: Unlocks awesome weapons and blueprints like Betatina and Jupiter.
- Level 3: Allows crafting of advanced weaponry.
While the gunsmith is valuable, prioritize the refiner and gear bench first. Once they're leveled up, shift your focus to the gunsmith.
4. Other Workbenches
- Medical Lab: Useful for crafting herb bandages and shield rechargers. However, it's not a top priority early on unless you frequently run out of healing items.
- Utility & Explosive Station: Upgrade later based on your playstyle and needs.
↖ Best Trader Tips & Strategies
Traders in ARC Raiders are absolute game-changers if you know how to use them effectively. So, how to make the most out of them?

1. Celeste: Maximizing Free Materials
Celeste is your go-to trader for turning assorted seeds (obtained from Scrappy) into valuable crafting materials like batteries, duct tape, and voltage converters.
- Daily Tip: Always trade your assorted seeds before the daily reset to stockpile essential materials.
- Batteries are especially important for crafting shields, so prioritize them when trading.
2. Tanwen's Gun Shop: Weapon Deals
Tanwen offers weapons on a daily reset. While some options may be overpriced, there are gems like the Hullcracker, which is fantastic against AI Arc enemies.
- Don't Waste Money: Avoid buying green weapons—they're commonly found during gameplay.
- Focus on Purple Weapons: The purple Hullcracker is a great investment if you're a PVE-focused player.
3. Clinic: Stock Up on Shields
The clinic is perfect for purchasing blue and purple shields on a daily reset. These shields are invaluable during tough battles when you don't have materials to craft them yourself.
- Blue Shield: Costs 18k—affordable and effective.
- Purple Shield: A must-have for tougher encounters.
Keep a few shields in your inventory at all times for emergencies.
Why Keep It?
| Item | Why Keep It? |
|---|---|
| Batteries | Essential for crafting shields and augments |
| Assorted Seeds | Trade them with Celeste for free materials daily |
| Voltage Converters | Needed for purple shield crafting |
| Duct Tape | Frequently used for crafting attachments |
| Steel Springs | Required for creating advanced attachments |
Avoid Deleting: These items may seem minor but are critical for long-term progress.
↖ ARC Raiders Trials
If you're wondering what trials are, think of them as ARC Raiders' achievement system combined with a competitive leaderboard. Every week, new tasks are introduced, giving you opportunities to climb the ranks.
How Trials Work?
- Weekly Tasks: Each week, you'll be given specific objectives to complete. For example, "Search First Wave Husks" might require you to score 4,000 points. However, aiming for a higher score (e.g., 13,000 points) will boost your rank.
- Ranks: Your performance determines your rank. Here's the progression:
- Rookie
- Try Hard
- Wildcard
- Daredevil
- Hot Shot
- Cantina Legend (Top 100 players!)
Strategies:
- Aim High: Always strive for higher scores than the minimum requirement. The higher your score, the faster you'll ascend the ranks.
- Extraction is Key: Points won't count unless you extract successfully after completing a task.
- Weekly Reset: Tasks and leaderboards reset weekly, so consistency is crucial.
For example, let's say you've completed "Destroy Ticks, Fireballs, and Pops" with 13,000 points (even though only 4,000 are required). If you don't extract, those points will be wasted. So always prioritize extraction!
↖ Projects
Now let's move on to projects—a unique system that allows you to reset your character for long-term benefits.
What Are Projects?
Projects allow you to completely wipe your character after completing six stages of specific tasks. While this might sound intimidating, it's actually a strategic feature with significant rewards.
What Resets and What Stays?
| Resets | Keeps |
| Stash upgrade progress | Bonus skill points from expeditions |
| Inventory items | Bonus stash slots from expeditions |
| Blueprints | / |
| Coins | / |
| Player level | / |
| Skill points | / |
| Raider Den & Workshop Quests | / |
Why Reset Your Character?
- Bonus Skill Points: Each reset grants additional skill points earned from expeditions.
- Bonus Stash Slots: More stash slots mean better inventory management.
- Exclusive Cosmetics: While details are still under wraps, resetting will unlock unique cosmetics that set you apart from other players.
Over time, resetting your character multiple times (e.g., three, five, or even ten times) strengthens your account significantly. It's a long-term investment that pays off in skill points, stash slots, and style.
With these tips in hand, you're ready to dive into the world of ARC Raiders and make your mark. Got questions? Join our discord community or drop a comment below—we're here to help! Stay positive, stay disciplined, and good luck out there!

Most Popular Posts
- ARC Raiders Riven Tides Key Room Guide: Best Hotel Keys, Loot Routes, Secure & Crane Storage
- ARC Raiders Damage Fireflies Trial Guide: Best Farm Method on Buried City Night Raid
- ARC Raiders Riven Tides Update: New Map & Items, ARC Turbine, Rewards, and Best Early Strategy
- ARC Raiders Bettina Guide: Best Build, Buffs, and How to Use It Against ARC
- Arc Raiders Season 4 Riven Tides Update, Rewards, Safe Skins, and Release Timeline
- ARC Raiders Solo Search Supply Drops Guide: Best Buried City Route, Beacon Locations
Popular Category Lists
- Grow a Garden / (286)
- ARC Raiders / (262)
- CoD: Black Ops 7 / (166)
- Monopoly Go / (146)
- MLB 26 / (145)
- Star Citizen / (112)
- Steal a Brainrot / (89)
- Sailor Piece / (68)
- ARK Survival Ascended / (67)
- Diablo IV / (61)
- Forza Horizon 6 / (60)
- Blox Fruits / (60)
- CoD: BLACK OPS 6 / (55)
- Adopt Me / (53)
- Path of Exile 2 / (48)
- Monster Hunter Wilds / (46)
- Windrose / (44)
- Path of Exile / (40)
- Grow a Garden 2 / (40)
- Bee Swarm Simulator / (36)


