0
0Ashes of Creation Crates: Make Gold, Level Systems, and Deliver Safely
- Rive
- Share
- Ashes of Creation
- 01/04/26
- 1609
Crates in Ashes of Creation look like a simple craft → deliver → Gold loop, but they're really a logistics mini-game with PvP consequences. I've run crates solo, I've run them in small groups, and I've been on the other side trying to intercept deliveries.

If you treat the system like a repeatable operation—bulk prep, smart routes, flexible destinations—you'll earn consistent Ashes of Creation Gold early and still have a scalable method when nodes mature. Here's the full guide, stitched into one clean playbook.
- 1) What Crates Are (And Why They Matter)
- 1.1 Crate categories and rewards (what you're actually earning)
- 2) Where You Can Craft Crates (And How to Find the Right NPC Fast)
- 2.1 Node stage requirement
- 2.2 Vendor locations (practical navigation cues)
- 3) The End-to-End Crate Loop (Do This and You'll Never Be Stuck)
- 3.1 Step-by-step: from certificate to turn-in
- 3.2 Movement penalty (why route planning matters more than you think)
- 4) The Early Gold Method That Scales: Mule + Bulk + Short Loops
- 4.1 Why a mule is non-negotiable (throughput beats heroics)
- 4.2 Starter crate crafting: keep it local (and understand the biome rule)
- 4.3 The starter-route logic (why distance can be a trap early)
- 4.4 The biggest profit lever: stop crafting every run
- 4.5 Real benchmark numbers (so you know if you're doing it right)
- 5) What Actually Changes Payout: The Model That Makes It Predictable
- 5.1 The 4-factor payout model
- 5.2 Diminishing returns (the detail most people ignore)
- 5.3 Biome borders (why slightly longer sometimes wins)
- 6) Certificates & Reputation: Unlocking Better Crates Without Wasting Weeks
- 6.1 Why you're stuck on low-tier certificates
- 6.2 How to gain reputation/standing (fast and repeatable)
- 6.3 The one person buys for everyone strategy (why guilds scale faster)
- 6.4 The parked-alt trick (location becomes profit)
- 7) Crafting ROI: How I Decide What to Craft (So I'm Not Working for Free)
- 7.1 Work backwards (this prevents expensive mistakes)
- 7.2 The quick ROI worksheet (copy/paste and fill once per route)
- 8) Risk Management: How to Deliver More Than You Lose
- 8.1 The mistakes that get people deleted
- 8.2 My don't lose crates checklist
- 8.3 Solo vs group (what I actually recommend)
- 8.4 Multi-account follow trains and compliance
- FAQ
- 1) Which crate type should I start with?
- 2) Why doesn't furthest settlement always pay best?
- 3) Should I take the shortest route?
- 4) Why can I only buy low-tier (gray/green) certificates?
- 5) How do I know when to pivot routes?
- 6) Do biome borders really matter for payout?
- 7) How many mules should I own?
- Summary
↖ 1) What Crates Are (And Why They Matter)
A crate is a shipment you craft in one location and deliver to another for a reward. The reward is determined when you choose the crate category, not at the end.
↖ 1.1 Crate categories and rewards (what you're actually earning)
In Alpha Phase 3, you'll commonly deal with these crate categories:
| Crate Type | Where You Craft | Crafting Fee Paid In | Delivery Reward | Best For |
|---|---|---|---|---|
| Market Commodity | Near marketplace/center | Glint | Silver/Gold | Personal profit; gearing funds |
| Citizen Commodity | Town hall area | Node currency (script) | Silver/Gold | Gold routes with separate diminishing returns from Market |
| Settlement Commodity | Town hall area | Glint | Node currency (script) | Funding certificates/operations via script |
| Guild Commodity | Town hall area | Silver | Seals of Valor (tradable) / guild progression | Guild leveling; sell seals if market is strong |
| Harbor Commodity | Harbors | (varies) | Endgame mats (often WIP in tests) | Only if the mats have real demand |
| Construction Crates | Starting areas near construction benches | (resource-heavy) | 666 citizen rep + 10 script | Fast reputation pushes + script drip |
Why this matters: picking the wrong crate type doesn't just reduce profit—it can change which currency you're being paid in. If your goal is personal wealth, Market/Citizen commodities usually lead.
↖ 2) Where You Can Craft Crates (And How to Find the Right NPC Fast)
You can't craft most commodity crates in a low-tier node. The system expects a certain level of settlement development.
↖ 2.1 Node stage requirement
You'll generally need a node at Village/Town/City stage to access the commodity vendors and crate benches.
If you're in a lower-stage node, then your move is simple: travel to the nearest developed settlement and treat it as your crate hub.
↖ 2.2 Vendor locations (practical navigation cues)
Most settlements follow predictable placement:
| Vendor / Bench | Typical Location | What I Look For |
|---|---|---|
| Market commodity vendor + crate table | Near the market/center | Player traffic, stalls, central plaza vibe |
| Guild commodity vendor | Near town hall | Administrative district |
| Citizen commodity vendor | Near town hall | Administrative district |
This means: if you can find the town hall, you usually find two crate types immediately.
↖ 3) The End-to-End Crate Loop (Do This and You'll Never Be Stuck)
Here's the clean loop I run every time. It prevents the classic beginner failure where you craft first and think later.
↖ 3.1 Step-by-step: from certificate to turn-in
1. Choose a crate type based on your goal (gold vs script vs guild progress).
2. Buy a certificate from the matching commodity vendor.
3. Check the recipe at the crate bench and prepare the materials.
4. Pay the crafting fee (often Glint, sometimes script or silver depending on crate type).
5. Craft the crate (it straps onto you immediately).
6. Plan the route (avoid obvious paths; details below).
7. Travel to the destination settlement.
8. Turn in at the same category vendor in the destination.
9. Collect the reward.
↖ 3.2 Movement penalty (why route planning matters more than you think)
Once you're carrying a crate, you're slower—on foot and on mounts.
| While Carrying a Crate | What Changes | What I Do Instead |
|---|---|---|
| Run speed | Drops noticeably | I assume I'm a slow target and route around traffic |
| Mount speed | Also reduced | I avoid main roads where crate checks happen |
| Mobility skills | Some still work | I save them for escapes, not convenience |
If you plan like you're full-speed, then you're planning for a character you stop being the moment you craft.
↖ 4) The Early Gold Method That Scales: Mule + Bulk + Short Loops
Early crate systems are deliberately accessible, and that's your best chance to build a stable bankroll.
↖ 4.1 Why a mule is non-negotiable (throughput beats heroics)
Carrying one crate on your back caps your output hard. A mule turns crates into a throughput game: more crates per trip = more silver/hour with the same travel time.
| Mule Tier | How You Get It | Who Can Obtain It | Why It Matters |
|---|---|---|---|
| Day Rider (Novice) | Buy from NPC near agricultural supply; train via Animal Husbandry | Any player | Cheapest entry point to multi-crate hauling |
| Apprentice / Journeyman | Unlocks when a settlement builds Agricultural Supply | Usually bought from players | Better capacity; pays itself back quickly |
| Trained mules (player market) | Buy from other players | Anyone with gold | Often cheaper than self-leveling—breeders dump stock |

If you're new, buy a trained mule if the price is sane. I've watched breeders power-level husbandry and sell trained mules just to recover costs—meaning you can skip the grind at a discount.
↖ 4.2 Starter crate crafting: keep it local (and understand the biome rule)
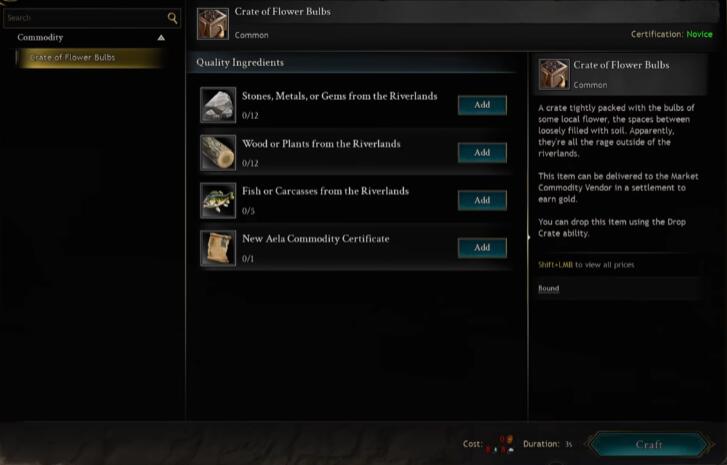
Basic crate recipes tend to follow the same structure:
- 12× stone/ore/gems
- 12× wood/herbs
- 5× fish
- 1× crate certificate
The rule that quietly controls everything:
You can only use resources that are gatherable in the same biome where you craft the crate.
What this means: your best materials aren't universal. Your best materials are whatever is cheap, abundant, and nearby.
↖ 4.3 The starter-route logic (why distance can be a trap early)
In many starter loops, sale value is effectively static and does not scale enough with distance to justify longer runs.
So if you deliver those starter crates to far settlements, you add time without adding payout.
My approach: run tight point A ↔ point B loops in the starter region. It's faster, safer, and more predictable.
↖ 4.4 The biggest profit lever: stop crafting every run
Most new players burn time because they craft mid-loop. The fix is boring—and it prints money.
Bulk craft + stockpile at both ends.
- Fish can be gathered with low attention (including AFK fishing in practice)
- Other mats are easy to farm near the crafting points
- Early on, herbs often beat wood because they store more efficiently in small bags/tabs
If you're leveling gathering, then this is a double dip: you earn while pushing gathering skills, and you can save rare mats for later.
↖ 4.5 Real benchmark numbers (so you know if you're doing it right)
On a decent mule delivering 3 crates per run, a run typically looks like:
- ~6 minutes travel
- + 1–3 minutes to sell, access storage, reload
In my own efficient starter runs (after fees/cert costs, economy varies):
- Common crate payout ballpark: ~24 silver (gross)
- Uncommon crate payout ballpark: ~37 silver (gross)
- Efficient mixed run: ~60 silver/run
- 6–7 runs/hour is realistic
- ≈3.5 gold/hour is achievable in safer starter loops when you minimize downtime
| Target | What You Optimize | What Good Looks Like |
|---|---|---|
| Gold/hour | Delivery time vs crafting time | Delivery dominates your session |
| Consistency | Low risk + repeatable route | Few interruptions; low variance |
| Scaling | Mule capacity + stockpiles | You scale by throughput, not luck |
If you only have 30 minutes to play, then this method still works: either run a few loops or prep stockpiles so tomorrow's session is pure delivery.
↖ 5) What Actually Changes Payout: The Model That Makes It Predictable
Crate income feels random until you track the variables that move it. There are four that matter most.
↖ 5.1 The 4-factor payout model
| Factor | What It Does | Practical Takeaway |
|---|---|---|
| Rarity | Higher rarity → higher base payout | Only worth it if input costs don't spike |
| Distance | Longer routes → higher payout | Also increases time and PvP exposure |
| Diminishing returns | More deliveries on same route/type → payout drops | You need route flexibility |
| Biome borders crossed | Each border crossed adds a bonus (reported ~20% per border) | Sometimes not the closest route pays more |
↖ 5.2 Diminishing returns (the detail most people ignore)
Diminishing returns are calculated per crate type and per route direction.
So:
- Market A → B can get discounted while Citizen A → B stays healthy.
- B → A is its own market.
- A → C is unaffected by A → B spam.
If you notice payout slipping, then pivot fast. Switch crate type, switch direction, or change destination. Organized players do this instinctively, which is why their income stays stable.
↖ 5.3 Biome borders (why slightly longer sometimes wins)
Biome borders can add a meaningful bonus. That creates weird-but-profitable cases where two similar-time routes pay differently because one crosses more biome boundaries.
If you're choosing between two similar travel-time options, then pick the one with more biome transitions—unless it increases gank risk or forces chokepoints.
↖ 6) Certificates & Reputation: Unlocking Better Crates Without Wasting Weeks
Certificates are the throttle on crate rarity, and reputation is the key.
↖ 6.1 Why you're stuck on low-tier certificates
By default, many players only see Common/Uncommon local certificates. Higher tiers unlock as your reputation/standing rises in that settlement, especially if you hold citizenship there.
This means: you can be respected in one node and a nobody in another. The system is intentionally local.
↖ 6.2 How to gain reputation/standing (fast and repeatable)
| Method | Where | Typical Reward | Why It's Efficient |
|---|---|---|---|
| Construction crates | Construction projects/buildings | 666 rep + 10 script | Big rep chunks; also feeds node currency |
| Mural commissions | Town hall board (when available) | 250–500 rep | Easy rep spikes when they show up |
| Requisition buy orders | Requisition agent near storage | ~250 rep/order | Best for power leveling if mats are cheap |
A practical reality check I use:
If top ranks require around 100,000 rep, then doing only 250-rep buy orders means about:
- 400 orders
That's doable, but only if you systematize it (cheap mats, batch turn-ins, consistent node focus).
↖ 6.3 The one person buys for everyone strategy (why guilds scale faster)
In efficient groups, one player is boosted to high reputation so they can buy high-tier certificates in bulk for the team.
If your guild is organized, then you don't need everyone grinding reputation. You need one reliable certificate buyer and a script flow to fund it.
↖ 6.4 The parked-alt trick (location becomes profit)
A low-level alt parked in a far settlement can act as a permanent certificate buyer.
If traveling is your bottleneck, then location is income. I've seen groups maintain certificate access across multiple nodes so they can rotate routes instantly when diminishing returns hit.
↖ 7) Crafting ROI: How I Decide What to Craft (So I'm Not Working for Free)
Crate crafting isn't use the rarest mats. It's a cost puzzle where you can mix rarities, and the certificate is often the most important piece.
↖ 7.1 Work backwards (this prevents expensive mistakes)
When I plan a crate, I decide in this order:
1. Certificate (you need exactly one; it defines the ceiling and cost floor)
2. Fish (only 5 needed; price swings matter)
3. Stone/ore/gems (12)
4. Wood/herbs (12)
If your certificate is expensive, then your crate is expensive. That one line has saved me a lot of cool crate, bad profit crafts.
↖ 7.2 The quick ROI worksheet (copy/paste and fill once per route)
| Input | Qty | Your Unit Cost | Total |
|---|---|---|---|
| Certificate | 1 | 2.0 s | 2.0 s |
| Fish | 5 | 0.2 s | 1.0 s |
| Stone/Ore/Gems | 12 | 0.05 s | 0.6 s |
| Wood/Herbs | 12 | 0.05 s | 0.6 s |
| Crafting fee (glint/script/silver) | — | — | 0.5 s |
| Total cost | 4.7 s | ||
| Expected payout | 24.0 s | ||
| Estimated profit | 19.3 s |
Two rules I follow:
- If profit per run doesn't beat my easy alternative, I don't force it.
- Sometimes Rare beats Epic on profit because input costs spike disproportionately. If margin is better, I go less fancy.
↖ 8) Risk Management: How to Deliver More Than You Lose
This is open-world PvP. Risk never becomes zero, so the goal is controlled risk.
↖ 8.1 The mistakes that get people deleted
From both running and intercepting, the repeat offenders are consistent:
- Solo hauling in remote areas with low gear/level
- Taking the most obvious road every run
- Not adapting after getting hit once
- Owning only one mule and having no plan when it dies
↖ 8.2 My don't lose crates checklist
| Threat | Prevention | If It Happens |
|---|---|---|
| Solo gank | Run with 2–5 players | Detour immediately; don't revenge run the same path |
| High-traffic roads | Avoid main roads and chokepoints | Treat the area as hot and reroute for an hour |
| Mule death (mobs or players) | Bring a backup mule | Resummon fast; buy time to secure crates |
| Camped choke points | Vary routes; use intel | Switch approach angle; avoid predictable crossings |
| Thin margins | Shorten route or add protection | One loss shouldn't erase multiple wins |
If you get attacked and lose crates, then change something immediately. Same route + same time window + same visibility = same result.
↖ 8.3 Solo vs group (what I actually recommend)
| Mode | Pros | Cons | Best Use |
|---|---|---|---|
| Solo | Instant start, fast turns | Highest gank risk | Short, quiet, low-value loads |
| Small group (2–5) | Strong deterrent | Coordination time | Medium/long routes; higher-value runs |
| Large group | Safe vs randoms | Can attract organized PvP | Planned events, high-value moves |
↖ 8.4 Multi-account follow trains and compliance
Using a second account on a second PC can boost throughput, but it also creates visible behavior that draws attention—and sometimes crosses policy lines depending on enforcement.
I treat compliance as part of profit. A banned account has a gold/hour of zero, and that's the worst diminishing return of all.
↖ FAQ
↖ 1) Which crate type should I start with?
If you want personal progression and gearing, start with Market commodity crates. If you're funding certificate access or node progression, mix in Settlement and Construction crates strategically.
↖ 2) Why doesn't furthest settlement always pay best?
Because diminishing returns punish popular routes. If everyone is doing the same obvious long haul, payout can degrade until a weird mid-range route wins per hour.
↖ 3) Should I take the shortest route?
Usually no. With a crate you're slower, and the shortest path often equals main roads and chokepoints. If you discover repeated PvP near a corridor, then route around it.
↖ 4) Why can I only buy low-tier (gray/green) certificates?
Higher certificate tiers are tied to your standing/reputation in that specific settlement (often tied to citizenship). Build standing via buy orders, commissions, and construction turn-ins.
↖ 5) How do I know when to pivot routes?
If you see payouts dropping run-over-run for the same route and crate type, you're likely hitting diminishing returns. Pivot by changing crate type, direction, or destination.
↖ 6) Do biome borders really matter for payout?
They can. Reported testing suggests a meaningful bonus per biome border crossed. In practice: if two routes take similar time, the one crossing more borders can pay more—unless it increases risk.
↖ 7) How many mules should I own?
At least two if you run outside safe starter loops. A backup mule is insurance against mule death timers when your crates are sitting in the open.
↖ Summary
Crates are a repeatable logistics system with a few levers that decide whether you feel rich or feel robbed: throughput (use a mule), uptime (bulk craft and stockpile), value mechanics (rarity, distance, borders, diminishing returns), and access (certificates tied to reputation).
If you run tight starter loops to build capital, upgrade certificates when the math supports it, and plan routes like a slow-moving target—not a sprinting adventurer—you'll turn crates into consistent income instead of an occasional gamble.
Most Popular Posts
- Ashes of Creation Leveling Guide (1–25): Fast Core Route + Best Alternate Spots
- Ashes of Creation Gold Farming With Crates, Commissions & Crafting
- Ashes of Creation Phase 2 Mage Gearing Best in Slot, Stat Priorities, and Farming Strategegies
- Ashes of Creation Level 10–19 Gearing Guide: Cheap Adept Set Damage and Healing Fast
- Ashes of Creation Gold Farming Guides: Freshwater Sport Fishing and Selling Routes
- Ashes of Creation Gold Farming Guides: Pivot + Commodity Crates
Popular Category Lists
- Grow a Garden / (286)
- ARC Raiders / (266)
- CoD: Black Ops 7 / (166)
- Monopoly Go / (146)
- MLB 26 / (145)
- Star Citizen / (116)
- Steal a Brainrot / (89)
- ARK Survival Ascended / (74)
- Sailor Piece / (68)
- Forza Horizon 6 / (63)
- Diablo IV / (61)
- Blox Fruits / (60)
- CoD: BLACK OPS 6 / (55)
- Adopt Me / (53)
- Path of Exile 2 / (48)
- Monster Hunter Wilds / (46)
- Windrose / (44)
- Grow a Garden 2 / (42)
- Path of Exile / (40)
- Bee Swarm Simulator / (36)