0
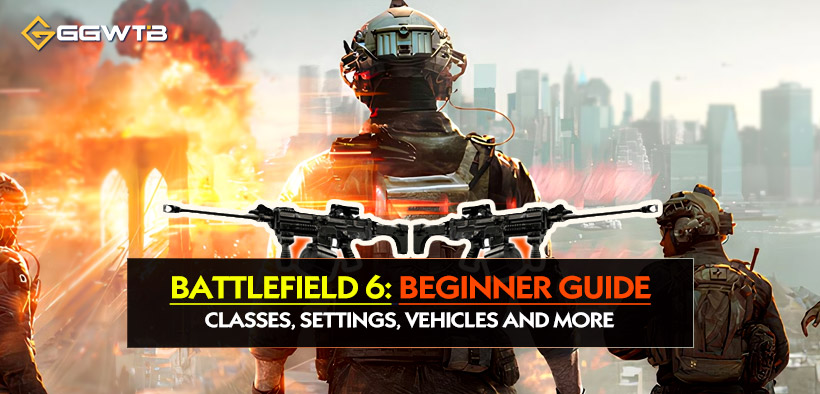
0Battlefield 6 Beginner Guide: Classes, Settings, Vehicles and More
- Ben
- Share
- Battlefield 6
- 08/16/25
- 3640
Jumping into Battlefield 6 and feeling overwhelmed by UI clutter, frantic pacing, and people spawning behind you? You don't just need “good aim”; you need a modern battlefield acceleration manual. This guide focuses on Classes (role choices), Settings (clarity + control), movement/destruction, vehicles, sniping, training paths, and common pitfalls—so your first 10 matches move from chaotic sightseeing to consistent impact.
- Core Mindset
- The Classes
- Sniping Tips & Strategies
- The Movement
- Use Destruction
- The Vehicles
- Best Settings
- Micro Gunplay & Fight Windows
- 48-Hour Training Script
- Top 10 FAQ
↖ Core Mindset
Question: Why do players with 1.8 KD still lose objective rounds? Because they output damage but don't build an information cycle.
Information Cycle =(1) Quality spawn pipeline; (2) Sustain: ammo + health; (3) Foresight of enemy movement; (4) Speed of unlocking macro resources (call-ins/vehicles).
Your goal isn't just more kills; it's shortening the loop: Spot → Decide → Execute → Consolidate.
Actions:
- Before each push: identify your next safe spawn anchor (beacon / teammate / vehicle).
- Every 30 seconds audit ammo + throwables; resupply proactively (dying empty is lost tempo).
- Between fights take a 3-second minimap sweep: is there an unguarded flank lane?
What this means: The faster you stabilize your loop, the more each kill compounds into spatial control.
↖ The Classes
Battlefield 6 simplifies the class system, bringing back the familiar roles from Battlefield 3 and Battlefield 4. Gone are the specialists from 2042. Instead, you'll find four core classes: Assault, Recon, Support, and Engineer.
Each class has unique traits, gadgets, and playstyles designed to complement squad-based tactics. Below, we'll break down each class so you can choose the one that fits your style.
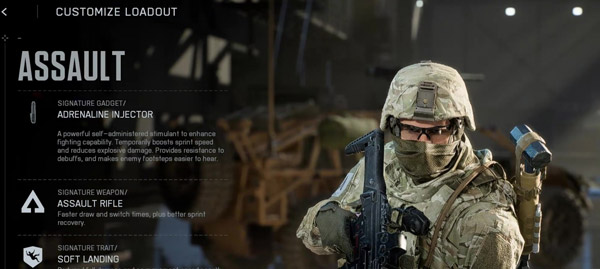
↖ Assault
If you love aggressive gameplay and pushing objectives, Assault is your go-to class.
| Pros | Cons |
|---|---|
| High mobility | Limited healing |
| Squad utility | Vulnerable solo play |
Key Features:
- Weapons: Strong assault rifles for mid-range combat.
- Gadget: Deploy Beacon – allows squad members to spawn near you but self-destructs after use.
- Ability: Capture objectives faster when near teammates.
Note: Use the Adrenaline Ejector before breaching enemy defenses. It clears stun effects and boosts movement speed but doesn't heal. Deploy the Assault Ladder to create new pathways in destructible environments. Perfect for flanking or scaling walls. Work with your squad to earn points for call-ins like UAVs.
↖ Recon
Recon isn't just about sniping—it's about gathering intel and disrupting enemies from behind the scenes.

| Pros | Cons |
|---|---|
| Long-range combat | Vulnerable at close range |
| Intel gathering | Limited anti-infantry options |
Key Features:
- Weapons: Sniper rifles with headshot bonuses that prevent revives.
- Gadget: Motion Sensor – detects enemy movement but can be countered by crouching or going prone.
- Ability: Auto-spot enemies while aiming down sights (with specialization).
Note: Use Spec Ops specialization to move quietly while crouched or prone. Drop C4 on tanks during stealth flanks for devastating results. Counter UAVs by shooting them down or using Engineer's anti-air rockets.
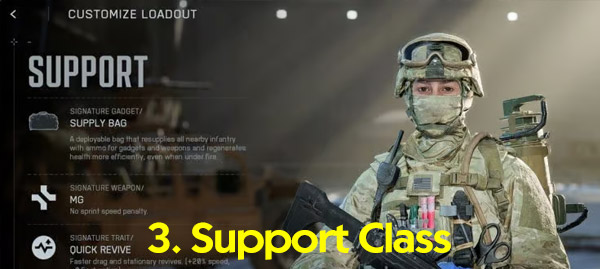
↖ Support
Support players are the backbone of any squad, keeping teammates alive and stocked with ammo.
| Pros | Cons |
|---|---|
| Team-oriented gameplay | Low mobility |
| Revive and resupply | Vulnerable when exposed |
Key Features:
- Weapons: LMGs with no movement penalties—perfect for suppressing enemies.
- Gadget: Ammo and health bags combined into one portable cover.
- Ability: Faster revives with defibrillators that can shock multiple teammates back to life.
Note: Charge up defibrillators for multi-revives in chaotic situations. Mount your LMG on cover or go prone for increased accuracy using a bipod attachment. Coordinate with Engineers to repair portable cover when damaged.
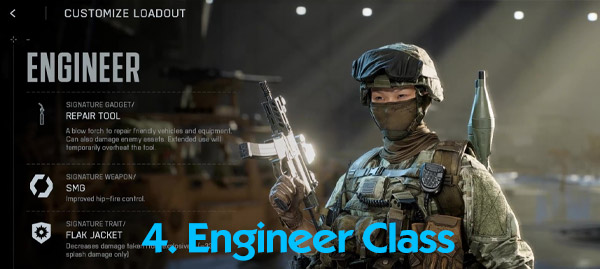
↖ Engineer
Engineers specialize in vehicle destruction and maintenance, making them indispensable in large-scale battles.
| Pros | Cons |
|---|---|
| Vehicle destruction | Limited range |
| Utility repair | Vulnerable in open areas |
Key Features:
- Weapons: Submachine guns with attachments for sprinting while shooting.
- Gadget: Blowtorch repair tool for vehicles and utility items.
- Ability: Anti-armor training for faster reloads and extra rockets when targeting vehicles.
Note: Place mines off-road for maximum impact—they now work like mortars hitting weak spots on vehicles. Use RPGs or anti-air rockets to take down helicopters and UAVs effectively. Pair submachine guns with tight hip-fire attachments for close-range dominance.
↖ Sniping Tips & Strategies
Sniping in Battlefield 6 is an art form that rewards precision and strategy.
- Understand Bullet Drop: Long-range shots require leading your target and adjusting for gravity. Each sniper rifle has unique velocity and drop rates.
- Range Awareness: Ping the ground to check distances or use headshot indicators to gauge the range for subsequent shots.
- Zeroing: Adjust your scope for 100m (default) or 200m for long-range engagements.
- Relocate Often: Avoid camping in one spot. Sniper glint (scope glare) reveals your position to enemies. After one or two kills, move to a new vantage point.
- Spot Targets: Use your sniper scope to mark tanks, enemies, or objectives for your team. This helps jets and engineers coordinate attacks more effectively.
- Utilize Gadgets: Motion sensors, grenade launchers, and other gadgets are invaluable for marking enemies or opening pathways during breakthrough mode.
↖ The Movement
Battlefield 6 introduces a fluid kinesthetic combat system that transforms how you navigate the battlefield. Mastering movement is key to survival and success.
- Slide to Cover: Sliding is an effective way to reach cover quickly or traverse dangerous zones. You can even slide into prone for added stealth.
- Vault and Sprint: Vault over obstacles and sprint with your knife equipped for a speed boost.
- Contextual Lean: Walk up to walls or ledges; your character will automatically adjust their aim for better positioning.
- Tank & Vehicle Rides: Hitch rides on tanks, helicopters, or trucks to enter the battle faster.
- Slide-Jump Combo: Jump out of a slide for extended mobility or slide past opponents for surprise kills.
- Supine Diving: Dive backwards onto your back in dangerous zones—this makes you harder to spot while keeping you in the fight.
↖ Use Destruction
Battlefield 6's dynamic environments are more than just scenery—they're tools you can use strategically.
- Blow Open Walls: Use grenades or launchers to create openings in buildings or doorways for better access.
- Destroy Escapes: If enemies are chasing you, destroy staircases or bridges behind you to cut off their pursuit.
- Open Windows: Even a knife can break open a window sill for quick access or escape.
- Tactical Sliding: Jump into a crouch mid-air to land in a slide while aiming down sights—perfect for aggressive close-range encounters.
↖ The Vehicles
Vehicles are a cornerstone of Battlefield gameplay, offering mobility and firepower to turn the tide of battle.
↖ Jets
Jets are exclusive to large maps and can be spawned at vehicle supply stations. Timing is everything—redeploy at the start of a match and aim for the first spawn about 20 seconds in.

- Master Throttle Control: Maintain around 315 mph for sharp turns and adjust speeds for effective targeting.
- Prioritize Targets: Focus on enemy helicopters and jets first. Use controlled bursts to avoid overheating your machine gun cannon.
- Strafing Runs: Spot enemy tanks and infantry to line up bombing runs. Use third-person free look to gauge threats.
- Air-to-Ground Lock-On Missiles: Aim directly at tanks for maximum impact. Use thermal cameras for surveying but avoid flattening your jet for too long.
- Settings Tweaks: Adjust pitch controls (e.g., spacebar for pitch up) for smoother flying.
Note: Stay low to the terrain and set up ambushes where you can unload your firepower before enemies react. Practice flying often—it takes time but pays off big in combat.
↖ Tanks
Tanks are game-changers when it comes to dominating objectives and controlling space. They spawn at deployment bases or captured objectives on large maps.
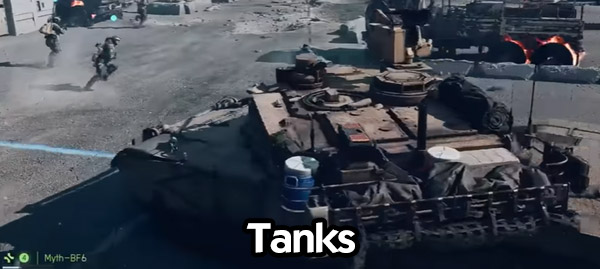
- Survivability: Always angle the front (armored side) toward enemies to avoid exposing the weak rear spot to RPGs.
- Teamwork: Bring a gunner or engineer with you for repairs and extra firepower. Tanks also act as mobile spawn points for your squad.
- Deploy Smokes: Use smokes when locked onto by enemy missiles to block their line of sight.
- Tank Battles: Prioritize eliminating enemy tanks first. Use the toe cable on default tanks for precise aiming during engagements.
- Anti-Air Support: Tanks are effective against helicopters, especially the M1 Abrams near Bravo and Echo objectives.
Note: If you win a tank battle, retreat for repairs before pushing forward again. A repaired tank gives you a significant advantage in subsequent fights.
↖ Helicopters
Helicopters, while slower and heavier in the beta, offer an excellent opportunity for coordinated assaults behind enemy lines.

- Control Mastery: Spend your first few flights learning how to maneuver effectively. Use terrain and buildings to stay low and avoid direct fire.
- Strafe Runs: Swoop in quickly, unleash rockets, and retreat before enemies can lock onto you with RPGs or stingers.
- Flare Timing: Save flares until a missile is inbound (you'll hear a fast beep). Break line of sight using cover whenever possible.
- Momentum-Based Movement: Tilt sideways while pushing up to move laterally across the battlefield—this helps avoid incoming RPGs while giving your gunner time to fire.
Note: Coordinate with teammates for maximum effectiveness. A gunner can focus on infantry while you handle vehicles and objectives during strafing runs.
↖ Best Settings
Customizing your settings can make a huge difference in your performance and overall experience.
Accessibility Settings
- Camera Effects: Turn down World Blur and World Motion Blur for clearer visuals; Leave some blur on if you prefer cinematic effects, but cleaner visuals often improve gameplay focus.
- Weapon Shake Amount: Reduce this setting to minimize screen shake during explosions or building collapses.
Movement Settings
- Crouch Toggle Sprint to Stand: If you're crouched and start sprinting, this option automatically stands you up—perfect for staying mobile during intense firefights.
- Landing Roll: Enable this feature to mitigate fall damage when jumping from high places. Spam the space bar upon landing to perform a roll.
Graphics Settings
- Field of View (FOV): Set FOV to 110 for better peripheral vision without distorting the visuals; For vehicle third-person FOV, max it out to see enemies approaching from all angles.
- Weapon Field of View: Choose the "Wide" setting to make weapons appear smaller on-screen, giving you better visibility of enemies.
- VSYNC: Turn VSYNC off for smoother gameplay and reduced input lag.
HUD Customization
- HUD Padding: Bring your HUD elements closer to the center of the screen for quicker access to information like the mini-map.
- Mini-Map Scale: Increase the scale for close, medium, and far distances—especially helpful when piloting vehicles.
- HUD Icons: Minimize unnecessary icons to declutter your screen; Reduce opacity for zoomed-in aiming but keep revive icons fully visible to assist teammates effectively.
Jet Pilots
Aircraft Camera Roll: In mouse and keyboard control settings, set Third-Person Aircraft Camera Roll to "Off." This keeps the camera level with the horizon instead of following the plane's wings, making it easier to maintain spatial awareness.
| Setting | Recommended Adjustment | Purpose |
|---|---|---|
| World Blur | Turn Down | Clearer visuals |
| Weapon Shake Amount | Reduce | Minimize screen shake |
| Crouch Toggle Sprint | Enable | Faster movement transitions |
| Landing Roll | Enable | Reduce fall damage |
| FOV | Set to 110 | Better peripheral vision |
| Vehicle Third-Person FOV | Max Out | Improved situational awareness in vehicles |
| Weapon Field of View | Wide | Enhanced visibility |
| VSYNC | Off | Smoother gameplay |
| HUD Padding | Adjust inward | Easier access to mini-map and icons |
↖ Micro Gunplay & Fight Windows
- Recoil: Early 6–8 rounds are tight; use 7–9 round controlled bursts → 0.2s reset for LMG/AR to avoid heat bloom expansion.
- Pre-aim: Place crosshair at likely emergence edge when minimap pings; stabilize <0.4s to avoid headshot vulnerability.
- Window Timing: Teammate smoke/explosive triggers a 2–3s visual degradation—ideal for stance change or push.
- Condition: If you often trade 1-for-1 and die to second enemy, after first down strafe 1–1.5 body widths before finishing.
- Next step: Track "successful multi-kill rate" daily; iterate burst discipline.
↖ 48-Hour Training Script
Day 1:
- 30m: Settings tuning + range: 100 reps “slide → ADS chest hit.”
- 3 Assault matches: ≥4 beacon redeploy cycles; log successful teammate spawn counts.
- 2 Support matches: ≥12 revives; deaths due to “out of ammo” ≤2.
Day 2:
- 20m: Recon relocation drill (rule: never >60s same perch).
- 20m: Engineer mine sets (10 groups shoulder-stagger) log trigger ratio.
- 2 Vehicle rounds (tank + heli/jet): aim ≥180s survival; review first death cause (greed / no retreat / no cover).
- End: Self-score (beacon use, sensors, supply uptime, anti-armor contribution, HUD clarity) 1–5; lowest = next focus.
Review Methods
- Death screenshot tags: unseen / unheard / slow decision. Quantify dominant failure source.
- Vehicle log: Write last 10 seconds pre-destruction (chasing? exposed angle?).
- Class rotation rule: After 3 consecutive rounds same class, force a switch to broaden spatial read.
Next step: Maintain a 7-row tracking sheet; fill once per session.
↖ Top 10 FAQ
Q1: I deal lots of damage but enemies reset fast—why?
A: Suppression only delays self-heal; you need staggered follow-up or crossfire to convert "delay" into elimination. Coordinate timing.
Q2: Can't judge sniper drop?
A: Start at 100m zero; for 150–180m raise aim roughly 1/6 head height above chest or switch to 200m zero. Maintain consistent scope zoom while learning muscle memory.
Q3: Constantly flanked?
A: Missing a "last 5-second minimap sweep" habit and lacking sensor/beacon coverage. Increase relocation frequency.
Q4: On capture: place beacon/supply first or clear enemies?
A: If enemy attention is elsewhere → deploy first; if multi-angle fire already on you → neutralize nearest threat before setup.
Q5: Do I need to prone with LMGs?
A: Not mandatory; suppression no longer blooms enemy shots randomly. Prone/bipod = stability but sacrifices reposition time.
Q6: Mines rarely trigger—why?
A: Center-road placement = visibility; side-offset + foliage + stagger improves trigger probability; remember side-proximity mortar effect.
Q7: Jet can't turn sharply.
A: You're too fast; decel before hard turn; aim for ~315 mph; bind Pitch Up to a rapid-access key.
Q8: HUD downscaling makes me miss info—help?
A: After 3 matches, if "missed icon" deaths >3, slightly increase opacity or size for critical icons only (enemy/vehicle).
Q9: Support revives get me killed.
A: You're reviving without smoke or drag reposition. Confirm enemy audio (footsteps/muzzle) distance >1s before revive.
Q10: Low K/D = dragging team?
A: Not necessarily. Supportive actions (revives, resupply, beacon-based spawn quality) generate temporal advantage not shown in KD. Check scoreboard objective + squad score.
Boot up, treat the information loop as your first weapon, and start executing the checklist in your next Battlefield 6 round. Good hunting.
Most Popular Posts
- Battlefield 6 Season 1 Ultimate Weapon Tier List: Best Guns, TTK Data, Loadouts, and Pro Tips
- Top 10 Low-Recoil BF6 Guns: Most Accurate Battlefield 6 Weapons
- Battlefield 6 AFK XP After Patch: Easy Passive Leveling Using 4-Minute Portal Lobbies
- How To Unlock the PSR (M98B) in Battlefield 6 Fast?
- Battlefield 6 Top 10 Meta Weapons: Builds, TTK Insights, and Practical Tips
- Battlefield 6 Fast Weapon Leveling Guide: Unlock Attachments
Popular Category Lists
- Grow a Garden / (286)
- ARC Raiders / (283)
- CoD: Black Ops 7 / (166)
- MLB 26 / (149)
- Monopoly Go / (148)
- Star Citizen / (128)
- Steal a Brainrot / (90)
- ARK Survival Ascended / (85)
- Sailor Piece / (68)
- Forza Horizon 6 / (66)
- Diablo IV / (62)
- Blox Fruits / (62)
- Adopt Me / (57)
- CoD: BLACK OPS 6 / (55)
- Grow a Garden 2 / (54)
- Path of Exile 2 / (48)
- Monster Hunter Wilds / (46)
- Windrose / (44)
- Path of Exile / (40)
- Bee Swarm Simulator / (37)