0
0Battlefield 6 REDSEC Controller Settings Guide: Pro Aim, Zero-Lag Deadzones, and Crystal-Clear Visuals
- Ben
- Share
- Battlefield 6
- 10/30/25
- 7421
What's up, soldier? If you've jumped into Battlefield 6 REDSEC and thought why does aim assist feel like it's driving me? or why is my mini-map useless indoors?, you're not alone. After two days of testing across BR and infantry lobbies—tuning stick curves, ADS multipliers, deadzones, and HUD density—I've landed on a profile that feels like the snappy control of COD with the tactical vision of Battlefield. The goal: tighter shots, faster target acquisition, fewer screen distractions.
- Core Gameplay & Accessibility: Clear the Noise
- Infantry Gameplay Tweaks That Matter
- HUD & Icons: See More, Think Less
- Crosshair & Hit Indicator: Static and Legible
- Controller: Aim Philosophy and Sensitivity Spine
- Movement & Binds: Sprint Like You Mean It
- ADS Scaling per Optic: Stop Fighting Your Scopes
- Vibration, Gyro, Vehicles
- Deadzones & Triggers: The Zero-Lag Core
- Graphics: Clarity Over Raw FPS
- Audio: Make Footsteps Usable (Work-in-Progress)
- Field Testing and Fast Debug
- FAQ
Below you'll get the what, the why, and the how-to-verify. If you're on a couch 3 meters away, you'll see conditional tweaks. If you snipe a ton, you'll get per-scope ADS that stops your reticle from dragging in molasses. Let's dial this in.
↖ Core Gameplay & Accessibility: Clear the Noise

- Do this:
- Turn off narration/subtitles if you find them distracting.
- HUD on; prompts on; motion blur off (details later).
- Infantry aim assist detailed tuning will be in Controller.
- Why:
- Less non-combat UI means fewer attention splits in firefights.
- Verify:
- Load a bot range or empty server; your screen should feel calmer with less pop-up chatter.
↖ Infantry Gameplay Tweaks That Matter
- Do this:
- Crouch: Toggle
- Sprint-to-crouch: On
- Vault over sprint: On
- Sprinting door barge: On
- Double-tap crouch for slide: Off (we'll bind sliding cleanly)
- Skydive: Parachute auto-deploy On
- Landing roll camera/roll: Off
- Peek type: Disabled
- Interact/Reload priority: Prioritize Interact
- Why:
- You get faster mantle/sprint flow, fewer accidental slides, fewer camera shakes, and a more predictable mantle/dash rhythm.
- Peek visuals are local only and can mislead your feel for hit timing; disabled = steadier aim picture.
- Verify:
- Sprint toward a waist-high obstacle—vault should be seamless; sliding only triggers on your mapped input.
↖ HUD & Icons: See More, Think Less
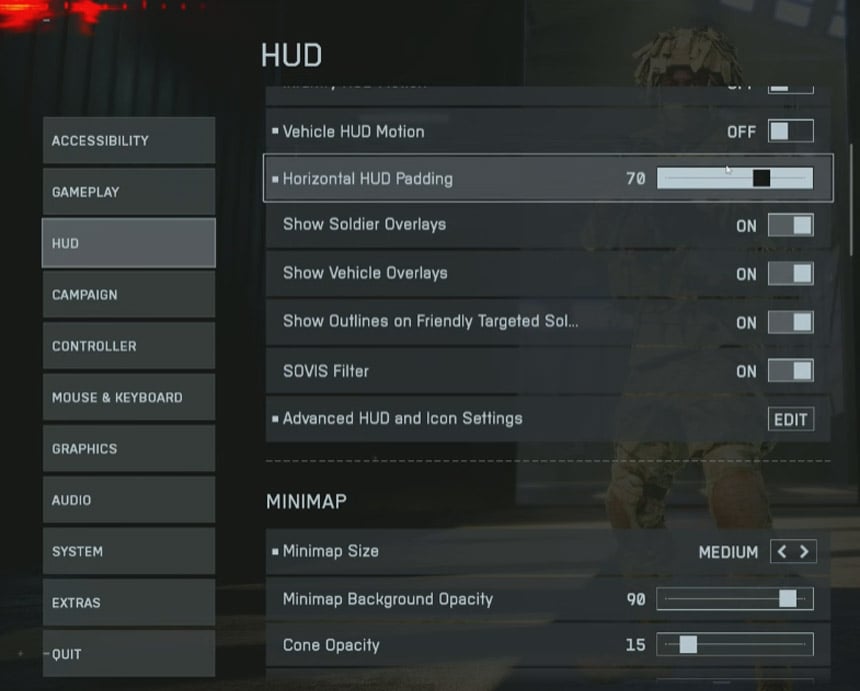
- Do this:
- HUD motion: On (if you like slight kinetic feedback)
- Horizontal HUD padding: 70 if you sit close; 30–50 if on TV
- Big map opacity: 85
- Icon intensity: 60
- Friendly icon scale: 80; Squad icon scale: 80; Enemy: default/big
- Mini-map: Size Medium; zoom params 90 / 15 / 40 (as tested); On-foot view distance: 250 (from 160 default)
- Why:
- Bringing HUD inward reduces eye travel; downscaling teammate blobs clears your sight lines during ADS.
- Mini-map 250 zoom shows more macro info (rotations, unsuppressed shots). Indoors, red pings demand acclimation—worth it once trained.
- Verify:
- In a 3rd-party room fight, teammate pips shouldn't block doorways; on the mini-map, distant gunfire should be meaningfully spaced, not clumped.
↖ Crosshair & Hit Indicator: Static and Legible
- Do this:
- Crosshair opacity: 100; intensity: 55; color: green; thickness: default
- Infantry crosshair projection: Off
- Hit indicator: opacity ~60; hit color: white; headshot: blue; kill: red
- Why:
- Projection Off stops the crosshair from breathing/warping with movement—keeps a consistent aim reference. Color coding gives instant TTK readouts.
- Verify:
- Sprint/ADS while tracking a wall—crosshair center should not drift relative to your screen center.
↖ Controller: Aim Philosophy and Sensitivity Spine
- Target feel: COD-like snap with Battlefield tracking depth, without overbearing AA.
- Do this:
- Infantry sensitivity: 45 (baseline; adjust to taste ±5)
- FOV: 120 if you sit close; 100–105 if far away; 110 if in-between
- Vertical aim ratio: 56
- Vertical zoom ratio: 85
- Uniform infantry aiming: Off
- Infantry aim assist: 100
- Infantry aim assist slow-down: 70
- Aim input curve: BF1/BF4 for infantry; Zoom curve: Standard
- Stick input acceleration preset: BF4/BF3/BFBC; Left/Right acceleration: 30
- Why:
- High FOV shrinks targets—great awareness, harder micro. If you're missing 12+ pellet-equivalent shots at mid-range, drop to 105–110.
- AA at default feels too gluey; slow-down at 70 restores agency so you can break through bubble stickiness.
- Accel 30 adds speed for big turns without making micro jittery.
- Verify:
- Strafe duel test at 15–20m: you should pierce AA bubble and re-center without over-flicking. If you overshoot on micro, lower accel to 20–25.
↖ Movement & Binds: Sprint Like You Mean It
- Do this:
- Map Sprint to Left Stick Up (push-forward = sprint)
- Crouch/Slide: Toggle; Double-tap crouch: Off
- If you have paddles: Bottom Left = Slide; Bottom Right = Jump; Top Left = Interact/Reload; Top Right = Switch/Plate
- Zoom: Hold; Steady scope: LS click
- Why:
- Forward-sprint mimics Auto Tactical Sprint ergonomics—less L3 mashing, more consistent sprint engages.
- Paddles keep thumbs on sticks, enabling 0 deadzone reliability.
- Verify:
- From dead stop, a gentle LS forward should engage sprint; rapid slide-cancel attempts shouldn't trigger accidentally.
↖ ADS Scaling per Optic: Stop Fighting Your Scopes
- Do this:
- Uniform zoom aim sensitivity: 85
- Zoom transition smoothing: On
- Per optic ADS multipliers:
- 1.0x to 3.5x: 85
- 4.0x, 4.5x: 100
- 5.0x to 8.0x (snipers): 150
- Why:
- Low/mid scopes benefit from slight slow-down for tracking; high zoom needs higher coefficient to counter the narrow FOV and keep lateral tracking viable.
- Verify:
- Track a sprinting target at 60–80m with 4x: you should keep them centered with reasonable thumb speed; at 6–8x, lateral movers shouldn't feel like dragging syrup—150 fixes that.
↖ Vibration, Gyro, Vehicles
- Do this:
- Controller vibration: Off
- Gyro: Off (unless you purposefully train it)
- Vehicles/Air: leave default until you specialize
- Why:
- Vibration adds noise to fine motor control. Gyro without discipline = drift and nausea for most.
- Verify:
- Hipfire at close range: your sight picture should stay visually stable under recoil.
↖ Deadzones & Triggers: The Zero-Lag Core
- Philosophy:
- Deadzone (DZ) = how far a stick must move to register. Lower DZ = faster input, but risk of drift.
- Do this (Right/Left sticks):
- Center deadzone: 0 (raise to 1–2 if you have drift when untouched)
- Axial deadzone: 2 (0 feels floaty; >5 reduces diagonal precision)
- Max input threshold: Left = 70; Right = 100
- Why:
- 0 center yields instant micro—works best if you never take thumbs off sticks (paddles/claw). Left max at 70 reduces how far you must slam LS to hit full sprint; Right max 100 preserves full precision range for aiming.
- Triggers:
- LT/RT deadzone: 0/5/0/5 if you have instant-click triggers
- If using analog triggers and fat-fingering: increase OT deadzone slightly to prevent accidental throws/ADS.
- Verify:
- With hands off controller, aim should not drift; while feathering RS, micro-adjusts should register with hairline inputs.
↖ Graphics: Clarity Over Raw FPS
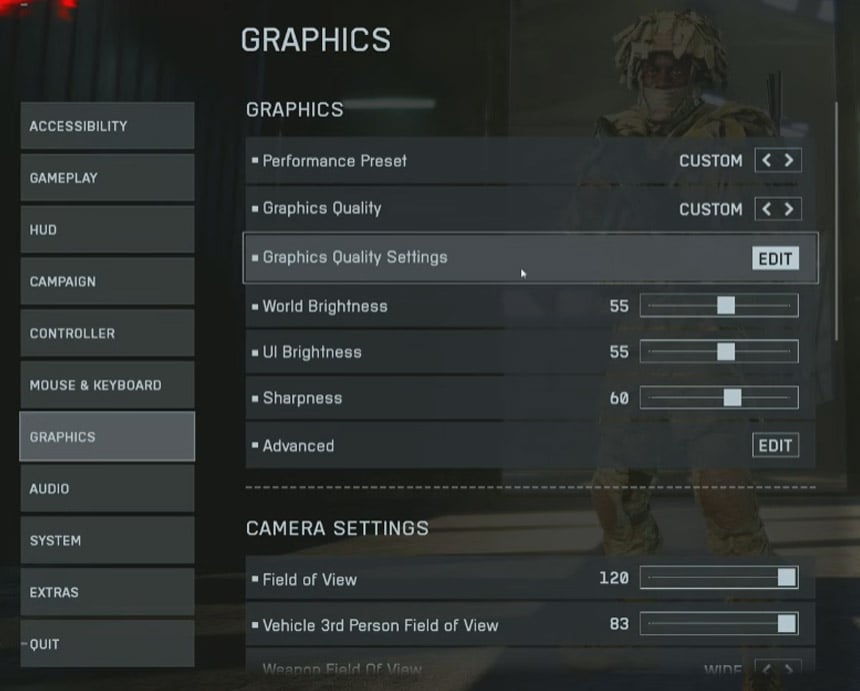
- Global:
- Custom preset
- Turn off Screen Space Reflections
- Turn off Screen Space AO/GI
- High Fidelity Objects Amount: Ultra
- World brightness: 55; UI brightness: 55; Sharpness: 60
- DLSS: On (Quality mode); Frame Generation: Off
- Low Latency (Reflex): Enabled + Boost
- Future frame rendering: Off
- Fullscreen exclusive; VSync: Off
- Why:
- SSR/SSAO often add glare and haze. High-fidelity distant objects help ID heads and limbs at range (fewer Play-Doh silhouettes). DLSS Quality today is clean; Frame Gen introduces input feel weirdness—skip it for shooters.
- FOV block:
- FOV: 120 if desk-close; 100–110 if couch
- Weapon FOV: Wide (smaller gun model, more scene = perceived lower recoil)
- Motion blur: Off; Camera shake: 50; Reduce sprint camera bobbing: On; Chromatic aberration: Off
- Verify:
- In sun-lit exteriors, scopes should not wash out with fake glints; panning should feel crisp without smear.
↖ Audio: Make Footsteps Usable (Work-in-Progress)
- Do this (current WIP):
- Master: 100
- SFX: ~40 (bump to 60 if too quiet)
- Music: 0
- Voiceovers: Soldier/Commander ~50–60
- Device: Headphones
- Mix: War Tapes variant (test alternates if footsteps remain muddy)
- Why:
- Game mix is early and inconsistent; prioritizing SFX and ditching music preserves cognitive bandwidth.
- Verify:
- In buildings, unsuppressed shots should be clearly directioned; if not, try Standard/Headphones mix and raise SFX 10–15.
↖ Field Testing and Fast Debug
- - If you find your reticle sticking past targets at close range: lower AA slow-down from 70 to 60–65.
- - If micro feels twitchy on 1x sights: reduce accel from 30 to 20–25 or raise ADS 1.0–1.5x set from 85 to 90.
- - If you lose track at 6–8x while panning: increase high-zoom ADS from 150 to 160–170.
- - If diagonal tracking feels locked: raise axial DZ from 2 to 3–4; if floaty, drop to 1–2.
- - If sprint doesn't trigger reliably: reduce LS max threshold from 70 to 60–65.
↖ FAQ
Q1: Is Battlefield 6 aim assist stronger than COD by default?
- Short answer: It feels stickier. With default slow-down, many players report over-glue. Setting AA slow-down to ~70 returns control while keeping tracking help.
Q2: Why not use Uniform ADS across all optics?
- Different zooms compress FOV differently. A single coefficient makes high zoom untrackable in lateral fights. Per-zoom tuning preserves muscle memory.
Q3: I play on TV 2–3 meters away. Should I copy 120 FOV?
- If you do, targets will be tiny and you'll miss more micro. Start 100–105, weapon FOV Wide, and move up only if you need more peripheral info.
Q4: Zero deadzone gives me drift. Am I doomed?
- Not at all. Raise center DZ to 1–2 until drift stops at rest. Keep axial low (2–3) for diagonal precision.
Q5: My frames dropped after turning on high-fidelity objects. Worth it?
- For BR/long-range, yes—enemy readability trumps raw FPS past a smoothness threshold. If sub-90 FPS on your display, drop to High, not Low.
Q6: Should I enable Frame Generation?
- For shooters, no. It can inflate FPS counters but worsens input feel. DLSS Quality + Reflex Boost is the safer clarity/latency combo.
Q7: I like controller vibration. Any benefit to keeping it?
- Competitive aiming benefits from no vibration. If you insist, limit it to light feedback and expect minor micro-wobble in recoil control.
Lock in this setup in three passes: first HUD/crosshair for sight clarity, then controller core (FOV, AA slow-down, curves), then deadzones/ADS per zoom. After two sessions, your brain maps the new coefficients and the fighting your scope sensation disappears. If you notice a specific pain point—close-range overshoot, high-zoom sludge, or sprint unreliability—use the fast debug cues above and you'll correct in minutes instead of days.
Most Popular Posts
- Battlefield 6 Season 1 Ultimate Weapon Tier List: Best Guns, TTK Data, Loadouts, and Pro Tips
- Top 10 Low-Recoil BF6 Guns: Most Accurate Battlefield 6 Weapons
- Battlefield 6 AFK XP After Patch: Easy Passive Leveling Using 4-Minute Portal Lobbies
- How To Unlock the PSR (M98B) in Battlefield 6 Fast?
- Battlefield 6 Top 10 Meta Weapons: Builds, TTK Insights, and Practical Tips
- Battlefield 6 Fast Weapon Leveling Guide: Unlock Attachments
Popular Category Lists
- Grow a Garden / (286)
- ARC Raiders / (277)
- CoD: Black Ops 7 / (166)
- MLB 26 / (149)
- Monopoly Go / (148)
- Star Citizen / (127)
- Steal a Brainrot / (90)
- ARK Survival Ascended / (84)
- Sailor Piece / (68)
- Forza Horizon 6 / (66)
- Diablo IV / (62)
- Blox Fruits / (61)
- Adopt Me / (56)
- CoD: BLACK OPS 6 / (55)
- Grow a Garden 2 / (53)
- Path of Exile 2 / (48)
- Monster Hunter Wilds / (46)
- Windrose / (44)
- Path of Exile / (40)
- Bee Swarm Simulator / (37)