



 0
0 Created: Jan 17,2026 | ARC Raiders
Arc Raiders Grenade & Trap Tier List Ranked (S to D) in Patch 1.11

If you have spent any time in Arc Raiders recently, you know that resources are life. Wasting precious crafting materials like Springs on a gadget that doesn't secure a kill or save your life is a fast track to the lobby. With Patch 1.11 shaking up the balance—specifically targeting the dominance of the Trigger Grenade—we need to rethink our loadouts completely.
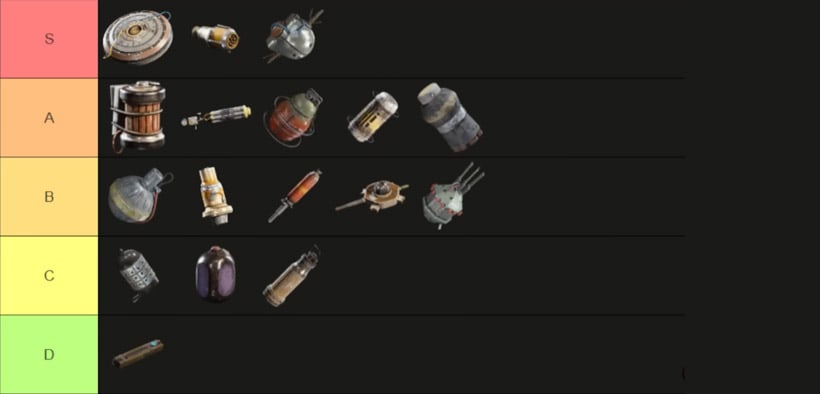
We have combined hundreds of hours of frontline experience with the latest patch data to bring you a guide that cuts through the noise. We aren't just looking at damage numbers; we are looking at utility, crafting costs, and actual combat reliability.
The Fall of a King: The Trigger Grenade Nerf
Before we get to the tier list, we must address the biggest change. The Trigger Grenade is no longer the undisputed S-Tier god. It has moved to A-Tier.
The Math Behind the Nerf:
- Fuse Delay: Increased from 0.7s to 1.5s.
- Damage Radius: Damage is now heavily concentrated at the center.
What this means: In PvP, that extra 0.8 seconds is an eternity. If you throw this at a player's feet, they now have ample time to sprint-roll away. It is no longer a free damage button, though it remains excellent for sticky precision in PvE.
S-Tier: The Must-Have Kit
These items define the current high-level play. If you aren't running at least one or two of these, you are putting yourself at a massive disadvantage.
| Gadget | Type | Role | Why It's S-Tier |
|---|---|---|---|
| Showstopper | Grenade | PvP Control | The ultimate Cheese. It forces enemies to stand up and stuns them. It decides fights instantly by stripping player control. |
| Deadline Mine | Trap | Boss Killing | The one-shot machine. Combine with a Lure/Cloak to stick it on a Bastion or Matriarch. Highest PvE damage potential. |
| Snap Hook | Utility | Movement | Movement is survival. Two charges allow you to engage, reposition to high ground, or escape a losing fight. |
| Big Smoke | Utility | Reset/Revive | The best reset tool. Essential for looting safely, reviving in the open, or breaking line-of-sight against Arc AI. |
| Wolfpack | Grenade | Anti-Air | The only reliable answer to Rocketeers and Drones. Tracks reliably and is cost-effective for its role. |
| Jolt Mine | Trap | Area Denial | A defensive nightmare. It stuns enemies and drains shields. Perfect for covering flanks or trapping zip lines. |
A-Tier: The Specialists
These items are incredible in specific scenarios but lack the universal spamability of the S-Tier.
| Gadget | Type | Role | Why It's A-Tier |
|---|---|---|---|
| Trigger Grenade | Grenade | Precision | Still the best for sticky traps on doors. In PvE, if you stick a core, it deals massive damage. Requires aim now. |
| Trailblazer | Grenade | Ground PvE | A rising star. Cluster explosions can one-shot Leapers or melt Bastion armor. Avoid in PvP (too slow). |
| Barricade Kit | Utility | Cover | Creates instant cover in open fields. Allows you to heal or reload safely in bad positions. |
| Door Blockers | Utility | Intel/Delay | Information tools. Blocking a door behind you prevents silent flanks and buys time. |
B-Tier: Reliable & Budget Friendly
These are the workhorses. They aren't flashy, but they get the job done without breaking the bank.
| Gadget | Type | Role | Why It's B-Tier |
|---|---|---|---|
| Snap Blast | Grenade | PvP Damage | Better than Shrapnel. Sticks to targets and creates thick black smoke. Great for corner denial. |
| Light Impact | Grenade | Shield Break | Most cost-effective item. One grenade breaks shields or stops healing. One-shots Wasps. Carry 5. |
| Lure Grenade | Utility | Distraction | Essential for solo PvE. Forces Bastions to turn around, exposing weak points for your mines. |
| Blaze Grenade | Grenade | Area Denial | Good for flushing enemies out of rooms. Decent tick damage, but lacks instant kill pressure. |
C & D Tier: The Do Not Craft List
Resources like Springs are incredibly valuable. Do not waste them on these items unless you have no other choice.
| Gadget | Type | Why to Avoid |
|---|---|---|
| Shrapnel Grenade | Grenade | A noob trap. Costs Springs but deals unreliable damage. Use Snap Blast instead. |
| Gas Grenade | Grenade | Drains stamina, but bullets kill faster. If you catch someone, just shoot them. |
| Light Sticks | Utility | They look cool at night. That is their only function. |
| Pulse Mine | Trap | Displaces enemies, but Jolt Mine stuns them. Always choose the stun. |
Advanced Tactics: The Wallhack Combo
On its own, the Tagging Grenade is mediocre (C-Tier) because of the activation delay. However, you can turn it into an A-Tier utility with this combo:
1. The Setup: Throw a Smoke Grenade into a room or corridor.
2. The Trigger: Immediately throw a Tagging Grenade into the smoke.
3. The Result: The enemy cannot see you through the smoke, but the tag reveals their exact location through the smoke.
4. The Payoff: This is essentially a legal wallhack. Pre-fire their position for an easy kill.
Frequently Asked Questions
Q: Is the Trigger Grenade still viable for PvP?
A: Yes, but it requires more skill. You can no longer use it as an air-burst weapon. You must use it to force enemies out of cover or stick it directly to them. If you miss the stick, don't expect damage.
Q: What is the best loadout for a solo player?
A: We recommend a mix of Impact Grenades (for cheap utility), Showstoppers (for get off me moments in PvP), and Wolfpacks (to deal with annoying drones/rocketeers).
Q: How do I effectively use the Lure Grenade?
A: The trick is line-of-sight. If the Arc sees the Lure, they destroy it instantly. You must throw it behind a wall or cover. This forces the AI to turn around or investigate, exposing their weak points (batteries/cores) for you to attack with a Deadline Mine.
Final Verdict
The days of mindlessly spamming Trigger Grenades are over. Patch 1.11 rewards precision, economy, and utility.
If you want to survive consistently, build your loadout around the Showstopper for PvP dominance and the Snap Hook for mobility. Save your springs by avoiding Shrapnel Grenades, and master the Trailblazer for melting PvE targets.

Most Popular Posts
- ARC Raiders Update 1.42: Phantom Targets Farming Guide (Glitched Wasps, Rewards, Regional Conditions)
- ARC Raiders Hullcracker Blueprints: Fastest Way to Complete The Major's Footlocker
- ARC Raiders Best Pop Trigger Strategy: Fast Phantom Targets Damage Guide
- ARC Raiders Subway Skin Guide: Unlock the Subterranean Outfit
- ARC Raiders Looting Mk. 3 Survivor Blueprint Guide: Best Blue Gate Route and Drop Locations
- ARC Raiders Medium & Heavy Gun Parts Blueprint Guide: Best Farm Route, Locations, and Refiner Crafting
Popular Category Lists
- ARC Raiders / (354)
- Grow a Garden / (294)
- CoD: Black Ops 7 / (167)
- Star Citizen / (163)
- MLB 26 / (159)
- Monopoly Go / (153)
- ARK Survival Ascended / (128)
- Steal a Brainrot / (99)
- Blox Fruits / (74)
- Adopt Me / (74)
- Forza Horizon 6 / (72)
- Sailor Piece / (68)
- Grow a Garden 2 / (68)
- Diablo IV / (62)
- CoD: BLACK OPS 6 / (55)
- Aion 2 / (52)
- Path of Exile 2 / (48)
- Monster Hunter Wilds / (46)
- Windrose / (44)
- Maplestory Classic / (42)






