0
0 Created: Sep 20,2026 | Star Citizen
Star Citizen Crafting Guide: Blueprint Sourcing, Quality & Mining Routes

Farming rare ores before securing a blueprint guarantees cluttered cargo bays full of unusable resources. Complete the production cycle in strict sequence: verify the blueprint, inspect the recipe, extract verified materials, test a low-grade prototype, and only then burn your high-purity stock.
- Lock Down the Blueprint First
- The Reverse-Engineering Workflow
- Standard Production Card Template
- Target P6-LR and A03 Blueprints in Pyro V
- Blueprint Extraction Protocol
- Mission Selection Matrix
- Pack Disposable Loadouts for Reconnaissance
- Material Quality: Isolate Tiers Before Fabrication
- Resource Storage Tiering
- Prototype First, Commit Later
- Select Mining Sectors by Real Delivered Yield
- Mining Expedition Profiles
- Calculate Delivered Output
- Set Non-Negotiable Abort Triggers
- Navigate Reputation and Mission Locking
- Contract Validation Protocol
- Coordinate Multi-Crew Farming Tasks
- FAQ (Frequently Asked Questions)
- Where do you find the P6-LR blueprint in Star Citizen?
- How do you unlock the A03 sniper rifle blueprint?
- Why should you craft a prototype before the final item?
- Which mining locations offer the safest crafting material extraction?
- How do you prevent farming an outdated blueprint location?
Lock Down the Blueprint First
Mining blindly produces surplus inventory, not finished equipment. In Star Citizen, blueprints dictate component recipes, permissible input grades, and required fabrication tiers. Availability shifts between patches across loot tables, faction milestones, and merchant inventories.
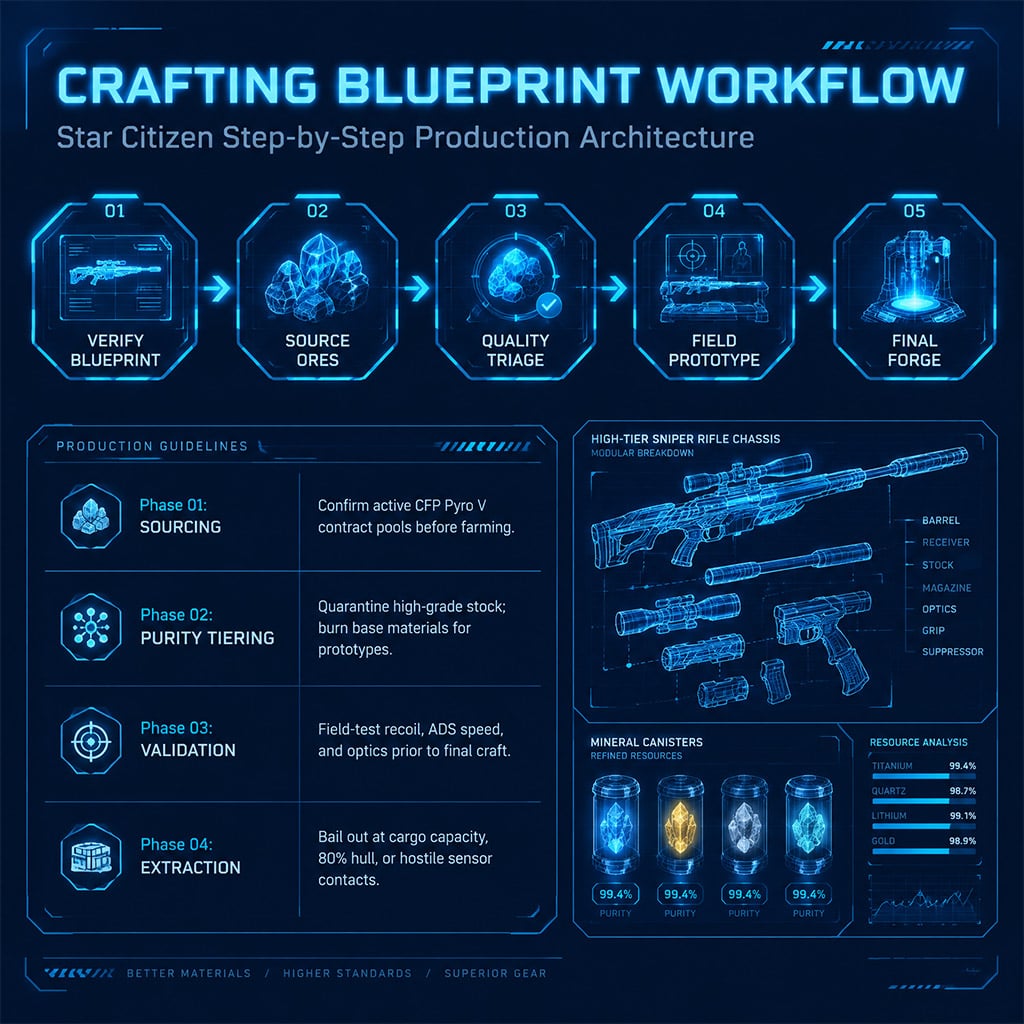
Blueprint Verification ➔ Recipe Breakdown ➔ Reserve Gathering ➔ Prototype Field-Test ➔ High-Grade Production Run
The Reverse-Engineering Workflow
Run your production planning backward from the terminal objective:
1. Specify the final variant: Identify the exact weapon, armor plate, or utility tool needed.
2. Confirm live blueprint drops: Cross-reference community drop reports against live contract reward text.
3. Map the exact bill of materials: Isolate required ores, composites, and minimum quality thresholds.
4. Draft primary and secondary extraction routes: Select one aggressive multi-objective zone and one secure backup system.
5. Fabricate a discardable prototype: Use base-tier resources to test base weapon handling and recoil characteristics.
6. Deploy the final craft: Commit high-purity ingredients only after validating handling and combat performance.
Standard Production Card Template
Log every operational variable before spooling your quantum drive:
| Production Parameter | Required Entry | Critical Failure Avoided |
|---|---|---|
| Target Item | Exact designation and tier | Sourcing incompatible resource classes |
| Blueprint Source | Specific mission, faction tier, or depot | Wasting hours in defunct contract pools |
| Input Manifest | Ore types, refined units, and minimum quality | Returning with deficient material stacks |
| Primary Route | Preferred gathering sector | Idle flight time and scanning blind runs |
| Backup Route | Low-risk secondary sector | Total mission failure from hostile interdiction |
| Prototype Material | Lowest-viable commodity grades | Burning high-purity stock on unvalidated gear |
Target P6-LR and A03 Blueprints in Pyro V
Current field reports associate the P6-LR sniper rifle and A03 sniper rifle blueprints with Citizens for Prosperity (CFP) contract pools around Pyro V. Because regional loot distributions fluctuate between game iterations, never chain contracts without validating the initial payout.
Blueprint Extraction Protocol
1. Jump to the Pyro V orbital envelope.
2. Filter your Contract Manager strictly for Citizens for Prosperity.
3. Inspect contract details for specific blueprint caches or equipment unlock objectives.
4. Run a single reconnaissance contract to confirm the live pool before committing to an extended loop.
5. Check your fabricator terminal to confirm recipe registration.
6. Terminate the contract loop the moment the blueprint registers.
Mission Selection Matrix
| Blueprint Target | Primary Contract Lead | Operational Check | Abort Condition |
|---|---|---|---|
| P6-LR | CFP Combat/Recon around Pyro V | Confirm live contract loot pool includes rifle blueprints | Recipe registers at your fabricator |
| A03 | CFP Tactical Operations near Pyro V | Verify faction contract availability in Pyro sub-sectors | Recipe registers at your fabricator |
| General Small Arms | System-wide Mercenary / Bunker pools | Check patch notes for regional loot table shifts | 3 consecutive runs yield zero relevant tables |
| Restricted Components | High-rep Faction Gateways | Confirm minimum reputation tier before accepting | Contract tier does not match current reputation |
Pack Disposable Loadouts for Reconnaissance
Blueprint extraction zones in Pyro carry high ambush and interdiction risks. Deploy with replaceable, store-bought equipment rather than custom-crafted gear:
- Standard ballistics with ample magazine reserve
- Tier-1 medical pens equipped on external armor rigs
- Tractor beam utility attachment with fresh battery reserves
- Medium or light armor sets to prioritize sprint velocity and stamina recovery
- Empty ship storage to maximize recovered loot volume
Material Quality: Isolate Tiers Before Fabrication
High-purity resources are rare assets. Pumping pure-grade minerals into a blueprint that scales off handling or magazine durability yields diminishing returns if your combat profile relies purely on alpha damage.
Resource Storage Tiering
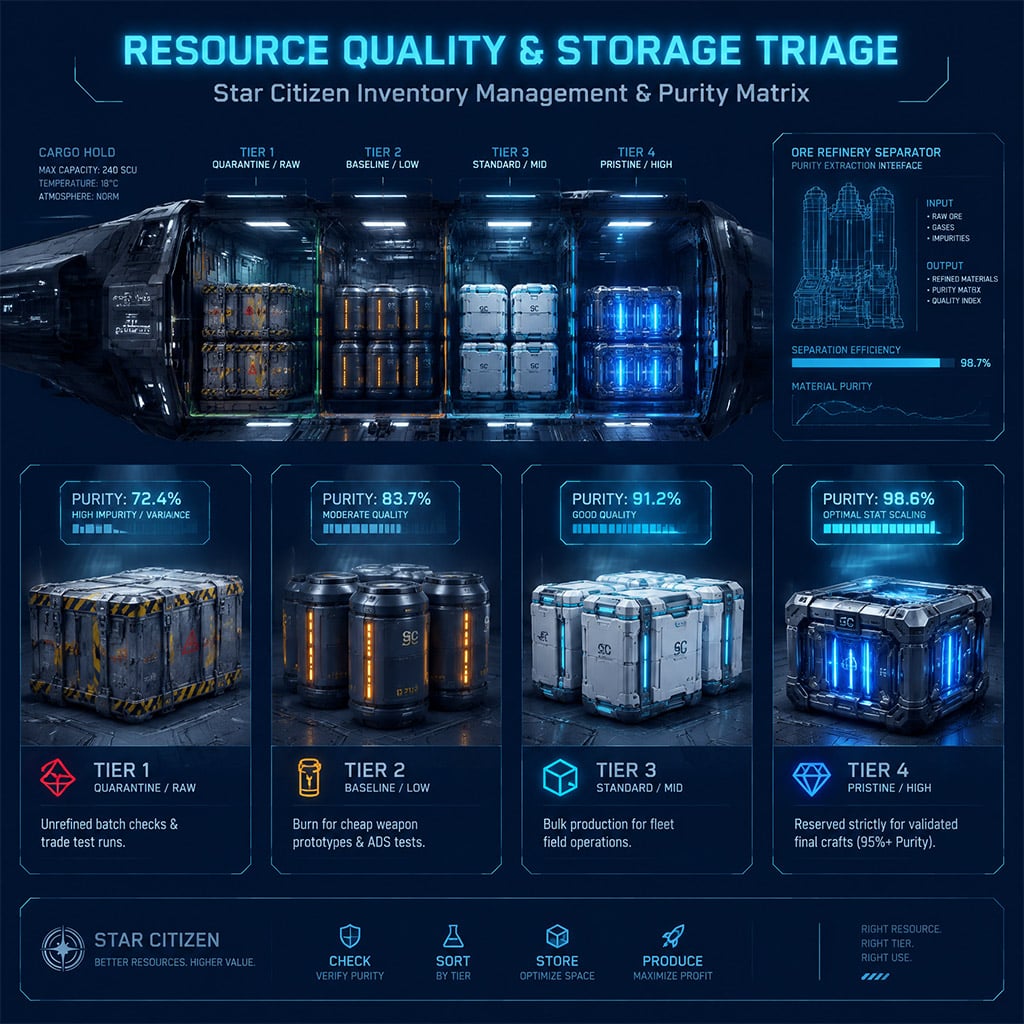
Do not dump extracted commodities into a common station warehouse. Segment your stockpiles directly at the freight elevator:
| Storage Tier | Material Purity Level | Designated Application | Inventory Handling Rule |
|---|---|---|---|
| Tier 1: Quarantine | Unrefined / Mixed | Quality verification and testing | Move in isolated batches |
| Tier 2: Baseline | Low Purity | Prototype fabrication and dry-fire runs | Stage adjacent to fabricator |
| Tier 3: Standard | Medium Purity | Standard field replacements | Sort by operational gear set |
| Tier 4: Pure | High Purity | Validated builds and precision components | Lock behind dedicated storage profiles |
Prototype First, Commit Later
Fabricate a base-tier weapon using low-grade stock before deploying pristine minerals. Take the prototype into combat and verify:
- Time-to-kill against common local armor profiles
- Reticle stability, sway recovery, and optic drift under full fatigue
- ADS (Aim-Down-Sights) transition speed in your standard operational armor
- Recoil reset time relative to rapid follow-up shot requirements
If the base prototype handles the operational objective cleanly, bank your pure-grade materials for items where stat-scaling fundamentally shifts weapon mechanics.
Select Mining Sectors by Real Delivered Yield
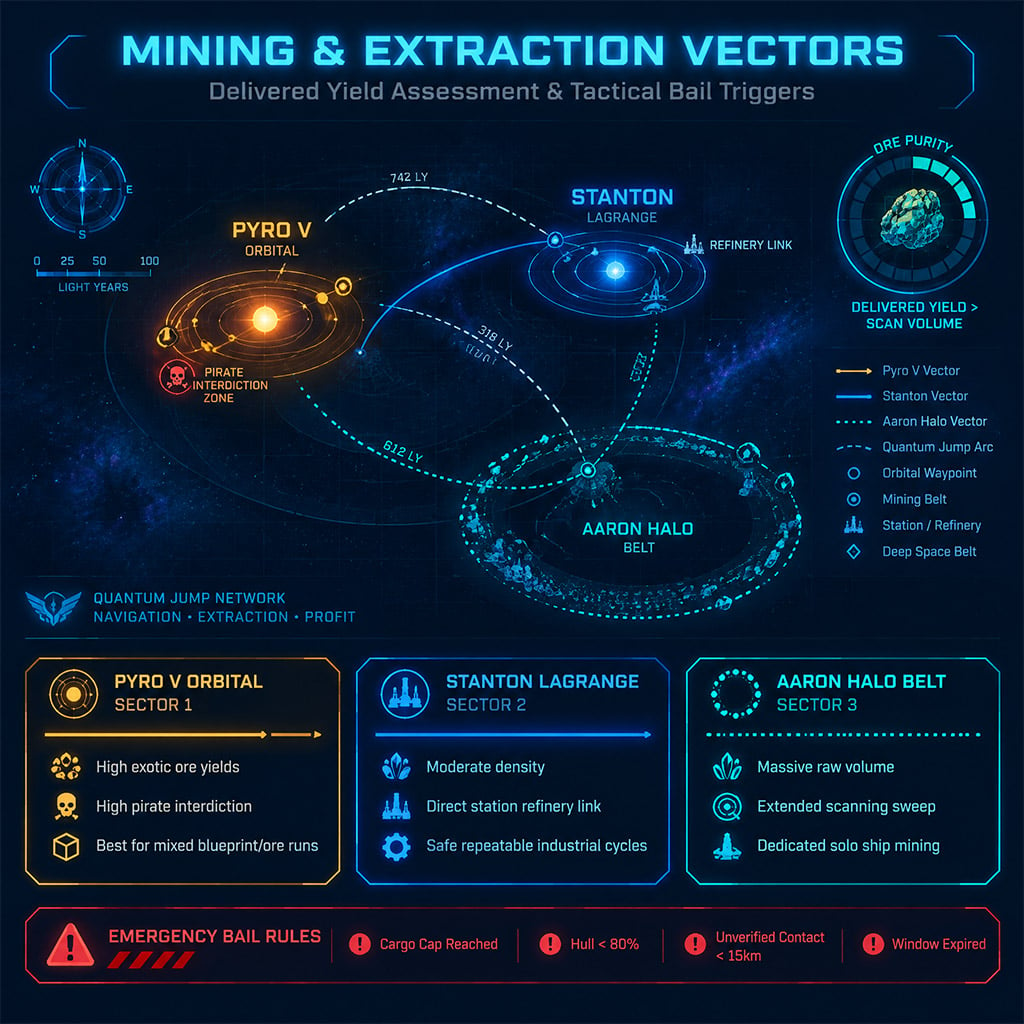
Scan density is a vanity metric; delivered yield per hour determines true operational efficiency. A zone with high-yield rock clusters that demands three quantum jumps through hostile pirate corridors consistently underperforms a moderate, secure deposit adjacent to a refinery terminal.
Mining Expedition Profiles
| Operating Sector | Primary Advantage | Major Point of Failure | Recommended Deployment |
|---|---|---|---|
| Pyro V Orbital Ring | High concentration of exotic crafting inputs | Hostile interdiction, lack of armistice protection | High-risk blueprint and mineral extraction |
| Stanton Lagrange Points | Rapid turnaround; close to refinery hubs | Dispersed clusters increase scan duration | Consistent, lower-risk industrial farming |
| Aaron Halo Belt | Immense deposit volume, zero signature crowding | Deep scanning time drains active operating windows | Solo industrial ship mining |
| Derelict Recovery Sites | Bypasses mining laser requirements | Inconsistent resource types and volumes | Rapid salvage runs |
Calculate Delivered Output
Audit your mining runs using delivered volume rather than scanner projections:
Delivered Efficiency = Safely Unloaded Ore Units / (Transit Time+ Extraction Time + Refining Overhead)
Set Non-Negotiable Abort Triggers
Establish an immediate bug-out threshold before spooling mining lasers:
- Cargo Fill: Recipe quantity reached, regardless of remaining cluster deposits.
- Structural Integrity: Hull drops below 80% or any single thruster suffers critical damage.
- Hostile Signatures: Unidentified radar contact closes within 15 km without broadcast transponder.
- Time Window: Predetermined operational window expires.
Navigate Reputation and Mission Locking
Reputation thresholds function as structural locks on crafting progression. If your organization lacks standing with local security or syndicates, the relevant blueprint contracts remain completely hidden.
Contract Validation Protocol
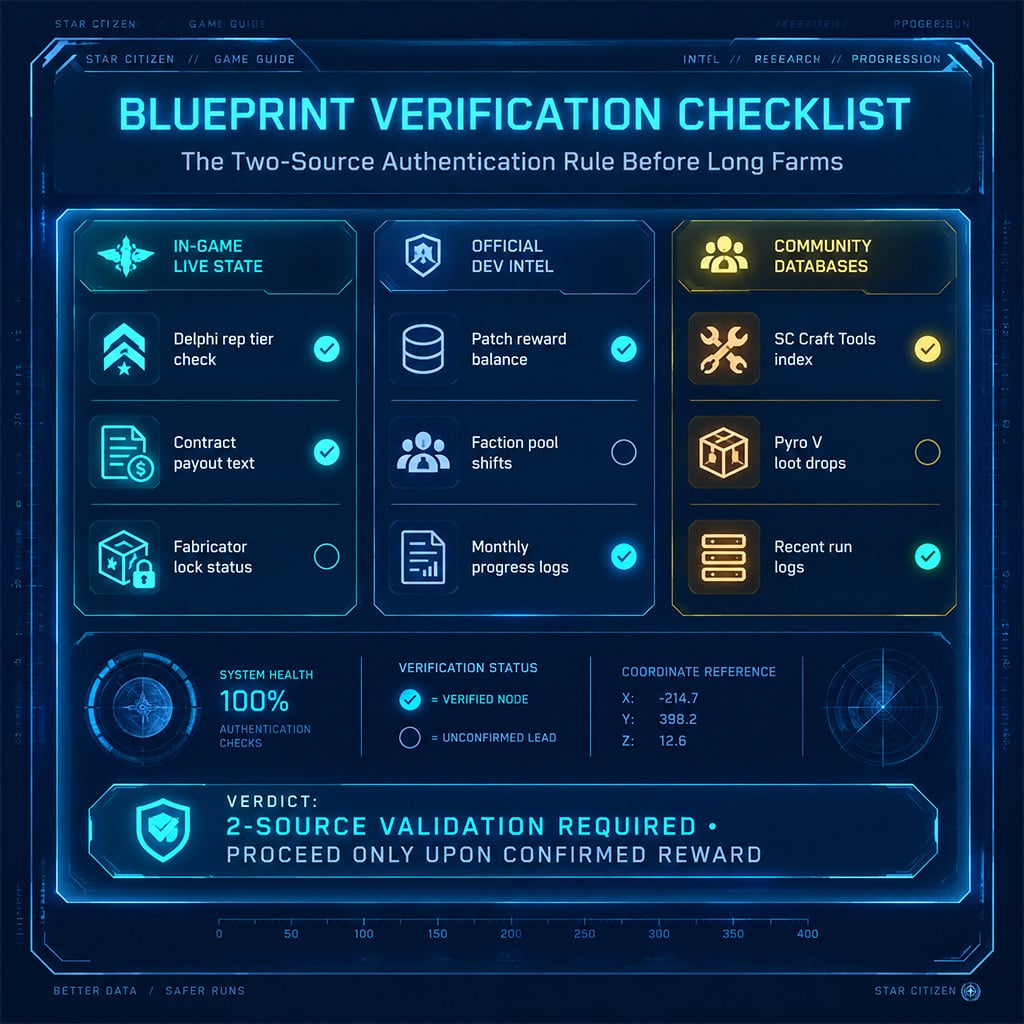
1. Locate your desired blueprint within external reference databases or in-game fabricator menus.
2. Cross-reference the required faction and standing tier in your Delphi reputation interface.
3. Verify your live affinity score matches contract prerequisites.
4. Complete an entry-level assignment to verify progress bar updates.
5. Scale your grinding schedule only after confirming that reputation points tick upward cleanly.
Coordinate Multi-Crew Farming Tasks
When operating in wings, mission completions and item rewards do not always distribute evenly across fireteam members. Organize distinct functional responsibilities:
- Point Scout: Sweeps approach vectors, tags resource clusters, and flags hostile radar blips.
- Extraction Operator: Controls mining lasers, regulates laser power levels, and fractures deposits.
- Cargo Master: Manages tractor beams, stacks containers into magnetic grids, and tracks manifests.
- Overwatch: Patrols high orbit, screens for combat drops, and secures extraction corridors.
Always complete an initial test turn-in. If blueprint acquisition does not credit across the whole party, rotate contract ownership sequentially between wingmen.
FAQ (Frequently Asked Questions)
Where do you find the P6-LR blueprint in Star Citizen?
Community tracking locates the P6-LR blueprint in Citizens for Prosperity mission rewards around Pyro V. Always review the active contract text and verify current patch reward structures before running missions.
How do you unlock the A03 sniper rifle blueprint?
The A03 blueprint drops primarily through Citizens for Prosperity combat contracts within the Pyro system. Regional loot pools remain subject to live balance updates, making single-mission verification essential.
Why should you craft a prototype before the final item?
Prototypes built with base-grade commodities allow you to evaluate handling, sight alignment, and recoil behavior under field conditions. This prevents burning rare, high-purity materials on gear that does not align with your combat style.
Which mining locations offer the safest crafting material extraction?
Stanton lagrange stations (HUR-L1, CRU-L1) and the Aaron Halo provide the safest balance of high-density deposits and accessible refining facilities. Pyro V offers higher raw material potential but exposes your hauler to sustained interdiction risk.
How do you prevent farming an outdated blueprint location?
Apply the two-source rule: cross-reference current community-maintained databases with live contract mission descriptions. If a contract fails to display or grant the expected tier reward upon initial completion, pivot immediately to an alternate sector.

I’m Benjamin Walsh, an Australian Senior Copy Editor at GGWTB focused on survival crafting, open-world exploration, and extraction games. My guides weigh base locations, supply routes, and what deserves the last slot in your backpack. When editing, I look for skipped prerequisites and unclear directions—a useful guide shouldn’t send you across the map without the right tools.

Most Popular Posts
- Star Citizen 4.9 Mining Guide: Best Laser Buffs, Crafted Heads, Scanning, Materials and Nyx Missions
- Star Citizen 4.9 Ship Buying Guide: What to Buy, Skip, and Prioritize
- Star Citizen 4.9 Salvage Guide: Easy AUEC from Battaglia Ship in Distress + Golem Module Fix
- Star Citizen 4.9 Battaglia Contracts, Persistence Fixes, Best Loot, Scanning Changes, and Ship Rewards
- Star Citizen Alpha 4.9 Guide: Best Features, Mining Scan Upgrade, Weapon Nerfs
- Star Citizen 4.9 Hull C Cargo Hauling Guide: Make Millions aUEC Without Autoload
Popular Category Lists
- ARC Raiders / (345)
- Grow a Garden / (292)
- CoD: Black Ops 7 / (167)
- Star Citizen / (161)
- MLB 26 / (159)
- Monopoly Go / (152)
- ARK Survival Ascended / (126)
- Steal a Brainrot / (98)
- Blox Fruits / (74)
- Adopt Me / (73)
- Forza Horizon 6 / (72)
- Sailor Piece / (68)
- Grow a Garden 2 / (68)
- Diablo IV / (62)
- CoD: BLACK OPS 6 / (55)
- Path of Exile 2 / (48)
- Monster Hunter Wilds / (46)
- Aion 2 / (46)
- Windrose / (44)
- Donut SMP / (41)