0
0 Created: Aug 12,2026 | Maplestory Classic
MapleStory Classic World Dragon Knight Guide: Best Skills, Spear Build, Hyper Body, and Dragon Blood Tips

Dragon Knight is still the classic Spearman upgrade: sturdy, simple, party-friendly, and built around heavy melee hits. The difference in MapleStory Classic World is that several skills now work differently. Rush fixes a lot of Warrior movement pain. Dragon Blood is a real damage steroid. Hyper Body moved to third job. Final Attack is finally usable as a toggle.

If you want the short version: go Spear, build around crit + Dragon Blood, use Crusher for 1–3 targets, use Dragon Fury for 4 targets, and treat Hyper Body as your party ticket.
- Dragon Knight Build Overview
- Spear vs Polearm: Best Weapon for Dragon Knight
- First and Second Job Setup
- Precision Strikes vs Max HP Increase
- Key Second Job Changes
- Final Attack Is Worth Using Now
- Iron Will Is for Knockback Control
- Rush Fixes Warrior Mobility
- Dragon Knight Third Job Skills
- Dragon Knight Skill Table
- Piercing Crusher: Use on 1–3 Targets
- Dragon Fury: Use on 4 Targets
- Dragon Roar: Good Farming Tool, Not a Screen Clear
- Partial Resistance: Take It for Unlocks
- Power Crash: Boss Tool Only
- Dragon Blood: Your Biggest Damage Gain
- Hyper Body: Still the Party Ticket
- Best Dragon Knight Skill Priority
- Solo Build Focus
- Party Build Focus
- Best Combat Rules for Dragon Knight
- Buff Checklist
- Damage Expectations and Gear Check
- Dragon Knight Strengths and Weaknesses
- FAQ
- Is Spear or Polearm better for Dragon Knight?
- Should Dragon Knight use Precision Strikes?
- Is Dragon Blood worth maxing?
- When should I use Piercing Crusher vs Dragon Fury?
- Is Hyper Body still important in MapleStory Classic World?
- Summary
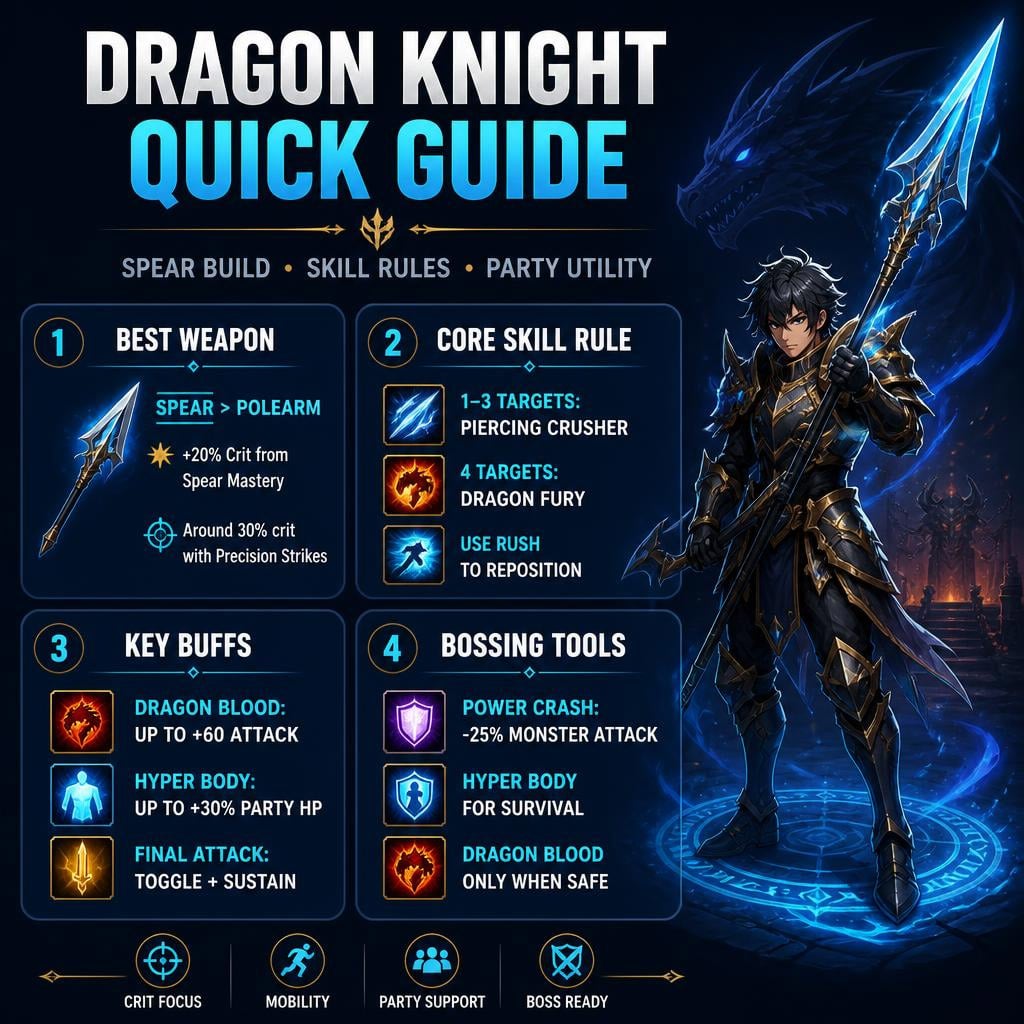
Dragon Knight Build Overview
Dragon Knight does not need a complicated rotation. It needs clean skill choices.
| Core Choice | Best Pick | Reason |
|---|---|---|
| Weapon route | Spear | Better long-term damage through crit |
| Main mobbing rule | Crusher 1–3 / Fury 4 | Simple and efficient target logic |
| Main damage steroid | Dragon Blood | Up to +60 attack |
| Party value | Hyper Body | Up to +30% party HP |
| Mobility tool | Rush | 3-sec cooldown, works without mobs |
| Boss utility | Power Crash | Reduces monster attack by up to 25% |
The class feels best when played with discipline. Keep buffs up. Pick the right attack. Don't waste Dragon Roar into dangerous mobs. Don't let Dragon Blood drain you into a free tombstone.
Spear vs Polearm: Best Weapon for Dragon Knight
For most players, Spear Dragon Knight is the better long-term route.
The reason is simple: Spear Mastery gives 20% Critical Rate. Add Precision Strikes from first job and the class's 5% base crit, and Dragon Knight can sit around 30% crit rate.
That is strong for a Warrior.
| Weapon Path | Main Gain | Best Use | Verdict |
|---|---|---|---|
| Spear | +20% crit | Bossing, scaling damage | Best overall |
| Polearm | Speed | Casual grinding | Comfortable, but weaker scaling |
| Spear + Precision Strikes | Around 30% crit | Long-term build | Recommended |
Polearm is not useless. It feels smoother when training. But most big bosses are not moving enough for speed to beat stable damage. Zakum-style fights reward consistency, not footwork.
If you care about bossing and future-proofing, take Spear Mastery.
First and Second Job Setup
Your Dragon Knight starts before third job. Bad early choices make the class feel worse later.
Precision Strikes vs Max HP Increase
Take Precision Strikes if you care about damage.
Warriors already have high HP. Classic World also gives accuracy from leveling, so flat HP is less exciting than crit scaling.
| Early Choice | Value | Why It Matters |
|---|---|---|
| Precision Strikes | Crit and accuracy | Better damage consistency |
| Max HP Increase | More HP | Safe, but weaker long-term value |
| Base crit | 5% | Stacks with Spear Mastery |
| Spear Mastery | +20% crit | Key Dragon Knight scaling |
If you feel your damage is unstable, check Mastery level first. Low mastery makes every Warrior feel worse than it actually is.
Key Second Job Changes
Final Attack Is Worth Using Now
Final Attack is now a toggle. It also works with third job skills like Piercing Crusher and Dragon Fury.
For Spearman, it also gives a small heal when it hits. That helps offset potion use and pairs well with Dragon Knight's HP-drain gameplay.
| Final Attack Feature | Current Value |
|---|---|
| Skill type | Toggle |
| Works with 3rd job skills | Yes |
| Spearman bonus | Small healing effect |
| Practical value | More damage, better sustain |
Keep it on unless it causes positioning issues.
Iron Will Is for Knockback Control
The weapon defense is forgettable. The useful part is the 35% chance to ignore knockback.
Use it when mobs keep interrupting attacks. It is no longer a party buff, so treat it as personal quality-of-life.
Rush Fixes Warrior Mobility
Rush has a 3-second cooldown and works even when no monster is nearby.
That matters a lot.
| Rush Detail | Value |
|---|---|
| Cooldown | 3 sec |
| Requires monster target | No |
| Best use | Repositioning, gap closing, map movement |
This is one of the biggest feel-good upgrades for Dragon Knight. It does not make you a Thief. It just stops Warrior movement from feeling like dragging a fridge uphill.
Dragon Knight Third Job Skills
Dragon Knight Skill Table
| Skill | Use | Key Number |
|---|---|---|
| Piercing Crusher | Main attack for 1–3 targets | 3 enemies, 3 hits, 120% |
| Dragon Fury | Main attack for 4 targets | 4 enemies, 240% |
| Dragon Roar | Weak mob farming | About 160%, flat HP cost |
| Partial Resistance | Elemental defense / unlocks | Lv.3 Power Crash, Lv.5 Hyper Body |
| Power Crash | Boss debuff | Up to -25% monster attack |
| Dragon Blood | Damage toggle | Up to +60 attack |
| Hyper Body | Party survival | Up to +30% max HP |
The kit is clean. Your job is to manage it without overthinking.
Piercing Crusher: Use on 1–3 Targets
Piercing Crusher hits up to 3 enemies, 3 times each, at 120% damage per hit.
It is weaker on paper than old versions, but it is still your main tool against small groups and boss parts.
| Piercing Crusher | Value |
|---|---|
| Targets | 3 |
| Hits | 3 |
| Damage per hit | 120% |
| Best use | 1–3 enemies |
| Final Attack works | Yes |
If Crusher feels bad, the problem is usually not only the skill.
Check:
- Clean weapon
- Low Mastery
- Dragon Blood not active
- Wrong target count
- Comparing it to modern MapleStory screen-clears
Crusher is practical, not flashy.
Dragon Fury: Use on 4 Targets
Dragon Fury hits up to 4 monsters for 240% damage.
This is your larger-pack button.
| Dragon Fury | Value |
|---|---|
| Targets | 4 |
| Damage | 240% |
| Best use | 4 enemies |
| Final Attack works | Yes |
Use this rule:
- 1–3 targets: Piercing Crusher
- 4 targets: Dragon Fury
- Spread mobs: Rush first, then attack
That is the whole rotation for most grinding maps.
Dragon Roar: Good Farming Tool, Not a Screen Clear
Dragon Roar now costs flat HP instead of a huge HP percentage. At max level, the cost is around 900 HP.
The damage is around 160%, and it still stuns you after use. At max level, the stun is about 2 seconds.
| Dragon Roar | Value |
|---|---|
| HP cost | Flat HP |
| Max-level cost | Around 900 HP |
| Damage | Around 160% |
| Stun | Around 2 sec at max |
| Best use | Weak mob drops, ores, low-level farming |
Use Dragon Roar when it saves time. Do not spam it into dangerous mobs unless you enjoy watching your Warrior take a nap mid-fight.
Partial Resistance: Take It for Unlocks
Partial Resistance gives elemental resistance, but its main early value is unlocking key skills.
| Partial Resistance Level | Unlock |
|---|---|
| Lv.3 | Power Crash |
| Lv.5 | Hyper Body |
Get it to Lv.5 early if you party. Hyper Body is too important to delay for long.
Power Crash: Boss Tool Only
Power Crash reduces enemy attack power. It is not a grinding skill.
At max level, it hits 4 monsters, reduces attack by 25%, lasts 15 seconds, and has a 30-second cooldown.
| Power Crash | Level 1 | Max Level |
|---|---|---|
| Targets | 2 | 4 |
| Attack reduction | 8% | 25% |
| Duration | 8 sec | 15 sec |
| Cooldown | 50 sec | 30 sec |
Use it on bosses or tanky monsters. Skip it during normal grinding unless the mob actually hurts.
Dragon Blood: Your Biggest Damage Gain
Dragon Blood is now a toggle and hits hard.
At level 1, it gives about +30 attack for a small HP drain. At max level, it gives about +60 attack, but drains around 10% HP every 3 seconds.
| Dragon Blood | Attack Gain | HP Cost |
|---|---|---|
| Level 1 | +30 attack | 40 HP every 3 sec |
| Max level | +60 attack | About 10% HP every 3 sec |
| Old classic reference | +12 attack | Timed buff |
This skill is the reason Dragon Knight damage can feel much better than the raw Crusher numbers suggest.
Use it when:
- You have enough potions
- Monsters are not chunking your HP
- You need faster kills
- You are in a controlled boss window
Turn it off when:
- HP drops too fast
- You are learning a boss
- You are moving through dangerous maps
- Potion cost becomes painful
Dragon Blood is not free damage. It is rented damage, and the rent is paid in HP.
Hyper Body: Still the Party Ticket
Hyper Body moved to third job, but it is still Dragon Knight's identity.
At max level, it gives the party +30% max HP for 300 seconds.
| Hyper Body | Level 1 | Max Level |
|---|---|---|
| HP increase | 10% | 30% |
| Duration | 100 sec | 300 sec |
This is massive for low-HP classes and bossing. If you party often, prioritize it early after unlocking it through Partial Resistance Lv.5.
Best Dragon Knight Skill Priority
There is room to adjust, but this is the practical route.
| Priority | Skill | Why |
|---|---|---|
| 1 | Main attack: Crusher or Fury | Training speed |
| 2 | Partial Resistance Lv.5 | Unlock Hyper Body |
| 3 | Hyper Body | Party value |
| 4 | Dragon Blood | Major damage boost |
| 5 | Max main attack | Stable grinding |
| 6 | Power Crash | Boss prep |
| 7 | Dragon Roar | Farming utility |
| 8 | Remaining Partial Resistance | Defense |
Solo Build Focus
| Goal | Focus |
|---|---|
| Faster leveling | Crusher/Fury first |
| More damage | Dragon Blood early |
| Better movement | Use Rush constantly |
| Lower potion waste | Manage Final Attack + Dragon Blood |
Party Build Focus
| Goal | Focus |
|---|---|
| Survival support | Hyper Body early |
| Boss readiness | Power Crash |
| Reliable damage | Spear Mastery + Dragon Blood |
| Safer play | Partial Resistance |
If you mostly solo grind, push damage earlier. If you run with friends, unlock Hyper Body fast.
Best Combat Rules for Dragon Knight
Keep this simple.
| Situation | Use |
|---|---|
| 1–3 monsters | Piercing Crusher |
| 4 monsters | Dragon Fury |
| Weak clustered mobs | Dragon Roar |
| Need to move | Rush |
| Boss/tanky monster | Power Crash |
| Party play | Hyper Body |
| Damage window | Dragon Blood |
Buff Checklist
| Skill | Action |
|---|---|
| Final Attack | Keep toggled on |
| Dragon Blood | Toggle when safe |
| Booster | Keep active |
| Iron Will | Use when knockback is annoying |
| Hyper Body | Refresh before expiry |
| Power Crash | Use on meaningful targets |
This is the whole class loop. Dragon Knight rewards clean habits more than fancy inputs.
Damage Expectations and Gear Check
Do not judge Dragon Knight with clean gear.
A clean level 70 weapon makes Crusher look worse than it is. Low Mastery also causes ugly damage ranges. Classic World has also adjusted monster HP and formulas, so old percentage comparisons are not always reliable.
| Problem | Likely Cause | Fix |
|---|---|---|
| Low damage | Clean weapon | Upgrade weapon first |
| Unstable damage | Low Mastery | Invest in Mastery |
| Slow kills | Dragon Blood off | Toggle it when safe |
| Bad mobbing | Wrong skill choice | Crusher 1–3, Fury 4 |
| Class feels clunky | Not using Rush | Rush on cooldown |
The class feels solid when the basics are handled. It feels mediocre when you ignore weapon upgrades and buff uptime.
Dragon Knight Strengths and Weaknesses
| Strengths | Weaknesses |
|---|---|
| Hyper Body is elite party utility | Hyper Body arrives later now |
| Dragon Blood gives huge attack | HP drain can punish lazy play |
| Rush improves movement | Still slower than ranged/mobile classes |
| Simple combat rules | Not a flashy class |
| Good Spear crit scaling | Weapon choice matters early |
| Power Crash helps bosses | Weak value in normal grinding |
Dragon Knight is for players who like stable melee, party value, and old-school Warrior gameplay with better movement.
FAQ
Is Spear or Polearm better for Dragon Knight?
Spear is better for most players. Spear Mastery gives 20% crit, and with Precision Strikes plus base crit, Dragon Knight can reach around 30% crit rate. Polearm is smoother for casual grinding, but Spear scales better.
Should Dragon Knight use Precision Strikes?
Yes, if you care about damage. Precision Strikes gives better long-term value than a small flat HP increase. Warriors already have high HP, and crit is harder to replace.
Is Dragon Blood worth maxing?
Yes, but manage the HP drain. Max Dragon Blood gives about +60 attack, which is huge. The cost is around 10% HP every 3 seconds, so use it with enough potions and turn it off when unsafe.
When should I use Piercing Crusher vs Dragon Fury?
Use Piercing Crusher against 1–3 targets. Use Dragon Fury against 4 targets. If mobs are spread out, use Rush first to fix positioning.
Is Hyper Body still important in MapleStory Classic World?
Yes. Hyper Body gives up to +30% party max HP for 300 seconds. It remains one of Dragon Knight's best party tools, especially for bossing and low-HP classes.
Summary
Dragon Knight in MapleStory Classic World is simple, sturdy, and useful. The best route for most players is Spear, because crit scaling beats Polearm speed in long-term content.
Your core rules are clear:
- Spear Mastery for crit
- Precision Strikes for better scaling
- Crusher for 1–3 targets
- Dragon Fury for 4 targets
- Dragon Blood for damage
- Hyper Body for party survival
- Rush whenever movement feels bad
- Power Crash for bosses, not trash mobs
Played cleanly, Dragon Knight is not flashy, but it is reliable. It brings damage, survival, mobility fixes, and one of the most valuable party buffs in Classic World.

Most Popular Posts
- MapleStory Classic World CBT2: The No-BS Guide to 3rd Job, Orbis, and Class Reworks
- MapleStory Classic World Early Best Maps, PQ, and Party Spot): The No-BS 1-30 Leveling Guide
- Maplestory Classic Closed Beta #2: 3rd Job Skills, Class Reworks & What to Test First
- MapleStory Classic Early Leveling Guide: Best Maps, Fastest Route, Real Player Tips
- MapleStory Classic World Release Date Guide: Launch Date, Founder Access
- MapleStory Classic World Priest Guide: Skills, Nerfs and Holy Arrow build
Popular Category Lists
- ARC Raiders / (351)
- Grow a Garden / (294)
- CoD: Black Ops 7 / (167)
- Star Citizen / (162)
- MLB 26 / (159)
- Monopoly Go / (152)
- ARK Survival Ascended / (128)
- Steal a Brainrot / (99)
- Blox Fruits / (74)
- Adopt Me / (74)
- Forza Horizon 6 / (72)
- Sailor Piece / (68)
- Grow a Garden 2 / (68)
- Diablo IV / (62)
- CoD: BLACK OPS 6 / (55)
- Aion 2 / (50)
- Path of Exile 2 / (48)
- Monster Hunter Wilds / (46)
- Windrose / (44)
- Donut SMP / (41)