0
0PoE 2 Best Map Modifiers Guide: Increased Quantity / Rare-Monsters / Rarity
- Davis
- Share
- Path of Exile 2
- 02/23/25
- 17653
PoE 2 Map modifiers play a critical role in determining the quality and quantity of loot drops. However, not all modifiers are created equal, and their effectiveness varies depending on your strategy and goals. This guide explores three of the best map modifiers—Increased Quantity, Increased Rare Monsters, and Increased Rarity—offering a breakdown of their impact on rare currency drops, when to prioritize each, and how to diversify for optimal results.
- Introduction
- Increased Quantity
- Increased Rare Monsters
- Increased Rarity
- Comparison Summary
- Scenarios Analysis
↖ Introduction
When it comes to juicing maps in Path of Exile 2, many players wonder which modifiers offer the best returns in terms of loot quantity, rarity, and rare monster spawns. Are there diminishing returns to consider? Which modifiers provide the most value without unnecessary risk?
To answer these questions, a detailed data-driven approach was undertaken. Over the past few weeks, hundreds of maps and breaches were tested, tracking over 1.2 million items. The findings aim to provide clarity on how different modifiers stack up and which ones are worth prioritizing.
↖ Increased Quantity
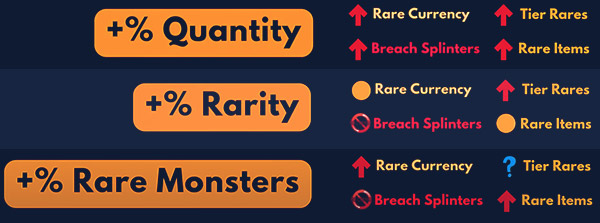
Increased Quantity is, alongside item rarity, one of the easiest and most impactful map modifiers. It boosts the items dropped from monsters directly. For instance, with 100% Increased Quantity, you are likely to receive twice the loot as compared to having no modifier.

Important Notes:
- Baseline Test Results: At a baseline of 105% (with 5% Atlas passive bonus), testing with an average of 118% Increased Quantity gave me the following results:
- 112% increase in currency drops
- 129% increase in total item drops
- Diminishing Returns Do Not Apply: The value obtained from the stat scales in a linear fashion which is very good and useful.
- Breach Splinters Exception: For breach splinters, the drop rate was only improved by 60%. This is probably because of them having some sort of additive interaction with a +75% Breach Splinter bonus on the Atlas Tree.
| Metric | Increase (%) | Notes |
|---|---|---|
| Total Currency | +112% | Linear scaling observed |
| Total Items | +129% | Best overall stat for general loot |
| Breach Splinters | +60% | Impacted by additive Atlas tree bonuses |
With Increased Quantity, there is no argument that this is one of the best stats when it comes to maximizing loot, specifically when there are no Atlas bonuses which are aimed at certain item types.
↖ Increased Rare Monsters
The Increased Rare Monsters perk increases the spawn rate of monsters which usually drop valueable items like rare and unique gear or high tier currency.

Important Notes
Testing Data: We took a sample size of ~52K monsters with a mean value of 143% Increased Rare Monsters:
- Breach Splinters: Examination revealed with increased spawn percentages, there was only a 5% rise suggesting rare monsters are of little value in these drops.
- Low Tier Currency: Noted a moderate increase of 31% per 100%.
- High Tier Currency: Noted a 62% increase per 100%.
- Rare and Unique Items: Noted was an increase of 52% and 55% respectively.
| Metric | Increase (%) per 100% Modifier | Notes |
|---|---|---|
| Breach Splinters | +5% | Minimal impact |
| Low-Tier Currency | +31% | Modest improvement |
| High-Tier Currency | +62% | Strong improvement |
| Rare Items | +52% | Consistent with unique items |
| Unique Items | +55% | Significant boost |
For players aiming at targeting high tier currency and rare/unique items, Increased Rare Monsters is a fantastic option, though with Breach Splinters, the impact is non existent.
↖ Increased Rarity
Having Rarity Increased will always be useful for finding rare or unique items, since it improves the quality of items dropped. The increase in effectiveness will be negated if other sources of Rarity bonuses are already high.
Important Notes:
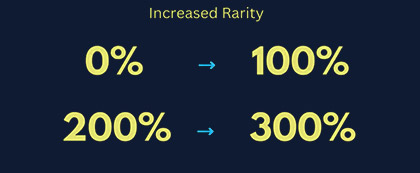
Observations of Player Rarity in comparison with Area Rarity: Even with having 206% Player Rarity, there was an effect called diminishing returns while putting more Rarity into the system. For instance:
- Having 0% to 100: Player Rarity increased 66% of rare currency drops.
Area Rarity Observations: Based off a sample population of approximately 51,000 monsters and normalized to 100% Area Rarity:
- Since the amount of players with Player Rarity were so high, currency was collected less and increased by only 15%.
- There was a 67% and 47% increase in unidentified Tier 2-5 items and unique items, respectively.
| Metric | Increase (%) with Area Rarity | Notes |
|---|---|---|
| Rare Currency | +15% | Diminishing returns observed |
| Tier 2–5 Items | +67% | Significant improvement |
| Unique Items | +47% | Consistent with rare monsters stat |
It is most useful to use Increased Rarity from lower or zero Rarity bonuses. As those bonuses get higher, its used becomes limited in comparison to Increased Quantity or Increased Rare Monsters.
↖ Comparison Summary
| Modifier | Best For | Key Strengths | Key Weaknesses |
|---|---|---|---|
| Increased Quantity | General loot optimization | Linear scaling, no diminishing returns | Limited by additive Atlas bonuses in specific cases (e.g., Breach Splinters) |
| Increased Rare Monsters | High-tier currency/rare items | Strong boost to rare/unique drops | Minimal impact on Breach Splinters |
| Increased Rarity | Rare/unique item farming | Significant boost at low baseline | Diminishing returns at high levels |
↖ Scenarios Analysis
To better understand the impact of these modifiers, use the Loot Calculator to simulate different scenarios.
| Modifier | Efficiency at 100% | Efficiency at 300% | Notes |
|---|---|---|---|
| Increased Quantity | +100% loot | +300% loot | Diminishing returns as you stack higher values |
| Increased Rare Monsters | +62% efficiency | +4.9x loot (with transfer) | Best for diversification after high Quantity |
| Increased Rarity | +15% efficiency | Limited impact | Situational; best when Rarity is otherwise low |
Diversification of stats and the usage of a loot calculator allows you to optimize rare currency drops and overall efficiency. Try out new combinations to find the one that caters to your playstyle and goals.
Most Popular Posts
- Path of Exile 2 Witch Class Overview: Blood Mage vs Infernalist
- PoE 2 Passive Tree Guide: Classes and Builds Application
- Path of Exile 2 Mercenary Overview: Witchhunter vs Gemling Legionnaire
- PoE 2 Leech Mechanics: Types, Statistics, Example and Keypoints
- PoE 2 Sanctum Farm Guide: Trial of the Sekhemas
- Path of Exile 2 Warrior Class Overview: Titan vs Warbringer
Popular Category Lists
- Grow a Garden / (286)
- ARC Raiders / (262)
- CoD: Black Ops 7 / (166)
- Monopoly Go / (146)
- MLB 26 / (145)
- Star Citizen / (112)
- Steal a Brainrot / (89)
- Sailor Piece / (68)
- ARK Survival Ascended / (67)
- Diablo IV / (61)
- Forza Horizon 6 / (60)
- Blox Fruits / (60)
- CoD: BLACK OPS 6 / (55)
- Adopt Me / (53)
- Path of Exile 2 / (48)
- Monster Hunter Wilds / (46)
- Windrose / (44)
- Path of Exile / (40)
- Grow a Garden 2 / (40)
- Bee Swarm Simulator / (36)