0
0Pokemon Legends Z-A Fast Grind Guide: Setup for Shiny Charm, Infinite XP, Money, Shards
- Lime
- Share
- Legends Z-A
- 10/22/25
- 2919
If you've hit that point in Pokemon Legends Z-A where the story's done (or nearly there) and the grind begins—tickets, money, shards, research, Shiny Charm—you don't need five specialized mons and endless swapping. You need one Lucario, tuned for speed, teleporting hitboxes, and low cooldowns. Why Lucario? Because Bullet Punch and Extreme Speed share the fastest attack animation in the game, both teleport you to the target, and both sit on the 3-second global cooldown floor. This means you'll chain kills, chain trainers, and chain income. And when you start one-shotting, your time-to-reward curve spikes.
- Why Lucario is the single best grinder
- Getting Lucario fast (Alpha and non-Alpha routes)
- Moveset: the universal grinder
- Nature, EVs, IVs: pushing the speed breakpoint
- Items: damage consistency vs situational spikes
- Leveling and the self-fueling loop
- Execution tips that save real time
- FAQ
- Summary
What does that mean for you? If you routinely finish 25 trainers per Infinite Royale night, this setup pushes you to the 30-trainer threshold—unlocking a 3x medal-to-money multiplier. Better still, the same build cracks mega crystals efficiently and fuels your XP candy pipeline. Below, I'll walk you through the exact moveset, why Alpha Lucario matters, how to source mints/vitamins/bottle caps, which items to equip, and what to swap based on your goal. If you're earlier in progression, I've got you covered with a Riolu route and a minor version that still feels great.
↖ Why Lucario is the single best grinder
- - The speed-teleport combo: Bullet Punch (Steel) and Extreme Speed (Normal) share the game's fastest animation and instantly teleport to the target. Even when a trainer turns to spot you, if you've pressed the button, the sneak hit goes through. That's a practical immunity to “lost tempo.”
- - 3-second cooldown floor: Both moves sit at the shortest CD in the game; you can alternate them with minimal recovery. If you find that you already one-shot common mobs, faster attacks beat stronger attacks in terms of throughput.
- - Base stats and options: Lucario is fast and hits hard. Access to Swords Dance amplifies everything; its buff persists out of combat if you don't return Lucario to the ball. That matters for ambush chains and Royale routes.
You can use one Legends Z-A Pokemon for trainer clears, Infinite Royale ticket farming, shard cracking, money generation, and XP funneling to the rest of your team—without constant box juggling.
↖ Getting Lucario fast (Alpha and non-Alpha routes)
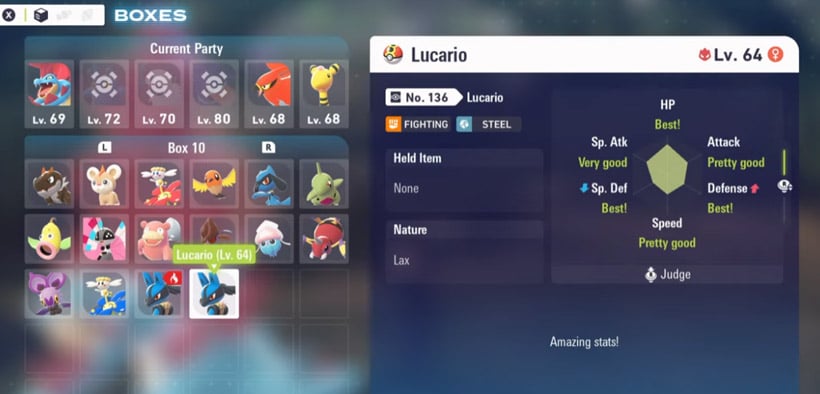
- Endgame Alpha Lucario (best-in-slot):
- Location: Wild Zone 20 (unlocked at story end). There are always two alpha spawns in the middle; Lucario is in a pool of 65 possible alpha species.
- Fast reset: Run out of render range and back. If the model fades, it despawned; WZ20 is big enough to respawn without fast travel (skip loading screens). Sometimes stepping out of the zone and a few feet further is faster depending on spawn position—use whichever cuts your runback.
- Why Alpha? Three guaranteed perfect IVs (saves bottle caps), max HP EVs by default (we'll reset), and larger model = longer melee reach for hit confirms and easier contact on elevated crystals.
- Pre-endgame Riolu route:
- Spot: Consistent rooftop spawn at the shopping area (exact tile matters; revisit if missed).
- Evolution: Sit and play with Riolu on a bench three times for max friendship, then evolve into Lucario.
If you don't find an Alpha: Standard Lucario still works. You'll invest a few more bottle caps later, but the gameplay loop remains intact.
↖ Moveset: the universal grinder
- Core two:
- Extreme Speed (Normal): fastest animation + teleport, 3s CD, primary nuke.
- Bullet Punch (Steel): mirrors Extreme Speed's tech; alternate on cooldown.
- Slot 3: Swords Dance
- Why: Persistent out-of-combat buff as long as Lucario stays out. If you open with a buffed sneak, you'll one-shot tiers earlier than you “should.”
- How to use: Refresh between chains; don't pocket Lucario unless you must.
- Slot 4: choose based on goal
- Protect: I-frame timing to negate most damage. Great into hard hitters or when you're under-geared in new zones.
- Power-Up Punch (TM-only): Fighting STAB plus chance to raise Attack; complements SD for rolling momentum. TM location: rooftop east of the battle court in Wild Zone 9.
- Bulldoze: For mega crystal farming. The plus-variant widens radius, covering most rooftops. Not as huge as Surf, but Lucario can't learn Surf; Bulldoze is the best do-everything compromise when you insist on a single mon on the field.
If you find yourself whiffing crystals: try jumping-cancel then Bulldoze near ledges; Alpha's size helps tag slightly elevated shards.
↖ Nature, EVs, IVs: pushing the speed breakpoint
- Nature: Jolly (Speed up, Sp. Atk down). You're purely physical. Speed isn't just move faster—it lowers effective cooldown cycle and improves initiative windows. If you already one-shot, shaving seconds beats marginal damage.
- Where to buy: Speed mints at the southeastern market stall, 20,000 Poke Dollars each.
- EVs:
- 252 Speed, 252 Attack, 8 HP.
- How: After Story Mission 20, reset EVs at Rust Syndicate (costs a few mega shards), then buy vitamins at Poke Centers. You'll need:
- 25 Speed vitamins + 2 Speed feathers
- 25 Attack vitamins + 2 Attack feathers
- 1 HP vitamin or 8 HP worth of feathers
- Why this spread: It aligns with the kill faster, chain sooner philosophy. The 8 HP gives minimal survivability without compromising cycles.
- IVs (Hyper Training at Justice Dojo; Requires Rank D):
- Prioritize: Attack > Speed > HP > the rest. Ignore Sp. Atk.
- Bottle caps:
- 1 in Wild Zone 20 pickup
- 2 from Side Mission 96 (north of WZ20 battle court, postgame)
- The rest from high-level Mabel research or Infinite ZA Royale
If you're bottle-cap starved: Cap Attack first. The gains are immediate and make Swords Dance breakpoints trivial.
↖ Items: damage consistency vs situational spikes
Muscle Band (+10% to all physical moves). Always on, covers both Extreme Speed and Bullet Punch, and any Fighting/Ground utility you slot.
- Alternatives:
- Metal Coat (+20% Steel only): Spikes Bullet Punch but does nothing for Extreme Speed.
- Silk Scarf (+20% Normal only): Spikes Extreme Speed but not Bullet Punch.
- Use-case: If a route heavily favors one move (e.g., Normal-weak lanes), the 20% can outperform Muscle Band on paper. In mixed play, the Band's average output wins.
- Leftovers: Heals 1/16 HP every 10 seconds, even out of combat if Lucario stays out. The tick rate is underwhelming, but on a one-shot route it can save you a handful of potions across a full night. Side Mission 68 reward (behind Restaurant Lena, east side).
Keep the Lucarionite on hand for ZA Royale battle cards that require a Mega. Swap when necessary.
↖ Leveling and the self-fueling loop
- Alpha Lucario from WZ20 starts mid-60s, so your baseline is already decent. The goal is to hit the one-shot threshold widely across trainer rosters.
- The loop:
- Use Lucario to farm mega shards → Convert to XP candies → Pump Lucario → Raise one-shot coverage → Farm Infinite Royale faster → Print medals → Cash out for money/gear → Repeat.
- Practical benchmark from field experience:
- Hitting 30 trainers in one Infinite Royale night triggers a 3x medal-to-money multiplier. With this setup, moving from 25 to 31 trainers in the same window is realistic, assuming decent lane layout and minimal backtracking. That is the inflection where your “time to cash” really takes off.
↖ Execution tips that save real time
- Alpha respawn sprints beat fast travel: You're avoiding load screens; the despawn fade is your confirmation.
- Keep Swords Dance up: Buff outside combat, chain ambushes, don't return Lucario to the ball unless you must.
- Input buffering: Press Extreme Speed as trainers turn; the sneak still registers once the input is in.
- Bulldoze crystal routes: Use plus-variant for rooftop coverage; sweep edges to catch off-ground shards. If you own a Surf mon, you can duo-slot—Surf's AoE is unmatched—but the point of this guide is one mon does it all, so Bulldoze stays.
- Item micro: If you're short of one-shotting specific Steel-weak clusters, temporarily swap to Metal Coat; otherwise default to Muscle Band.
↖ FAQ
Q1: I can't find Alpha Lucario in Wild Zone 20. Am I doing something wrong?
- Likely not. The two alpha slots pull from a 65-mon pool. Keep running out of render range to force respawns. Watch for the fade-out cue, and avoid fast travel unless a spawn sits right on a boundary—movement-only resets are faster on average.
Q2: I'm early game. Is the Riolu version worth it?
- Yes. Grab the rooftop Riolu, bench-play three times to evolve. Run Extreme Speed + Bullet Punch + Swords Dance + Protect. You'll lose some raw stats and reach, but the speed-teleport combo still crushes low-mid content and preps you for the Alpha later.
Q3: Power-Up Punch vs Swords Dance—do I need both?
- Not necessarily. SD is your big, persistent buff for ambush chains. PuP is for rolling fights where SD downtime feels awkward. If you're confident in timing a quick SD outside combat, you can skip PuP. If you prefer momentum stacking mid-combat, slot PuP.
Q4: Should I prioritize Speed or Attack when I can't max both?
- Cap Attack IV first, then Speed. For EVs, still go 252/252 Speed/Attack. If your damage is barely off breakpoints, Attack IV makes a larger immediate difference. Once one-shots are consistent, Speed feels better because it compresses cycles all night long.
Q5: Is Muscle Band really better than Silk Scarf for Extreme Speed spam?
- In mixed play, yes. Silk Scarf wins if your entire route is Extreme Speed-dominant and Bullet Punch is rare. In practice you'll alternate both moves for CD cycling and coverage; Band's universal 10% wins on uptime.
Q6: Leftovers feels weak—worth using?
- Only if you already one-shot and want to reduce potion stops. It's not a power item; it's a convenience item for marathon sessions.
Q7: Do I need Mega Lucario?
- Only for specific Royale battle cards that require Mega-evolved Pokemon. Otherwise, the base kit's speed/teleport is the star; Mega isn't mandatory for the grind loop.
↖ Summary
If you want one Pokemon to handle almost every grind in Legends Z-A, build a Jolly Lucario around Extreme Speed and Bullet Punch, stack Speed/Attack EVs, hyper-train Attack first, and keep Swords Dance rolling outside combat. Grab an Alpha in Wild Zone 20 if possible—its IVs and size matter more than you'd think. Rotate your fourth slot (Protect/PuP/Bulldoze) based on tonight's plan, keep Muscle Band as the default item, and micro-swap when a lane heavily favors Steel or Normal. Do this, and you'll cross the 30-trainer line in Infinite Royale, hit the 3x payout breakpoint, and spin up a self-feeding loop of shards, XP candies, tickets, and cash that powers your entire roster.
Most Popular Posts
- Pokemon Legends Z-A Money and EXP Farming Guide: Early, Mid, and Post-Game ZA Royale Routes
- Pokemon Legends Z-A Fast Method to Hunt 6 Shiny Alphas Wild Zone 20 Full Guide
- Pokemon Legends Z-A BEST Team: Gyarados + Excadrill + Gardevoir Full Guides
- How to Shiny Hunt Eevee in Pokemon Legends Z-A: Fast Respawn Route and AFK Bench Method
- Pokemon Legends Z-A Easy & Fast EXP Farm: Level Up Fast and Max Mega Shards
- Fast Farm Mega Shards in Pokemon Legends Z-A: Per-Loop Route, Best Mons, and Respawn Timers
Popular Category Lists
- Grow a Garden / (286)
- ARC Raiders / (264)
- CoD: Black Ops 7 / (166)
- Monopoly Go / (146)
- MLB 26 / (145)
- Star Citizen / (114)
- Steal a Brainrot / (89)
- ARK Survival Ascended / (72)
- Sailor Piece / (68)
- Forza Horizon 6 / (62)
- Diablo IV / (61)
- Blox Fruits / (60)
- CoD: BLACK OPS 6 / (55)
- Adopt Me / (53)
- Path of Exile 2 / (48)
- Monster Hunter Wilds / (46)
- Windrose / (44)
- Grow a Garden 2 / (41)
- Path of Exile / (40)
- Bee Swarm Simulator / (36)