0
0Star Citizen Mining Guide 2026: Find, Fracture, Refine, and Sell Ore Fast
- RCHM
- Share
- Star Citizen
- 06/09/26
- 1835
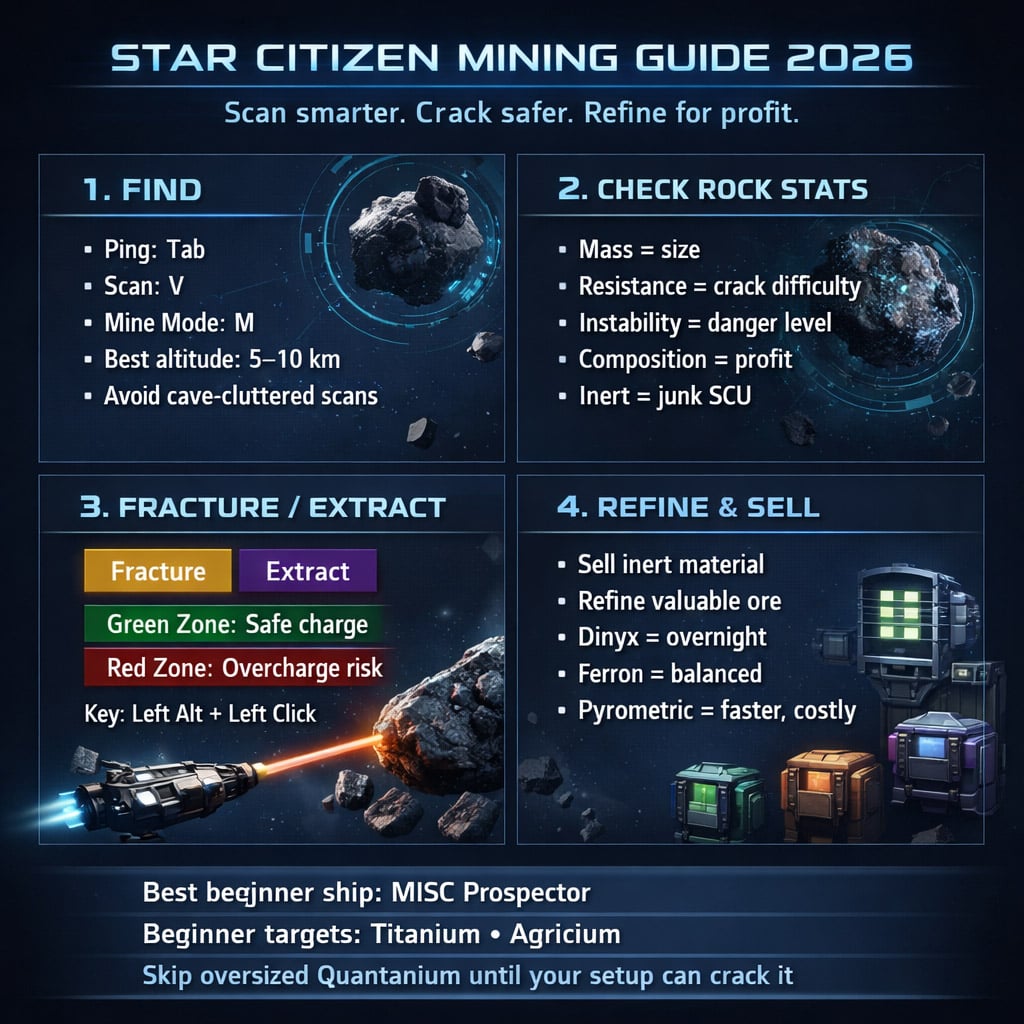
Mining in Star Citizen is simple once you stop treating every rock as profit. Most bad mining runs fail for three reasons: poor scanning, bad rock selection, and wrong refining choices.

The working loop is:
Scan ➔ identify ➔ evaluate ➔ fracture ➔ extract ➔ refine ➔ sell
- Star Citizen Mining Basics: The Core Loop
- Best Places to Mine in Star Citizen
- How to Scan Rocks Fast
- Mining Scan Controls
- Best Scanning Altitude
- Star Citizen Scan Signatures: Identify Ore Before Flying In
- How to Read Rock Stats
- Resistance
- Instability
- Is the Rock Worth Mining?
- Inert Material Math
- Fracture vs Extraction: Yellow and Purple Rocks
- How to Fracture Rocks Safely
- Safe Fracture Method
- Mining Heads and Modules
- Surge Module Example
- Quantanium Mining: Profitable, But Not Beginner-Friendly
- Refining Ore in Star Citizen
- Best Refinery Bonuses
- Best Refining Methods
- What to Pick
- Sell Inert Material Before Your Next Run
- Fast Beginner Mining Checklist
- FAQ
- What is the best beginner mining ship in Star Citizen?
- How do I know if a rock needs fracturing?
- Why is my mining laser not charging the rock?
- Which refining method should I use?
- Should beginners mine Quantanium?
- Summary
If you follow that loop, you waste less time, carry less junk, and turn more ore into usable value.
↖ Star Citizen Mining Basics: The Core Loop
Ship mining is not about filling bags as fast as possible. It is about filling bags with the right material.
| Step | Action | Goal |
|---|---|---|
| 1 | Pick a moon, planet, or Lagrange point | Find valid ore spawns |
| 2 | Ping with Tab | Reveal unknown markers |
| 3 | Scan with V | Check signatures |
| 4 | Mine with M | Read rock stats |
| 5 | Fracture yellow rocks | Break large rocks |
| 6 | Extract purple rocks | Collect ore |
| 7 | Refine at a station | Improve final value |
| 8 | Sell inert waste | Free bag space |
The big rule: do not mine blind. Scan first. Decide second. Fire the laser last.
↖ Best Places to Mine in Star Citizen
Good mining starts before you leave the hangar. Check the location's potential resources on the Starmap.
| Location Type | Best Use | Notes |
|---|---|---|
| Moons | Beginner ship mining | Clean terrain, easier scanning |
| Lagrange points | Asteroid mining near refineries | Great for short loops |
| Planet surfaces | Mixed surface mining | Radar can get cluttered |
| Caves | Hand mining | Can interfere with scan markers |
| Asteroid fields | Longer ship mining runs | More searching, better volume |
For early ship mining, moons and Lagrange points are the safest picks.
Example: around Hurston, a moon like Magda can list ship mineables such as Aluminum, Titanium, Agricium, and Quantanium. If the moon does not list the material you want, move on.
↖ How to Scan Rocks Fast
Most of your mining time is scanning. That is normal. The trick is to scan from a height where your radar is not fighting terrain, caves, flora, and random clutter.
↖ Mining Scan Controls
| Key | Function |
|---|---|
| Tab | Ping area |
| V | Scan mode |
| M | Mining mode |
| Left Alt + Left Click | Toggle fracture / extraction |
↖ Best Scanning Altitude
| Environment | Recommended Height | Why |
|---|---|---|
| Low-atmosphere moons | 5 km+ | Cleaner signatures |
| Dense planets | 10 km | Less radar clutter |
| Near caves | Move away first | Cave markers can bug scans |
| Asteroid clusters | Adjust by density | Too many returns overlap |
If signatures flicker or fail to show, climb higher. If that does not fix it, leave the cave area. This saves more time than forcing bad scans.
↖ Star Citizen Scan Signatures: Identify Ore Before Flying In
After pinging, hover over an unknown marker in scan mode. You may see a signature number.
Use that number with a mining database such as SCMMD to identify the ore type before you fly several kilometers.
| Tool | Use |
|---|---|
| SCMMD | Scan signature identification |
| UEX Corp Space | Refinery bonuses, prices, mining data |
| El Guapo's War Chest | Mining loadout and rock calculator |
| Peace Frog's Rock Breaker | Web-based crack calculator |
This is where experienced miners save time. We do not chase every marker. We filter targets first.
↖ How to Read Rock Stats
Once you reach a rock, press M and scan it.
Focus on five things:
| Stat | Meaning | What It Tells You |
|---|---|---|
| Mass | Rock size | Bigger rock needs more power |
| Resistance | Energy blocked | Higher = harder to crack |
| Instability | Volatility | Higher = more dangerous |
| Composition | Materials inside | Shows if it is worth mining |
| Inert Material | Junk filler | Wastes SCU |
↖ Resistance
High resistance means your laser struggles to push energy into the rock.
- 20% resistance: usually manageable.
- 70%+ resistance: needs better setup, modules, or a bigger ship.
↖ Instability
High instability means the charge bar jumps harder.
If the rock spikes toward overcharge, reduce power or back away. Do not try to save it with more laser. That is how mining ships become expensive fireworks.
↖ Is the Rock Worth Mining?
Composition decides profit. Not the rock's size. Not the shiny name. Composition.
Check:
- Valuable ore percentage
- Total SCU
- Inert material percentage
- Whether your ship can crack it
↖ Inert Material Math
A default MISC Prospector carries about 32 SCU with standard bags. Every SCU of inert material steals space from real ore.
| Rock Size | Inert % | Inert SCU | Call |
|---|---|---|---|
| 5 SCU | 20% | 1 SCU | Fine |
| 10 SCU | 30% | 3 SCU | Maybe |
| 30 SCU | 16% | 4.8 SCU | Usually bad |
| 40 SCU | 40% | 16 SCU | Skip |
If you see a large rock with mediocre ore and heavy inert content, leave it. Time is profit.
↖ Fracture vs Extraction: Yellow and Purple Rocks
Rock outline color tells you what to do.
| Outline | Meaning | Action |
|---|---|---|
| Yellow | Needs fracturing | Use mining laser |
| Purple | Ready to extract | Switch to extraction |
| No charge window | Usually extractable | Check for purple outline |
| Charge window visible | Fracturable | Manage laser charge |
Use Left Alt + Left Click to switch modes.
If it is yellow, crack it.
If it is purple, extract it.
Simple. Do not overthink it.
↖ How to Fracture Rocks Safely
Fracturing is where beginners lose money.
Your goal is to push charge into the green optimal window without filling the red overcharge zone.
| UI Element | What It Means | What To Do |
|---|---|---|
| Distance bar | Range to rock | Stay within max range |
| Optimal line | Suggested laser distance | Start there |
| Green zone | Safe fracture window | Keep charge inside |
| Red zone | Overcharge danger | Avoid it |
| Laser power | Energy input | Raise slowly |
↖ Safe Fracture Method
1. Move inside laser range.
2. Start with low power.
3. Increase slowly.
4. Watch the charge bar.
5. Keep it in the green zone.
6. Cut power if it climbs too fast.
7. Move back if the rock gets unstable.
Distance matters. Closer usually means more effective power. Farther means weaker input.
If the charge will not rise, move closer or increase power.
If the charge spikes, back off or cut power.
↖ Mining Heads and Modules
Mining heads and modules change your ability to crack rocks.
Most beginners focus too hard on raw power. Control matters more.
| Stat | Meaning |
|---|---|
| 100 | Baseline |
| Resistance 70 | Resistance reduced by 30% |
| Laser Power 150 | Power increased by 50% |
| Instability 110 | Instability increased by 10% |
| Optimal Window 160 | Bigger green safe zone |
↖ Surge Module Example
A Surge module can help crack tougher rocks, but it adds risk.
| Effect | Result |
|---|---|
| +50% laser power | More cracking force |
| Reduced resistance | Easier energy transfer |
| Increased instability | More volatile rock |
Activate modules with Alt + 1 / Alt + 2 / Alt + 3, depending on slot.
Use Surge when the rock needs a push. Do not leave it on mindlessly.
↖ Quantanium Mining: Profitable, But Not Beginner-Friendly
Quantanium pays well, but it punishes bad judgment.
A large Quantanium rock may look like this:
| Stat | Example |
|---|---|
| Mass | 40,565 |
| Resistance | 77% |
| Instability | 387 |
| Quantanium | 58%+ |
That is not a casual Prospector rock. A solo Prospector may fail to crack it even if the composition looks excellent.
If a Quantanium rock is too massive or unstable, skip it. Bring a MOLE, support lasers, better modules, or a proper calculator-tested setup.
Chasing uncrackable Quantanium is one of the fastest ways to destroy your credits per hour.
↖ Refining Ore in Star Citizen
After mining, go to a refinery station. Common refinery locations include Lagrange points such as HUR-L1, HUR-L2, ARC-L1, and MIC-L5.
Basic refinery flow:
1. Land at station.
2. Store mining ship.
3. Go to refinery deck.
4. Open refinery terminal.
5. Set up work order.
6. Sell inert material at ore sales terminal.
7. Wait for processing.
8. Collect refined material.
You can refine from a stored ship. You can also remove ore bags and send them through a freight elevator, but for beginners, storing the ship is cleaner.
↖ Best Refinery Bonuses
Refineries have positive and negative yield modifiers. These matter more when you haul a lot.
Example for Titanium:
| Refinery | Titanium Yield |
|---|---|
| MIC-L5 | +13% |
| Levski | +8% |
| ARC-L1 | +5% |
| ARC-L2 | +3% |
| ARC-L4 | -2% |
| CRU-L1 | -1% |
| Pyro Gateway | -1% |
For a small 5 SCU load, do not cross the system for a bonus. For a full MOLE load, refinery choice matters.
↖ Best Refining Methods
Ignore the flavor text if it looks wrong. Check the actual quote: yield, cost, and time.
| Method | Speed | Cost | Yield | Best Use |
|---|---|---|---|---|
| Dinyx Solventation | Slow | Low | High | Overnight refining |
| Ferron Exchange | Medium | Moderate | High | Same-session refining |
| Pyrometric Chromalysis | Faster | High | High | Fast material turnaround |
↖ What to Pick
Use Dinyx Solventation if you are logging off.
Use Ferron Exchange if you are still playing and want a decent wait time.
Use Pyrometric Chromalysis if you need refined material soon and can eat the cost.
Do not spam fast refining on every order. It cuts into profit.
↖ Sell Inert Material Before Your Next Run
The ore sales terminal is not just for selling ore. Its real value is clearing garbage.
Sell:
- Inert material
- Low-value ore you do not plan to refine
- Bugged leftovers if the terminal accepts them
Refine:
- Valuable ore
- Crafting materials
- High-quality material
If a material will not sell, try refining it. Some terminal behavior changes by patch, and Star Citizen will occasionally do Star Citizen things.
↖ Fast Beginner Mining Checklist
Use this every run.
| Step | Check |
|---|---|
| 1 | Pick a moon or Lagrange point with useful ore |
| 2 | Ping with Tab from 5–10 km altitude |
| 3 | Scan with V and check signatures |
| 4 | Enter mining mode with M |
| 5 | Check mass, resistance, instability, composition |
| 6 | Skip high-inert junk rocks |
| 7 | Fracture yellow rocks carefully |
| 8 | Extract purple fragments |
| 9 | Refine valuable ore |
| 10 | Sell inert waste |
This checklist prevents most bad mining runs.
↖ FAQ
↖ What is the best beginner mining ship in Star Citizen?
The MISC Prospector. It is solo-friendly, simple to operate, and has enough capacity to learn the full mining loop. The MOLE is stronger but works best with crew or coordinated support.
↖ How do I know if a rock needs fracturing?
Look at the outline. Yellow means fracture. Purple means extract. If the rock shows a charge window, it usually needs cracking first.
↖ Why is my mining laser not charging the rock?
You are probably too far away, using too little power, or trying to crack a rock with too much resistance. Move closer, raise power slowly, or skip it if your setup cannot handle it.
↖ Which refining method should I use?
Use Dinyx Solventation for overnight orders, Ferron Exchange for balanced same-session refining, and Pyrometric Chromalysis when speed matters more than cost.
↖ Should beginners mine Quantanium?
Only if the rock is manageable. Large Quantanium rocks with high resistance and instability are often bad targets for a solo Prospector. Start with safer materials, then move into Quantanium once your loadout is tested.
↖ Summary
Good mining in Star Citizen is not about luck. It is about filtering.
Scan from the right altitude.
Identify signatures before flying in.
Mine rocks with strong composition and low waste.
Start laser power low.
Use distance to control charge.
Refine at the right station.
Clear inert material every run.
For new miners, the best path is simple: use a Prospector, target manageable ores like Titanium or Agricium, refine with Dinyx Solventation when logging off, and leave oversized Quantanium rocks until your setup can actually crack them.

Most Popular Posts
- Star Citizen Covalex Cargo Hauling 4.8: Fast Reputation Route, Best Ships, and Master Unlocks
- Star Citizen 4.8 Solo Ship Guide: Best Purchasable PvP & PvE Ships, Loadouts, Components
- Star Citizen 4.8 Salvage Guide: Best RMC Farming, Adagio Rep, and Ships to Use
- Star Citizen 4.8.3 XenoThreat Event Guide: Fast Points, Best Missions, Rewards, and Ship Strategy
- Star Citizen 4.8 Best Component Blueprints: Fast Farming Roadmap for Crafting
- Star Citizen 4.8 aUEC Farming Guide: Best Money Methods, First Ships, and Fast Progression
Popular Category Lists
- Grow a Garden / (286)
- ARC Raiders / (266)
- CoD: Black Ops 7 / (166)
- Monopoly Go / (146)
- MLB 26 / (145)
- Star Citizen / (119)
- Steal a Brainrot / (89)
- ARK Survival Ascended / (75)
- Sailor Piece / (68)
- Forza Horizon 6 / (64)
- Diablo IV / (61)
- Blox Fruits / (60)
- CoD: BLACK OPS 6 / (55)
- Adopt Me / (54)
- Path of Exile 2 / (48)
- Monster Hunter Wilds / (46)
- Grow a Garden 2 / (45)
- Windrose / (44)
- Path of Exile / (40)
- Bee Swarm Simulator / (36)