0
0Star Citizen Palatino Armor Farming Guide: Fast Full Set Loot Run
- KETE
- Share
- Star Citizen
- 06/14/26
- 1349
Palatino Armor is farmed from orange loot boxes inside hostile Distribution Centers. The goal is simple: land fast, avoid security, loot each fixed box, and leave with the full set.

- Star Citizen Palatino Armor Farm: Quick Requirements
- Best Locations to Farm Palatino Armor
- Palatino Armor Full Set Route
- Step 1: Land at the Hostile Distribution Center
- Step 2: Loot the Palatino Helmet
- Step 3: Farm Palatino Legs in Security
- Step 4: Grab the Palatino Chest Piece
- Step 5: Loot the Palatino Backpack in Storage
- Step 6: Get the Palatino Arms at the Crane Route
- Palatino Armor Variants
- Palatino Armor Stats and Use Case
- Fast Palatino Loot Run Checklist
- Common Mistakes That Ruin the Run
- FAQ
- Where do you farm Palatino Armor in Star Citizen?
- How long does a full Palatino Armor run take?
- Do you need to kill guards for Palatino Armor?
- Why are the Palatino orange boxes empty?
- What is the rarest Palatino Armor variant?
- Summary
A clean run takes about 9 minutes once you know the route. Don't fight guards unless you have to. This farm rewards map knowledge, not hero plays.
↖ Star Citizen Palatino Armor Farm: Quick Requirements
Bring cheap gear. You are entering a hostile facility, and security will shoot on sight.
| Item | Bring | Why It Matters |
|---|---|---|
| MedPens | 2+ | Fast healing while sprinting |
| MedGun | 1 | Safer recovery between rooms |
| Undersuit | 1 | Required to equip armor pieces |
| Spare Helmet | 1 | Swap into the Palatino helmet immediately |
| Small Ship | 1 | Easier landing, less turret exposure |
Best ship choice: Aurora, Pisces, Cutter, 100i, or any compact ship.
Avoid expensive weapons. You are not here to clear the site. You are here to loot.
↖ Best Locations to Farm Palatino Armor
Farm hostile Distribution Centers. You want the trespassing warning. That usually means the orange boxes can spawn.
Good targets include hostile facilities around:
| Planet | Example Farm Areas | Use Case |
|---|---|---|
| microTech | Cry-Astro-type sites, S4LD13-type sites | Strong choice, common farm route |
| Hurston | Dupri-type sites, Complex B-type sites | Good backup if microTech is busy |
If every box is empty, the site was probably looted. Don't waste time. Rotate server or location.
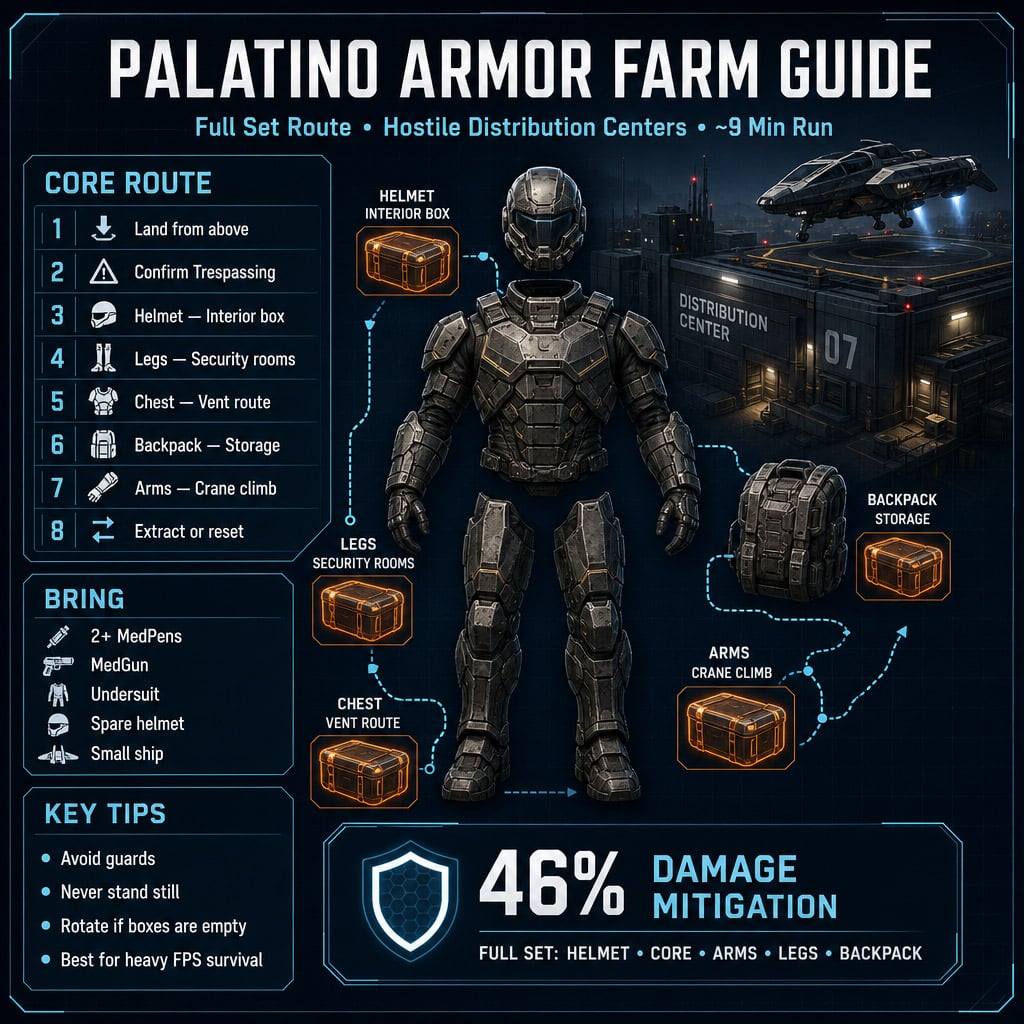
↖ Palatino Armor Full Set Route
The full set has 5 core pieces:
| Piece | Box Location |
|---|---|
| Helmet | Interior lounge / server-side orange box |
| Legs | Security maintenance rooms |
| Chest / Core | Central vent or fan route |
| Backpack | Warehouse / storage area |
| Arms | Crane or container climbing route |
Run the route in this order for the cleanest flow.
↖ Step 1: Land at the Hostile Distribution Center
Approach from above. Hostile facilities can punish low, slow flying.
Land on a roof pad or upper landing area. A small ship makes this much safer.
Once outside, check for Trespassing. If you see it, you are in the right type of zone.
Move immediately. Standing around gets you shot.
↖ Step 2: Loot the Palatino Helmet
Enter the main building and head toward the first interior orange box. This is usually near a lounge, server racks, or upper interior route.
Expected loot: Palatino Helmet.
Equip it fast. That is why you brought a spare helmet.
If the box is empty, keep moving. One empty box does not kill the run.
↖ Step 3: Farm Palatino Legs in Security
Take the elevator to Security 1.
This is one of the most dangerous parts of the run. Guards may shoot while you wait for the elevator.
Key rule: never stand still.
Inside Security 1, follow the maintenance route or small jumping path to the hidden orange box.
Expected loot: Palatino Legs.
Then check Security 2 if available. It is often a mirrored route and can give another leg piece or a different color variant.
| Security Area | Loot | Risk |
|---|---|---|
| Security 1 | Legs | High |
| Security 2 | Legs / variant chance | High |
Heal only after breaking line of sight. Don't med in the open.
↖ Step 4: Grab the Palatino Chest Piece
After security, move toward the center of the facility.
Look for a drop, gap, vent, or fan-side path. Follow it to the small loot room.
Expected loot: Palatino Chest / Core.
This piece matters most visually. Once you have it, the set starts looking complete.
If guards are waiting outside the route, sprint past them. Heavy armor farming is not the time for a fair fight.
↖ Step 5: Loot the Palatino Backpack in Storage
Exit toward the warehouse or storage section.
Look for large industrial doors, wide storage lanes, and side tunnels. The backpack box is usually tucked deeper inside the storage area.
Expected loot: Palatino Backpack.
This area can have multiple guards and long sightlines. Use walls and machinery to cut angles.
| Area | Loot | Main Threat |
|---|---|---|
| Warehouse / Storage | Backpack | Open sightlines, several guards |
If you get tagged hard, duck behind cover and heal. Don't try to tank the room.
↖ Step 6: Get the Palatino Arms at the Crane Route
The arms are usually the longest pickup.
Move toward the container or crane area. Look for stacked boxes you can climb.
Climb upward, jump across the containers, and reach the orange box near the crane/scissor-lift section.
Expected loot: Palatino Arms.
Common mistake: rushing the climb and falling. Slow down for the jumps. You lose more time resetting than you save by panic-jumping.
Once you loot this box, you should have the full Palatino set.
↖ Palatino Armor Variants
Palatino pieces can spawn in multiple color variants. If you want a matching set, expect repeat runs.
| Variant | Look | Notes |
|---|---|---|
| Default | Green / black / orange | Standard Palatino style |
| Mark I | White / blue / red | Clean tech look |
| Daystar | Yellow / black | Bright, easy to spot |
| Moonfall | White / black | Popular contrast skin |
| Sunstone | Orange / black / blue | Strong collector look |
| Metropolis | Mint / black / orange | Distinct and stylish |
| Necropolis | All black | Rare and highly wanted |
If you only care about stats, take the first full set. If you care about fashion, welcome to the grind.
↖ Palatino Armor Stats and Use Case
Palatino is heavy armor with roughly 46% damage mitigation.
That makes it strong for:
- Bunker runs
- FPS missions
- Boarding fights
- Hostile facility looting
- High-risk ground combat
The downside is standard heavy armor movement penalty. You are tougher, but slower.
Use it when survival matters more than sprint speed.
↖ Fast Palatino Loot Run Checklist
| Step | Action | Target |
|---|---|---|
| 1 | Land from above at hostile Distribution Center | Safe entry |
| 2 | Confirm Trespassing warning | Correct site state |
| 3 | Loot first interior orange box | Helmet |
| 4 | Run Security 1 | Legs |
| 5 | Check Security 2 | Legs / variant |
| 6 | Take central vent/fan path | Chest |
| 7 | Enter warehouse/storage | Backpack |
| 8 | Climb crane/container route | Arms |
| 9 | Extract or reset | Full set / variants |
Target time after practice: about 9 minutes.
↖ Common Mistakes That Ruin the Run
Avoid these and the farm gets much smoother.
- Bringing expensive gear you don't need.
- Flying in low and getting punished by defenses.
- Standing still near elevators.
- Fighting every guard.
- Healing in open hallways.
- Staying in a looted facility too long.
- Skipping Security 2 when chasing variants.
Best rule: if two or more boxes are empty, rotate.
↖ FAQ
↖ Where do you farm Palatino Armor in Star Citizen?
Farm hostile Distribution Centers. Look for trespassing warnings, security NPCs, and orange loot boxes. microTech and Hurston sites are the most common farm targets.
↖ How long does a full Palatino Armor run take?
A clean run takes around 9 minutes once you know the route. First attempts usually take longer because the facility layout is confusing.
↖ Do you need to kill guards for Palatino Armor?
No. Avoid them. Killing guards slows the run and can create extra risk. Sprint, loot, heal behind cover, and keep moving.
↖ Why are the Palatino orange boxes empty?
Another player likely looted them already. Server state can also affect spawns. If multiple boxes are empty, change server or farm another hostile Distribution Center.
↖ What is the rarest Palatino Armor variant?
Necropolis is the most desired variant because of its all-black look. Expect repeated runs if you are chasing a matching Necropolis set.
↖ Summary
The fastest way to farm Palatino Armor in Star Citizen is to run hostile Distribution Centers and loot the fixed orange boxes in order: Helmet, Legs, Chest, Backpack, Arms.
Bring cheap gear, use a small ship, avoid security, and rotate if boxes are empty. Once the route is learned, the full set is realistic in about 9 minutes, with extra runs needed for rare variants like Necropolis.

Most Popular Posts
- Star Citizen Covalex Cargo Hauling 4.8: Fast Reputation Route, Best Ships, and Master Unlocks
- Star Citizen 4.8 Solo Ship Guide: Best Purchasable PvP & PvE Ships, Loadouts, Components
- Star Citizen 4.8 Salvage Guide: Best RMC Farming, Adagio Rep, and Ships to Use
- Star Citizen 4.8.3 XenoThreat Event Guide: Fast Points, Best Missions, Rewards, and Ship Strategy
- Star Citizen 4.8 Best Component Blueprints: Fast Farming Roadmap for Crafting
- Star Citizen 4.8 aUEC Farming Guide: Best Money Methods, First Ships, and Fast Progression
Popular Category Lists
- Grow a Garden / (286)
- ARC Raiders / (272)
- CoD: Black Ops 7 / (166)
- Monopoly Go / (148)
- MLB 26 / (148)
- Star Citizen / (126)
- Steal a Brainrot / (90)
- ARK Survival Ascended / (81)
- Sailor Piece / (68)
- Forza Horizon 6 / (66)
- Diablo IV / (62)
- Blox Fruits / (61)
- Adopt Me / (56)
- CoD: BLACK OPS 6 / (55)
- Grow a Garden 2 / (51)
- Path of Exile 2 / (48)
- Monster Hunter Wilds / (46)
- Windrose / (44)
- Path of Exile / (40)
- Bee Swarm Simulator / (37)