


 0
0ARC Raiders: Advanced Secret Tips,Tricks and Broken Mechanics
- KITE
- Share
- ARC Raiders
- 02/05/26
- 822
Even after hundreds of hours, ARC Raiders still rewards the players who treat it like a systems game—not just a shooter. The hidden edge usually isn't aim; it's knowing which mechanics double your efficiency (like healing two teammates with one spray) and which ones quietly waste your resources (like stacking fire that doesn't stack).
Below is a practical, raid-ready guide we use ourselves: each tip includes when to use it, how to execute it, why it works, and what it changes in real fights.
- Quick Reference
- Efficiency & Mechanics Cheat Sheet
- Gameplay Tech
- Vita Spray
- Silent Railing Slide
- Fire Mechanics
- Fire Hits Harder Than the Tooltip Suggests
- All Fire Behaves Like One Damage Type
- Fire Does NOT Stack
- Map Tips & Tech
- Exact Combo
- Stella Montis Lobby
- Archives Room
- Resource & Economy
- Metal Shortage Fix
- Efficient Shredder Killing
- Mid-Raid Crafting
- Guaranteed Loot Habit
- Newer Gotchas
- Safe Room Isn't Safe: Window Entry With Zipline/Snap Hook
- Fuel Cells + Wasp Drivers
- Explosion Setup Table
- Vital Skill Tips
- Left Side Pays Rent
- Skills We Treat as High Value
- Skills We Commonly Skip
- Combat Hygiene
- Zipline Exit Dodge (A Habit, Not a Guess)
- Loot Discipline
- 1) Why Does Railing Sliding Matter If It's Hard To Execute?
- 2) If Fire Doesn't Stack, When Should We Throw Multiple Fire Items?
- 3) What's The Fastest Way To Fix A Metal Shortage?
- 4) Why Craft Grenades Mid-raid Instead Of Saving Components?
- 5) How Do We Stop Getting Punished When Holding A Safe Boss Room?
↖ Quick Reference
Here are the shortcuts we actually memorize so we don't overthink under pressure.
↖ Efficiency & Mechanics Cheat Sheet
| Topic | What We Do | Why It Works | What It Changes |
|---|---|---|---|
| Team healing | Spray to cover two allies at once | One spray instance can affect multiple players without extra durability cost | Faster resets after fights; fewer consumables burned |
| Fire damage | Treat fire as stronger than tooltips imply | Real damage over time feels higher than stated 5 DPS/10s | Don't tank it; reposition immediately |
| Fire stacking | Use one fire source per choke, spread others | Fire damage does not stack in the same spot | Stops grenade waste; better area denial |
| Zipline exits | Dodge sideways before stepping off | Avoid mines/traps placed at predictable exit points | Saves lives in the 1 out of 10 lethal setups |
| Mid-raid crafting | Craft light grenades/smokes on the fly | Cheap components convert into tempo and safe rotations | You're rarely out of utility again |
↖ Gameplay Tech
These are the kinds of tricks that don't look flashy—until you realize they win time, noise control, and fights.
↖ Vita Spray
If you find both teammates cracked and you're about to rotate, then we spray to hit both bodies inside the mist.
How we do it (steps):
- Stack teammates shoulder-to-shoulder (tight, but not blocking movement).
- Aim the spray so the cone overlaps both hitboxes.
- Hold the spray just long enough to tick both up—don't over-spray out of habit.
The heal application can affect multiple allies in the spray zone, and durability consumption doesn't double. With a 3-person squad, one person carrying a single spray can stabilize the whole team faster. In our raids, this cuts post-fight downtime noticeably—especially when third parties are likely.
↖ Silent Railing Slide
If you keep getting jumped near the metro stairs, then use the railing slide instead of stair sliding.
Execution:
- Line up perfectly centered on the railing.
- Commit to the slide; micro-corrections usually kick you off.
- On controller, we recommend a short approach run to lock the angle.
Stair sliding produces loud audio; railing sliding can be near silent when centered. You can arrive at the bottom with information advantage. In practice, that's the difference between opening a fight and reacting to one.
↖ Fire Mechanics
Fire is one of those mechanics that looks simple, but plays like a ruleset.
↖ Fire Hits Harder Than the Tooltip Suggests
If you're thinking it's only 5 damage per second, then assume that's a trap.
What We've Observed:
- Standing in burner-grade fire for the full duration can bring a medium-shielded player close to downed range.
- The lived damage curve feels meaningfully higher than 50 total.
Tooltips are not always the whole truth; the practical rule is: treat fire as lethal area denial, not chip damage.
↖ All Fire Behaves Like One Damage Type
Burners, blaze grenades, blaze traps—functionally, fire is fire.
| Fire Source | Practical Role | Best Use Case |
|---|---|---|
| Fireball burner | Tight, controllable denial | Corner pushes, doorway checks |
| Blaze grenade | Fast zone creation | Cutting rotations, forcing dismounts |
| Blaze trap | Pre-fight control | Holding stairs, ladders, chokepoints |

There isn't strong fire vs weak fire behavior—so we choose based on delivery and area, not damage scaling.
↖ Fire Does NOT Stack
If you throw multiple fire grenades into the same spot, then you're usually donating resources to the void.
Rules:
- One fire to block a path.
- Second fire goes somewhere else to expand coverage.
Fire damage doesn't stack in the same area, so multiple overlaps don't multiply DPS. You get more value by chaining denial across exits than by double-cooking one doorway.
↖ Map Tips & Tech
Here are the map interactions that feel like glitches until you learn the constraints.
↖ Exact Combo
If the game refuses to let you run up an incline, then try this exact combo.
Steps:
- Start with full stamina.
- Look straight down or straight up (not level).
- Sprint up the section that has the divot/screw-like texture and keep the angle steady.
Movement/traction checks appear more permissive when the camera isn't level, but only on certain surface geometry. You gain unexpected flank routes—great for breaking predictable lines of sight.
↖ Stella Montis Lobby
If breaching is going to broadcast your entry, then we take the detour jump on the lobby side where the ledge grab is possible.
How we stabilize the jump:
- Take a running start for momentum.
- Commit to the grab; late hesitations cost distance.
You bypass the loud, telegraphed breach action. You enter ground-zero spaces with fewer audio tells, which reduces third-party timing on you.
↖ Archives Room
If you see gaps in the structure and assume you can shoot or toss through, then don't—some openings behave like invisible collision.
Wasted grenades and missed shots usually happen at the worst time: when you're trying to punish a peek. Pre-aim the real angles and reposition instead of gambling utility.
↖ Resource & Economy
Winning long-term means treating raids like a supply chain.
↖ Metal Shortage Fix
If you're low on metal, then we hunt shredders—they're walking scrap piles.
What to look for:
- Shredder drops that recycle into advanced mechanical components
- Arc alloy / performance steel equivalents that convert into large metal returns
Practical Route Example: Archives-type rooms often hold multiple shredders plus small ARC mobs. Clear, loot, recycle. The time-to-metal ratio is high compared to random container looting.
↖ Efficient Shredder Killing
If you're short on ammo or want speed, then convert nearby explosives into damage.
| Tool / Item | How We Use It | Why It's Good |
|---|---|---|
| Synthesized fuel cells | Throw/place near shredders, then detonate | Big damage without expensive ammo |
| Fireball burners (looted) | Zone shredders through their pathing | Sustained denial + safe distance |
| Light impact grenades | Cheap crafted burst | Consistent, fast finishing |
↖ Mid-Raid Crafting
If your team says no smokes, no nades, then we craft them on the spot (light grenades and smokes are usually cheap).
Small component costs buy you tempo: safer revives, cleaner disengages, better pushes. You're not limited by what you spawned with—you're limited by whether you remember crafting exists under stress.
↖ Guaranteed Loot Habit
If you spawn on the east side of Blue Gate, then we immediately hit the tunnel entrance that consistently contains at least one weapon case.
How we run it: Drop in, check the three case/bag spawn points, climb out, zipline away. It's a compact loop with quick exit—especially valuable on night raids when visibility punishes long detours.
↖ Newer Gotchas
These are the updates that punish old habits.
↖ Safe Room Isn't Safe: Window Entry With Zipline/Snap Hook
If your plan relies on a room being unpushable, then assume someone can enter through a window using a zipline or snap hook.
Your strongest hold becomes your coffin if you stop watching that angle. We assign window coverage the same way we cover doors—no exceptions.
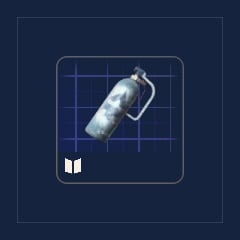
↖ Fuel Cells + Wasp Drivers
If you're building an explosive trap, then use fuel cells as the trigger.
Core rule:
- Drivers and fuel cells must be shot to explode.
- A shot fuel cell can ignite nearby stacks, causing a chain reaction.
Hitting a bright, large fuel cell at range is easier than threading shots onto small drivers.
↖ Explosion Setup Table
| Goal | Setup | Detonation Method | Practical Benefit |
|---|---|---|---|
| Max burst in a small area | 1–2 stacks of wasp drivers + 1 fuel cell | Shoot the fuel cell | Easier aim, reliable chain reaction |
| Deny a push route | Spread stacks along the path | Shoot when footsteps commit | Turns a chase into a wipe threat |
Damage intuition: Drivers/fuel cells can hit hard in a wide radius—functionally comparable to heavy grenade output when chained.
↖ Vital Skill Tips
Skill points feel abundant until you realize half the tree is bait.
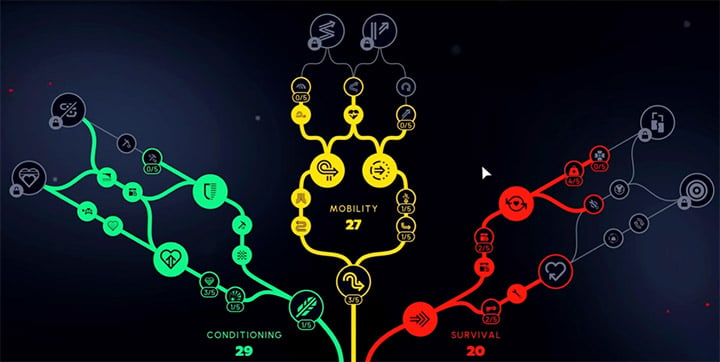
↖ Left Side Pays Rent
If you're building any loadout, then we prioritize the left-side stamina skills first. Stamina consistency affects every fight: rotations, resets, disengages, and chase pressure.
↖ Skills We Treat as High Value
| Skill Cluster | Our Take | When You Feel It |
|---|---|---|
| Left stamina path | Always first priority | More consistent climbs, sprints, evasions |
| Effortless roll + crawl-before-death style nodes | Strong survivability value | Turns near-death into recoverable situations |
| Broad shoulders + looter's luck | Worth it once you're deep enough | Higher carry efficiency + better loot tempo |
| Silent breach + quick breach (combo) | Massive difference vs no points | Faster, quieter entries; fewer punish windows |
↖ Skills We Commonly Skip
If you're tempted by flashy-sounding movement perks, then double-check the payoff. Some nodes provide minimal real advantage compared to stamina reliability.
↖ Combat Hygiene
These are boring rules that keep us alive long enough to use the fun tricks.
↖ Zipline Exit Dodge (A Habit, Not a Guess)
If you exit a vertical zipline, then dodge sideways every time. Trap placement is predictable, so defenders mine the obvious landing. Even if it only saves you once in ten exits, that one save often preserves a full kit.
↖ Loot Discipline
If you're spending time looting every small ARC, then tighten the filter.
Rule:
- Ignore most small mobs for loot.
- Always loot fireballs.
Fireball drops (cells and especially burners) are high-leverage tools. You maintain a steady supply of corner counters for forcing peeks and denying holds.
↖ 1) Why Does Railing Sliding Matter If It's Hard To Execute?
Because silence is a multiplier. If you can descend without announcing yourself, you decide whether the next interaction is an ambush, a scout, or a disengage.
↖ 2) If Fire Doesn't Stack, When Should We Throw Multiple Fire Items?
When you're expanding coverage: different doors, staggered chokepoints, or cutting off two exits. Multiple overlaps in the same spot are usually waste.
↖ 3) What's The Fastest Way To Fix A Metal Shortage?
Target shredders in consistent spawn areas and recycle their drops. It's more reliable than hoping for high-metal containers.
↖ 4) Why Craft Grenades Mid-raid Instead Of Saving Components?
Because utility creates safe time. A cheap smoke can secure a revive or extraction—often worth more than the components you'd carry out.
↖ 5) How Do We Stop Getting Punished When Holding A Safe Boss Room?
Assume every window/ledge is reachable with mobility tools. Assign coverage like it's a door, and don't anchor your whole plan to one unpushable assumption.
We get the biggest gains in ARC Raiders by playing the mechanics, not the mood: heal efficiently, move quietly, treat fire as lethal but non-stacking, farm metal with intention, craft utility on demand, and build habits that deny cheap deaths. When you apply these as a checklist—especially zipline hygiene, fire discipline, and stamina-first skill choices—you'll feel your raids become calmer, faster, and far more profitable.

Most Popular Posts
- ARC Raiders Riven Tides Key Room Guide: Best Hotel Keys, Loot Routes, Secure & Crane Storage
- ARC Raiders Damage Fireflies Trial Guide: Best Farm Method on Buried City Night Raid
- ARC Raiders Riven Tides Update: New Map & Items, ARC Turbine, Rewards, and Best Early Strategy
- ARC Raiders Bettina Guide: Best Build, Buffs, and How to Use It Against ARC
- Arc Raiders Season 4 Riven Tides Update, Rewards, Safe Skins, and Release Timeline
- ARC Raiders Solo Search Supply Drops Guide: Best Buried City Route, Beacon Locations
Popular Category Lists
- Grow a Garden / (286)
- ARC Raiders / (262)
- CoD: Black Ops 7 / (166)
- Monopoly Go / (146)
- MLB 26 / (144)
- Star Citizen / (112)
- Steal a Brainrot / (89)
- Sailor Piece / (68)
- ARK Survival Ascended / (67)
- Diablo IV / (61)
- Forza Horizon 6 / (60)
- Blox Fruits / (60)
- CoD: BLACK OPS 6 / (55)
- Adopt Me / (53)
- Path of Exile 2 / (48)
- Monster Hunter Wilds / (46)
- Windrose / (44)
- Path of Exile / (40)
- Grow a Garden 2 / (40)
- Bee Swarm Simulator / (36)


