


 0
0How to Finding Arc Raiders Snap Hook Blueprints?
- KIVRI
- Share
- ARC Raiders
- 02/05/26
- 983
Scouring the vast array of maps in Arc Raiders has its frustrations, with no reward greater than the lack of the Snap Hook blueprint. This Drop seemingly disappears only to be needed the most. After countless raids with in-depth examination of spawn patterns, the Snap Hook blueprint is discoverable through specific conditional requirements. You are correct in believing that the weather plays a major role in blueprints discovery.
- The Snap Hook Blueprint
- The Primary Place: Research and Administration
- The Way
- The Locker Rule: Spotting a Hit
- Location Comparison Table
- Execution and Extraction
- Frequently Asked Questions
- Final Thoughts on the Grind
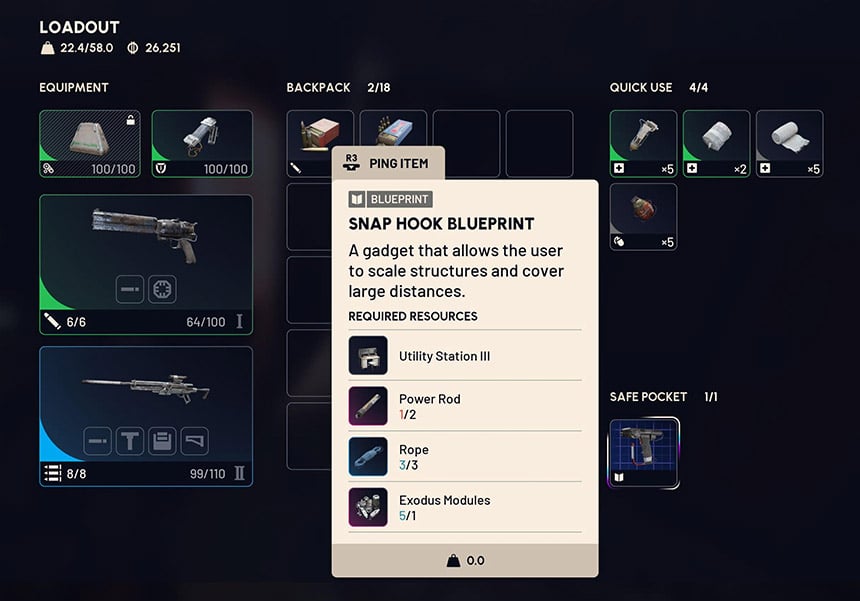
↖ The Snap Hook Blueprint
Before we get into maps and locations there is one rule you have to remember:
The Snap Hook blueprint can only drop during an Electromagnetic Storm.
This is the most common error that players make. You can be on any map. If the sky is not filled with an electromagnetic storm, that blueprint will not be part of the loot table.
It is possible to come across it on some maps under the conditions, but based on our experience Dam Battlegrounds has the highest success rate.
This implies that you shouldn't just queue without thinking. Check the conditions. If it's a clear day, try to complete other objectives. But, when that storm arrives, go hunting.
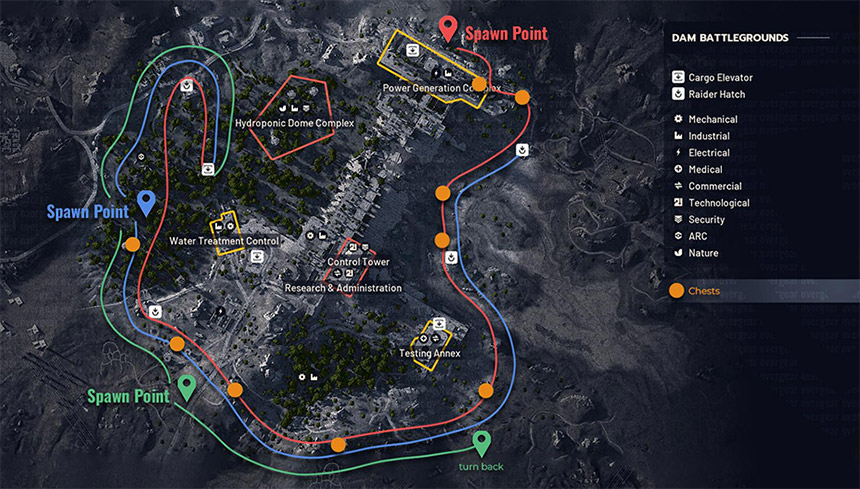
↖ The Primary Place: Research and Administration
We have noticed the blueprint drop from Hydroponic Dome Complex and sometimes Water Treatment, but there is one place that is better than the rest, and that is Research and Administration.
This spot on the Dam Battlegrounds map is a treasure trove for one reason: the building is full of the right type of containers, lockers and bathroom drawers that the Snap Hook favors.
↖ The Way
When entering Research and Administration, your target is the upper floor (2nd floor).
1. Ignore the low-tier loot: Ground floor loot is bad but don't get distracted unless you really need something.
2. Keep your head on a swivel: This floor is sometimes guarded by turrets, and a Rocketeer sometimes roams the halls. The Rocketeer is a menace, and if you spot him, focus on survival (or, running away) rather than looting.
3. Go to the restrooms: This may seem odd, but the upper floor restrooms have rows of lockers. This is your main objective.
↖ The Locker Rule: Spotting a Hit
Not all loot containers have the same value. During our looting journeys, we have identified some patterns with the lockers in the restrooms.
When you see a line of four or more lockers, the chances of you finding a blueprint are very high.
On the flip side, if you see groups of two or three lockers, the chances of finding a blueprint significantly decrease. This is not to say you cannot find a blueprint in a smaller group (we pulled one from a three-piece drawer set once) but the Rule of Four is a good way to predict a valuable room.
What other things should you pay attention to?
Showers: Don't skip the shower stalls as we often come across backpacks and weapon cases spawning here.
Medical Drawers: The blue medical cabinets in the area are great for finding augments, although they often do not contain the Snap Hook.
↖ Location Comparison Table
When considering the storm, here are the locations we have evaluated in detail for your movement prioritization:
| Location | Map | Blueprint Probability | Risk Level | Notable Loot |
|---|---|---|---|---|
| Research & Admin (Upper Floor) | Dam Battlegrounds | High | High (Turrets/Rocketeer) | Snap Hook, Augments, Weapon Cases |
| Hydroponic Dome | Dam Battlegrounds | Medium | Medium | General Blueprints, Materials |
| Water Treatment | Dam Battlegrounds | Low-Medium | Medium | Medical supplies, occasional backpacks |
↖ Execution and Extraction
Now that you know the location, speed is crucial. Because you're in an Electromagnet Storm, visibility will be limited and other players will be trying to get the same high-tier loot.
If you are fortunate enough to get the blueprint early—sometimes in the first 6 minutes of a raid—don't be greedy. Secure the perimeter, check the Staff Room (might be locked, check the key guide) for extra weapon cases, then plan your extraction.
The Research and Admin building is a hot zone. Players frequently camp the rooftops and set turret traps near the exit. If you have the Control Tower key, a quick look for extra weapon cases is worth it. But getting that blueprint out is the priority.
↖ Frequently Asked Questions
Q: Is the Snap Hook blueprint a guaranteed drop in Research and Admin?
A: No, it is not guaranteed. There still is a chance that it can be a no drop. But it's much more likely that you'll get a drop if you are in an Electromagnet Storm and looting cluster lockers in Research and Admin.
Q: Can I find this during a night raid?
A: Yes. Night raids usually increase the quality of loot as a general rule. If the visibility problems during a Night Raid and an Electromagnet Storm are manageable for you, this is the best time to farm.
Q: I found a hairpin instead of a blueprint. Is that good?
A: While some players got annoyed and found the hairpin to be a bait item while looking for blueprints and although it is not the item you are looking for, it is not a good item here. Keep looking.
Q: Do I need a key to access the bathroom lockers?
A: No. The main bathroom areas in Research and in Administration are accessible without keys. However, the Staff Room Key and Control Tower Key help you access adjacent rooms that have extra loot including a weapon case and a high tier backpack.
↖ Final Thoughts on the Grind
Obtaining the Snap Hook blueprint can be considered a rinse-and-repeat process. During your storm run, you might find it on your very first attempt, or it might take three or four. The main factor is consistency. By skipping clear weather maps and storm sprints directly to the Research and Administration bathrooms, you are saving yourself the time that 90% of players spend wandering aimlessly.
Crafting your Snap Hook is the most important thing, so good luck, and watch out for Rocketeers. Hopefully, you can do it soon.

Most Popular Posts
- ARC Raiders Riven Tides Key Room Guide: Best Hotel Keys, Loot Routes, Secure & Crane Storage
- ARC Raiders Damage Fireflies Trial Guide: Best Farm Method on Buried City Night Raid
- ARC Raiders Riven Tides Update: New Map & Items, ARC Turbine, Rewards, and Best Early Strategy
- ARC Raiders Bettina Guide: Best Build, Buffs, and How to Use It Against ARC
- Arc Raiders Season 4 Riven Tides Update, Rewards, Safe Skins, and Release Timeline
- ARC Raiders Solo Search Supply Drops Guide: Best Buried City Route, Beacon Locations
Popular Category Lists
- Grow a Garden / (286)
- ARC Raiders / (262)
- CoD: Black Ops 7 / (166)
- Monopoly Go / (146)
- MLB 26 / (144)
- Star Citizen / (111)
- Steal a Brainrot / (89)
- Sailor Piece / (68)
- ARK Survival Ascended / (66)
- Diablo IV / (61)
- Forza Horizon 6 / (60)
- Blox Fruits / (60)
- CoD: BLACK OPS 6 / (55)
- Adopt Me / (53)
- Path of Exile 2 / (48)
- Monster Hunter Wilds / (46)
- Windrose / (44)
- Path of Exile / (40)
- Grow a Garden 2 / (38)
- Bee Swarm Simulator / (36)


