


 0
0Arc Raiders Best PvP Controller Settings: Graphics, Crosshair & Sensitivity
- KITE
- Share
- ARC Raiders
- 12/15/25
- 4744
If you're on controller in Arc Raiders and you feel like enemies always see you first, hear you first, and turn on you faster, that's not just aim. A lot of it is your settings quietly sabotaging you.
- 1. Core Philosophy: How These Settings Are Built
- 2. Gameplay & HUD: Stop Losing to Your Own UI
- 2.1 Recommended Gameplay Settings
- 3. Graphics: Ugly But Deadly PvP Settings
- 3.1 Display & Performance Settings
- 3.2 Quality Settings: Lower for Clarity
- 4. Audio: Hearing Footsteps Before They Hear You
- 4.1 Recommended Audio Settings
- 5. Crosshair: The Simple Pink Dot That Just Works
- 5.1 Crosshair Behavior Settings
- 5.2 Pink Crosshair Settings (Highly Recommended)
- 6. Best Controller PvP Settings: Sensitivity, Curves, and Dead Zones
- 6.1 Core Aim Settings
- 6.2 Dead Zones & Boost Settings
- 7. Skill Tree: Matching Your Build to Your Playstyle
- FAQ
- Q1: These sensitivities feel way too fast. Should I lower them?
- Q2: Can I use a higher FOV than 80 on controller?
- Q3: My PC is weak. Which changes are absolutely non-negotiable?
- Q4: How long does it take to get used to Linear response curve?
- Q5: Should I copy your skill tree exactly?
- Conclusion: If You Only Change 5 Things, Change These
If you treat this as a baseline and tweak around it, you'll quickly feel your fights get easier—not because opponents got worse, but because your game finally works with you, not against you.
↖ 1. Core Philosophy: How These Settings Are Built
Before copying numbers, it helps to know the logic. Otherwise, every time you see a new YouTube guide you'll be tempted to throw out your entire setup and start over.
Here's what I prioritize for high-level controller PvP:
1. Information over aesthetics
Pretty graphics are nice in screenshots; clear silhouettes win fights. I always choose visibility over eye candy.
2. Low input delay
Controller already lags behind mouse in raw responsiveness. Extra latency from VSync, frame generation, or heavy post-processing just widens that gap.
3. Fast, controllable aim
You must be able to 180 quickly and track precisely. Pure speed with zero control is worthless, and ultra-low sens can't keep up with PC players.
4. Consistency across scenarios
The same sensitivity should feel usable from hipfire CQB to medium-range ADS. If hipfire is snappy but ADS feels like mud, you're fighting your own settings.
When you understand these principles, the specific settings below won't feel like random numbers; they start to make sense.
↖ 2. Gameplay & HUD: Stop Losing to Your Own UI
A lot of unlucky deaths are actually just bad HUD or interaction behavior. Fixing a few toggles removes a whole category of stupid deaths.
↖ 2.1 Recommended Gameplay Settings
| Setting | Recommendation | Why it helps in PvP |
|---|---|---|
| HUD Position | Centered (personal) | Keeps info closer to your focal point; less eye travel. |
| Show Reload Progress | ON | A visible ring tells you exactly when you can shoot again. |
| Show Damage Direction | ON | Crucial for spotting third parties and hidden angles. |
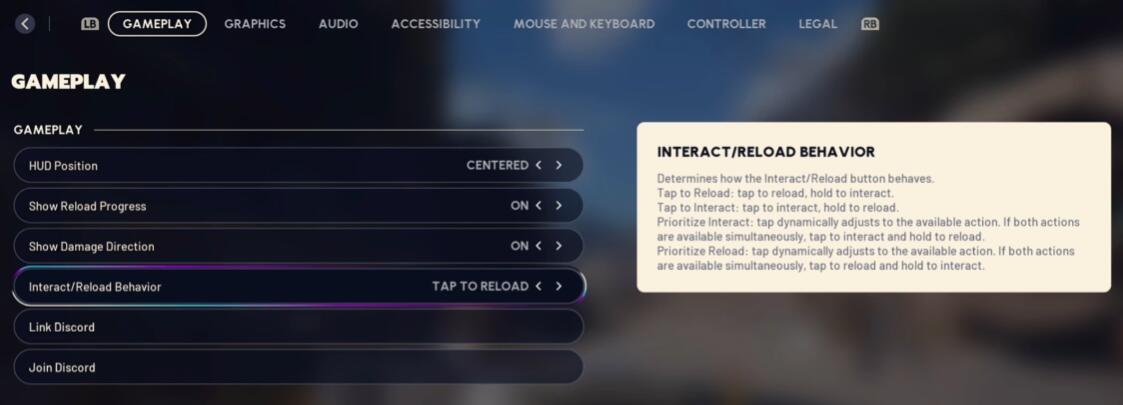
| Interact / Reload Behavior | Tap to Reload | Prevents opening crates/doors when you meant to reload mid-fight. |
If you ever tried to reload next to a search or breach prompt and ended up looting instead of reloading, you already know why Tap to Reload is a must on controller. It removes one of the easiest ways to throw a fight.
↖ 3. Graphics: Ugly But Deadly PvP Settings
High graphics look fantastic in trailers. In live lobbies, they hide enemies in shadows and tank your responsiveness. You're not making a wallpaper; you're trying to win gunfights.
↖ 3.1 Display & Performance Settings
Use these as a strong PvP baseline:
| Category | Setting | Recommended Value | Why |
|---|---|---|---|
| Window Mode | Borderless Fullscreen | 1920×1080 native | Stable, easy alt-tab, minimal compatibility issues. |
| NVIDIA DLSS Frame Gen | OFF | Adds input delay; skip it for PvP. | |
| VSync | OFF | Removes extra latency and weird frame pacing. | |
| NVIDIA Reflex Low Latency | ON | Lowers end-to-end system latency, feels more snappy. | |
| Frame Rate Limit | Match monitor | e.g., 240 FPS on 240 Hz | Cap at or just below refresh rate for smoother feel. |
| Upscale Resolution | 100% | Below 100% = blurry image and harder aiming. | |
| Resolution Scaling Method | No AA | Sharper edges and clearer enemy outlines. | |
| Field of View | 80 | Balanced zoom vs peripheral vision on controller. | |
| Motion Blur | Disabled | Blur never helps in PvP; it hides motion and targets. | |
| RTX Global Illumination | Static | Reduces distracting dynamic lighting and contrast swings. |
If you're on weaker hardware, you can lower base resolution if absolutely needed, but try to keep upscale at 100% so the game doesn't turn into a pixel soup.
↖ 3.2 Quality Settings: Lower for Clarity
Set Overall Quality Level to Low and then tune each subsetting down:
| Subsetting | Recommended | PvP Impact |
|---|---|---|
| View Distance | Low | Enough for most fights; saves performance. |
| Anti-Aliasing | Low | Keeps edges defined without mushy blur. |
| Shadows | Low | Makes dark corners less abusive for campers. |
| Post-Processing | Low | Reduces bloom, blur, and visual noise. |
| Textures | Low | Less pretty, more consistent performance. |
| Effects | Low | Fewer particles blocking vision in fights. |
| Reflections | Low | Less flickering noise on shiny surfaces. |
| Foliage | Low | Stops players from vanishing inside bushes/grass. |
| Global Illumination Res | Low | Less harsh contrast; silhouettes stand out more clearly. |
The trade is simple: worse screenshots, better enemy visibility. If you've ever died to someone sitting invisible in overly fancy lighting, this swap is worth it.
↖ 4. Audio: Hearing Footsteps Before They Hear You
Arc Raiders PvP is extremely sound-driven. If you repeatedly get pushed from angles you didn't hear, your audio mix is probably wrong, not your ears.
↖ 4.1 Recommended Audio Settings
| Setting | Value | Why it matters |
|---|---|---|
| Night Mode | ON | Compresses dynamic range, making quiet sounds more audible. |
| Music During Gameplay | OFF | Removes distraction; footsteps and gunfire take priority. |
| Master Volume | ~55% | Adjust for comfort, not too low. |
| Effects Volume | ~50% | Core audio: footsteps, shots, environment. |
| Music Volume | 0% | You don't need a soundtrack in PvP fights. |
| Dialogue Volume | ~45% | Keeps narrative cues audible but not overpowering. |
| Party Voice Chat | ~65% | Teammates clearly audible over game noise. |
| Proximity Voice Chat | ~80% | Useful information without drowning everything else. |
Night mode is doing a lot of heavy lifting here. It essentially boosts softer sounds (like distant footsteps) while stopping explosions and gunshots from drowning them out. Once you get used to this compressed soundstage, going back to default feels like playing half-deaf.
↖ 5. Crosshair: The Simple Pink Dot That Just Works
You stare at your crosshair every second you're in a fight. It should never blend into the environment or get lost in UI clutter.
The goals:
- Bright, high-contrast color
- Minimal shape that doesn't distract
- Clear feedback when line of fire is blocked
↖ 5.1 Crosshair Behavior Settings
| Setting | Value |
|---|---|
| Color Blind Mode | Default |
| Font Size | Small |
| Move Crosshair When Line of Fire Blocked | ON |
| Smooth Move When Line of Fire Blocked | ON |
| Override Crosshair Shape | ON |
| Crosshair Shape | Cross |
| Weapon Cross Center Dot | ON |
The move when blocked options give you instant visual feedback when you're aiming into cover instead of clear line of sight, which helps avoid that why didn't my bullet hit? feeling.
↖ 5.2 Pink Crosshair Settings (Highly Recommended)
Here's the exact simple pink dot + tiny cross setup that works consistently in PvP:
| Parameter | Value |
|---|---|
| Center Dot Radius | 3 |
| Crosshair Length | 1 |
| Crosshair Thickness | 1 |
| Outline Thickness | 0 |
| Crosshair Opacity | 100 |
| Crosshair Red | 253 |
| Crosshair Green | 0 |
| Crosshair Blue | 255 |
| Outline Red / Green / Blue | 0 / 0 / 0 |
You'll notice three tiny side dots when idle, but they disappear while shooting, so they don't interfere during actual fights.
If you dislike pink, pick any neon-level color:
- Neon green
- Bright cyan
- Hot purple
The rule is simple: if you ever lose sight of your crosshair against grass, sky, or metal, change the color.
↖ 6. Best Controller PvP Settings: Sensitivity, Curves, and Dead Zones
This is where most controller players fall behind. If your settings are too slow, you can't react; too fast, you can't track. You need that sweet spot where you can turn hard and still stay glued to a target.
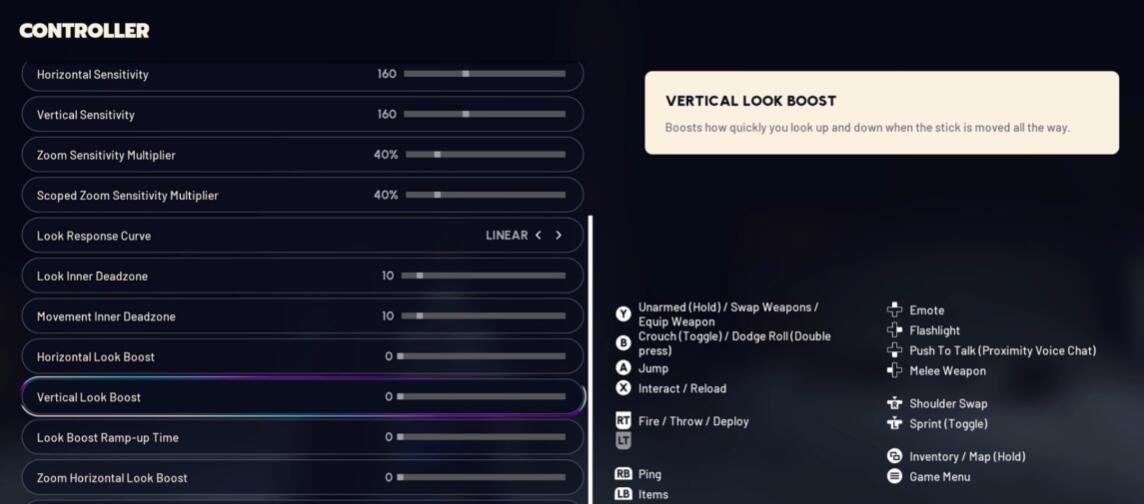
↖ 6.1 Core Aim Settings
| Setting | Value | Why |
|---|---|---|
| Aim Assist | ON | Non-negotiable for controller PvP. |
| Interact / Reload Behavior | Tap | Reduces reload vs interact misinputs. |
| Horizontal Sensitivity | 160 | Fast enough to keep up with PC lobbies. |
| Vertical Sensitivity | 160 | Matching vertical for consistent feel. |
| Zoom Sensitivity Multiplier | 40% | Slows ADS for controlled precision. |
| Scope Zoom Sensitivity Multiplier | 40% | Same idea for higher zoom scopes. |
| Look Response Curve | Linear | Raw, predictable response; no sluggish ramp. |
Why Linear instead of Exponential?
- Exponential feels smooth at low stick movement, but it delays the start of your turn.
- Linear means your stick movement = your turn speed, which is exactly what you need to react fast in close-range duels and third-party situations.
If you've been on exponential for months, linear will feel wild for a few days. But once your brain adapts, flicks, snaps, and 180s stop feeling like you're dragging through mud.
↖ 6.2 Dead Zones & Boost Settings
| Setting | Value |
|---|---|
| Look Inner Dead Zone | 10 |
| Movement Inner Dead Zone | 10 |
| Horizontal Look Boost | 0 |
| Vertical Look Boost | 0 |
| Look Boost Ramp Time | 0 |
| Zoom Horizontal Look Boost | 0 |
| Zoom Vertical Look Boost | 0 |
| Zoom Look Boost Ramp-Up Time | 0 |
The goal here is no hidden acceleration. Boosts and ramps might feel nice at first, but they make it harder to build consistent muscle memory, because your speed changes depending on how long you hold the stick.
If your controller has noticeable stick drift, you can bump inner dead zones up slightly (e.g., 12–15), but only after you confirm drift is actually causing input when you're hands-off.
↖ 7. Skill Tree: Matching Your Build to Your Playstyle
Skill tree is more flexible than settings, but it still needs to align with how you fight.
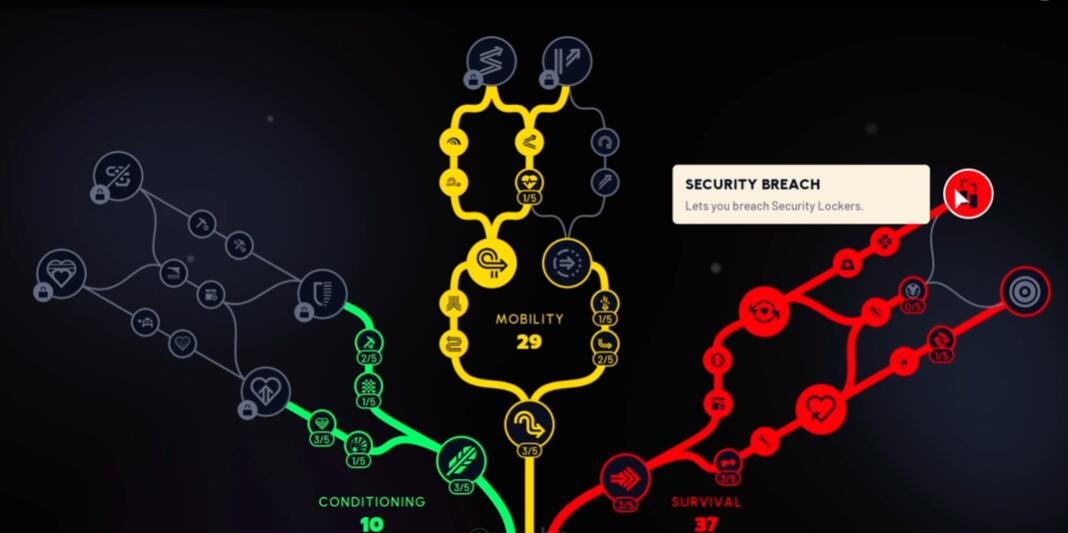
A working PvP-oriented layout that generated strong clips used approximately:
- 10 points in Conditioning
- 29 points in Mobility
- 37 points in Survival
Is this mathematically optimal? No. Too many points went into Survival just to reach Security Breach. But it does match an aggressive controller playstyle:
- Mobility supports fast repositioning, aggressive peeks, and making full use of high sensitivity.
- Survival gives you the durability to trade hits, revive under pressure, and survive near-miss grenades.
- Conditioning fills stamina and regen gaps so you're not winded mid-fight.
If you're planning for a future wipe and want a perfect PvP tree, you'll probably:
- Pull a few points out of deep Survival that only give marginal benefits.
- Reinforce talents that directly amplify burst damage, movement windows, and utility uptime.
The key idea: a good but imperfect tree plus strong settings beats a perfect tree with terrible settings.
↖ FAQ
↖ Q1: These sensitivities feel way too fast. Should I lower them?
If 160/160 is unplayable for you at first, that's normal. Try stepping down in controlled increments:
- First, test 140/140 with the same 40% ADS multipliers.
- If that's still too quick, try 120/120, but avoid going lower for PvP.
The most important rule: don't change sensitivity every session. Give each setup at least a few solid play sessions so your muscle memory can stabilize.
↖ Q2: Can I use a higher FOV than 80 on controller?
You can, but understand the trade-off:
- Higher FOV gives more peripheral info,
- But it also makes enemies visibly smaller, which is harder for thumbstick aim.
If you're an experienced FPS player and like higher FOV, you can experiment with 85–90, but for most controller players 80 is a very strong balance between awareness and target size.
↖ Q3: My PC is weak. Which changes are absolutely non-negotiable?
If you can't copy everything, at least do these:
1. Turn Night Mode ON in audio.
2. Disable Motion Blur.
3. Turn VSync OFF.
4. Turn DLSS Frame Generation OFF.
5. Set Shadows / Foliage / Effects to LOW.
These will give you a huge upgrade in clarity and responsiveness even on a low-end system.
↖ Q4: How long does it take to get used to Linear response curve?
Most players need about 2–5 days of consistent play:
- Days 1–2: You'll overshoot and undershoot targets a lot.
- Days 3–4: Your tracking starts to smooth out; 1v1s feel more fair.
- Day 5+: Flicks and snap corrections feel natural instead of forced.
As long as you commit to not touching the curve setting for a week, your brain will adapt.
↖ Q5: Should I copy your skill tree exactly?
You can, but treat it as a working template, not the only answer:
- If you prefer aggressive entry-fragging, heavy Mobility and decent Survival make sense.
- If you like anchoring and playing more supportive roles, you might move some points into talents that improve utility usage and sustained fights.
What matters is that your skill tree supports what you're already good at, instead of fighting your instincts.
↖ Conclusion: If You Only Change 5 Things, Change These
If you're about to queue into your next raid and don't want to overhaul everything at once, start with these five changes:
1. Set Overall Quality and all graphics subsettings to Low and disable Motion Blur; set RTX GI to Static so enemies stand out clearly.
2. Turn on Night Mode and turn off gameplay music so footsteps and reloads are easy to hear.
3. Switch your Look Response Curve to Linear and set a reasonably high sensitivity (around 140–160) with 40% ADS multipliers.
4. Copy the bright pink crosshair setup or create an equally neon, high-contrast variant.
5. Change Interact/Reload to Tap to Reload to stop losing fights to accidental interactions.
Once those foundations are in place, you can gradually fine-tune sensitivities, skill tree, and utility choices around your personal style. The important part is that your settings stop holding you back, so your actual skill and decision-making can start deciding the outcome of fights.

Most Popular Posts
- ARC Raiders Riven Tides Key Room Guide: Best Hotel Keys, Loot Routes, Secure & Crane Storage
- ARC Raiders Damage Fireflies Trial Guide: Best Farm Method on Buried City Night Raid
- ARC Raiders Riven Tides Update: New Map & Items, ARC Turbine, Rewards, and Best Early Strategy
- ARC Raiders Bettina Guide: Best Build, Buffs, and How to Use It Against ARC
- Arc Raiders Season 4 Riven Tides Update, Rewards, Safe Skins, and Release Timeline
- ARC Raiders Solo Search Supply Drops Guide: Best Buried City Route, Beacon Locations
Popular Category Lists
- Grow a Garden / (286)
- ARC Raiders / (262)
- CoD: Black Ops 7 / (166)
- Monopoly Go / (146)
- MLB 26 / (145)
- Star Citizen / (112)
- Steal a Brainrot / (89)
- Sailor Piece / (68)
- ARK Survival Ascended / (67)
- Diablo IV / (61)
- Forza Horizon 6 / (60)
- Blox Fruits / (60)
- CoD: BLACK OPS 6 / (55)
- Adopt Me / (53)
- Path of Exile 2 / (48)
- Monster Hunter Wilds / (46)
- Windrose / (44)
- Path of Exile / (40)
- Grow a Garden 2 / (40)
- Bee Swarm Simulator / (36)


