


 0
0Arc Raiders Items Complete Utility Tier List Ranking in Raid
- KITE
- Share
- ARC Raiders
- 12/15/25
- 1790
If you've played a few tense raids in Arc Raiders, you already know this: the squad with better utility often beats the squad with better aim. Smokes, defibs, mines, and movement tools decide whether you extract rich or die broke on the floor.
- 1. How This Tier List Works (And What Bring Every Raid Means)
- 2. Full Utility Tier List (Patch 1.6)
- 2.1 Tier Overview Table
- 3. The True S Tier: Stuff You Should Almost Always Bring
- 3.1 Smoke Grenades (Big & Small) – The Best Utility in the Game
- 3.2 Defibrillator – Your Second Life Printer
- 3.3 Trigger Grenade – Best Lethal Grenade in Patch 1.6
- 3.4 Heavy Fuse Grenade & Trailblazer – Area Damage & Hearing Abuse
- 3.5 Jolt Mine & Deadline Mine – PvP Control vs. PvE Nukes
- 3.6 Wolf Pack – PvE Delete Button
- 3.7 Zipline & Snap Hook – Positioning Wins Before Damage Does
- 3.8 Healing Utility: Adrenaline Shot & Vita Spray
- 4. Strong A Tier Picks: Great, But Not Always Mandatory
- 4.1 Light Impact Grenade & Shrapnel / Snap Blast
- 4.2 Blaze Grenade – Nerfed, Still Nasty in Hallways
- 4.3 Tag Grenade – Vision Wins Dex Fights
- 4.4 Showstopper & Pulse Mine – Control With Risk
- 4.5 Photo-Electronic Cloak & Seeker Grenade – Specialized Tools
- 4.6 Gas Grenade – Soft Control, Hard to Master
- 5. B, C, and D Tier: Use With Caution (or for Memes)
- 5.1 When B Tier Is Worth It
- 5.2 C Tier: Extremely Niche or Outclassed
- 5.3 D Tier: Screenshots, Roleplay, and Comedy
- 6. Practical Loadouts: What to Actually Bring
- 6.1 Aggressive PvP Squad Loadout
- 6.2 PvE / Money Farming Loadout
- 6.3 Solo Survival / Hybrid Loadout
- 6.4 I'm Broke Budget Loadout
- FAQ
- Q1: If I only have room for 3 utility items, what are the best universal picks?
- Q2: Should I always bring mines?
- Q3: Are Blaze Grenades still worth crafting after the nerf?
- Q4: When do Cloak and Raider Hatch Key become must-bring?
- Q5: I like trolling or style plays. Which low-tier items are still fun?
- Summary: Priority List You Can Apply Immediately
In this guide, I'll walk you through a full utility Arc Raiders items tier list for Patch 1.6, explain why each item sits where it does, and then give you ready-made loadouts you can literally copy into your next raid.
This isn't a flavor/opinion piece only; it's based on what consistently works in high-risk PvP and big Arc PvE when you don't have room to experiment in your backpack.
↖ 1. How This Tier List Works (And What Bring Every Raid Means)
Before slamming everything into S tier, we need a clear lens. I'm ranking each utility item using four main criteria:
1. Slot efficiency
- How much value do you get per single slot in your backpack or utility bar?
2. Raid consistency
- Does this item impact most raids, or only 1 out of 20 extremely specific situations?
3. Skill requirement vs. reward
- Is it worth learning, or is there a simpler, safer alternative that does 90% of the job?
4. Economy & accessibility
- Blueprint requirements, craft cost, and whether you can reasonably sustain it in a normal wipe.
For shorthand:
- S Tier – You should strongly consider bringing this nearly every raid.
- A Tier – Very strong; bring often, or if it fits your playstyle.
- B Tier – Solid, niche, or overshadowed by better options.
- C Tier – Very situational or outclassed.
- D Tier – Meme, screenshot, or I found it in raid so I used it once.
↖ 2. Full Utility Tier List (Patch 1.6)
Here's the high-level snapshot first, then we'll dive into categories and key items.
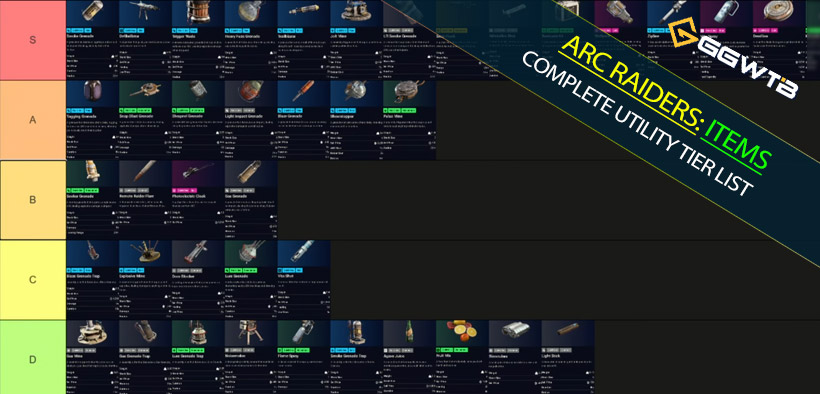
↖ 2.1 Tier Overview Table
Note: Items are roughly ordered from stronger → weaker within each tier.
| Tier | Utility |
|---|---|
| S | Smoke Grenade (big), Small Smoke Grenade, Defibrillator, Trigger Grenade, Heavy Fuse Grenade, Trailblazer, Wolf Pack, Zipline, Jolt Mine, Adrenaline Shot, Vita Spray, Deadline Mine (PvE-focused), Snap Hook |
| A | Light Impact Grenade, Snap Blast Grenade, Tag Grenade, Showstopper, Blaze Grenade, Photo-Electronic Cloak, Pulse Mine, Seeker Grenade, Gas Grenade |
| B | Gas Mine, Gas Grenade Trap, Remote Raider Flare, Shrapnel Grenade, Explosive Mine, Raider Hatch Key (map-dependent), Lure Grenade |
| C | Blaze Grenade Trap, Door Blocker, Vita Shot, Noise Maker, Flame Spray |
| D | Light Stick, Binoculars, Fruit Medley, Agave Juice, Lure Grenade Trap, Smoke Grenade Trap, Recorder (practically; emotionally S tier) |
Now let's unpack the important ones, starting with the tools you really should build your kit around.
↖ 3. The True S Tier: Stuff You Should Almost Always Bring
This is the if you don't know what to take, take these section. If you juggle your loadout a lot and get overwhelmed, you can treat this part as your default shopping list.
↖ 3.1 Smoke Grenades (Big & Small) – The Best Utility in the Game
Why they're broken (in a good way):
- Deny vision: You can delete enemy sightlines on demand – doorways, corridors, choke points, evac pads.
- Enable safe revives: Drop smoke + defib and your teammate is back in the fight before enemies can react.
- Control PvE chaos: Smokes let you reposition when Arc pressure gets absurd, especially in open terrain.
- PvP outplays: If you push through your own smoke while enemies hesitate, you're effectively fighting stunned players without throwing a stun.
Big vs. small smoke:
| Type | Pros | Cons | Recommendation |
|---|---|---|---|
| Big Smoke | Larger radius, longer duration, best for revives & evacs | Slightly heavier / more resource-intensive | Always bring at least one late-game |
| Small Smoke | Very cheap, craftable early, still enough to block most angles | Shorter duration, smaller cloud | Spam these mid-wipe, pair with aggressive pushes |
If you find yourself dying in open areas, getting beamed while reviving, or stuck on evac, start treating smokes as mandatory, not optional.
↖ 3.2 Defibrillator – Your Second Life Printer
I've lost count of how many fights were flipped purely because someone on my team had a defib and someone on the enemy team didn't.
Defib key strengths:
- Fast revive vs. manual pick up speed.
- Revive at 50 HP, not 1 HP panic mode.
- Enables chained revives: You can smoke → defib player A → both reposition → defib player B.
- Huge value per slot: It's one slot that can potentially restore two or three entire loadouts back into the raid.
In squads, entering raid without a defib is a straight downgrade. Even in solo, it's surprisingly useful: you can res randoms or turn a solo run into a temporary 2–3 man if you want help with big PvE objectives.
↖ 3.3 Trigger Grenade – Best Lethal Grenade in Patch 1.6
If smoke and defib are the backbone of survival, Trigger Grenades are the backbone of offensive pressure.
What makes them insane:
- Remote detonation: You decide exactly when it explodes, so dodging it is much harder.
- Massive damage: Two well-placed triggers will delete even high-tier shields and health.
- Hearing damage: Like other big explosives, they blow out enemy hearing so you can push in relative silence.
- Line control: You can pre-place it around corners and detonate when you hear footsteps.
Once you unlock the blueprint and can sustain crafting, it's hard to justify bringing other primary kill grenade types over Trigger Grenades, unless you're low on materials.
If you loot Trigger Grenades early wipe and haven't got the BP yet, don't hoard them: use them in important fights – they're literal win buttons.
↖ 3.4 Heavy Fuse Grenade & Trailblazer – Area Damage & Hearing Abuse
Although Trigger Grenades are king, Heavy Fuse and Trailblazer are still absolutely S tier.
- Heavy Fuse Grenade
- Huge radius, heavy damage, and very reliable hearing debuff.
- Bounces rather than sticks, which helps: you can bank them around cover, down stairs, or behind walls.
- Best used offensively: throw → enemy either eats damage or exposes themselves.
- Trailblazer
- Essentially a line-shaped chaos grenade: gas trail → delayed ignition → big AoE damage.
- Excels in hallways and tight corridors where enemies simply can't sidestep the line.
- Functions like a heavy fuse grenade stretched into a lane.
- Currently limited by blueprint availability, but when you have them, they're disgusting in the right map layouts.
If you hate grenade spam meta, I sympathize… but in a world where others are spamming, not having at least one of these in your pocket is handicapping yourself.
↖ 3.5 Jolt Mine & Deadline Mine – PvP Control vs. PvE Nukes
These two mines solve very different problems.
Jolt Mine – S Tier Crowd Control
- Enemy-only trigger (players, not teammates).
- 4-second stun is enormous; that's enough to reposition, reload, or delete someone.
- Cheap to craft (batteries) and easy to hide in doorways / tight entry points.
- Main downside: if a grenade or stray bullet hits it while you're standing nearby, you and your teammates also get stunned.
If you frequently hold buildings, staircases, or loot rooms, Jolt Mines are one of the best defensive utilities in the game. Just don't camp directly on top of them.
Deadline Mine – PvE S Tier, PvP B/C Tier
- One-shots Bastions (with good placement), wrecks Matriarchs if you tag the core, and overall does absurd PvE damage.
- Audible priming sound after a few seconds.
- Extremely effective for big Arc farming and safe money runs.
- Hard to use reliably in PvP, unless you pair it with smoke or clever baiting.
If your goal for the session is money and Arc parts, not PvP ego duels, Deadline Mines earn their S tier purely from PvE efficiency.
↖ 3.6 Wolf Pack – PvE Delete Button
Wolf Packs sit in that sweet spot:
- Locked behind a blueprint, but once you have it,
- They're not overly expensive, and
- They delete high-threat Arc units if you throw them properly (Rocketeer, Bastion, Bombardier, Leaper, etc.).
They're particularly strong when:
- You know the map has heavy Arc presence around PvP hotspots.
- You want to keep your main grenades for players but still handle PvE quickly.
- You play solo and don't have teammates to help burst down big Arc.
I rate Wolf Pack above Deadline in mixed PvP/PvE runs because of flexible usage, but Deadline is easier to buy if you don't have the blueprint yet.
↖ 3.7 Zipline & Snap Hook – Positioning Wins Before Damage Does
Zipline and Snap Hook are mobility tools that completely change how you can approach fights.
Zipline – Instant Macro Positioning
- Get instant high ground or horizontal repositioning your enemies don't expect.
- You can:
- Smoke both ends for safe traversal.
- Trap the arrival point with mines.
- Barricade one end so it yeets people into danger if they blindly take it.
Because they cost only rope once unlocked, Ziplines are one of the best value per slot items in the game if you like flanking and fast rotation.
Snap Hook – Micro Movement & Style Points
- Anything within ~20 meters can be snapped to.
- You can:
- Snap wasps out of the air and slam them to the ground.
- Spider-Man your way off tall buildings and save your fall.
- Create non-obvious movement angles during PvP.
They are a bit skill expression focused, but once you get comfortable with them, Snap Hooks give you survivability and outplay potential that plain grenades never will.
↖ 3.8 Healing Utility: Adrenaline Shot & Vita Spray
Healing and stamina tools often get thrown into the meds category and ignored in utility discussions, but they absolutely deserve spots.
Adrenaline Shot – S Tier Mobility & Stamina Fix
- Instantly refills stamina and grants infinite stamina for a short duration.
- Counteracts overweight penalties, especially in late raid when you're carrying too much loot.
- Perfect for:
- Evac runs when things go sideways.
- Aggro pushes when you need to close distance fast.
- Escaping Arc and players simultaneously.
For one cheap craft, you're essentially buying yourself a temporary movement buff that can save your life or secure a team wipe.
Vita Spray – Practical S Tier, Especially Mid-Wipe
- Much better than Vita shots.
- Heals quickly, and you can cancel the animation early if needed.
- Works beautifully between fights or behind cover.
- I place it around lower S / high A: it's not as mandatory as smoke/defib, but on risky maps it absolutely deserves a slot.
If you're still relying only on basic bandages and static heals, Vita Spray will feel like cheating once you get used to its flexibility.
↖ 4. Strong A Tier Picks: Great, But Not Always Mandatory
A tier is where you find tools that are powerful but either:
- Require specific setups, or
- Compete with S-tier slots you almost always want.
↖ 4.1 Light Impact Grenade & Shrapnel / Snap Blast
These represent your spammy, flush-them-out grenade family.
- Light Impact Grenade
- Very cheap.
- Annoying chip damage and hearing debuff.
- Disrupts heals and shield batteries (any damage cancels them).
- Early game MVP and still valid later as a pressure tool.
- Shrapnel Grenade
- Direct upgrade to Light Impact once you can afford it.
- The catch: by the time you get Shrapnel, you often also have Heavy Fuse / Snap Blast / Trigger, which are stronger.
- Snap Blast Grenade
- Sticks to surfaces (and sometimes to players).
- Great vs. AI if you can stick them.
- In PvP, can create hot zones enemies can't peek without taking huge damage.
If you enjoy grenade-heavy play, you can absolutely stack some of these alongside your main S-tier explosives.
↖ 4.2 Blaze Grenade – Nerfed, Still Nasty in Hallways
Even after the nerf, Blaze Grenades still:
- Control hallways and doorways with lingering fire.
- Force enemies out of cover or away from revives.
- Punish people stacking behind a single piece of cover.
However:
- They damage teammates, and
- They don't shred Arc the way they used to.
Think of them as area denial specialists rather than pure kill grenades.
↖ 4.3 Tag Grenade – Vision Wins Dex Fights
Tag Grenades are criminally underrated.
- Cheap to craft.
- They pair insanely well with smokes:
- Smoke a room → toss a Tag Grenade → you see silhouettes, they see nothing → free kills.
- Even in open fights, tagging fleeing players gives you tracking that otherwise relies on sound and guesswork.
I place Tag at top of A: it's almost S tier, but it shines brightest when combined with smokes… and smokes are already taking up slots.
↖ 4.4 Showstopper & Pulse Mine – Control With Risk
- Showstopper
- 2-second stun (shorter than Jolt).
- Can stun you and teammates, which is a real problem in hectic fights.
- Great for PvE (Bombardier, big Arc) setup: stun → Deadline / Wolf Pack.
- Strong when used well, but the self-sabotage potential keeps it in A instead of S.
- Pulse Mine
- Think weaker Jolt Mine with displacement.
- Best use: zipline traps – knock players off and turn fall damage into a kill.
- Good, but Jolt still wins the slot most of the time.
↖ 4.5 Photo-Electronic Cloak & Seeker Grenade – Specialized Tools
- Photo-Electronic Cloak
- Great for sneaking into Matriarch / Queen loot rooms or bypassing Arc-heavy zones.
- Pairs well with Deadline Mines for cheeky PvE kills.
- Storms are attracted to you when cloaked, which is a cool detail but also a danger.
- High skill / knowledge item, hence A tier, not S.
- Seeker Grenade
- Mini Wolf Pack-style homing damage.
- Solid for AI clearing.
- Not quite as impactful as true S-tier grenades, but can be a nice filler when you loot them.
↖ 4.6 Gas Grenade – Soft Control, Hard to Master
Gas Grenades don't kill fast, but they do things that matter:
- Drain stamina to zero and keep it there.
- Force cough animations and sound cues.
- Spread nicely in enclosed rooms.
They're dirt cheap, but in real gameplay I don't see many players abusing them. If you love controlling movement and punishing people who sit in one room too long, they're worth experimenting with.
↖ 5. B, C, and D Tier: Use With Caution (or for Memes)
Instead of detailing every low-tier item, here's a practical lens:
↖ 5.1 When B Tier Is Worth It
You pick B tier items when:
- A map or mission has very specific requirements, or
- Your playstyle is heavily built around traps / bait.
Examples:
- Remote Raider Flare – Great for baiting players into your traps or crossfire if you're disciplined about it.
- Gas Mine / Gas Grenade Trap – Stack with Blaze or Jolt setups if you enjoy trap gameplay.
- Lure Grenade – Works sometimes to weaponize Arc, but currently too inconsistent due to hyper-aggro behavior.
↖ 5.2 C Tier: Extremely Niche or Outclassed
- Blaze Grenade Trap, Door Blocker, Noise Maker, Vita Shot, Flame Spray
- They do something, but usually there's a strictly better way to achieve the same goal:
- Barricade > Door Blocker in almost every scenario.
- Vita Spray > Vita Shot.
- Real grenades > Noise maker / Flame Spray for distraction.
If you're still building your stash or learning maps, don't waste slots on these.
↖ 5.3 D Tier: Screenshots, Roleplay, and Comedy
- Light Stick, Binoculars, Fruit Medley, Agave Juice, Lure Grenade Trap, Smoke Grenade Trap, Recorder
- Binoculars for screenshots, Recorder for vibes, Light Sticks for roleplay – fun, but not winning fights.
If your goal is survival, profit, or PvP dominance, these are where you don't spend your weight and slots.
↖ 6. Practical Loadouts: What to Actually Bring
Now to close the loop: ranking is nice, but you still need concrete combinations. Here are some tested setups you can use as baselines.
↖ 6.1 Aggressive PvP Squad Loadout
Focus: fast pushes, third-partying fights, winning building skirmishes.
Core (should be covered across the squad):
- 2–3x Smoke Grenade (big)
- 2–3x Small Smoke Grenade
- 2x Defibrillator
- 2–4x Trigger Grenade
- 2x Heavy Fuse or Trailblazer
- 2x Jolt Mine
Per player example (4-man):
| Player | Suggested Utility |
|---|---|
| Fragger 1 | 1 Smoke, 1 Small Smoke, 2 Trigger, 1 Heavy Fuse |
| Fragger 2 | 1 Smoke, 1 Small Smoke, 1 Trigger, 1 Trailblazer, 1 Jolt Mine |
| Flex | 1 Smoke, 1 Defib, 1 Tag Grenade, 1 Jolt Mine, 1 Wolf Pack |
| Support | 2 Smoke, 1 Defib, 1 Vita Spray, 1 Zipline |
If you mirror something close to this, you'll feel a huge jump in revive success, entry consistency, and cleanup potential.
↖ 6.2 PvE / Money Farming Loadout
Focus: big Arc kills, safe evacuations, profit.
Per player:
- 1–2x Smoke Grenade
- 1x Defibrillator (if in a group)
- 1–2x Deadline Mine
- 1–2x Wolf Pack
- 1x Adrenaline Shot
- 1x Zipline or Snap Hook
Optional extras:
- Photo-Electronic Cloak if you're doing stealthy PvE objectives.
- Gas or Blaze grenades to zone Arc clusters while you reposition.
Here, your goal is simple: turn hard PvE content into consistent, repeatable income without unnecessary deaths.
↖ 6.3 Solo Survival / Hybrid Loadout
Focus: living through third-parties, handling both PvE and PvP alone.
Recommended kit:
- 1x Big Smoke
- 1–2x Small Smoke
- 1x Vita Spray
- 1x Heavy Fuse or 1x Trigger Grenade (depending on economy)
- 1x Wolf Pack
- 1x Adrenaline Shot
- 1x Zipline or Snap Hook
If you find yourself dying a lot on evac or while over-looted, prioritize Adrenaline + Smokes first, then layer in damage.
↖ 6.4 I'm Broke Budget Loadout
If you're early wipe or low on materials:
- 2x Small Smoke Grenade
- 1x Light Impact Grenade
- 1x Vita Spray (or best heal you can afford)
- 1x Jolt Mine (if you can craft cheaply)
- 1x Adrenaline Shot (if possible)
Even on a budget, notice the pattern: smoke + one form of reliable damage + at least one form of sustain or escape.
↖ FAQ
↖ Q1: If I only have room for 3 utility items, what are the best universal picks?
For most players in mixed PvP/PvE:
1. Smoke Grenade (big)
2. Defibrillator
3. Heavy Fuse or Trigger Grenade (Trigger if you've got the BP and economy)
If you're solo and hate using defibs on randoms, swap defib for Vita Spray or Jolt Mine.
↖ Q2: Should I always bring mines?
Not always. Mines are strongest when:
- You're defending buildings or specific loot locations.
- You understand common routes and doorways on that map.
- Your squad is patient enough to play around them.
If you're playing hyper-aggressive roam style, a mine slot might be better used on more grenades or movement tools.
↖ Q3: Are Blaze Grenades still worth crafting after the nerf?
Yes, but with clearer expectations:
- They're no longer Arc erasers.
- Use them as area denial and displacement tools, not raw kill grenades.
- If you don't like managing team damage and fire spread, Heavy Fuse / Trigger / Trailblazer are cleaner picks.
↖ Q4: When do Cloak and Raider Hatch Key become must-bring?
- Cloak becomes near-mandatory for high-value PvE farming when you already know precise Matriarch/Queen routes and want to minimize risk.
- Raider Hatch Key is map-dependent:
- If a map has reliable hatch exits and you know their locations, bringing the key massively increases survival odds.
- If you don't know the map well yet, invest that slot into smokes or healing until you do.
↖ Q5: I like trolling or style plays. Which low-tier items are still fun?
- Remote Raider Flares – Bait squads into mines or third parties.
- Lure Grenades – Occasionally weaponize Arc against your enemies.
- Recorder / Light Stick – Roleplay, screenshots, and social runs.
Just remember: every meme item is one less smoke, defib, or lethal grenade.
↖ Summary: Priority List You Can Apply Immediately
If you strip away all the nuance, Patch 1.6 utility boils down to a simple priority order:
1. Always respect smokes.
- Big or small, they are your lifeline for revives, evacs, and repositioning.
2. Defibs and healing define how many mistakes you're allowed to make.
- Defibrillator + Vita Spray are worth more than any single big damage grenade over a full raid.
3. Trigger / Heavy Fuse / Trailblazer are your offensive core.
- Bring at least one serious lethal grenade if you expect PvP.
4. Mines, mobility tools, and specialized grenades are flavor, not foundation.
- Jolt Mines, Ziplines, Snap Hooks, Wolf Packs – all fantastic once the core is covered.
If you adjust your raid kits around these principles, you'll notice fewer I died and I don't even know why moments and more we shouldn't have survived that, but we did extractions.

Most Popular Posts
- ARC Raiders Riven Tides Key Room Guide: Best Hotel Keys, Loot Routes, Secure & Crane Storage
- ARC Raiders Damage Fireflies Trial Guide: Best Farm Method on Buried City Night Raid
- ARC Raiders Riven Tides Update: New Map & Items, ARC Turbine, Rewards, and Best Early Strategy
- ARC Raiders Bettina Guide: Best Build, Buffs, and How to Use It Against ARC
- Arc Raiders Season 4 Riven Tides Update, Rewards, Safe Skins, and Release Timeline
- ARC Raiders Solo Search Supply Drops Guide: Best Buried City Route, Beacon Locations
Popular Category Lists
- Grow a Garden / (286)
- ARC Raiders / (262)
- CoD: Black Ops 7 / (166)
- Monopoly Go / (146)
- MLB 26 / (145)
- Star Citizen / (112)
- Steal a Brainrot / (89)
- Sailor Piece / (68)
- ARK Survival Ascended / (67)
- Diablo IV / (61)
- Forza Horizon 6 / (60)
- Blox Fruits / (60)
- CoD: BLACK OPS 6 / (55)
- Adopt Me / (53)
- Path of Exile 2 / (48)
- Monster Hunter Wilds / (46)
- Windrose / (44)
- Path of Exile / (40)
- Grow a Garden 2 / (40)
- Bee Swarm Simulator / (36)


