


 0
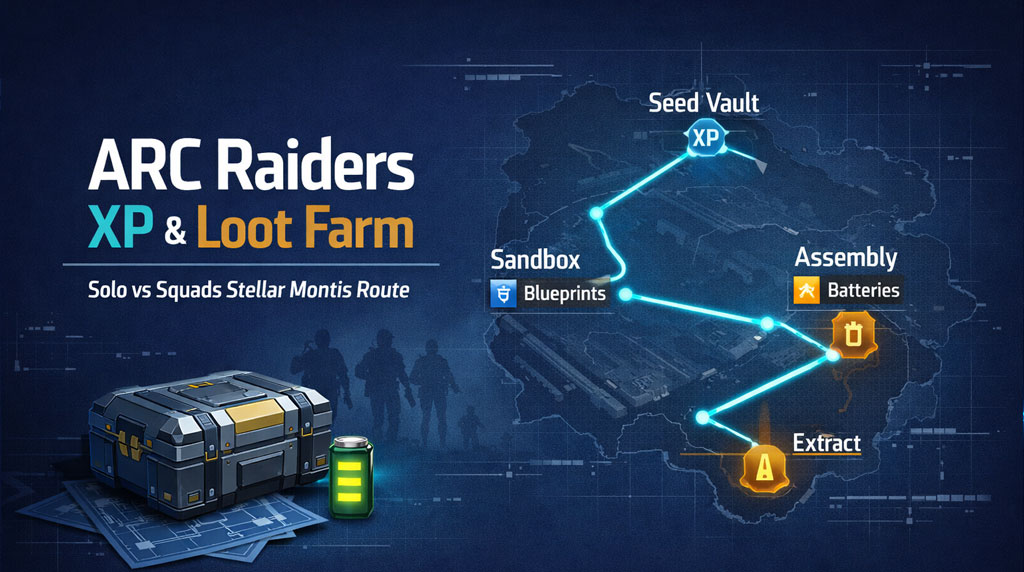
0ARC Raiders Best XP & Loot Farm: Solo vs Squads Stellar Montis Route
- KIVR
- Share
- ARC Raiders
- 05/17/26
- 252
Solo vs squads on Stellar Montis is brutal, but it is one of the best ways to farm XP, blueprints, batteries, Exodus materials, and player-body loot if you play it correctly.
The trick is simple: do not fight the lobby early.
Let squads rush Assembly, Medical, and Lobby. Let them burn meds, trigger ARC enemies, and kill each other. We loot safer zones first, rotate late, tap bodies for XP, then extract before greed kills the run.
A clean run with this route can hit around 117k loot value, 3 blueprints, 30 batteries, and roughly 66,000 XP.
- ARC Raiders Solo vs Squads Farm: Core Strategy
- Best Loadout for Solo vs Squads XP Farming
- Stellar Montis Route: Best XP and Loot Path
- Phase 1: Loot Seed Vault First
- If You Hear Players in Seed Vault
- Phase 2: Rotate to Sandbox for Batteries and Augments
- How to Handle Shredders and ARC Pressure
- Phase 3: Clean Up Assembly, Medical, and Lobby Late
- Body Tapping: The Fastest Late-Raid XP Spike
- Blueprint Farming Tips on Stellar Montis
- Loot Priority: What to Keep
- Combat Rules for Solo vs Squads
- Take Fights When:
- Avoid Fights When:
- Extraction Timing: Do Not Greed the Run
- Example Result From This Farm
- FAQ
- What is the best ARC Raiders XP farm on Stellar Montis?
- Is solo vs squads worth it for loot farming?
- Where should I farm batteries in ARC Raiders?
- How do I farm blueprints safely?
- When should I extract?
- Summary
↖ ARC Raiders Solo vs Squads Farm: Core Strategy
This is not a PvP ego route. It is a survival farm.
Your job is to:
- Loot quiet areas first.
- Avoid early squads.
- Abuse late-raid chaos.
- Tap dead raiders for XP.
- Extract with value, not screenshots.
| Farm Element | Best Choice | Why It Works |
|---|---|---|
| Map | Stellar Montis | Strong loot density and high player traffic |
| Queue | Solo vs Squads | Bonus XP and more dead bodies |
| Early Route | Seed Vault | Safe XP, breachables, electrical containers |
| Mid Route | Sandbox | Batteries, augment containers, side-room loot |
| Late Route | Assembly / Medical / Lobby | Dead bodies, missed loot, blueprints |
| Main Risk | Full squads | You lose if you take fair fights |
The whole route depends on timing. Early raid is for stealth. Mid raid is for value. Late raid is for cleanup.

↖ Best Loadout for Solo vs Squads XP Farming
Bring gear that helps you escape, not gear that tempts you into bad fights.
| Slot | Recommended Gear | Purpose |
|---|---|---|
| Weapon | Stable mid-range gun | Defensive kills only |
| Utility | Smoke grenades | Break line of sight and escape |
| Trap | Pop triggers | Punish door pushes and tight corridors |
| Healing | Basic meds | Recover from ARC chip damage |
| Backpack | Medium or larger | This route fills fast |
| Key | Assembly/Admin key if owned | Opens late high-value rooms |
Smoke is mandatory.
If a squad sees you, your first goal is not to wipe them. Your first goal is to survive the first three seconds.
Use smoke to:
- Cross open angles.
- Leave body piles.
- Escape extract pressure.
- Break a squad push.
- Reset after taking a quick kill.
↖ Stellar Montis Route: Best XP and Loot Path
Follow this route unless your spawn forces a safer adjustment.
| Phase | Timer | Area | Goal |
|---|---|---|---|
| Early | 25–18 min | Seed Vault | Safe loot, seeds, breachables |
| Mid | 18–10 min | Sandbox | Batteries, augment boxes, materials |
| Late | 10–5 min | Assembly / Medical / Lobby | Bodies, missed containers, blueprints |
| Exit | 5–0 min | Extract routes | Body tap, leave alive |
Do not sprint into Assembly at spawn. That is where geared squads go to turn the first five minutes into a scrapyard.
↖ Phase 1: Loot Seed Vault First
Seed Vault is the best opener because it gives XP without forcing early PvP.
You want:
- Seeds for quick XP.
- Breachable containers for Exodus materials and valuables.
- Electrical containers for blueprint chances.
- Raider-style containers for parts and utility loot.
| Seed Vault Loot | Priority | Reason |
|---|---|---|
| Seeds | High | Fast XP, low risk |
| Breachables | High | Can drop Exodus materials |
| Electrical containers | High | Blueprint chance |
| Raider containers | Medium | Parts, meds, misc value |
| Android loot | Medium | Useful crafting materials |
Breachables are worth opening, but they are loud. Breach once, stop, listen. If you chain loud actions, good squads will track you.
↖ If You Hear Players in Seed Vault
| Situation | Correct Play |
|---|---|
| Distant gunfire | Keep looting, stay near cover |
| Footsteps nearby | Stop looting, hold an exit |
| Door opens | Rotate out immediately |
| Squad comms | Let them pass |
| ARC aggro outside | Wait; it may distract them |
Seed Vault is your bank. Fill the account, then leave before someone audits you.
↖ Phase 2: Rotate to Sandbox for Batteries and Augments
After Seed Vault, move toward Sandbox instead of forcing Assembly.
Sandbox is safer in the mid raid and has excellent loot.
Main targets:
- Battery containers
- Augment containers
- Mechanical parts
- Side-room loot
- Bodies from nearby fights
| Sandbox Loot | Value | Notes |
|---|---|---|
| Batteries | Very High | Strong crafting value; 30+ possible in good runs |
| Augment containers | High | Can produce augment blueprint drops |
| Mechanical parts | High | Useful for upgrades |
| Side containers | Medium | Often ignored by squads |
| Nearby bodies | Very High | Fast XP and possible keys |
If you find untouched battery containers, slow down and clear them. In one strong run, Sandbox alone produced around 30 batteries.
↖ How to Handle Shredders and ARC Pressure
Do not burn your run fighting every ARC enemy.
If a Shredder blocks the path:
- Break line of sight.
- Use corners.
- Wait for movement.
- Sprint through when clear.
- Never start PvP while ARC is locked onto you.
If a squad is fighting ARC nearby, let them. ARC enemies are free pressure. Use that noise to rotate or loot.
↖ Phase 3: Clean Up Assembly, Medical, and Lobby Late
The final 10 minutes are where this farm pays.
By then, squads have usually:
- Extracted.
- Died.
- Burned meds.
- Left containers behind.
- Dropped loot on bodies.
Now you move into the high-value zones.
| Late Area | Best Loot | Risk |
|---|---|---|
| Assembly Workshop | Blueprints, parts, key room loot | Very High |
| Medical Research | Med bags, bodies, containers | High |
| Lobby | Bodies, extract loot, leftovers | Very High |
| Extract zones | Body XP, abandoned kits | Extreme |
| Key rooms | Dense high-value loot | High |
Move only after the gunfire slows. If you still hear multiple squads trading shots, wait or rotate around them.
↖ Body Tapping: The Fastest Late-Raid XP Spike
Dead raiders are one of the best XP sources in solo vs squads.
You do not need to full-loot every body. Tap first for XP, then decide if the inventory is worth the risk.
In strong late raids, body taps can be worth roughly 500 XP each, and solo-vs-squads bonus makes the total even better.
| Body Action | Use Case | Risk |
|---|---|---|
| Quick tap | Fast XP | Low |
| Quick inventory scan | Keys, meds, springs, ammo | Medium |
| Full loot | High-value gear | High |
| Loot body pile | Huge XP/value | Extreme |
| Skip exposed body | Preserve run | Smart |
If bodies are stacked near extract, assume the winning squad may still be close.
Rule: tap fast, loot under cover, leave early.
↖ Blueprint Farming Tips on Stellar Montis
Blueprints are not only in obvious hotspots. Squads rush the known spawns, but they often skip side containers during fights.
Check these:
| Blueprint Source | Where to Look |
|---|---|
| Electrical blueprints | Electrical containers, Seed Vault tech areas |
| Augment blueprints | Sandbox augment containers |
| Mechanical blueprints | Assembly and workshop-style zones |
| Random rare blueprints | Key rooms and rare containers |
| Player-carried blueprints | Dead raider bodies |
If you find a blueprint, your priority changes.
Stop playing for one more room.
Play for extraction.
↖ Loot Priority: What to Keep
Inventory fills fast. Do not carry trash deep into a squad lobby.
| Item | Priority | Reason |
|---|---|---|
| Blueprints | S+ | Permanent progression |
| Exodus materials | S | Rare and valuable |
| Batteries | A+ | High-use crafting item |
| Advanced mechanicals | A | Strong upgrade value |
| Gun parts | A | Crafting and value |
| Keys | A | Future loot access |
| Rare trinkets | B | Sell value |
| Common materials | C | Drop first |
Drop common junk before you drop batteries, keys, or rare materials.
If you are carrying a blueprint, stop gambling.
↖ Combat Rules for Solo vs Squads
You are allowed to fight. You are not allowed to be stupid.
↖ Take Fights When:
- A player is isolated.
- They are injured.
- ARC is pressuring them.
- You have cover.
- You have an escape route.
- You need to secure extract.
↖ Avoid Fights When:
- You hear multiple footsteps.
- You are carrying blueprints.
- You are in a hallway.
- ARC is targeting you.
- The timer is under five minutes.
| Situation | Correct Decision |
|---|---|
| One injured player talking nearby | Track, but expect teammates |
| Squad looting bodies | Wait or smoke away |
| Enemy fighting Shredder | Let ARC weaken them |
| You down one player | Secure only if safe |
| Doors opening nearby | Stop moving and listen |
Most solo deaths come from overcommitting after one knock. The downed player is bait until proven otherwise.
↖ Extraction Timing: Do Not Greed the Run
Extraction discipline is what separates a good farm from a sad backpack on the floor.
| Timer | Correct Play |
|---|---|
| 25–18 min | Loot quietly |
| 18–10 min | Rotate and build value |
| 10–5 min | Tap bodies, check leftovers |
| 5–2 min | Move to extract |
| Under 2 min | Leave. No debate. |
The last two minutes are not for one more container. They are for getting paid.
↖ Example Result From This Farm
A strong Stellar Montis solo vs squads run can produce:
| Category | Example Result |
|---|---|
| Loot Value | 117k |
| XP | 66,000 XP |
| Blueprints | 3 |
| Batteries | 30 |
| Key Loot | Controlled access key, mechanical parts, gun parts |
| Main XP Sources | Looting, seeds, body taps, survival bonus |
This is not guaranteed every raid. Bad spawns happen. Aggressive squads happen. But the route is consistent because it farms the lobby's chaos instead of fighting it head-on.
↖ FAQ
↖ What is the best ARC Raiders XP farm on Stellar Montis?
The best high-risk XP farm is solo vs squads with a Seed Vault → Sandbox → Assembly/Medical/Lobby route. Loot safe early, rotate mid-raid, then body-tap dead raiders late.
↖ Is solo vs squads worth it for loot farming?
Yes, if you avoid early fights. Solo vs squads creates more dead bodies and more abandoned loot. It also gives bonus XP, making long survival runs extremely profitable.
↖ Where should I farm batteries in ARC Raiders?
Sandbox is one of the best battery farming areas on Stellar Montis. Check battery containers and side rooms. A good run can produce around 30 batteries.
↖ How do I farm blueprints safely?
Do not rush obvious blueprint spawns early. Check electrical containers, augment containers, Assembly rooms, key rooms, and dead raider bodies after squads fight.
↖ When should I extract?
Start moving toward extract at 5 minutes. Under 2 minutes, stop looting and leave. Greed kills more good runs than squads do.
↖ Summary
The best Stellar Montis solo vs squads farm is built on patience.
Start in Seed Vault for safe XP and breachables. Rotate into Sandbox for batteries and augment containers. Push Assembly, Medical, and Lobby only after squads thin out. Tap bodies for fast XP, grab blueprints when they appear, and extract before the timer gets ugly.
Play it right and this route can deliver 100k+ loot value, multiple blueprints, 30+ batteries, and massive XP without needing to wipe the lobby.

Most Popular Posts
- ARC Raiders Riven Tides Key Room Guide: Best Hotel Keys, Loot Routes, Secure & Crane Storage
- ARC Raiders Damage Fireflies Trial Guide: Best Farm Method on Buried City Night Raid
- ARC Raiders Riven Tides Update: New Map & Items, ARC Turbine, Rewards, and Best Early Strategy
- ARC Raiders Bettina Guide: Best Build, Buffs, and How to Use It Against ARC
- Arc Raiders Season 4 Riven Tides Update, Rewards, Safe Skins, and Release Timeline
- ARC Raiders Solo Search Supply Drops Guide: Best Buried City Route, Beacon Locations
Popular Category Lists
- Grow a Garden / (286)
- ARC Raiders / (262)
- CoD: Black Ops 7 / (166)
- Monopoly Go / (146)
- MLB 26 / (145)
- Star Citizen / (112)
- Steal a Brainrot / (89)
- Sailor Piece / (68)
- ARK Survival Ascended / (67)
- Diablo IV / (61)
- Forza Horizon 6 / (60)
- Blox Fruits / (60)
- CoD: BLACK OPS 6 / (55)
- Adopt Me / (53)
- Path of Exile 2 / (48)
- Monster Hunter Wilds / (46)
- Windrose / (44)
- Path of Exile / (40)
- Grow a Garden 2 / (40)
- Bee Swarm Simulator / (36)


