


 0
0ARC Raiders Blueprint Container-Based Farming with Safe Stella Montis Route
- KIVRI
- Share
- ARC Raiders
- 12/26/25
- 1362
For a long time, We treated Blue gate Security Wing like a magic blueprint shrine: get there first, touch the good spots, pray. Then I started logging what we actually opened and what actually dropped. The pattern that snapped everything into place was simple: blueprints are strongly tied to container types.
That changes how you farm ARC Raiders blueprints. It means you can stop queueing up for one tiny contested room and start hunting the same container archetypes across other maps and routes—often with less PvP pressure and more total rolls per run. Here's how I approach it, what containers matter, and a Stella Montis route that consistently hits the right boxes.
- 1) The Real Mechanic: It's the Container, Not the Room
- Why this matters
- what I tracked
- 2) Container Types That Matter (Target-Farming Cheatsheet)
- Blueprint-relevant container pools (what to prioritize)
- Raider container pool: what I've personally seen show up
- Medical containers: the underrated augment pipeline
- 3) Stella Montis Loot Route (High Blueprint Rolls, Lower Conflict)
- Route goals (what you're optimizing)
- Step-by-step route logic (the why behind the path)
- A practical interaction priority list (what I open first)
- 4) Risk Control: How I Stop Dying With Blueprints
- My three rules
- A simple stay or leave checklist
- 5) What This Means for Blue gate (and Every Other Map)
- The honest takeaway
- FAQ
- 1) Are augment blueprints only in Blue gate?
- 2) Which containers should I open if I only care about augments?
- 3) If a hotspot is contested, what should I do?
- 4) Do trash cans really drop blueprints?
- 5) How do I know I'm opening a raider container versus a normal bag?
- 6) What's the biggest mistake blueprint farmers make?
- Summary
↖ 1) The Real Mechanic: It's the Container, Not the Room
The big misconception is Blue gate Security Wing has better augment blueprint luck. What my runs showed is closer to: Security Wing has a high density of specific containers that are allowed to drop augment blueprints.
↖ Why this matters
- Density beats superstition. A famous room is usually just a room with multiple eligible containers.
- Route flexibility increases survival. If one hotspot is contested, you can still farm the same blueprint pool elsewhere.
- You can target-farm. Once you know which container families can roll which blueprints, you can stop opening everything and start opening what matters.
↖ what I tracked
I'm not pulling this from a spreadsheet someone tweeted; this is from my own testing habit: I ran repeated Stella Montis loops and recorded:
- the container type I opened
- whether I got any blueprint
- the blueprint category (augment / medical / weapon part / named weapon blueprint)
Over multiple sessions (dozens of raids), the aha wasn't a single lucky drop—it was repeatable blueprint hits from the same container families, even when the location changed.
↖ 2) Container Types That Matter (Target-Farming Cheatsheet)
Below is the practical mapping I use when I'm specifically hunting augment blueprints (and the bonus pools you often get alongside them).
↖ Blueprint-relevant container pools (what to prioritize)
| Container Family (In-Game Look/Use) | Best For | Also Commonly Includes | Where I See Them Most |
|---|---|---|---|
| Augment-capable utility containers (the ones people fixate on in Blue gate) | Augment blueprints | Weapon part blueprints | High density in Blue gate Security Wing; scattered elsewhere |
| Raider containers (raider bags/raider-style cases) | Named weapon blueprints | Gun parts | Mixed spawns across maps; often near combat lanes |
| Medical containers (med bags/medical caches) | Augment blueprints + medical blueprints | Defib-style utility items, heals | Nearly every map has multiple med clusters |
| Weapon cases / radar-style bags | Loadout acceleration | Parts, weapons (varies) | Common along rotation corridors and side rooms |
| Trash can style containers (residential/utility bins) | Surprise blueprint rolls | Mixed low-to-mid tier loot | Extremely map/POI dependent; worth checking in clusters |
↖ Raider container pool: what I've personally seen show up
When raider containers hit a blueprint roll, they can pay out big. In my runs, raider containers have produced named weapon blueprint hits such as:
- Il Toro
- Anvil
- Osprey
- Torrente
- Ventor
plenty of gun part blueprints.
That doesn't mean every raider bag is secretly a jackpot. It means: if your goal is named weapons + parts, raider containers are a high-value interaction.
↖ Medical containers: the underrated augment pipeline
Medical containers are where a lot of players accidentally do target-farming without realizing it. If you want augments but hate contested augment rooms, then:
If you find a med-heavy building/wing, then you have multiple augment blueprint rolls without stepping into the usual PvP funnel.
I've pulled augment blueprints out of medical containers often enough that I now treat them like a quiet alternate route to the same outcome.
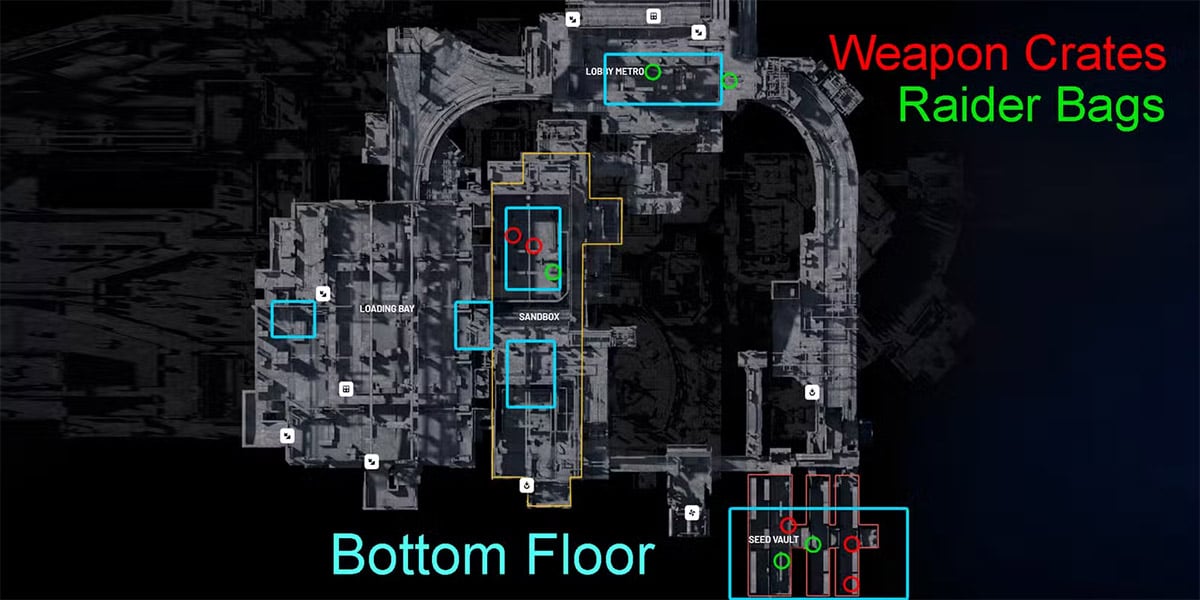
↖ 3) Stella Montis Loot Route (High Blueprint Rolls, Lower Conflict)
This is the route I run when I want multiple eligible containers quickly, while keeping escape options open. The core idea is not follow my exact footsteps, but hit dense container clusters, avoid dead-end ego fights.
↖ Route goals (what you're optimizing)
| Goal | What you do | What you avoid |
|---|---|---|
| Max blueprint rolls per minute | Prioritize eligible containers in clusters | Opening low-value singletons in risky hallways |
| Reduce PvP bottlenecks | Take flexible entries, keep two exits | Forcing the same famous room every raid |
| Keep survivability high | Loot fast, rotate, don't overstay | Long inventory management sessions in hot zones |
↖ Step-by-step route logic (the why behind the path)
1. Path toward Lobby via a vertical entry
I like approaching via routes that let me land near container density instead of sprinting down obvious corridors.
2. Start looting where container clusters begin
The moment you hit the first cluster, your job is simple:
- If a container is already looted, then don't tilt—just keep tempo and move to the next cluster.
Tempo beats anger.
3. Prioritize black-box style containers and nearby bins
In my experience, black-box style containers consistently justify the interaction time.
Then I sweep nearby bins/trash cans only if they're clustered (single bins in open lanes aren't worth getting spotted for).
4. Chain into mixed-value rooms (med + weapons + bins)
A good Stella Montis loop is a sequence of small wins:
- a few med containers (augment/medical blueprint chances)
- a few raider containers (named weapon blueprint chances)
- a few black boxes / utility containers (augment-capable chances)
- weapon cases/radar bags so you can actually defend yourself
5. Use breach/door events for access, not drama
Sometimes opening a breach isn't about loot behind the door—it's about controlling hazards and unlocking safer angles to reach nearby containers.
↖ A practical interaction priority list (what I open first)
| Priority | Open This First | Why |
|---|---|---|
| 1 | Augment-capable utility containers (incl. black-box style) | Direct blueprint objective, good time-to-value |
| 2 | Medical containers | Alternate augment pipeline + strong survival value |
| 3 | Raider containers | Named weapons + parts; high upside |
| 4 | Weapon cases / radar bags | Stabilize your run so you don't die holding blueprints |
| 5 | Trash cans/bins (clustered only) | Cheap extra rolls when density is high |
↖ 4) Risk Control: How I Stop Dying With Blueprints
This is the part most guides skip, but it's where your blueprint drop rate really lives—because dead players don't extract.
↖ My three rules
1. If my bag contains a new blueprint, then I stop gambling.
I rotate toward safer lanes and look for a clean exit timing.
2. If I hear active fighting near a container cluster, then I switch to the next cluster.
The whole point of container-based farming is you have options.
3. If I'm undergeared, then I loot defense before greed.
One weapon case can be worth more than three extra trash cans if it keeps you alive.
↖ A simple stay or leave checklist
| Signal | Meaning | My call |
|---|---|---|
| Multiple looted containers in the first cluster | You're late to the party | Rotate immediately |
| New blueprint acquired + no strong kit | You're carrying value but can't fight | Extract path now |
| Fresh med/raider spawns + quiet audio | Low contest window | Sweep fast, then move |
| Repeated footsteps / doors opening nearby | Someone is matching your route | Break line, change level, reset |
↖ 5) What This Means for Blue gate (and Every Other Map)
Blue gate Security Wing is still strong—just not for mystical reasons.
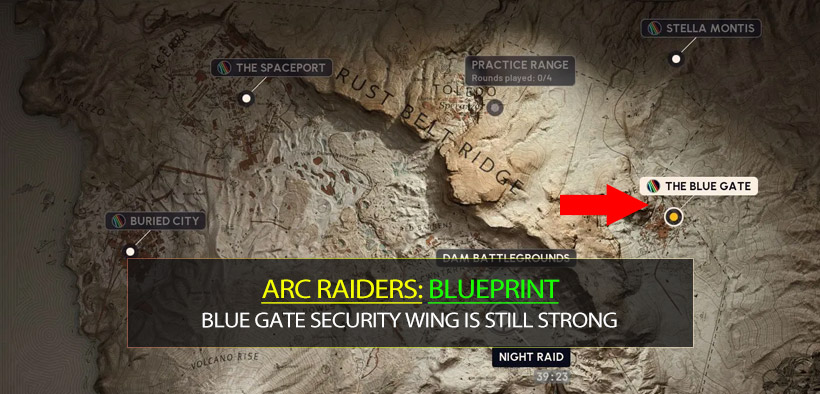
↖ The honest takeaway
- Blue gate is good because it's dense with the right container types.
- That same blueprint logic applies anywhere those containers spawn.
- So your best blueprint strategy is:
- learn containers
- learn clusters
- learn two routes per map (hot + quiet)
Once you do that, you'll notice something funny: you stop caring who got to the famous room first, because you're no longer dependent on it.
↖ FAQ
↖ 1) Are augment blueprints only in Blue gate?
No. Blue gate is a high-density spot, but augment blueprints are tied to eligible container types, and those containers exist across maps. If you find the same container family elsewhere, you're rolling the same kind of dice.
↖ 2) Which containers should I open if I only care about augments?
I prioritize:
1) augment-capable utility/black-box style containers
2) medical containers
Then I add raider containers if I also want named weapons/parts.
↖ 3) If a hotspot is contested, what should I do?
If you hear fighting or see multiple looted containers early, then rotate to your next planned cluster. Container-based farming works because you can keep your attempts high without taking the same predictable fight every raid.
↖ 4) Do trash cans really drop blueprints?
Yes, but I treat them as density-dependent. If you have a cluster of bins in a relatively safe pocket, then it's worth a quick sweep. If it's one bin in a wide hallway, I skip it.
↖ 5) How do I know I'm opening a raider container versus a normal bag?
I go by the consistent raider-style container set (bags/cases that repeatedly roll the raider pool). The easiest practical method: track your own drops for 10–20 raids and you'll see which visuals keep paying out weapon/part blueprints.
↖ 6) What's the biggest mistake blueprint farmers make?
Overcommitting to a single famous room and over-looting while under-defended. If you pull a new blueprint, then your priority shifts from more rolls to secure extraction.
↖ Summary
Once I stopped treating maps like lucky charms and started treating containers like loot tables, blueprint farming became calmer, faster, and way more consistent. The play isn't win the Blue gate sprint every raid. The play is touch more eligible containers per hour, take fewer forced fights, and extract more often.
If you adopt just one habit from this guide, make it this: log what you open for a week. The moment you see the same container family paying out the same blueprint categories in different places, you'll never go back to room-worshipping again.

Most Popular Posts
- ARC Raiders Riven Tides Key Room Guide: Best Hotel Keys, Loot Routes, Secure & Crane Storage
- ARC Raiders Damage Fireflies Trial Guide: Best Farm Method on Buried City Night Raid
- ARC Raiders Riven Tides Update: New Map & Items, ARC Turbine, Rewards, and Best Early Strategy
- ARC Raiders Bettina Guide: Best Build, Buffs, and How to Use It Against ARC
- Arc Raiders Season 4 Riven Tides Update, Rewards, Safe Skins, and Release Timeline
- ARC Raiders Solo Search Supply Drops Guide: Best Buried City Route, Beacon Locations
Popular Category Lists
- Grow a Garden / (286)
- ARC Raiders / (262)
- CoD: Black Ops 7 / (166)
- Monopoly Go / (146)
- MLB 26 / (145)
- Star Citizen / (112)
- Steal a Brainrot / (89)
- Sailor Piece / (68)
- ARK Survival Ascended / (67)
- Diablo IV / (61)
- Forza Horizon 6 / (60)
- Blox Fruits / (60)
- CoD: BLACK OPS 6 / (55)
- Adopt Me / (53)
- Path of Exile 2 / (48)
- Monster Hunter Wilds / (46)
- Windrose / (44)
- Path of Exile / (40)
- Grow a Garden 2 / (40)
- Bee Swarm Simulator / (36)


