


 0
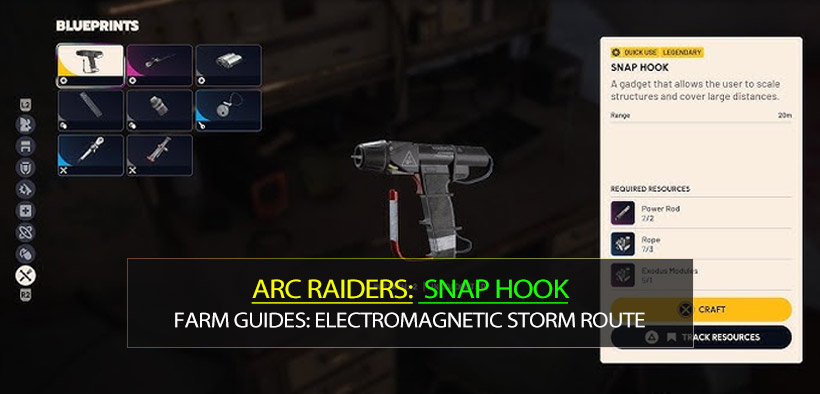
0Arc Raiders Snap Hook Blueprint Farm Guides: Electromagnetic Storm Route
- KITE
- Share
- ARC Raiders
- 12/26/25
- 4972
If you've been watching people zip and fly across the map with the Snap Hook, you already know why the blueprint matters: it turns movement into an advantage you can craft on demand. The good news is you don't need lucky, once-a-week RNG. With the right map condition and a tight loot loop, you can make Snap Hook blueprint runs feel routine—sometimes even pulling multiple blueprints in a single raid.
I'm going to walk you through the exact approach I use when I want consistency over hero plays: Electromagnetic Storm + lightweight kit + a container-first route through Research/Admin. I'll also tell you what I skip, what I always check, and when I stop looting and just leave—because the fastest blueprint is the one you actually extract with.
- 1) The One Requirement That Actually Matters
- 2) Loadout Philosophy: Win With Speed, Not Gear
- 3) The Route (With Priority Order)
- 4) Container Targets: What You're Actually Farming
- 5) The Metal Stairs Left Side Trick (Where Runs Spike)
- 6) Inventory Rules (So You Actually Extract)
- 7) A Real Raid Outcome (What Good Looks Like)
- 8) Decision Tree: What To Do When Things Go Sideways
- FAQ
- 1) Do I need to bring a full weapon kit?
- 2) Is Electromagnetic Storm mandatory?
- 3) Where is the highest-value place to check first in Research/Admin?
- 4) I found the Snap Hook blueprint—should I keep looting?
- 5) What's the biggest mistake people make on this farm?
- Summary
↖ 1) The One Requirement That Actually Matters
This farm revolves around a single gate:
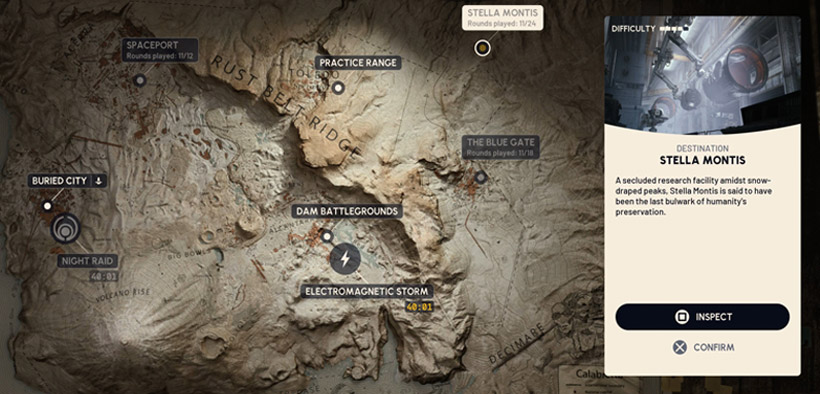
- Map condition:Electromagnetic Storm on the battleground (the storm variant).
- Why this matters: In my experience, storm raids feel like they wake up the blueprint pool in the high-density container areas. This doesn't mean every box is magic; it means your best container clusters pay out more often, so your route gets more consistent.
If you load in and it's not Electromagnetic Storm, I treat it as a different raid. I'll still loot, but I won't force the Snap Hook blueprint route.
↖ 2) Loadout Philosophy: Win With Speed, Not Gear
My default setup for this run is intentionally boring:
- Go in nearly naked
- Bring adrenaline shots (your stems)
- Optional: a tiny amount of space-efficient meds
Why speed wins here: You're not trying to outgun stacked players. You're trying to arrive first at the densest drawer/locker clusters, roll the blueprint dice more times per minute, and extract before you become a walking storage unit.
If you bring a full kit, you can fight—but you'll also move slower, loot slower, and you'll hesitate to drop items when you get over-encumbered. That hesitation is how runs die.
↖ 3) The Route (With Priority Order)
Here's the loop I run when the goal is Snap Hook blueprint consistency:
1. Spawn → Water Treatment Control (hit lockers fast)
2. Pipeline → Research/Admin
3. Tunnel → Loading Bay
4. Zip up → Left-side drawers near metal stairs (highest priority cluster)
5. Quick medical check (only if convenient)
6. Extract (don't negotiate with greed)
The big idea: you're chaining container density, not visiting cool places.
↖ 4) Container Targets: What You're Actually Farming
Blueprints can show up in multiple container types, but some clusters simply give you more rolls.
Below is how I prioritize what to open on this run:
| Priority | Container Cluster | Why It's Good | What I Do |
|---|---|---|---|
| 1 | Research/Admin drawer banks (especially near metal stairs/left side after zip) | Highest rolls per minute in a compact area | Open everything rapidly; don't over-sort |
| 2 | Water Treatment Control lockers | Early high-density hit that sets the pace | Pop stems, clear lockers, leave immediately |
| 3 | Loading Bay drawers + nearby gray boxes | Solid secondary cluster; good supply value too | Quick sweep; don't get stuck inventory-tetris-ing |
| 4 | Side drawers on shipment containers | Prints materials fast; can bloat your weight | Hit only if you're not already heavy |
| 5 | Medical area (situational) | Can be already looted; time cost varies | Check only if pathing is clean |
This means you're optimizing for volume. More containers opened per raid is the closest thing this game has to control over blueprint RNG.
↖ 5) The Metal Stairs Left Side Trick (Where Runs Spike)
After you zip up into the Research/Admin upper area, I immediately bias left.
- Why left first? That side tends to have stacked drawers in a tight line, which is exactly what you want for blueprint rolling.
- What to watch for: If the drawers look untouched, that's your green light to commit. If they're clearly hit, don't linger—rotate and salvage the raid elsewhere.
I've had raids where this single cluster produced multiple blueprints in one pass, including Snap Hook. When it happens, it feels absurd, but it's not magic—it's just a dense cluster you reached quickly.
↖ 6) Inventory Rules (So You Actually Extract)
Blueprint runs fail for two reasons: dying and getting slow. Over-encumbrance is the stealth version of both.
Here are the rules I follow:
- If you find Snap Hook blueprint, your raid objective is complete.
- If you get over-encumbered, drop low-impact bulk immediately.
- Craft or convert small items only if it reduces weight or consolidates space.
A practical approach is to treat materials like this:
| Item Type | Keep When… | Drop When… | Why |
|---|---|---|---|
| Blueprint(s) | Always | Never | This is the entire point |
| High-value compact parts | If you still move well | If you're crawling | Value per slot matters |
| Bulky plastics/low-value stacks | Early only | As soon as you're heavy | Weight kills extraction odds |
| Nice-to-have crafting mats | If you're light | If you're already rich this raid | Greed tax is real |
If you discover you're moving like a refrigerator, then you're no longer farming blueprints—you're donating them.
↖ 7) A Real Raid Outcome (What Good Looks Like)
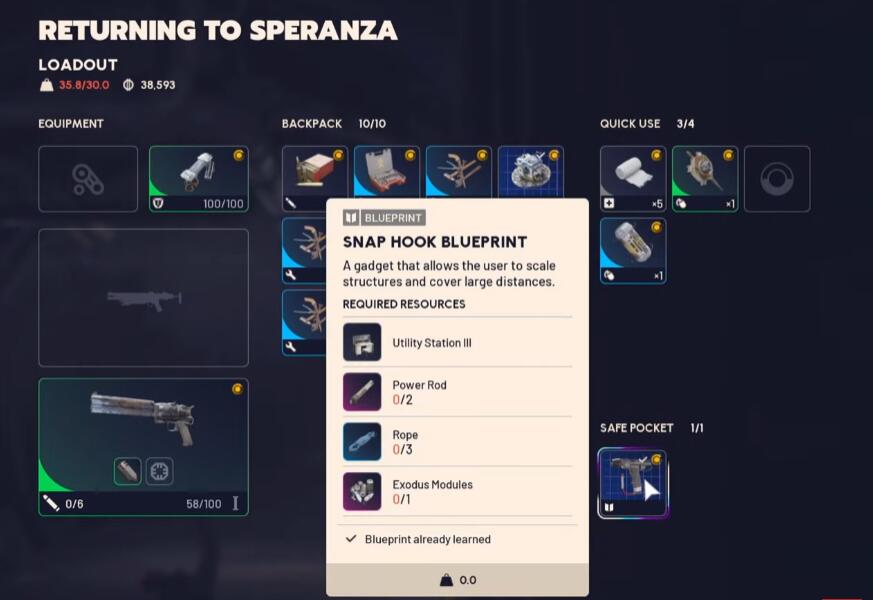
To calibrate expectations, here's a typical this route worked result from my own storm runs:
- Blueprint count: I've pulled 2 blueprints in one raid more than once, and 3 blueprints in a single run is absolutely possible when the drawer banks are untouched.
- Value: One strong run can clear roughly 38,000 value while entering with basically just adrenaline shots.
- Extras you'll often see: springs via rusted tools, occasional quest items (like motors), and enough crafting materials to keep your kit loop going.
The point isn't to promise every raid pays like that. The point is that the route produces these spikes often enough to feel repeatable.
↖ 8) Decision Tree: What To Do When Things Go Sideways
Use these triggers to stay efficient:
- If you hear VOIP/gunfire deep in Research/Admin early, then assume top clusters may be contested; hit what's safe and rotate to Loading Bay fast.
- If your favorite drawer bank is already looted, then don't cope loot every corner—take the nearest secondary cluster and pivot toward extract.
- If you land Snap Hook blueprint, then stop expanding the route. Tighten your path to extraction and play boring.
- If you're over-encumbered before you're halfway done, then you picked up too many bulky mats. Drop them, keep compact value, keep moving.
↖ FAQ
↖ 1) Do I need to bring a full weapon kit?
No. For blueprint farming, speed and arrival timing beat being ready for every fight. If you bring heavy gear, you'll loot slower and hesitate to drop weight. If you insist on carrying a weapon, keep it lightweight and commit to leaving earlier.
↖ 2) Is Electromagnetic Storm mandatory?
If your goal is Snap Hook blueprint consistency, I treat it as mandatory. Without storm, you can still get lucky, but your container rolls per minute won't feel as reliable.
↖ 3) Where is the highest-value place to check first in Research/Admin?
The upper area after the zip, then immediately left toward the dense drawer banks near the metal stairs. That cluster can decide the raid in under a minute if it's untouched.
↖ 4) I found the Snap Hook blueprint—should I keep looting?
Only if the path is still safe and you're not getting heavy. If there's any sign of contest or your movement slows, extract. The blueprint is worth more than whatever you're about to pick up just in case.
↖ 5) What's the biggest mistake people make on this farm?
Turning a blueprint run into a hoarding run. The second you're over-encumbered, your survival odds drop, your time-to-extract increases, and you're giving other players more time to intersect your route.
↖ Summary
This Snap Hook blueprint farm is simple on paper and brutally effective in practice: queue Electromagnetic Storm, run light with adrenaline shots, chain the highest-density drawer/locker clusters in Water Treatment → Research/Admin → Loading Bay, and extract the moment you hit your objective.
Play it like a timing problem, not a loot museum. The more quickly you reach untouched drawers—and the less you negotiate with greed—the more often Snap Hook stops being rare and starts being inevitable.

Most Popular Posts
- ARC Raiders Riven Tides Key Room Guide: Best Hotel Keys, Loot Routes, Secure & Crane Storage
- ARC Raiders Damage Fireflies Trial Guide: Best Farm Method on Buried City Night Raid
- ARC Raiders Riven Tides Update: New Map & Items, ARC Turbine, Rewards, and Best Early Strategy
- ARC Raiders Bettina Guide: Best Build, Buffs, and How to Use It Against ARC
- Arc Raiders Season 4 Riven Tides Update, Rewards, Safe Skins, and Release Timeline
- ARC Raiders Solo Search Supply Drops Guide: Best Buried City Route, Beacon Locations
Popular Category Lists
- Grow a Garden / (286)
- ARC Raiders / (262)
- CoD: Black Ops 7 / (166)
- Monopoly Go / (146)
- MLB 26 / (145)
- Star Citizen / (112)
- Steal a Brainrot / (89)
- Sailor Piece / (68)
- ARK Survival Ascended / (67)
- Diablo IV / (61)
- Forza Horizon 6 / (60)
- Blox Fruits / (60)
- CoD: BLACK OPS 6 / (55)
- Adopt Me / (53)
- Path of Exile 2 / (48)
- Monster Hunter Wilds / (46)
- Windrose / (44)
- Path of Exile / (40)
- Grow a Garden 2 / (40)
- Bee Swarm Simulator / (36)


