


 0
0ARC Raiders Blueprint Spawn Guide: Containers, Events & Best Farming Routes
- KIVRI
- Share
- ARC Raiders
- 01/18/26
- 3293
Blueprints hunting in ARC Raiders often feels like pure chaos—until we treat it like what it really is: container loot pools mixed with specific event locks. Once we stopped sprinting to the same popular room every raid and instead optimized for container type, density, and route time, our Arc Raiders blueprints completion rate jumped noticeably.
Identify the container family, pick the map area with the highest density of that container, and run a tight loop. If you do that, luck still plays a role—but it becomes luck per hour, which is the only metric we can actually control.
- 1) Blueprints Don't Spawn in Places, They Spawn in Containers
- Container Pools
- Event/Map Locks
- 2) Fastest Way to Decide Where to Go
- 3) Medical Blueprints: Farm Containers, Not Medical Zones
- What we open (and why)
- Best places to stack medical containers
- 4) Augment Blueprints (The Stop Rushing One Room Rule)
- Where people get stuck
- Our reliable loop logic
- Complex Gun Parts
- 5) Raider Containers: Weapons + Gun Parts (Volume Wins)
- What counts as Raider containers
- Why Uncovered Caches are King
- Managing Expectations
- 6) Attachments: Residential Containers Are the Factory
- Where we look
- Best map targets
- 7) High-Level Attachments: Events Matter More Than Containers
- What we do
- 8) Event-Specific Blueprints (Hard Gates)
- The Key Event Locks
- 9) Map-Specific Blueprints (Stella Montes Pool)
- The Rule
- 10) Explosives & Electronics: Context Matters
- Practical Routes We Run (Repeatable Session Plans)
- Route A: The Medical + Augment Session
- Route B: The Attachments Session
- Route C: The Weapons/Gun Parts Session
- FAQ
- Summary
↖ 1) Blueprints Don't Spawn in Places, They Spawn in Containers
Let's set the rule that keeps us sane during the grind.
↖ Container Pools
- Medical-style containers: Spawn Medical blueprints and Augment blueprints (they share a pool behavior).
- Augment-style containers: Spawn Augment blueprints + Complex gun parts (plus rare surprises).
- Raider containers: A massive shared pool containing many weapon blueprints and gun parts (duplicates are common here).
- Residential containers: The source for Attachment blueprints (and utility items like the Smoke Grenade).
- Industrial containers: The primary source for Explosive blueprints (with some location-based exceptions).
- Electrical containers: Spawn the Tagging Nade, Remote Raider Flare, and Barricade blueprints.
↖ Event/Map Locks
Some blueprints are strictly event-only or map-only. If you are not in the right condition, no amount of perfect looting will help. This means the fastest strategy is often:
If the required event isn't active, we farm a different category instead of forcing it.
↖ 2) Fastest Way to Decide Where to Go
This is the open it and run version of our strategy.
| Blueprint Category | Primary Spawn Source | Best Maps / Areas (High Density) | What This Means in Practice |
|---|---|---|---|
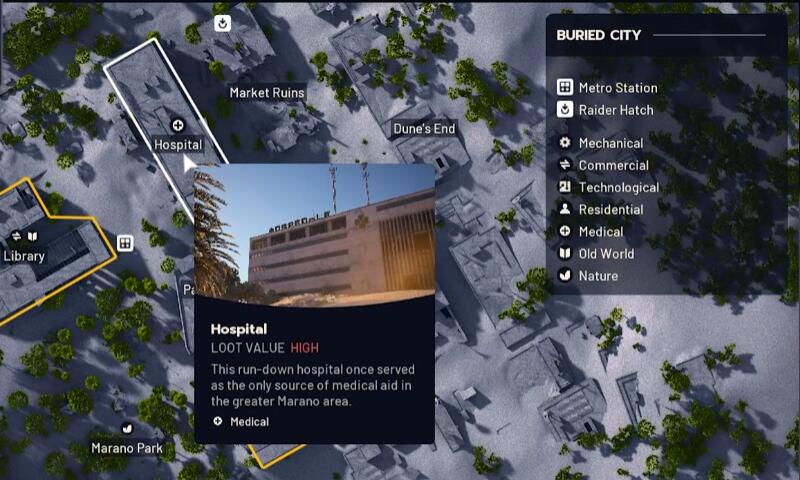
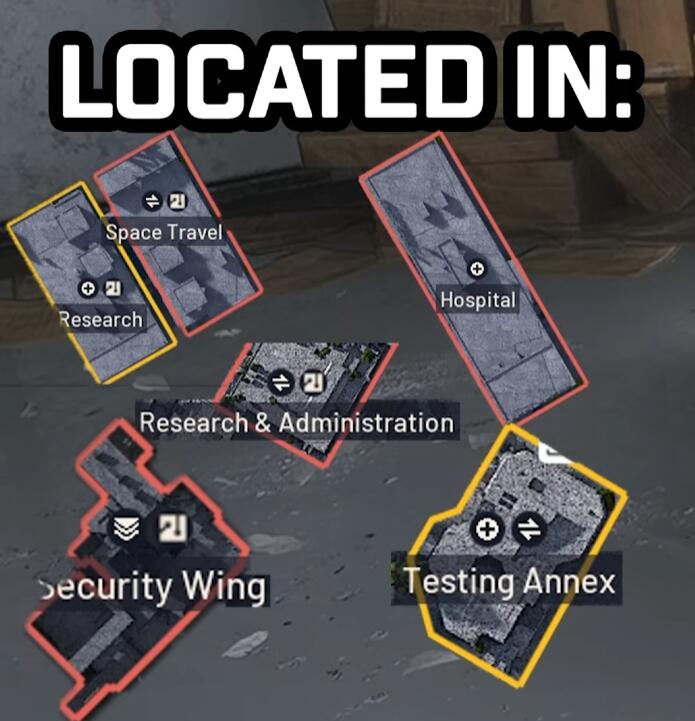
| Medical (Meds, sprays, shots) | Medical containers (white drawers, hospital cabinets) | Buried City (Hospital + Research), Stella Montes (Medical Research), Dam (Testing areas) | If you aren't opening medical containers, you are rolling the wrong dice. |
| Augments | Medical containers + Augment boxes | Bluegate (Security Wing, including upstairs), Stella Montes (Lobby augment boxes) | If you only rush one downstairs room, you are trading time for competition. |
| Complex Gun Parts | Mostly Augment-style containers | Same as Augments (Security Wing + Stella locations) | If you need complex parts, stop general looting and commit to augment boxes. |
| Weapons + Gun Parts | Raider containers (backpacks, ammo/weapon boxes) + Uncovered Caches | Any map with Raider density; prioritize Uncovered Cache events | Expect duplicates: we are pulling from a large pool, so volume wins. |
| L2 Attachments | Residential containers (trash cans, wardrobes, desks, suitcases) | Bluegate Village, Buried City residential blocks, Stella Montes Lobby | If you see home/office clutter, you are in attachment territory. |
| High-Level Attachments | Tied to map conditions/events | Locked Gate condition is best; Night/Storm raids also help | If you farm high-tier attachments on a normal day raid, you are choosing hard mode. |
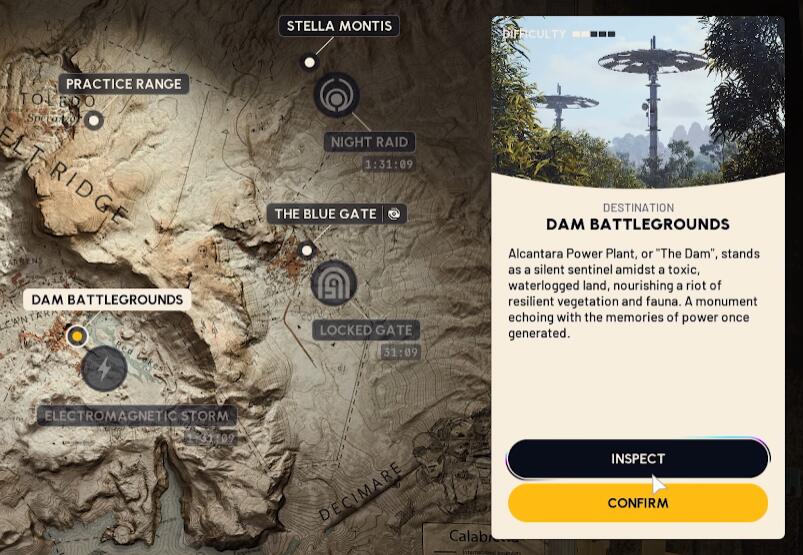
| Explosives | Industrial containers (lockers, shipping containers, rusty boxes) | Bluegate Maintenance Wing, Dam facilities, Stella Montes Loading Bay | If the area looks like a warehouse, explosives are more likely. |
| Tagging Nade / Flare / Barricade | Electrical containers (servers, wall cabinets, computers) | Any map with clusters of electronics | If you aren't looting electronics, you will likely never see these. |
| Quest Blueprints | Quest rewards | Quest paths (check your mission log) | If you skip quest chains, you might block the blueprint entirely. |
| Equalizer + Jupiter | Queen core loot OR Harvester puzzle reward | Queen kill runs / Harvester puzzle runs | If you can't access these activities, you can't access the blueprints. |
↖ 3) Medical Blueprints: Farm Containers, Not Medical Zones
Medical blueprints are the classic trap: players roam medical-looking areas but open the wrong boxes.
↖ What we open (and why)
Medical pullout drawers, hospital drawers, and clinic cabinets are the reliable sources.
Yes, medical blueprints can show up in weird places—but that is an outlier that burns time. If you bet your whole session on astronomically unlikely, you will feel cursed.
↖ Best places to stack medical containers
Buried City: The Hospital is dense, and nearby research buildings contribute to the count.
Stella Montes: The Medical Research area is essentially a buffet of medical containers.
Dam Battlegrounds: Testing and Administration zones often have concentrated medical storage.
If your goal is strictly medical blueprints, then we pick Stella Montes or Buried City because the route is shorter and the container count per minute is higher. That means more rolls, less running.
↖ 4) Augment Blueprints (The Stop Rushing One Room Rule)
Augment blueprints share behaviors with medical containers and augment boxes—so we treat them as a network of spots, not a single shrine.
↖ Where people get stuck
If you only sprint to a single high-traffic room (especially the Bluegate Security Wing basement), then:
You compete harder against other players.
You loot fewer total containers.
You die more often for the same number of rolls.
↖ Our reliable loop logic
If the hotspot is crowded, then we pivot upstairs or to adjacent corridors and clear all medical drawers and augment boxes there.
If it's quiet, then we still clear the full wing because one-room farming caps your odds.
↖ Complex Gun Parts
From our experience, complex gun parts mostly ride in augment-style containers. So if you are chasing those specific parts, this isn't a loot everything day—this is an augment box day.
↖ 5) Raider Containers: Weapons + Gun Parts (Volume Wins)
This is where players get emotionally damaged: you finally see a blueprint drop... and it is your 9th duplicate.
↖ What counts as Raider containers
Raider backpacks
Medical bags (yes, oddly enough)
Ammo boxes & Weapon boxes
Grenade cases
Uncovered Ticking Caches (Special Mention)
↖ Why Uncovered Caches are King
In our runs, the blueprint drop rate in Uncovered Caches feels meaningfully higher than standard containers—think noticeably frequent, roughly in the single-digits to ~10% range depending on variance.
If an Uncovered Cache event is active, then we prioritize it because it compresses the grind: you open fewer containers to find a blueprint.
↖ Managing Expectations
If a raider pool has ~10 possible blueprints and you want one specific item, every blueprint drop is roughly a 1-in-10 roll for your target. That means duplicates are not bad luck—they are the default setting. This is why we optimize for containers opened per minute rather than perfect routes.
↖ 6) Attachments: Residential Containers Are the Factory
Attachments are essentially everyday clutter loot.
↖ Where we look
Residential containers include trash cans, wardrobes, desks, suitcases, and storage in broken houses.
↖ Best map targets
- Bluegate Village: Absurd residential density with quick loops.
- Buried City: Large residential blocks and building clusters.
- Stella Montes (Lobby + Business Center): Suitcases and trash cans are everywhere.
If you are hunting L2 attachments, then we recommend committing to residential loops for an entire session rather than mixing them with industrial or medical zones. Mixing feels productive but usually lowers your total attachment rolls.
↖ 7) High-Level Attachments: Events Matter More Than Containers
For higher-tier attachments, our best results come when the map condition boosts the effective loot pool.
↖ What we do
Locked Gate Condition: This provides our most consistent high-tier attachment sessions.
Night raids and Storm raids can work, but Locked Gate has felt unfairly good when we spam residential containers.
If Locked Gate is up, then we farm residential containers aggressively—even outside the locked area—because the condition seems to lift the ceiling on what can drop across the map.
↖ 8) Event-Specific Blueprints (Hard Gates)
Some blueprints only appear under specific events. This is where strategy becomes scheduling.
↖ The Key Event Locks
- Bobcat: Appears during the Locked Gate condition; can be anywhere on the map, not just in the gated zone.
- Volcano: Tied to the Hidden Bunker event. We have repeatedly seen reports (and had our own drops) clustering around locked key rooms, though it can theoretically appear broadly.
- Snap Hook: Tied to the Electromagnetic Storm; you must be inside the storm.
- Tempest + Wolfpack: Tied to Night Raids; residential areas tend to be efficient for volume here.
If you are not in the correct event, then your best move is to stop forcing it. Farm a different category until the event cycles back.
↖ 9) Map-Specific Blueprints (Stella Montes Pool)
Right now, Stella Montes has its own map-specific blueprint set (examples include the Seeker Grenade and various mines). The important part isn't the names—it's the rule.
↖ The Rule
These can spawn in any container on Stella Montes.
So the optimized approach is simple:
1. Pick Stella Montes.
2. Run the highest-container-density loop you can survive.
3. Loot fast and reset.
If you are dying mid-loop, then reduce your greed. We would rather extract with 25 opened containers than die after 40.
↖ 10) Explosives & Electronics: Context Matters
- Explosives: Trend toward industrial containers, but location can override behavior.
- Targets: Red lockers (in industrial areas), shipping containers, rusty raider boxes.
- Best Areas: Bluegate Maintenance Wing, Dam facilities, Stella Montes Loading Bay.
- Electrical Pool: Tagging Nade, Remote Flare, Barricade.
These are the blueprints that refuse to drop when you loot normal stuff.
Targets: Server cabinets, wall cabinets, androids, computers.
Strategy:If you are missing these three, then switch routes to electronics-dense interiors and stop wasting time on wardrobes and shipping crates.
↖ Practical Routes We Run (Repeatable Session Plans)
↖ Route A: The Medical + Augment Session
1. Choose Stella Montes Medical Research or Buried City Hospital.
2. Open every medical drawer and cabinet; detour only if it adds more medical containers.
3. If Bluegate Security Wing is your plan, clear upstairs + side rooms, not just the hot basement.
4. Extract after a clean loop—don't overstay once your bag is full of the right container type loot.
↖ Route B: The Attachments Session
1. Choose Bluegate Village or Stella Lobby/Business.
2. Treat every trash can, wardrobe, suitcase, and desk as your primary objective.
3. If the map condition is Locked Gate, prioritize this route immediately.
↖ Route C: The Weapons/Gun Parts Session
1. Hunt Uncovered Cache events first.
2. Fill the gaps with Raider backpacks, ammo boxes, and weapon boxes.
3. Expect duplicates; judge success by blueprint drops per hour, not by the specific name that appears.
↖ FAQ
1. Does a blueprint only spawn in one exact spot?
Not usually. Most blueprints are container-pool based, meaning they can spawn anywhere as long as the correct container type is present*. Event-locked and map-locked blueprints are the only exceptions.
2. Why do I keep getting the same weapon blueprint?
Because Raider containers often share a large pooled set. If there are 10 candidates and you want one, each drop is roughly a 1/10 roll. Duplicates are expected; the fix is more rolls via faster container loops.
3. Do I need to be in a medical zone to get medical blueprints?
No. You need medical containers, not a medical-themed area. Medical zones just happen to have more of those containers, so they are more efficient.
4. What is the biggest mistake with Augment blueprints?
Only rushing one contested room. If you do that, your container count per raid collapses. We get better results by looting the whole wing, including upstairs and adjacent rooms.
5. Where do the Tagging Nade / Remote Flare / Barricade blueprints come from?
They trend toward electrical containers (servers, wall cabinets, androids). If you are farming wardrobes, you are rolling the wrong pool.
↖ Summary
Blueprint farming becomes straightforward once we stop thinking in exact spawn locations and start thinking in container pools and event locks. If you match your route to the right container family—and pick maps with high container density—each raid gives you more meaningful rolls, fewer dead sprints, and significantly less frustration.

Most Popular Posts
- ARC Raiders Riven Tides Key Room Guide: Best Hotel Keys, Loot Routes, Secure & Crane Storage
- ARC Raiders Damage Fireflies Trial Guide: Best Farm Method on Buried City Night Raid
- ARC Raiders Riven Tides Update: New Map & Items, ARC Turbine, Rewards, and Best Early Strategy
- ARC Raiders Bettina Guide: Best Build, Buffs, and How to Use It Against ARC
- Arc Raiders Season 4 Riven Tides Update, Rewards, Safe Skins, and Release Timeline
- ARC Raiders Solo Search Supply Drops Guide: Best Buried City Route, Beacon Locations
Popular Category Lists
- Grow a Garden / (286)
- ARC Raiders / (262)
- CoD: Black Ops 7 / (166)
- Monopoly Go / (146)
- MLB 26 / (144)
- Star Citizen / (112)
- Steal a Brainrot / (89)
- Sailor Piece / (68)
- ARK Survival Ascended / (67)
- Diablo IV / (61)
- Forza Horizon 6 / (60)
- Blox Fruits / (60)
- CoD: BLACK OPS 6 / (55)
- Adopt Me / (53)
- Path of Exile 2 / (48)
- Monster Hunter Wilds / (46)
- Windrose / (44)
- Path of Exile / (40)
- Grow a Garden 2 / (40)
- Bee Swarm Simulator / (36)


