0
0ARC Raiders Blueprints Farming: Fastest Routes, Loadouts, and Loot Rules After-Wipe
- KITE
- Share
- ARC Raiders
- 12/23/25
- 3739
ARC Raiders Blueprints are the real early wipe power. The faster you lock in core augments, key weapons, and the attachments that make them feel human, the sooner every raid becomes easier—PvE, PvP, money runs, all of it.
I've put hundreds of hours into blueprint-focused routing: timing runs, comparing container-heavy buildings, and stress-testing reset fast strategies when spawns or PvP ruin the plan. Below is the playbook I'd use if my account wiped today—plus the loot-rule logic that lets you build your own routes instead of copying someone else's.
- 1) The Blueprint Mindset: Speed Beats Romance
- What I optimize (and you should too)
- 2) Four Loadout Strategies (When to Use Each)
- My practical rule
- 3) How Loot Actually Works (So Your Route Makes Sense)
- 3.1 Container types decide the kind of loot
- 3.2 Conditions/events layer extra items or upgrade rolls
- 3.3 Scripted locations override normal behavior
- 4) Blueprint Farming Map Tier List (Time-to-Blueprint)
- 5) Best Blueprint Spots & Practical Routes (By Map)
- 5.1 Buried City: The Blueprint Buffet
- 5.2 Blue gate: The Augment Blueprint Shortcut
- 5.3 Dam Battlegrounds: Dense, Contested, Worth It
- 5.4 Spaceport: Don't Force It
- 5.5 Stella Montis: Blueprint Runs with a PvP Tax
- 6) Events That Matter (Blueprint-Specific)
- 7) Route Planning Rules You Can Reuse Every Wipe
- Rule A: Stack the same container family
- Rule B: Don't worship the map's red/yellow boxes
- Rule C: Decide your reset trigger before the raid
- FAQ
- 1) Should I farm blueprints on night raids for better drops?
- 2) What's the fastest way to get early-wipe augments?
- 3) Why does naked farming beat free kits?
- 4) Is Spaceport bad for blueprints?
- 5) How do I avoid wasting time on low-yield buildings?
- Closing Thoughts
↖ 1) The Blueprint Mindset: Speed Beats Romance
Blueprint farming isn't about the perfect raid. It's about repeatable high-probability rolls per minute.
↖ What I optimize (and you should too)
- Roll density: how many blueprint-eligible containers you can open fast.
- Reset speed: how quickly you can end a bad raid and start a good one.
- Survival threshold: not never die, but die only after the blueprint is safe.
If you catch yourself walking across half the map because it's on the way, that's usually your blueprint rate quietly dying.
↖ 2) Four Loadout Strategies (When to Use Each)
Different wipe stages and different goals need different kits. Here's the decision table I use.
| Strategy | What you bring | Best for | Why it works | Main risk |
|---|---|---|---|---|
| Weekly Trials First | Whatever clears the trial efficiently | Steady blueprint income every week | Rewards are too good to skip | Trial path forces you into fights sometimes |
| Naked Sprint | Nothing (optionally 1–2 heals) | Pure blueprint target-farming | Fast resets, no rebuild time, blueprint goes straight to safe pocket | You're fragile; you're gambling on speed and timing |
| Barebones Value | Cheap weapon + small ammo + a few meds + safe exit key | Blueprints + loot + coins | You can loot longer, win small fights, and extract reliably | Slightly slower resets than naked |
| Full Squad Kit | Real guns, meds, utility (duo/trio) | High-contest areas with PvP | Squads can own a zone long enough to vacuum containers | Solo cost-to-benefit is usually bad |
↖ My practical rule
- If you're hunting a specific blueprint in a contested room → go naked.
- If you want blueprints but also need money/materials/bench upgrades → go barebones.
- If you're solo → treat full kits as PvP night, not blueprint night.
That sounds obvious, but it prevents the classic wipe mistake: I brought my best kit to loot cabinets and died before opening the second drawer.
↖ 3) How Loot Actually Works (So Your Route Makes Sense)
Loot feels random until you learn the three levers that shape it. Once you see them, route planning becomes a logic problem—not a superstition.
↖ 3.1 Container types decide the kind of loot
Lockers, cabinets, drawers, weapon crates, courier drops, ARC boss drops—these behave like container families. They don't pull from everything in the game. They pull from a narrowed pool.
This means if you're chasing med blueprints, you don't search harder, you touch more med-like containers (pharmacies, medical rooms, cabinets) per minute.
↖ 3.2 Conditions/events layer extra items or upgrade rolls
Night, storms, and special events don't necessarily rewrite the whole game—they tend to:
- Add items into pools, or
- Upgrade a roll (e.g., a weapon roll becomes higher quality)
From my own logging, blueprint quantity across conditions often feels similar, but blueprint quality can skew better in some conditions. Also, some conditions noticeably change what filler spawns, which indirectly affects how often you see good rolls.
↖ 3.3 Scripted locations override normal behavior
Some rooms are just built different. They can:
- Force more item rolls per container,
- Force more containers to spawn,
- Or inject special items into otherwise normal crates
This means the best blueprint spots are rarely big zones on the map. They're usually dense buildings + scripted micro-rooms + breach rooms.
↖ 4) Blueprint Farming Map Tier List (Time-to-Blueprint)
I'm going to be blunt: not all maps respect your time equally after wipe.
| Map | Blueprint Farming Value | What you're really farming | When I go |
|---|---|---|---|
| Buried City | Very High | Attachments + utility + general pool | Day or night, early wipe nonstop |
| Bluegate | High (specific) | Augment blueprints (especially) | Early wipe target-farm sessions |
| Dam Battlegrounds | High | Weapons/attachments + some medical | Night/storm when you want density + risk |
| Spaceport | Medium-Low | A few strong buildings/towers | Only if trials or event pulls me here |
| Stella Montis | Medium (but volatile) | Suitcase-style containers + breach rooms | Only when you're ready for PvP tax |
↖ 5) Best Blueprint Spots & Practical Routes (By Map)
Below are the locations I prioritize because they combine container density with fast exit options.
↖ 5.1 Buried City: The Blueprint Buffet
Buried City is the closest thing ARC Raiders has to a blueprint factory, because it stacks residential-style containers and repeatable building clears.
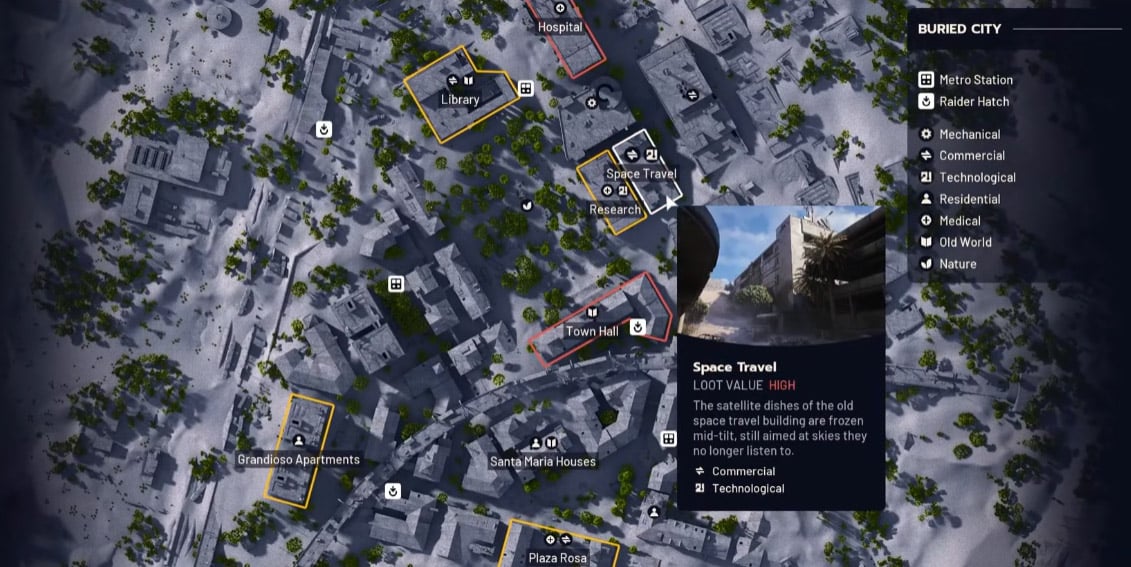
Grandioso Apartments (Top-tier all-rounder)
- Why it's elite: unusually high container density in a compact area.
- What I commonly pull here: attachments, utility, and mid-to-high value weapon/gear blueprints.
- How I run it:
1. Spawn → beeline into Apartments
2. Clear both buildings quickly (don't over-loot the street)
3. If you're naked and you hit a blueprint early → reset fast
If you're barebones → chain a second nearby building before extracting
Space Travel building (locker room focus)
There's a specific locker-heavy room accessible from the outside side entrance that consistently overperforms.
- Why it works: lockers + adjacent containers = fast roll stacking
- What it's best for: attachment blueprints in particular
Secondary options when spawns are awkward
- Santa Maria houses (two strong residential buildings)
- Two pharmacies (unique chance to see medical-related blueprints)
If you notice you spawned far from Apartments but close to pharmacy/houses, then commit to the nearby density instead of crossing the map late. Late arrivals pay a PvP fee.
↖ 5.2 Blue gate: The Augment Blueprint Shortcut
Most of Blue gate's surface loot can feel fine, but not special. The underground breachable security room is the exception—the kind that makes you restructure your entire wipe plan.
Underground breach room (augment blueprints)
- Best strategy: naked sprint
- Why: you're optimizing attempts per hour, not extraction rate
- What you're hunting: core augment blueprints that accelerate your wipe start
My practical loop:
1. Spawn → hard commit to the breach room
2. Open, loot only the highest-value containers
3. Blueprint secured → end the raid quickly and queue again
Yes, it's sweaty. That's the point. This is target-farming, not sightseeing.
↖ 5.3 Dam Battlegrounds: Dense, Contested, Worth It
Dam is excellent when you accept one truth: it's easier to be efficient at night/storm because fewer people wander aimlessly—most players either full commit or stay out.
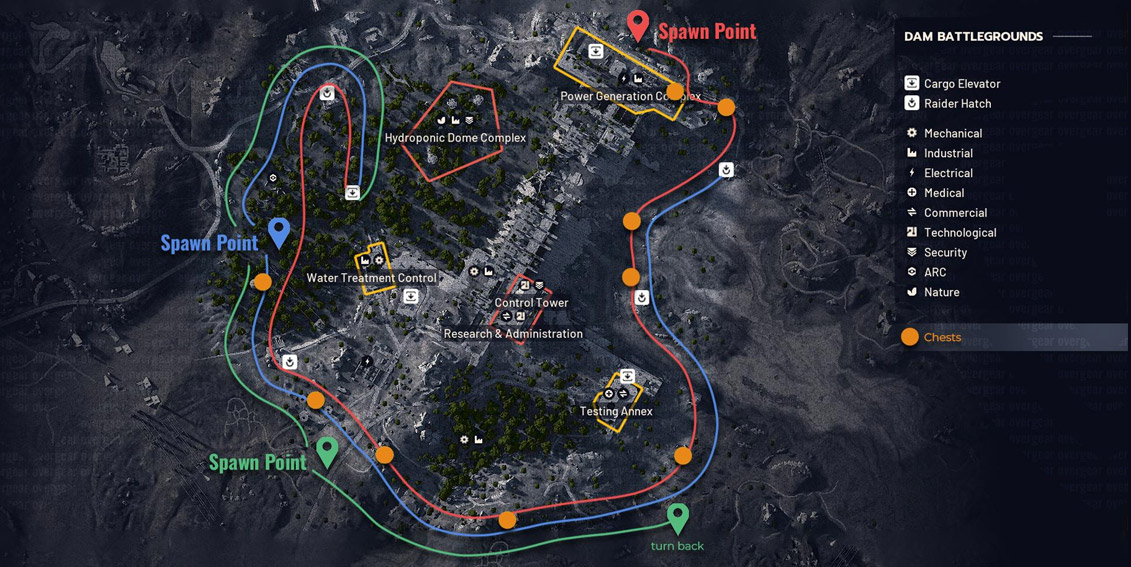
Reliable blueprint buildings
- Pale Apartments
- Ruby Residence
- Pattern House
Research & Administration (2nd floor)
This floor is a blueprint magnet because it stacks the right container types.
- Expect competition
- If you're solo and arrive late, then pivot to apartments instead of forcing a doomed fight
Testing Annex (medical blueprint chance)
If you're chasing defib/vita-style medical blueprints, this place is disproportionately relevant because the container theme matches the loot pool.
↖ 5.4 Spaceport: Don't Force It
Spaceport can absolutely drop blueprints, but it often feels like you're working harder for the same result because residential density is lower.
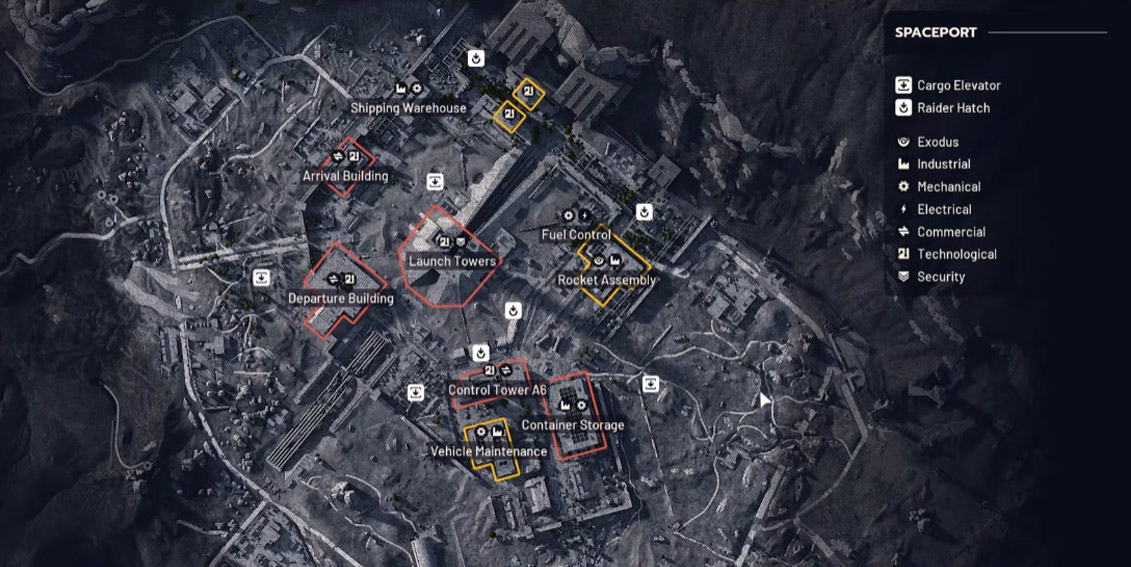
Where I bother farming
- Towers (multiple scattered)
- Departure building
- Arrival building
If your goal is blueprints per hour, Spaceport is usually a trials map for me, not a main farm.
↖ 5.5 Stella Montis: Blueprint Runs with a PvP Tax
Stella can pay out, but it's a hot zone. You're not just farming containers—you're paying for them with attention, ammo, and sometimes your life.
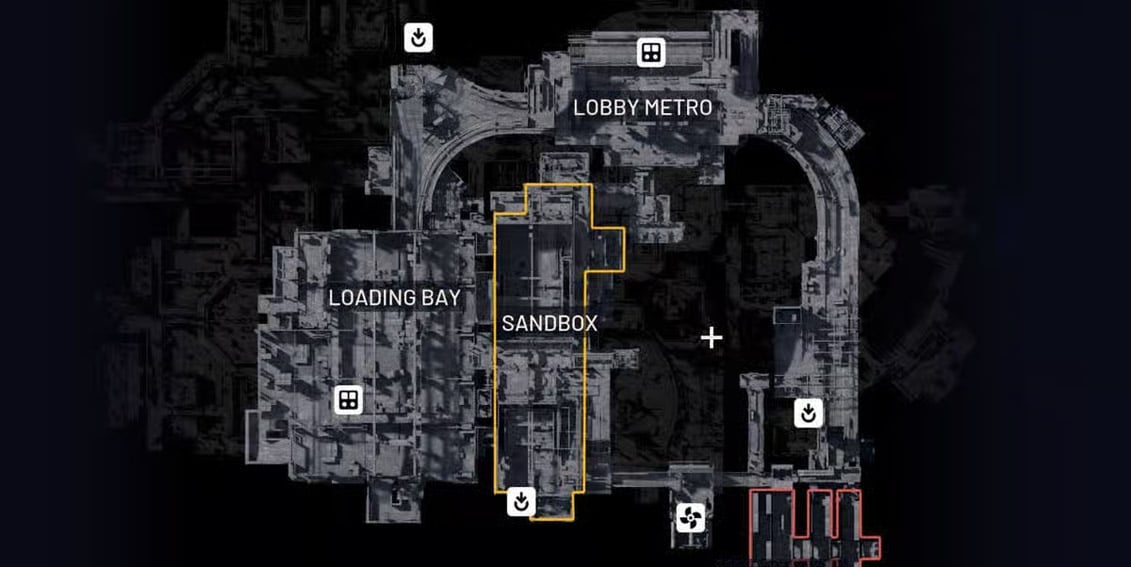
The spots worth checking
- Lobby / Business Center / Atrium: lots of small suitcase-like containers that roll blueprints well
- Lobby breach rooms (upper floors): strong scripted-room behavior
- A small admin office near the metro extract path: quick bonus check if you're already routing through
If you came naked, treat Stella as a hit-and-quit map.
If you came barebones, be realistic: once gunshots stack up, your blueprint rate collapses.
↖ 6) Events That Matter (Blueprint-Specific)
Some events don't just add flavor—they inject unique blueprint opportunities.
| Event | Map | Why it matters | What I do |
|---|---|---|---|
| Hidden Bunker | Spaceport | Adds access to a unique blueprint opportunity in the broader event context (not only inside the bunker) | Farm multiple nearby containers rapidly; don't tunnel vision one room |
| Locked Gate | Bluegate | Underground becomes significantly better across multiple containers | Route underground immediately; prioritize dense container clusters |
The key idea: events are best when they increase your roll density or add a specific blueprint into the pool. If an event only feels cool, it's usually not a blueprint event.
↖ 7) Route Planning Rules You Can Reuse Every Wipe
Here's the part that keeps working even if devs tweak drop rates.
↖ Rule A: Stack the same container family
If you loot one server cabinet, loot all nearby server cabinets. If you loot lockers, stay in locker land.
- Why: you're specializing your rolls toward the pool you want
- This also improves inventory efficiency (items stack thematically in value)
↖ Rule B: Don't worship the map's red/yellow boxes
Zones guide players, but scripted rooms and breach rooms can sit outside the pretty highlighted areas.
This means you should route to container density and scripted behavior, not color coding.
↖ Rule C: Decide your reset trigger before the raid
- If naked: Blueprint found = reset immediately
- If barebones: Blueprint found + bag value threshold met = extract
- If full squad: Zone secured + containers cleared = rotate
Pre-deciding prevents the classic late-raid death where you get greedy just one more building.
↖ FAQ
↖ 1) Should I farm blueprints on night raids for better drops?
Night can feel like it improves blueprint quality more than raw count, but the bigger win is usually behavioral: routes are clearer, and certain item pools shift. I treat night as slightly better upside, not magic.
↖ 2) What's the fastest way to get early-wipe augments?
Bluegate underground breach-room target farming with a naked loadout. It's not glamorous, but attempts-per-hour is the whole game early wipe.
↖ 3) Why does naked farming beat free kits?
Because you can reset instantly, you don't waste time rebuilding, and the moment a blueprint hits your safe pocket your objective is complete. Free kits tempt you to play it out, which often destroys your hourly blueprint rate.
↖ 4) Is Spaceport bad for blueprints?
Not bad—just usually lower value per minute compared to Buried City/Dam/Bluegate. If you're there for trials or an event, it's fine; as a primary blueprint farm, it's often inefficient.
↖ 5) How do I avoid wasting time on low-yield buildings?
Use the container rule: if the building doesn't concentrate blueprint-friendly containers (lockers/cabinets/suitcases/medical storage) or isn't a scripted/breach location, it's probably a scenic detour.
↖ Closing Thoughts
If you take only one thing from this guide, make it this: blueprint farming is a routing discipline, not a luck ritual. Pick the loadout that matches your goal, run buildings with dense container families, abuse scripted rooms and breach doors, and reset aggressively when the objective is done.

Most Popular Posts
- Arc Raiders Canto Guide: Best Build, Solo vs Trios Tips, and Blueprint Farm
- ARC Raiders Assessors Guide: Easy Solo Loot Strategy With or Without Smoke Grenades
- ARC Raiders Riven Tides Key Room Guide: Best Hotel Keys, Loot Routes, Secure & Crane Storage
- ARC Raiders Damage Fireflies Trial Guide: Best Farm Method on Buried City Night Raid
- ARC Raiders Scrappy Guide: Best Fruits, and What Apricots & Agave Actually Drop
- ARC Raiders Riven Tides Update: New Map & Items, ARC Turbine, Rewards, and Best Early Strategy
Popular Category Lists
- Grow a Garden / (283)
- ARC Raiders / (248)
- CoD: Black Ops 7 / (164)
- Monopoly Go / (145)
- MLB 26 / (133)
- Star Citizen / (99)
- Steal a Brainrot / (87)
- Sailor Piece / (67)
- CoD: BLACK OPS 6 / (55)
- Forza Horizon 6 / (54)
- Blox Fruits / (54)
- ARK Survival Ascended / (50)
- Path of Exile 2 / (48)
- Adopt Me / (47)
- Monster Hunter Wilds / (46)
- Diablo IV / (45)
- Windrose / (43)
- Path of Exile / (40)
- Battlefield 6 / (34)
- Bee Swarm Simulator / (32)