0
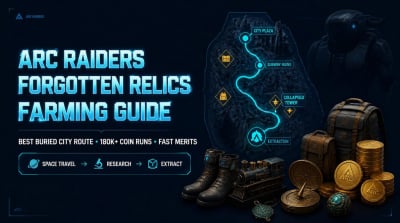
0ARC Raiders Bobcat Blueprint Fast Route: Locked Gate Event on Blue Gate
- KITE
- Share
- ARC Raiders
- 12/19/25
- 1921
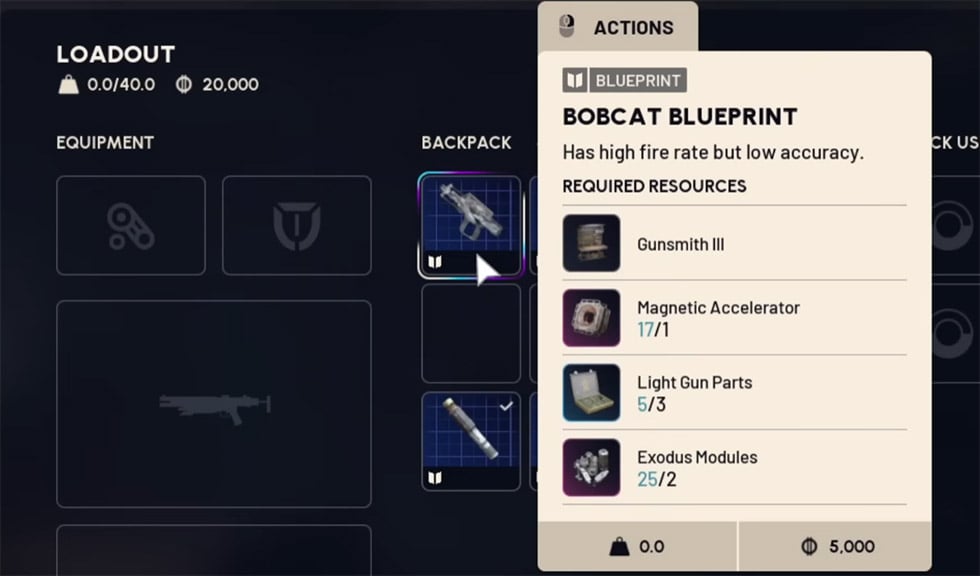
Bobcat blueprints can drop from normal loot on Blue Gate, but the Locked Gate underground is where the drop rate feels real because you simply open more containers per minute.
- Event timing: how I decide when to farm
- Two proven methods (pick based on your situation)
- Method A: Locked Gate Underground (most consistent)
- Method B: Pilgrim's Peak Speed Loot (fastest per attempt)
- Locked Gate keys: where they are and how I farm them without tilting
- The loot loop I run at each POI
- Gate Control and the only exit rule (don't get trapped)
- What usually goes wrong here
- The non-negotiable rule
- Underground looting: how I maximize Bobcat blueprint odds
- My practical route logic (not a rigid map)
- Loadout: what I bring for each method
- Locked Gate (I plan to live)
- Speed Loot (I plan to run)
- FAQ
- 1) Is Blue Gate the only map for the Bobcat blueprint?
- 2) Can I get the Bobcat blueprint without opening the Locked Gate?
- 3) Do I have to collect all four keys in one raid?
- 4) Where is the Gate Control terminal?
- 5) After opening the gate, can I leave through zip lines or side routes?
- 6) Why do people say Pilgrim's Peak is best for quick attempts?
- Summary
- Open world: possible, but inconsistent.
- Locked Gate underground: high-density looting = more blueprint rolls = better blueprints per hour.
That numbers game idea matters. It means you don't need a perfect chest; you need a repeatable route that lets you loot a lot and extract often.
↖ Event timing: how I decide when to farm
The Locked Gate event is limited. In my experience, there are two windows per day (often around midday and midnight, depending on time zone), and community timers like MetaForge have been reliable enough for planning.
| What you're checking | Why it matters | What I do |
|---|---|---|
| Locked Gate event window | Underground access = best loot density | I schedule serious blueprint farming during these windows |
| Your time zone offset | Noon/midnight shifts | I treat it as two daily windows, not fixed clock times |
| Session length | Determines method | <30 min: speed runs; 60–90 min: keys + gate cycle |
If the event is not up, I don't force it. I switch to the Pilgrim's Peak fast route and still get blueprint rolls while staying light.
↖ Two proven methods (pick based on your situation)
↖ Method A: Locked Gate Underground (most consistent)
You're completing a loop:
1. Collect four keys from four POIs.
2. Put keys in your safe pocket (bank progress even if you die).
3. Go to Gate Control (warehouse complex above checkpoint) and insert keys.
4. Enter underground → loot hard → extract through the big gate.
Why this works: the safe pocket turns a do everything perfectly in one raid problem into a multi-raid project. That's a huge difference in an extraction shooter.
↖ Method B: Pilgrim's Peak Speed Loot (fastest per attempt)
When I was grinding quickly, I ran naked/light kits and just sent it to Pilgrim's Peak and nearby lootables (including cars). In roughly one hour, I found ~12 blueprints total, including 2 Bobcat blueprints. That's not a guaranteed rate—RNG is RNG—but it's a real example of how fast attempts can stack.
Why this works: Pilgrim's Peak has dense, fast-to-check loot, and the outside cars are often ignored. That means your containers opened per minute is high even without the underground.
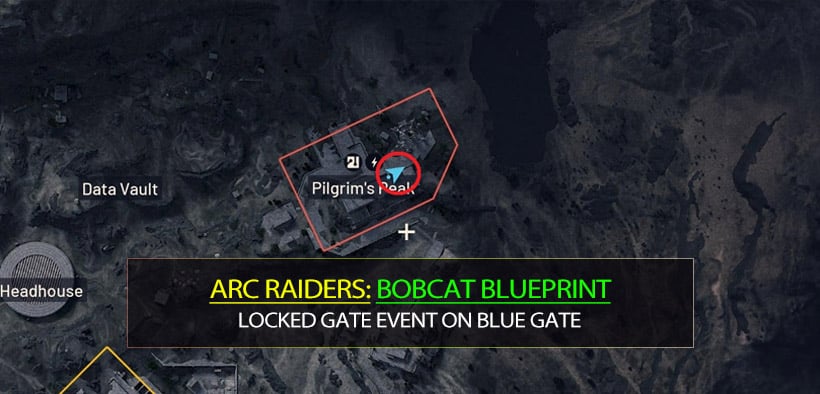
↖ Locked Gate keys: where they are and how I farm them without tilting
Keys come from lootable containers inside each POI, not a single fixed box. Your job is to loot efficiently and leave.
| Key POI | Where I focus first | Containers that commonly pay off | Risk profile |
|---|---|---|---|
| Ancient Fort | Central structures | Any bins/containers in the area | Medium (rotations happen here) |
| Pilgrim's Peak | Interior + outside cars | Inside loot + car hoods/trunks | High (popular) |
| Reinforced Reception | Inside only (small POI) | Lootable bins inside | Low–Medium (quick hit) |
| Raiders Refuge | Main cluster + breach container | Anything lootable, breach container | Medium–High (traffic) |
↖ The loot loop I run at each POI
- I sweep fast, touch everything lootable, then rotate.
- If I find a key, I immediately safe-pocket it.
- This means dying later is annoying, not catastrophic.
- If the POI is hot (shots/footsteps), I leave and return later.
- Fighting for a key when you could loot two other POIs is bad economics.
If you're trying to collect all four keys in one raid, expect it to be hard. It's doable, but it's also how you end up opening the gate with 6 minutes left and panic-looting like a raccoon in a supermarket.
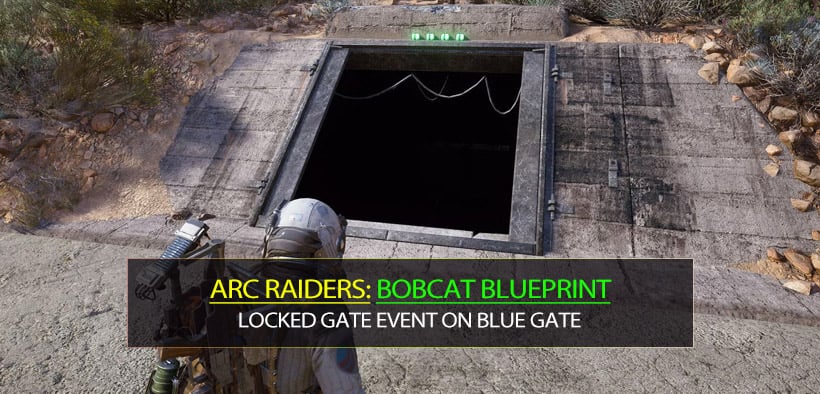
↖ Gate Control and the only exit rule (don't get trapped)
After you have all four keys, head to the warehouse complex above the checkpoint. That's where you insert each key to open the gate.
↖ What usually goes wrong here
Gate Control attracts players. Some are farming, some are camping, some are just looking around with suspiciously perfect angles.
If you see signs of recent looting (open containers, doors ajar) then clear slowly and assume a player is nearby.
If you're solo and you hear multiple footsteps then back off and wait; trading your key set for a 50/50 fight is rarely worth it.
↖ The non-negotiable rule
Once opened:
- You can only enter/exit via the big gate.
- Zip lines and alternate entrances stay closed.
This means your extraction plan is not optional. You're committing to a single choke point.
↖ Underground looting: how I maximize Bobcat blueprint odds
My underground strategy is simple on purpose: loot everything.
- Breach rooms and red locker areas can feel extra spicy, but I've had blueprint drops from regular containers too.
- This means your best play is to keep moving and keep opening containers.
↖ My practical route logic (not a rigid map)
1. Loot the entrance-adjacent containers first
- Why: if you get contested, you still got early rolls.
2. Move through high-density corridors and rooms
3. Stay aware of bag weight and time
4. Turn back before you're slow and loud
If your inventory is nearly full and you have a Bobcat blueprint, then start exiting.
That single decision has saved me more perfect runs than any gunfight ever did.
↖ Loadout: what I bring for each method
↖ Locked Gate (I plan to live)
| Slot | What I bring | Why |
|---|---|---|
| Weapon | Whatever you can fight with confidently | Gate Control and exit are PvP magnets |
| Healing | Enough for one fight | Underground attrition + third parties |
| Utility | One mobility/escape option if available | Chokepoints punish slow exits |
| Safe pocket | Keys + highest-value blueprint | Protects your progress |
↖ Speed Loot (I plan to run)
| Slot | What I bring | Why |
|---|---|---|
| Armor | Often none (naked runs) | Faster resets, low cost per attempt |
| Consumables | Adrenaline shots in safe pocket | Emergency sprint to disengage/extract |
| Loot plan | Minimal | The goal is containers opened, not full bags |
Trade-off: speed runs spike your attempts per hour but increase deaths. That's fine if your blueprint is protected and your kit is cheap.
↖ FAQ
↖ 1) Is Blue Gate the only map for the Bobcat blueprint?
From what I've seen in practice, Blue Gate is the reliable place, and the Locked Gate event is the standout source for farming multiple copies.
↖ 2) Can I get the Bobcat blueprint without opening the Locked Gate?
Yes. I've gotten Bobcat blueprints from normal world containers, especially while speed-looting. It's just less consistent than underground volume looting.
↖ 3) Do I have to collect all four keys in one raid?
No. Safe pocket banking is the whole trick. If you extract with keys, you can bring them back and open the gate earlier in a future run.
↖ 4) Where is the Gate Control terminal?
It's in the warehouse complex in the middle of the map above the checkpoint. Insert all four keys there to open the big gate down at the checkpoint.
↖ 5) After opening the gate, can I leave through zip lines or side routes?
No. Only the big gate works. If you go underground, plan to return to that gate to extract.
↖ 6) Why do people say Pilgrim's Peak is best for quick attempts?
Because it's fast to reach, has dense loot, and even the cars outside can pay out. That boosts containers-per-minute, which is what matters for blueprint farming.
↖ Summary
When I'm serious about stacking Bobcat blueprints, I treat Blue Gate like a system: I track the Locked Gate event windows, bank keys in my safe pocket, open the gate when I'm ready, then loot the underground like it's a timed grocery run—grab everything, don't get romantic about one room, and leave before the exit choke point turns into a party.
When the event timing is inconvenient, I switch to Pilgrim's Peak speed-loot runs with a cheap kit and adrenaline in the safe pocket. That approach is how I personally landed 2 Bobcat blueprints in about an hour, alongside a pile of other blueprints—proof that you can still progress even outside the underground loop.

Most Popular Posts
- Arc Raiders Canto Guide: Best Build, Solo vs Trios Tips, and Blueprint Farm
- ARC Raiders Assessors Guide: Easy Solo Loot Strategy With or Without Smoke Grenades
- ARC Raiders Riven Tides Key Room Guide: Best Hotel Keys, Loot Routes, Secure & Crane Storage
- ARC Raiders Damage Fireflies Trial Guide: Best Farm Method on Buried City Night Raid
- ARC Raiders Scrappy Guide: Best Fruits, and What Apricots & Agave Actually Drop
- ARC Raiders Riven Tides Update: New Map & Items, ARC Turbine, Rewards, and Best Early Strategy
Popular Category Lists
- Grow a Garden / (283)
- ARC Raiders / (248)
- CoD: Black Ops 7 / (164)
- Monopoly Go / (145)
- MLB 26 / (133)
- Star Citizen / (99)
- Steal a Brainrot / (87)
- Sailor Piece / (67)
- CoD: BLACK OPS 6 / (55)
- Forza Horizon 6 / (54)
- Blox Fruits / (54)
- ARK Survival Ascended / (50)
- Path of Exile 2 / (48)
- Adopt Me / (47)
- Monster Hunter Wilds / (46)
- Diablo IV / (45)
- Windrose / (43)
- Path of Exile / (40)
- Battlefield 6 / (34)
- Bee Swarm Simulator / (32)