


 0
0Arc Raiders Coins: Top 5 Easy Farming Methods for Expedition Skill Points
- KITE
- Share
- ARC Raiders
- 12/09/25
- 2835
you're not bad at the game, you're just using the slowest way to make Coins. Arc Raiders doesn't just ask you to survive; it asks you to be rich. You need 5M Arc Raiders Coins for Expedition unlocks and the extra skill points tied to them. If you're running both a main account and a hardcore account, you're realistically staring at 10 million+ over time.
- Five Coins methods at a glance: choose the route before you queue
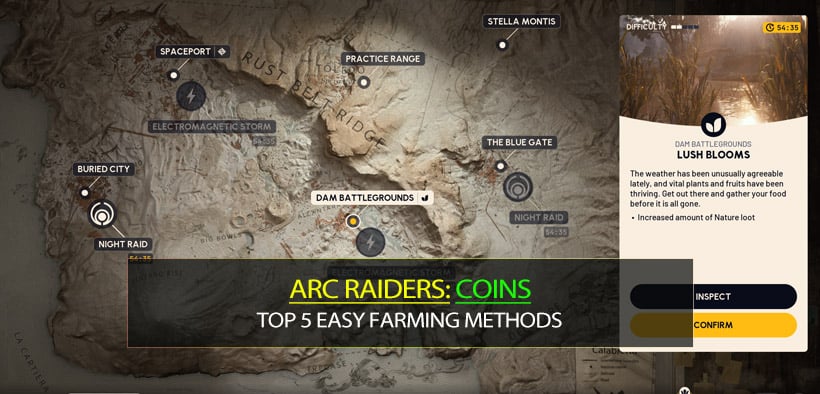
- Method 1 – Lush Bloom basket runs: fruit salesman route to 100k+
- Method 2 – Electromagnetic / Husk Graveyard: Rocketeer corpse farms
- Method 3 – Spaceport Great Mulan routes: Coins even without Lush Bloom
- Method 4 – Stella Montis free-kit snowballing: zero-cost Coins printer
- Method 5 – Residential trinket runs: the old-school loot route that still works
- Map vs method vs expected income: quick decision table
- FAQ
- Summary: turn all this into a concrete 5M plan
↖ Five Coins methods at a glance: choose the route before you queue
Here's a top-level summary of the Coins-making paths that consistently show up in high-level play:
| Method | Core Map / Event | Expected Income (once practiced) | Playstyle | Best For |
|---|---|---|---|---|
| Lush Bloom Basket Runs | Any map with Lush Bloom | 80k–120k per raid | Low-risk fruit/veg farming, minimal fighting | Players who want safe, steady income |
| Rocketeer Corpse Farming | Dam Electromagnetic / Husk Graveyard | 60k–120k per raid | Hit every Rocketeer husk, strip parts, leave | Event-aware players comfortable vs Arc |
| Spaceport Great Mulan Routes | Spaceport (with or without Lush Bloom) | 60k–100k per raid | Herb/fruit loops + light looting | Players who like combining missions + Coins |
| Stella Free-Kit Snowballing | Stella Montis (free loadout) | 50k–80k per raid (no gear risk) | Free kits into high-value POIs, repeat | Hardcore / low-budget players |
| Residential Trinket Runs | Dam / Bluegate / Buried City residential zones | 40k–90k per raid | Clearing houses, drawers, lockers for trinkets | Players who enjoy classic looting loops |
The key idea is simple:
- Don't just queue and see what happens.
- Look at events and map rotation, then pick the Coins route first.
For example:
- Lush Bloom active → Go baskets and fruit.
- Electromagnetic or Husk Graveyard → Dam Rocketeer corpses.
- Bad event pool, sweaty Trials → Spaceport Great Mulan or residential trinkets.
- Want zero-cost runs → Stella Montis with free kits.
Now let's break each route down into something you can actually follow.
↖ Method 1 – Lush Bloom basket runs: fruit salesman route to 100k+
Any time you see Lush Bloom as an event, you should be thinking:
Great, the game just spawned a ton of Coins and nobody's guarding it.
1. What you're actually doing
You're not hunting players; you're hunting baskets and food spawns.
You fill your inventory with:
- Basket contents
- Fruit and vegetables (lemons, Great Mulan, agave, etc.),
- Occasionally herbs and odd high-value consumables.
- On a decent run, it's realistic to walk out with 80k–120k in one game just from food/produce + incidental loot.
2. When basket runs are the right call
They're ideal when:
- Lush Bloom is active on any map.
- Lobbies feel sweaty and you don't want to risk expensive kits.
- You just died with a big loadout and want a low-tilt, high-value reset.
If you notice:
I spent that whole raid chasing one fight and made less Coins than the guy picking fruit,
that's a hint you should be running baskets whenever Lush Bloom is up.
3. Execution example (generic Lush Bloom route)
You'll adapt this to each map, but the pattern is:
1. Off spawn: scan for nearby POIs with basket spawns.
- On Dam: residential edges, roadside sheds, courtyards.
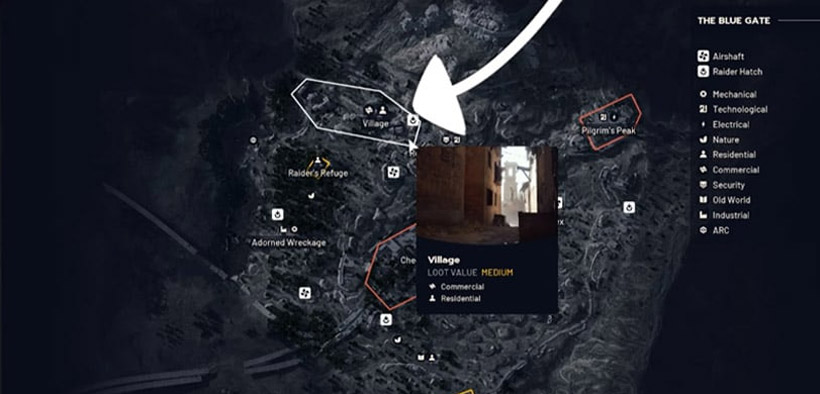
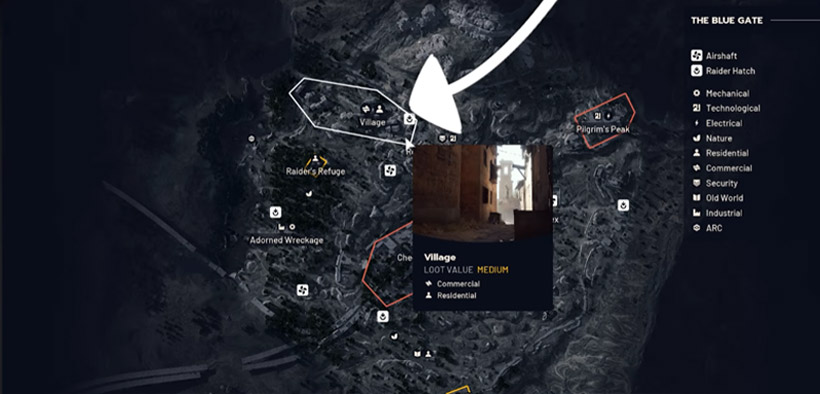
- On Bluegate: village, road edges near fields, farmhouses.
2. Run your first ring of baskets.
- Clean all baskets and nearby free fruit in a safe loop around spawn.
- Prioritize high-density areas rather than running across the whole map.
3. If safe, expand to a second ring.
- Once the inner loop is clear and you're not hearing heavy PvP, go one ring farther out.
- Keep checking your inventory; drop low-value clutter to keep room for food/produce.
4. Know when to extract.
- When your bag is ~80–90% full, you've already locked in most of the profit.
- Don't get greedy and push into obvious fight zones just because you still have space.
Income vs risk
| Aspect | Notes |
|---|---|
| Per-raid income | 80k–120k once you know spawns |
| Risk profile | Low if you avoid major fights; other basket farmers are main competition |
| Skill requirement | Map awareness and discipline > aim |
If you use Lush Bloom only for a bit extra while farming PvP, you're leaving a ridiculous amount of guaranteed Coins on the table.
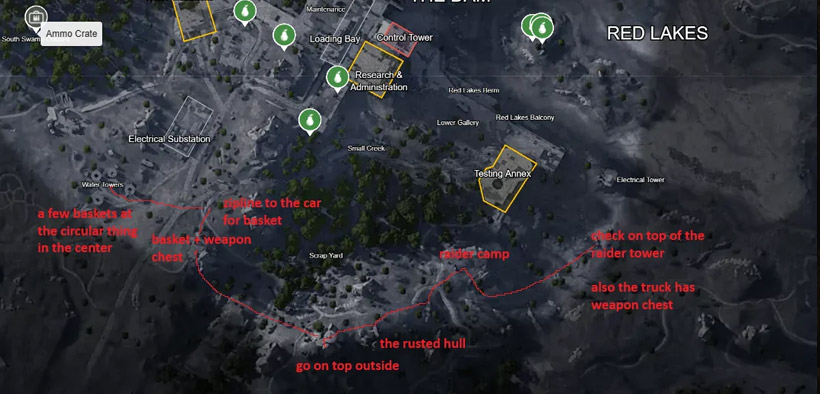
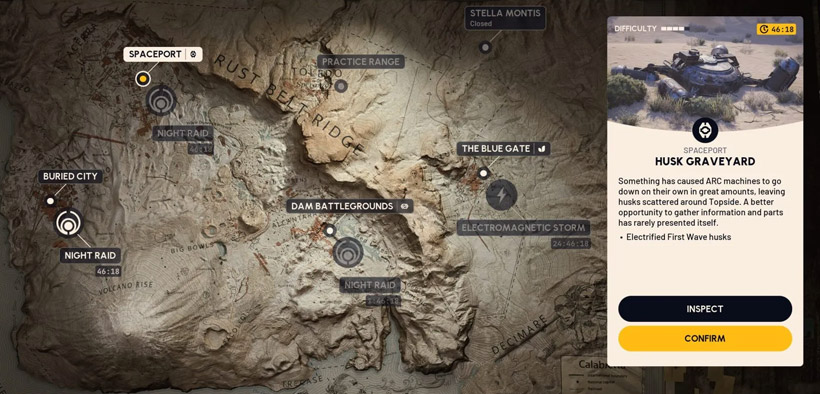
↖ Method 2 – Electromagnetic / Husk Graveyard: Rocketeer corpse farms
Most people see Electromagnetic and think danger.
Experienced players see it and think: Rocketeer graveyard.
1. Why Rocketeer corpses are worth your time
Rocketeer husks are jackpots because they can contain:
- Rocketeer Drivers (the pink parts), even damaged ones sell well.
- Large stacks of heavy ammo.
- Misc Arc components that salvage into useful materials.
If you do a focused corpse run on Dam during Electromagnetic or Husk Graveyard:
- Just the drivers can easily net 40k–80k.
- Throw in some extra loot and you're looking at 60k–120k raids.
2. Best maps / events and how to run them
| Map / Event | What's good about it | How to path it |
|---|---|---|
| Dam – Electromagnetic | Very high density of Rocketeer corpses | Run a memorized loop of all known husks (islands, banks, hillside). Loot only corpses and leave. |
| Dam – Husk Graveyard | Similar density, slightly different corpse positions | Follow the Husk clusters; prioritize Rocketeer remains over small Arc husks. |
| Other maps w/ Electromagnetic | Lower density but still profitable | Use as backup: grab a few Rocketeer husks then shift to standard loot routes. |
Practical loop:
1. Spawn on Dam with Electromagnetic / Husk Graveyard active.
2. Bee-line straight to known Rocketeer corpse areas.
3. Ignore almost everything else (don't get baited into prolonged fights or full POI clears).
4. Strip drivers and core materials; when you've hit all known corpses, extract.
Income vs risk
| Aspect | Notes |
|---|---|
| Per-raid income | 60k–120k from drivers + side loot |
| Risk profile | Moderate: Arc weather, live Rocketeers, and other farmers |
| Player requirement | Must be comfortable navigating Dam under pressure |
If you still treat Electromagnetic like a bad event to avoid, you're missing one of the most reliable high-value Coins phases in the game.
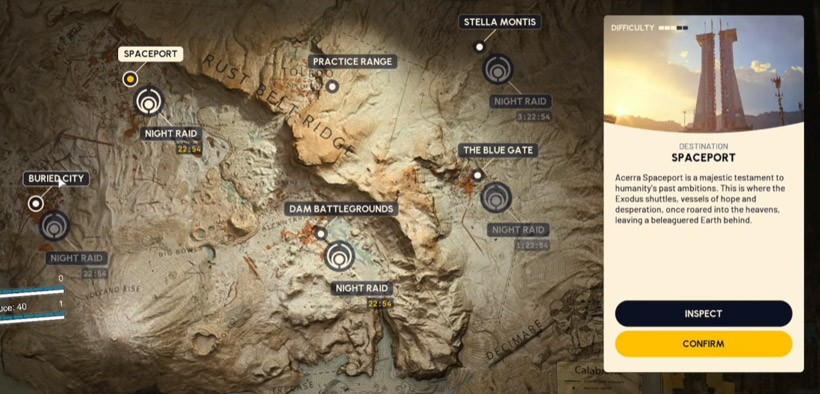
↖ Method 3 – Spaceport Great Mulan routes: Coins even without Lush Bloom
Spaceport is one of those maps that keeps paying you even when there's no special event helping it. Great Mulan, apricots, lemons, herbs—there's a lot of value lying around.
1. What you're doing on Spaceport
You're effectively running a hybrid fruit + light-looting route:
- Farm Great Mulan, lemons, agave, etc. along set paths.
- Mix in a limited number of high-yield cabinets, lockers, and medbags.
- Optionally stack missions along the way (valves, tunnels, etc.).
In practice, what the streamer demonstrated was:
- Non-Lush Bloom Spaceport runs netting ~90k with a mix of fruit and a few good lockers.
- Lush Bloom Spaceport runs going well past 100k when baskets + fruit spawn align.
2. Sample Spaceport loop
A generic Coins-first route might look like:
1. Spawn area → first fruit sweeps.
- Tap nearby fruit/herb spots and any obvious medbags.
2. Trench → Mulan fields.
- Follow the trenches and their adjacent ridges; harvest Mulan and herbs along the way.
- Hit predictable fruit trees you learn over time.
3. Control / Medical / Assembly (if safe).
- If the lobby isn't chaos, duck into 1–2 high-value indoor zones:
- Control: drawers & lockers.
- Medical: meds + parts.
- Assembly: industrial comps, batteries.
4. Inventory check → extraction.
- Once you've got a heavy fruit stack plus a few medium-value items, leave.
- Don't force a second full lap unless the lobby is dead quiet.
3. When Spaceport routes beat other options
Spaceport Great Mulan routes are your go-to when:
- Lush Bloom is not running anywhere relevant.
- Electromagnetic / Husk Graveyard are absent or in maps you don't like.
- Trials for the week are extremely squad-focused, so PvP events are bad ROI.
In those situations, instead of queueing into pure PvP again, you pick Spaceport and farm predictable, low-drama income.
↖ Method 4 – Stella Montis free-kit snowballing: zero-cost Coins printer

If you're running a hardcore account with rules like:
- No buying from traders.
- No safe pockets.
- No accepting gear from other players.
then free kits on Stella Montis are a gift.
1. Hardcore account constraints (why free kit matters)
Here's what this kind of hardcore run looks like:
| Rule | Effect |
|---|---|
| No trader purchases | Every piece of gear comes from raids or crafting |
| No safe pockets | You cannot guarantee Coins with safe-slot items |
| No handouts | You can't shortcut progression via friends or strangers |
Under those rules, death normally hurts a lot. But free kits on Stella change the equation:
- Death with a free kit costs absolutely nothing.
- Survival, even modest survival, equals pure profit.
2. How to run the free-kit snowball
1. Queue Stella Montis with the free loadout.
2. Push into high-value areas:
- Assembly,
- Medical,
- Security (especially if you have keys from previous raids).
3. Loot everything that sells well:
- Weapons (even if you won't use them, you can sell them),
- Mods and gear parts,
- High-value trinkets and components.
4. Extract when:
- You're full or
- The map gets too hot.
If you die?
- You've lost nothing; just queue again with another free kit.
Over several sessions, hardcore accounts have reached:
- ~2.5 million stash value while climbing toward 5 million;
- Days where close to 1 million was made without spending a single credit on gear.
3. Who this is ideal for
- Players who love self-imposed challenge.
- Anyone who wants Death = lesson, not setback.
- People grinding Expedition Coins on second accounts without burning out.
If you're anxious about losing gear, spending time on Stella with only free kits is one of the best ways to toughen your mindset and fund your progression at the same time.
↖ Method 5 – Residential trinket runs: the old-school loot route that still works
This is the classic: go to residential areas, village blocks, and apartment complexes, and loot them room by room.
1. Why trinkets are still worth your time
Trinkets are:
- Light,
- Stack up quickly,
- Universally sellable.
Instead of gambling on rare drops, you run a high-density open every drawer route:
- Drawers,
- Lockers,
- Cabinets,
- Weapon cases and bedside tables.
Across Dam, Bluegate, and Buried City, the streamer was repeatedly walking out with 70k–100k from one solid residential run—often despite arriving mid-raid.
2. Good maps and zones
| Map | Recommended areas | Notes |
|---|---|---|
| Dam | Admin + north residential blocks | Great for trinkets and mission overlap |
| Bluegate | Village + underground sections | Apartments + weapon cases + trinket spawns |
| Buried City | Residential blocks + village | Many drawers, cabinets, and hidden rooms |
3. When to favor trinket runs
Trinket routes are especially useful when:
- The event pool is bad (e.g., Trials that massively favor squads only).
- You're not in the mood to chase events or grind bosses.
- You just want a steady, low-variance income while improving map knowledge.
They're also great filler: if you log on and nothing special is running, simply default to your best residential route and walk away with 40k–90k instead of tilting in random fights.
↖ Map vs method vs expected income: quick decision table
Here's a quick lookup table you can mentally consult before each raid:
| Map / Event | Best Money Method | Expected Income (practiced) | Comment |
|---|---|---|---|
| Dam + Lush Bloom | Basket + residential sweep | 80k–120k | Mix baskets with limited trinket looting |
| Dam + Electromagnetic / Husk Graveyard | Rocketeer corpse farming | 60k–120k | Focus on husks, not full clears |
| Spaceport + Lush Bloom | Basket + Great Mulan | 80k–120k | Fruit + baskets is very strong |
| Spaceport (no event) | Great Mulan herb/fruit route | 60k–100k | Use missions to justify pathing |
| Stella Montis | Free-kit snowball | 50k–80k | Zero gear risk, great for hardcore |
| Bluegate / Buried City (no good events) | Residential trinket runs | 40k–90k | Ideal when events suck or you're tired |
You don't have to memorize them all at once. A realistic progression is:
1. Learn one Dam Rocketeer loop.
2. Add one Lush Bloom basket loop on your favorite map.
3. Add a Spaceport Great Mulan route.
4. Fill in the gaps with Stella free kits and residential trinket runs when events are bad.
↖ FAQ
Q1: I'm new and only have white gear and free kits. Can I still make decent Coins?
Yes.
You're actually in a great spot to use:
- Lush Bloom basket runs – you don't need strong guns to pick fruit.
- Spaceport Great Mulan routes – you can do most of the work unarmed or with basic kits.
Focus on learning a couple of safe loops. Once you're clearing 60k–100k in a run or two, you'll have enough to start crafting and buying stronger guns if you want to.
Q2: Is grinding to 5M on a hardcore account really worth it?
It depends on your goal.
- If all you care about is having Expedition skill points, your main account is the priority.
- If you enjoy the process and want a more intense experience, a hardcore account grind is one of the best ways to push your game knowledge and discipline.
In practice, hardcore Coins pushes will:
- Force you to rely on routes and loot quality,
- Make free kits and map knowledge feel extremely valuable,
- Give real satisfaction when you see the stash hit 5 million with almost no safety nets.
Q3: Does playing in squads make Coins farming faster than solo?
It depends on the method:
- Events / Trials / boss damage: squads win easily here; three players can triple certain Trial scores.
- Pure Coins routes (baskets, Rocketeers, trinkets):
- Squads dilute loot; the more mouths, the more splits.
- Solo players can keep 100% of everything they touch.
If your primary goal this week is max Trials rank, squad up.
If your primary goal is grow the stash towards 5M, solo or duo on Coins routes is often more efficient.
↖ Summary: turn all this into a concrete 5M plan
Instead of trying to remember every detail, organize your grind into three practical steps:
Step 1 – Set your Coins targets realistically
- Main account: aim for 5M to unlock Expedition perks and skill points.
- If you have a hardcore account you care about: add another 5 million goal, but treat it as a long-term project.
Step 2 – Build your Coins route toolkit
For every session:
- Check events and map rotation.
- Pick from five routes, not from 10 random ideas:
1. Lush Bloom → Basket runs.
2. Electromagnetic / Husk Graveyard → Dam Rocketeer corpse loops.
3. No strong events → Spaceport Great Mulan route.
4. Want zero-risk / hardcore play → Stella free-kit snowball.
5. Events all feel bad → Residential trinket run on Dam / Bluegate / Buried City.
Stick to one or two routes per session so you get efficient at them, rather than half-doing all five.
Step 3 – Separate fighting to win from playing to get rich
- When you're actually working on your stash, treat PvP as something to minimize, not chase.
- When you're in the mood for fights, pick a couple of PvP sessions where you don't care about Coins and just push with Venator, Renegade, Tempest, etc.
Once you start consciously switching between Coins runs and fight runs, you stop burning your best gear in bad economic situations. Your stash will grow faster, your tilt will drop, and hitting 5M becomes a matter of time and consistency, not a distant fantasy.
At that point, weapons and builds become choices, not crutches—and you can start spending as aggressively as you like, because you've finally learned how to refill the bank on demand.

Most Popular Posts
- ARC Raiders Riven Tides Key Room Guide: Best Hotel Keys, Loot Routes, Secure & Crane Storage
- ARC Raiders Damage Fireflies Trial Guide: Best Farm Method on Buried City Night Raid
- ARC Raiders Riven Tides Update: New Map & Items, ARC Turbine, Rewards, and Best Early Strategy
- ARC Raiders Bettina Guide: Best Build, Buffs, and How to Use It Against ARC
- Arc Raiders Season 4 Riven Tides Update, Rewards, Safe Skins, and Release Timeline
- ARC Raiders Solo Search Supply Drops Guide: Best Buried City Route, Beacon Locations
Popular Category Lists
- Grow a Garden / (286)
- ARC Raiders / (264)
- CoD: Black Ops 7 / (166)
- Monopoly Go / (146)
- MLB 26 / (145)
- Star Citizen / (114)
- Steal a Brainrot / (89)
- ARK Survival Ascended / (72)
- Sailor Piece / (68)
- Forza Horizon 6 / (62)
- Diablo IV / (61)
- Blox Fruits / (60)
- CoD: BLACK OPS 6 / (55)
- Adopt Me / (53)
- Path of Exile 2 / (48)
- Monster Hunter Wilds / (46)
- Windrose / (44)
- Grow a Garden 2 / (41)
- Path of Exile / (40)
- Bee Swarm Simulator / (36)


