


 0
0ARC Raiders Solo Loot Routes: Best PvE Routes for Every Map, Rare Blueprints, and Coin Runs
- KIVR
- Share
- ARC Raiders
- 05/08/26
- 750
Solo looting in ARC Raiders is simple: hit high-value containers fast, avoid pointless PvP, and extract before greed kills the run.
These routes focus on PvE solo farming after the Riven Tides update. The goal is consistent profit: rare blueprints, Wolf Packs, Vita Sprays, weapons, gun parts, trinkets, and regular 100k+ coin extracts.
- Best Solo Loot Routes by Map
- Solo Loadout for ARC Raiders Loot Runs
- Loot Priority: What to Keep and What to Drop
- Dam Battlegrounds Solo Loot Route
- Route Order
- Dam Battlegrounds Rule
- Buried City Solo Loot Route
- Route Order
- Buried City Rule
- Spaceport Solo Loot Route
- Route Order
- Spaceport Rule
- Blue Gate Solo Loot Route
- Route Order
- Blue Gate Rule
- Riven Tides Solo Loot Route
- Route Order
- Riven Tides Rule
- Best Map by Farming Goal
- Fast Solo Survival Rules
- FAQ
- What is the best solo loot map in ARC Raiders?
- What is the safest ARC Raiders solo route for 100k coins?
- Which map is best for rare blueprints?
- Are Zip Lines worth bringing?
- What should we drop when the backpack is full?
- Summary
We are not full-clearing maps. We are chaining the best loot checks and leaving alive.
↖ Best Solo Loot Routes by Map
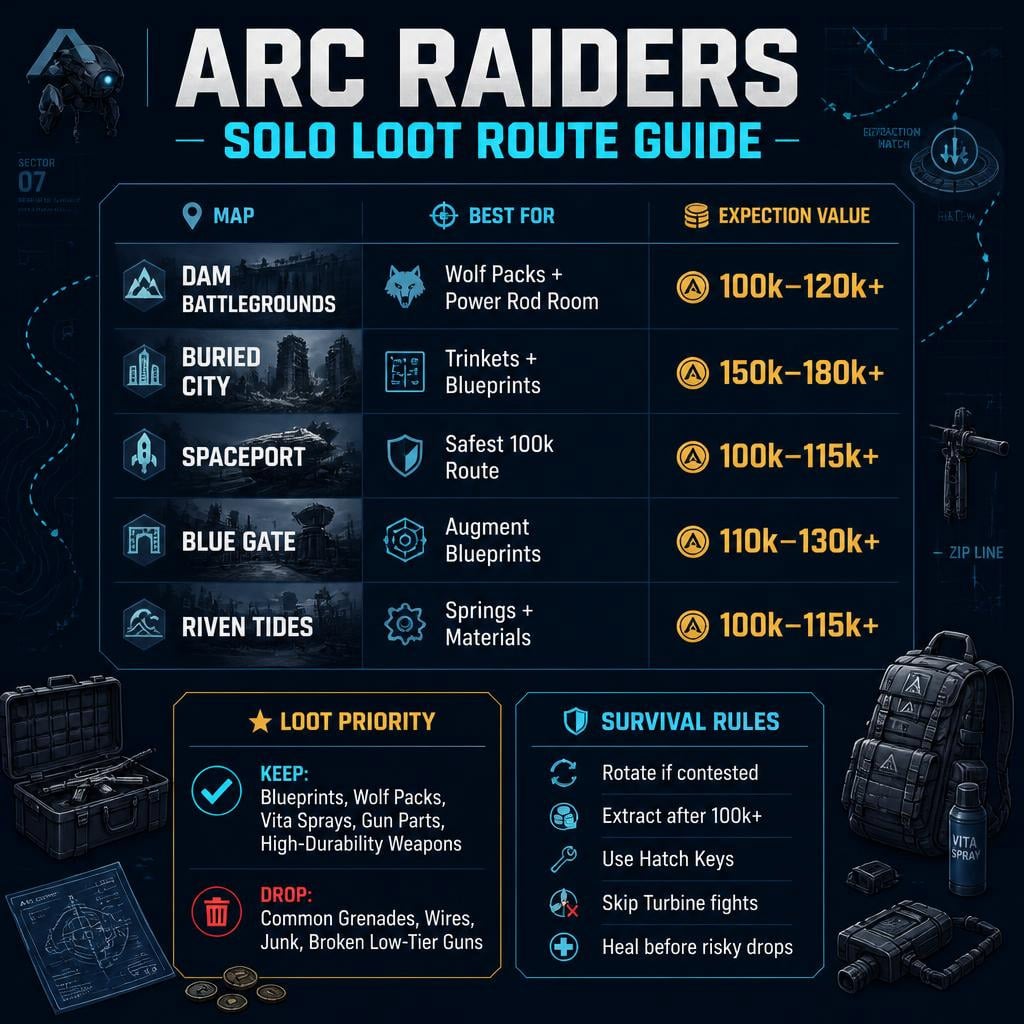
Use this table first. It tells you where to farm based on what you actually need.
| Map | Expected Value | Best For | Risk | Bring |
|---|---|---|---|---|
| Dam Battlegrounds | 100k–120k+ | Wolf Packs, Power Rod room, weapon cases | Medium | Power Rod, 1–3 Zip Lines, Hatch Key |
| Buried City | 150k–180k+ | Trinkets, blueprints, attachments | Medium-high | 2–3 Zip Lines, Hatch Key |
| Spaceport | 100k–115k+ | Safe loot, grenade tubes, security lockers | Low-medium | 1–2 Zip Lines, Hatch Key |
| Blue Gate | 110k–130k+ | Augment blueprints, weapons, gun parts | Medium-high | 1 Zip Line, Hatch Key |
| Riven Tides | 100k–115k+ | Springs, blueprints, weapon cases | Medium | 2 Zip Lines, Barricade Kit, Hatch Key |
Best money map: Buried City.
Safest 100k map: Spaceport.
Best blueprint gamble: Blue Gate.
Best Wolf Pack route: Dam Battlegrounds.
Best materials route: Riven Tides.
↖ Solo Loadout for ARC Raiders Loot Runs
Run light. Move fast. Do not bring a PvP ego kit unless you plan to fight.
| Item | Use |
|---|---|
| Light weapon | Beretta, Anvil, or similar for low weight |
| Stronger weapon on Riven Tides | Patina or Anvil recommended due to heavy flying ARC packs |
| Adrenaline Shots | Bring 8–15 depending on map size |
| Zip Lines | Required for roof cases, towers, and shortcuts |
| Raider Hatch Key | Safer extract once your bag hits 100k+ |
| Power Rod | Mandatory for the Dam Battlegrounds Power Rod room |
| Barricade Kit | Used for the Riven Tides solo container trick |
If you find yourself dying with full bags, bring fewer nice-to-have items and more extraction tools. A Hatch Key saves more money than most weapons earn.
↖ Loot Priority: What to Keep and What to Drop
The biggest solo mistake is carrying bad loot because it was the first thing you found.
| High Priority | Drop First |
|---|---|
| Blueprints | Common grenades |
| Wolf Packs | Low-value single trinkets |
| Vita Sprays | Basic medical clutter |
| Complex Gun Parts | Wires, metal parts, weak materials |
| High-durability weapons | Broken low-tier guns |
| Stacked trinkets | Random single items |
| Ship Models | Low-value junk if you do not need merits |
| Springs / Seeds stacks | Loose non-stacked materials |
After the durability changes, many edge-map weapons sell badly. A broken El Toro or Arpeggio may be worse than stacked materials.
↖ Dam Battlegrounds Solo Loot Route
Dam Battlegrounds is reliable because the route has many small high-value checks. You are farming grenade tubes, weapon cases, backpacks, medical bags, and the Power Rod room.
A strong run can hit 109k+ coins with Wolf Packs, Vita Sprays, blueprints, guns, and rare materials.
↖ Route Order
1. Electric Tower
- Check grenade tube.
- Check ammo box.
- Look for weapon case and medical bag.
- Loot upper ammo crates if spawned.
2. Water Towers
- Use Zip Line if needed.
- Check weapon case and medical bag spots.
- Do not overstay if Matriarch or players are active.
3. Formai
- Loot lower containers.
- Climb to the upper secret area.
- Check ammo crate, grenade tube, medical bag, and weapon case.
4. Wreckage
- Check backpack near the husk leg.
- Grab seeds, modules, or rare materials.
5. Raider Camp / Creek Area
- Check backpack spawns.
- Check weapon case spots.
- Avoid Rocketeer patrols.
6. Floodgates
- Open drawbridge rooms.
- Prioritize security locker, red lockers, weapon cases, and grenade tube.
- This is where the run usually breaks open.
7. Pipeline Tower
- Zip to the top.
- Check weapon case, ammo crate, med bag, and containers.
8. Power Rod Room
- Use the Power Rod.
- Kill small ARC inside.
- Loot Vita Sprays, medical items, weapons, and utility loot.
9. Final Checks and Extract
- Check East Broken Bridge loot if safe.
- Check lower Pipeline Tower med bag.
- Check tire-area grenade tube.
- Extract through Red Lakes Hatch.
↖ Dam Battlegrounds Rule
If you hit 100k+ before the final checks, stop gambling. Take the hatch and leave.
↖ Buried City Solo Loot Route
Buried City is the best solo money map. Trinkets, attachments, keycards, blueprints, and security lockers stack value fast.
Realistic high-end run: 180k+ coins with items like Powered Descender, Cranehouse keycard, Patina blueprint, Bobcat, and pink trinkets.
↖ Route Order
1. Plaza Rosa Pharmacy
- Rush it if your spawn is close.
- Loot containers, attachments, medical items, and blueprint rolls.
- Clear turret quickly if present.
2. Cross-Street Building
- Check weapon case.
- Loot upper rooms.
- Check backpack outside/drop spot.
- Breach the nearby room if unlooted.
3. Santa Maria Houses
- Check security locker.
- Check backpacks.
- Look for table and chair trinkets.
- Check weapon case and grenade tube spawns.
4. Red Tower
- Check ammo crate.
- Loot red lockers and blue containers.
- Kill Hornet only if it commits to you.
5. Second Pharmacy
- Loot if empty.
- Skip if occupied. Buried City has enough money elsewhere.
6. Space Travel
- Loot fifth and sixth floors.
- Check blue containers for augments.
- Check grenade tube and security locker.
- Loot second-floor trinket lockers if time allows.
7. Research Building
- Check computer-style containers.
- Loot blue containers.
- Strong blueprint chance here.
- Kill small ARC only when needed.
8. Parking Garage
- Check basement.
- Look for weapon case, breachables, trinkets, and containers.
9. Hospital Roof
- Use Zip Lines.
- Check weapon case, med bag, suitcase, and security locker.
- Extract through hatch if time is low.
↖ Buried City Rule
If your bag is already 150k+, do not force Hospital interior. Roof checks and hatch extract are enough.
↖ Spaceport Solo Loot Route
Spaceport is the safest consistent 100k+ solo route. Fewer forced fights. Clean rotations. Good loot density.
A solid run can reach 110k+ coins with Wolf Pack, Silencer blueprint, weapons, gun parts, and trinkets.
↖ Route Order
1. Outer Weapon Case / Tower
- Check nearby weapon case if you spawn close.
- Zip or climb tower.
- Loot weapon case, security locker, and containers.
2. Breachable Room Near Fuel Lines
- Check grenade tube.
- Check security locker.
- Loot drawers and ammo crate.
3. Fuel Lines Half-Pipe
- Check weapon case.
- Skip if ARC pressure is bad.
4. Departure Building Staff Room
- This is the best Spaceport room.
- Loot red lockers, security locker, trinkets, ammo crate, and shower weapon case.
- Drop down and check medical bag.
5. Arrival Building
- Check bottom-floor grenade tube.
- Loot red lockers and trinkets.
- Check weapon case.
- Enter second-floor room quietly from outside if possible.
- Check hidden ammo crate above.
6. Medical Wing
- Loot blue containers.
- Check med bag.
- Look for augment and blueprint chances.
7. North Trench Tower
- Use Zip Line.
- Check roof weapon case.
- Loot interior red lockers.
- Take seeds/modules if stacked.
8. Rocket Assembly
- Use lift.
- Check ammo crate, pipe weapon case, grenade tube, med bag.
- Extract through East Trench Hatch.
↖ Spaceport Rule
If a Turbine blocks an optional med bag, leave it. Spaceport profit comes from safe chaining, not hero plays.
↖ Blue Gate Solo Loot Route
Blue Gate is a blueprint hunter's map. It can produce huge runs, especially if you reach Security Wing early.
Tested results include 120k+ coin runs, Heavy Gun Parts blueprint, Tempest, Renegade II, and rare gun parts. Another run hit 130k+ before halfway with a Survivor Augment blueprint.
↖ Route Order
1. Security Wing
- Only rush this if you spawn close.
- Check augment containers, weapon case, grenade tube, security locker, backpack, and med bag.
- This is your best early blueprint window.
2. Red Room Battery Puzzle
- Carry three batteries.
- Open the red room.
- Loot weapon case, augment containers, gun parts, medical items, and rare components.
3. Connector to Maintenance Wing
- Check stairwell grenade tube.
- Check traffic tunnel weapon case.
- Check corner security locker.
- Loot ammo crate.
- Check second weapon case.
4. Breachable Side Room
- Check medical bag.
- Check security locker.
- Loot suitcase and containers.
5. Supply Call Station
- Activate console.
- Follow the color marker.
- Loot reward quickly. Do not spend too long here.
6. Maintenance Wing
- Check under-stair weapon case.
- Loot lockers.
- Check backpack on pipe.
- Check grenade tube and guaranteed weapon case.
7. Warehouse / Gate Control
- Check backpack under stairs.
- Check second-floor weapon case if spawned.
- Check Gate Control backpack.
8. Highway Collapse
- Check bus weapon case.
- Check tunnel backpack.
- Drop to grenade tube ledge.
- Use Zip Line for elevated backpack.
- Finish at Adorned Wreckage weapon case.
- Extract through Reinforced Hatch.
↖ Blue Gate Rule
If Security Wing is already looted, do not chase scraps. Rotate to Maintenance and weapon-case chain instead.
↖ Riven Tides Solo Loot Route
Riven Tides has great loot, but the ARC density is nasty. Bring a real weapon. A basic pistol can get you killed when four flying ARC chain you in the open.
A clean route can hit 106k+ coins with Power Descender blueprint, Flag blueprint, Osprey, Anvil II, springs, and gun parts.
↖ Route Order
1. Customs House
- Go roof first.
- Check rooftop weapon case.
- Drop to basement breach room.
- Check security locker, containers, ammo, and attachments.
- Check lower weapon case and grenade tube spawns.
2. Transfer Depot
- Check weapon case.
- Check security locker.
- Check grenade tube.
- Loot trash cans and containers. Blueprints can appear in simple containers.
3. Stacking Yard
- Loot outer containers.
- Move to left-side upper area.
- Prepare for the solo container hideout trick.
4. Solo Container Hideout Trick
- Bring Barricade Kit.
- Place barricade below the breach point.
- Stand on it and start the breach.
- If you fall, repeat. Breach progress still helps.
- Inside, loot weapon case and grenade tube.
5. Upper Stacking Yard
- Check security locker.
- Check grenade tube.
- Check roof weapon case.
- Grab springs and gun parts.
6. Wave Breaker
- Check pipe grenade tube.
- Check ammo crate.
- Check medical bags.
- Check barrel-side grenade tube.
7. Beach and Locker Building
- Loot beach containers.
- Check trash cans.
- Search lockers for seeds, springs, and materials.
8. Tennis Court
- Loot breachables.
- Search trash cans.
- Check lockers and containers.
9. Hilltop Hatch
- Use Zip Line for elevated weapon case spot.
- Extract through Hilltop Hatch.
↖ Riven Tides Rule
If flying ARC packs spawn near your route, clear them or rotate wide. Do not sprint through open ground at half health.
↖ Best Map by Farming Goal
| Goal | Best Map |
|---|---|
| Highest coins | Buried City |
| Safest 100k route | Spaceport |
| Rare blueprints | Blue Gate, Buried City |
| Wolf Packs | Dam Battlegrounds, Spaceport |
| Weapon cases | Blue Gate, Dam Battlegrounds, Riven Tides |
| Springs and materials | Riven Tides |
| Medical value | Dam Battlegrounds, Riven Tides |
Pick the map based on your shortage. If you need coins, go Buried City. If you need blueprint rolls, go Blue Gate. If you need a low-stress extract, go Spaceport.
↖ Fast Solo Survival Rules
- If another Raider is already looting the room, rotate.
- If you hit 100k+, start thinking extract.
- If you are below half HP before a drop, heal first.
- If a Turbine blocks optional loot, skip it.
- If you collect stackables, commit early: springs, seeds, light bulbs, music albums, ship models.
- If a weapon is badly damaged, compare value before taking it.
- If you have a Hatch Key, use it. Do not die walking to a public extract with a full bag.
↖ FAQ
↖ What is the best solo loot map in ARC Raiders?
Buried City is the best map for raw coin value. A clean route can reach 150k–180k+ coins through trinkets, attachments, blueprints, security lockers, and dense container rooms.
↖ What is the safest ARC Raiders solo route for 100k coins?
Spaceport is the safest consistent 100k route. It has strong loot chains, lower PvP pressure, and easy hatch extraction through the trench side.
↖ Which map is best for rare blueprints?
Blue Gate is the best for augment blueprint hunting if you spawn near Security Wing. Buried City is also excellent because of its dense container rooms and Research building.
↖ Are Zip Lines worth bringing?
Yes. Zip Lines unlock roof weapon cases, tower loot, shortcut routes, and safer movement. Bring 2–3 on Buried City, 1–3 on Dam, 1–2 on Spaceport, 1 on Blue Gate, and 2 on Riven Tides.
↖ What should we drop when the backpack is full?
Drop common grenades, wires, low-value junk, and broken weapons first. Keep blueprints, Wolf Packs, Vita Sprays, complex gun parts, high-durability weapons, and stacked trinkets.
↖ Summary
For solo profit in ARC Raiders, the best routes are not the loudest routes. They are the cleanest.
Run Buried City for maximum coins.
Run Spaceport for safer 100k extracts.
Run Blue Gate for rare augment blueprints.
Run Dam Battlegrounds for Wolf Packs and Power Rod value.
Run Riven Tides for springs, materials, and newer blueprint routes.
Loot fast. Replace bad items. Skip bad fights. Extract once the bag is worth protecting.

Most Popular Posts
- ARC Raiders Riven Tides Key Room Guide: Best Hotel Keys, Loot Routes, Secure & Crane Storage
- ARC Raiders Damage Fireflies Trial Guide: Best Farm Method on Buried City Night Raid
- ARC Raiders Riven Tides Update: New Map & Items, ARC Turbine, Rewards, and Best Early Strategy
- ARC Raiders Bettina Guide: Best Build, Buffs, and How to Use It Against ARC
- Arc Raiders Season 4 Riven Tides Update, Rewards, Safe Skins, and Release Timeline
- ARC Raiders Solo Search Supply Drops Guide: Best Buried City Route, Beacon Locations
Popular Category Lists
- Grow a Garden / (286)
- ARC Raiders / (262)
- CoD: Black Ops 7 / (166)
- Monopoly Go / (146)
- MLB 26 / (144)
- Star Citizen / (111)
- Steal a Brainrot / (89)
- Sailor Piece / (68)
- ARK Survival Ascended / (66)
- Diablo IV / (61)
- Forza Horizon 6 / (60)
- Blox Fruits / (60)
- CoD: BLACK OPS 6 / (55)
- Adopt Me / (53)
- Path of Exile 2 / (48)
- Monster Hunter Wilds / (46)
- Windrose / (44)
- Path of Exile / (40)
- Grow a Garden 2 / (38)
- Bee Swarm Simulator / (36)


