


 0
0ARC Raiders Damage Bastions Score Easy SOLO 4‑Bastion Loop Method in Dam Battlegrounds
- KITE
- Share
- ARC Raiders
- 12/13/25
- 4604
When you want to farm Damage Bastions score in Trials, you don't need a god squad—you need a clean, repeatable solo route. After a lot of runs, failed explosives, and one truly cursed 0‑damage Deadline bug, I ended up with a pattern that reliably pushes 16k+ and has real 20k potential if you don't grief yourself the way I did.
- 1. How the Bastion Trial Works and Why 4 Kills Is the Sweet Spot
- 1.1 Goal: Damage Bastions Trial, Not Just Survive the Match
- 1.2 Why Dam Battlegrounds + Night Raid or Electromagnetic Storm
- 2. Pre‑Match Setup: Timing, Loadout and Expectations
- 2.1 Queue Timing Trick: Why Join With 1–2 Minutes Left
- 2.2 Recommended Loadout for Bastion Melting
- 2.3 Realistic Score Expectation
- 3. First Engagement: Pipeline Tower Bastion
- 3.1 Getting There Safely and Checking for Raiders
- 3.2 Pulling Bastion and Choosing Your Fighting Position
- 3.3 Breaking the Knees: How to Safely Immobilize Bastion
- 3.4 The Deadline Bug: How I Lost a Kill and How You Avoid It
- 4. Moving to Hydrodomes: Safer Pathing and Second Bastion
- 4.1 Why Use the Zipline Down and Around
- 4.2 Picking the Right Dome to Fight From
- 4.3 Repeat the First Bastion Pattern
- 5. Respawns, Third and Fourth Bastion, and Match Timing
- 5.1 Understanding Bastion Respawn Rules
- 5.2 Third Bastion: Less Setup, More Direct Damage
- 5.3 Fourth Bastion: Resource Check and Field Crafting
- 6. Time Management, Extraction and When to Stop Pushing
- 6.1 Reading the Clock and Planning Your Final Bastion
- 6.2 Knowing When to Cut Your Losses
- 6.3 Safer Extraction Strategy
- FAQ
- Conclusion
Let's walk through why this works, what you need to bring, and how to run the 4‑Bastion loop without getting shredded by Gatlings or third‑partied by Raiders.
↖ 1. How the Bastion Trial Works and Why 4 Kills Is the Sweet Spot
Before we min‑max the route, it helps to understand what's actually being optimized.
↖ 1.1 Goal: Damage Bastions Trial, Not Just Survive the Match
You're not here just to evac with loot items; you're here to pump as much Bastion damage as possible into a single match.
The score scales with Bastions damaged/destroyed, so:
- More Bastions = more score
- Consistent damage on each Bastion matters more than overkilling just one
In practice, 4 Bastions in a full game length is the realistic ceiling for a solo player who also needs to extract alive.
If you try to force 5+ Bastions, you usually:
- Run out of explosives and ammo
- Get pinched by Raiders or bots while you're stuck in a long fight
- Miss extraction and lose everything—including your Trial score
So the mindset is: 4 Bastions, high uptime on damage, clean exit.
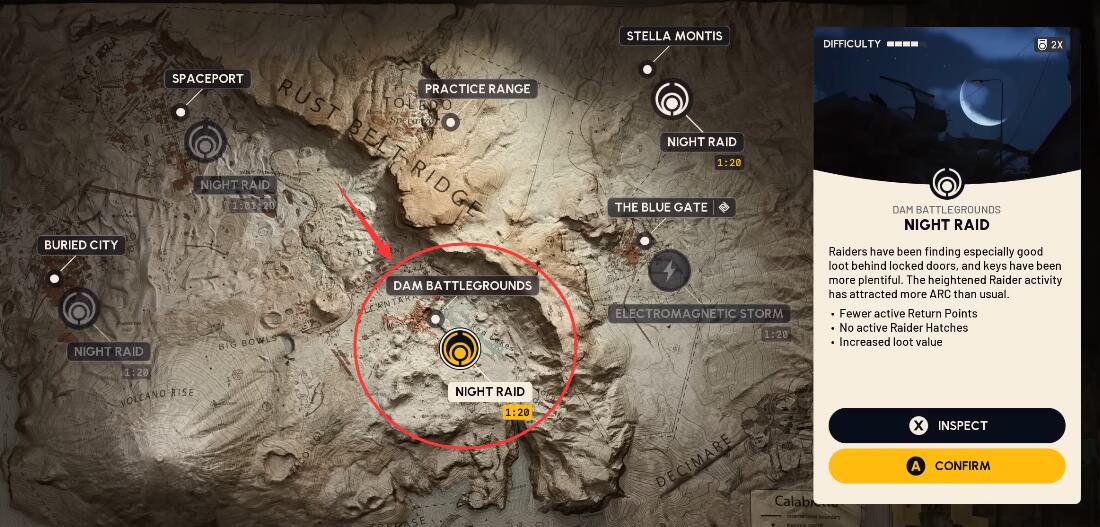
↖ 1.2 Why Dam Battlegrounds + Night Raid or Electromagnetic Storm
This method is designed specifically for:
Map: Dam Battlegrounds
Variants:
- Night Raid
- Electromagnetic Storm
These variants:
- Give you better control over vision and approach (darkness = easier to reposition unseen)
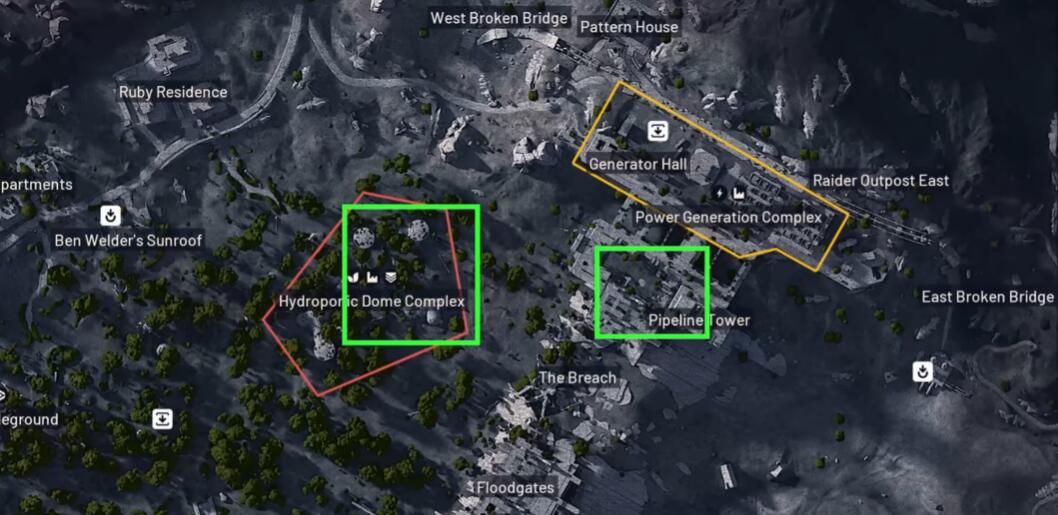
- Have predictable Bastion spawns at Pipeline Tower & Hydrodomes
- Still provide enough loot density for on‑field crafting
If you're on a different map or variant, the core logic still helps, but the spawn logic and routing in this guide are tuned for Dam Battlegrounds.
↖ 2. Pre‑Match Setup: Timing, Loadout and Expectations
This is the part where most solo runs are won or lost before you even drop.
↖ 2.1 Queue Timing Trick: Why Join With 1–2 Minutes Left
One small but powerful trick:
- Queue into the match when the map countdown shows ~1–2 minutes remaining.
What this does for you:
- Greatly reduces the chance of new players joining in progress
- Means that the players who launch with you are all you'll likely see in that match
- Makes the match feel much closer to a true solo or low‑pop run
Trade‑off:
- You might not get a full game, because sometimes the lobby just doesn't fill in time
- When it does fill, though, you get a much more controlled environment for this Bastion route
If you're tired of randoms wandering into your Bastion fights and ruining pacing, this timing trick is worth the gamble.
↖ 2.2 Recommended Loadout for Bastion Melting
Here's a practical loadout skeleton I recommend (and why):
| Slot | Recommendation | Why It Helps vs Bastions |
|---|---|---|
| Primary Weapon | High armor penetration (e.g. Anvil) | Great at knee shots, consistent DPS when explosives are gone |
| Heavy / Secondary | Another high-pen or explosive gun | Finishes Bastion if Deadline leaves a sliver of HP |
| Tactical / Gadget | Deadlines (as many as you own) | Each is effectively one Bastion kill if placed correctly |
| Explosives | Frag grenades, crude explosives | Reliable, craftable, fill gaps where Deadline underperforms |
| Resources | Plenty of ammo & crafting margin | Lets you convert field loot into extra grenades mid‑run |
Rule of thumb from experience:
- 1 Deadline ≈ 1 Bastion kill, with maybe a bit of top‑off damage from your weapon or an extra explosive
Plan your run around 4 total Bastions, which usually means:
- 3–4 Deadlines
- Plus a buffer of explosives in case one Deadline misfires or you take longer on a fight
↖ 2.3 Realistic Score Expectation
From my own runs using this approach:
- 16k+ is very realistic if you complete the 4‑Bastion plan and extract
20k+ becomes reachable if:
- Your Deadlines all work correctly
- You don't waste time on bad fights or chasing Raiders
- You maintain uptime on Bastion damage instead of running around aimlessly
The bugged Deadline that did exactly 0 damage cost me a ton of score, which is why avoiding that specific mistake is a big theme in this guide.
↖ 3. First Engagement: Pipeline Tower Bastion
Your opening Bastion sets the tempo. Get this one right, and the rest of the run feels smooth.
↖ 3.1 Getting There Safely and Checking for Raiders
Once you spawn in:
1. Check the map and identify which is closer:
- Pipeline Tower
- Hydrodomes in the swamp
2. Head toward the closest Bastion spawn.
3. When you get close, do a quick scan of the area:
- If there are Raiders lurking, don't force a messy 3‑way fight
- Either reposition or wait them out; your goal is to fight Bastion, not the whole server
What really matters here is controlling the environment before you start pumping damage into a boss‑tier enemy.
↖ 3.2 Pulling Bastion and Choosing Your Fighting Position
At Pipeline Tower:
- Use your primary to tag Bastion and pull his aggro.
- As he crab‑walks toward you, move to solid cover inside the pipeline tower structure.
You want to:
- Fight him from inside the tower, not out in the open
- Only peek between his Gatling bursts, never during
If you find you're getting shredded, you're probably peeking while he's still mid‑barrage—wait for that pause.
↖ 3.3 Breaking the Knees: How to Safely Immobilize Bastion
To set up your Deadline:
1. Aim for Bastion's knees with your primary.
2. Focus a single knee until it breaks.
3. When it breaks, Bastion will collapse and become immobilized for about 10 seconds.
This 10‑second window is your money phase: that's when you move in and plant your Deadline.
↖ 3.4 The Deadline Bug: How I Lost a Kill and How You Avoid It
Here's where my run went sideways, and where you can easily do better.
What happened to me:
- I tried to place the Deadline on Bastion's hull
- He was wiggling on the ground, my placement kept failing
- I panicked and dropped the Deadline on the ground next to him
- It exploded, but it did exactly 0 damage to Bastion
I'm almost certain this was a weird interaction/bug, but the result is the same:
- I wasted a Deadline
- Had to burn through all the explosives I had reserved for Bastions 3 and 4
- My final Trial score ended up much lower than it could have been
So, for you:
- Always place the Deadline directly on Bastion's body.
- Aim for the hull if possible
- If he's wiggling, stick it anywhere on him you can, just not on the ground
- Only when you are sure the Deadline is attached should you run back to cover and let it work
If everything works properly, the Deadline should do most or all of the killing.
If he survives with some HP:
- Finish him with:
- An explosive
- Or a few shots from your heavy / primary
This one detail—Deadline on hull, not on ground—is the difference between a smooth 4‑kill run and a scuffed scramble for materials.
↖ 4. Moving to Hydrodomes: Safer Pathing and Second Bastion
Once Pipeline Tower Bastion is down, it's time to rotate.
↖ 4.1 Why Use the Zipline Down and Around
From Pipeline Tower to Hydrodomes:
- I strongly recommend taking the path down and around via the zipline, rather than going straight up and across.
Why?
- If another Raider is camping, they're usually watching near the Bastion area
- The down‑and‑around route:
- Is only slightly longer in distance
- Keeps you safer and less exposed
- Reduces the chance of running straight into a waiting enemy while low on resources
If you notice a lot of gunfire or movement near the obvious route, that's another good sign to take the safer approach.
↖ 4.2 Picking the Right Dome to Fight From
Once you're at the Hydrodomes Bastion:
- Do not choose one of the big domes to fight from.
- Instead, find the smallest dome that is close to Bastion.
Why the small dome is better:
- There are fewer entrances, which means fewer angles for Raiders to surprise you
- You can visually cover the only other entrance during Bastion's Gatling barrages
- Your attention can stay mostly on Bastion without constantly spinning in circles
In big domes, you often get flanked while tunnel‑visioned on Bastion's weak spots. Small domes reduce that risk dramatically.
↖ 4.3 Repeat the First Bastion Pattern
The actual combat steps are almost identical to the first Bastion:
1. Pull Bastion toward your chosen dome using your primary.
2. Move inside and anchor yourself behind cover.
3. Shoot his knees between Gatling bursts until he collapses.
4. During the immobilize window, run out and stick a Deadline directly to his body.
5. Return to cover, let the Deadline work.
6. Top off with explosives or weapon fire if necessary.
You should also expect Hornets in this area:
- Plan for at least a couple to show up
- Either clear them early or be ready to quickly swap targets when they dive
If you're consistently getting overwhelmed here, consider pacing the fight: clear small threats first, then re‑engage Bastion.
↖ 5. Respawns, Third and Fourth Bastion, and Match Timing
After two Bastions, your run enters a more dynamic phase. This is where match timing and spawn logic really matter.
↖ 5.1 Understanding Bastion Respawn Rules
Bastions do not respawn instantly, and they don't do it under just any conditions. Respawn is affected by:
1. Time since Bastion was destroyed
2. Whether other Raiders are present in that area
Key rules:
- If other Raiders are wandering around where he died, Bastion often won't respawn
- He tends to respawn only when the area is clear of players
So when you go back toward the first Bastion location:
- Don't sprint blindly into the exact spot where he died
- Instead, slow down and listen for his audio cues as you approach
- If you rush in too fast, you might actually block his respawn and waste precious time
↖ 5.2 Third Bastion: Less Setup, More Direct Damage
For Bastions 3 and 4, the process shifts slightly. You can still break knees—especially if you want safe windows—but it's no longer mandatory.
You can:
- Use cover
- Throw explosives between Gatling barrages
- Pepper him with your primary in the gaps
Compared to the first two:
- You're more focused on raw damage throughput
- Immobilizing him is helpful but not required if you've got a good explosive rhythm
If you notice you're burning a lot of ammo, alternate:
- One burst of explosives
- One short weapon burst
- Back to cover, repeat
↖ 5.3 Fourth Bastion: Resource Check and Field Crafting
By the time you're lining up your 4th Bastion, one of two things is usually true:
- You're well‑stocked and just need to execute
- You've burned through more explosives than planned (maybe because a Deadline bugged out or a fight got messy)
Here's where Field Crafting saves your run.
As long as you have Field Crafting unlocked, you can craft frag grenades from simple materials:
- Frag Blueprint Cost (typical):
- Plastic Parts
- Chemicals
Both Pipeline and Hydrodomes have decent loot density to feed this:
| Item Type | Where You Find It | Salvages Into | Useful For |
|---|---|---|---|
| Fireball Burners | From Fireball enemies | Chemicals | Crafting explosives |
| Crude Explosives | Loot / Fireball drops | Chemicals | More chemicals for crafting |
| Oil | Domes & containers | Chemicals | Same as above |
| Explosive Compound | Domes & industrial areas | Chemicals | Same as above |
| Coolant | Domes & tech loot | Chemicals | Same as above |
| Plastic Components | Various junk loot | Plastic Parts | Core material for frags |
If you find Fireballs near the domes:
- Kill them, they are walking grenades from a resource perspective
- Salvage their burners and crude explosives
- Turn that into extra frags to finish your 3rd–4th Bastion
When you notice you're getting low on explosives but still have some time left on the clock, that's your cue to pause the hunt for Bastion and quickly run a loot → salvage → craft loop.
↖ 6. Time Management, Extraction and When to Stop Pushing
A lot of players throw away amazing Bastion runs in the final minutes by overextending. Your Trial score does not care if you die with just one more grenade thrown.
↖ 6.1 Reading the Clock and Planning Your Final Bastion
By this point in a good run, you're typically at:
- Around 10 minutes or less left in the match
You should now:
1. Check your remaining explosives and ammo
2. Identify where the extraction point is and how long it takes to reach
3. Estimate how long a 4th Bastion fight will last with your current resources
If those numbers don't line up comfortably, you adjust:
- Maybe you damage the 4th Bastion heavily but don't fully commit
- Or you stop at 3 full kills and protect your current score with a safe extract
If you realize you're about to enter the fight with almost nothing left, then the best play is often not to take the fight at all.
↖ 6.2 Knowing When to Cut Your Losses
I've had runs where I:
- Used all explosives I had reserved for Bastions 3 and 4
- Ended up nearly dry on ammo
- Was still tempted to just try one more Bastion
That's how perfectly good runs die.
If you're out of key resources and the clock is ticking down:
- Treat it as mission accomplished
- Head for extraction instead of stubbornly face‑tanking a Bastion with pea‑shooter damage
Sometimes the best thing you can do for your Trial score is survive and bank what you've already earned.
↖ 6.3 Safer Extraction Strategy
For extraction:
- Wait until the last minute to call the evac, but:
- Make absolutely sure you're close enough to reach the button when the timer is nearly done
- If someone else has already called the extraction:
- Hide nearby rather than rushing into the open
- When the doors open, slide in at the last possible second as they pull the lever
This minimizes your exposure to Raiders who like to camp the extract. Nothing tilts a player more than losing an entire 20k‑potential run in the final 10 seconds to a random headshot.
↖ FAQ
Q1: What if I can't reliably break Bastion's knees?
If you're struggling to hit knees, it usually means you're peeking at bad times or using the wrong weapon. Switch to a high‑accuracy, high‑penetration primary (like Anvil‑type weapons), and only shoot during his Gatling downtimes. You can also move closer behind cover so less of your screen is wasted on empty space.
Q2: What if my Deadlines keep bugging or doing no damage?
First check your placement: Deadlines need to be attached to Bastion's body, not just lying on the ground nearby. If you're sure you stuck it to him and it still did no damage, treat that run as a low‑roll and lean more heavily on explosives. For future runs, prioritize calm, precise placement during the immobilize window, even if it means skipping one extra shot.
Q3: Another player keeps contesting my Bastion—am I doomed?
Not necessarily, but your scoring window shrinks. If you find a player is always nearby:
- Shift your order (go Hydrodomes first, then Pipeline, or vice versa).
- Use the 1–2 minute queue trick to reduce player density.
- If the lobby is clearly sweaty, focus on damage uptime rather than insisting on solo kills.
Q4: I often die on the 3rd or 4th Bastion. What am I doing wrong?
Most players die late because they:
- Ignore the clock
- Overestimate their remaining ammo/explosives
- Start fights with no exit plan
Before you engage the 3rd or 4th Bastion, run a quick mental checklist:
1. Do I have enough explosives for a realistic kill?
2. Do I know where I'll rotate if a Raider shows up?
3. Do I still have time to reach extract after this fight?
If any answer is no, adjust your plan—either craft more frags, reposition, or skip the fight.
Q5: Can I push beyond 20k with this approach?
You can if everything lines up—clean Deadlines, efficient fights, minimal PvP interference—but past ~20k you're fighting RNG as much as the game. The route and logic in this guide are focused on giving you a high‑floor, reliable 16k+ baseline that can spike higher when the stars align.
↖ Conclusion
A strong solo Bastion Trial run isn't about miracle aim; it's about structured decisions: picking Dam Battlegrounds Night/Storm, queuing at the right time, committing to a 4‑Bastion plan, planting Deadlines directly on hulls, and knowing when to stop pushing and extract.
If you tighten those pieces—especially your Deadline discipline and mid‑game resource crafting—you'll find your scores climbing into the 16k+ range consistently, with 20k runs feeling less like a fluke and more like a natural extension of solid play.

Most Popular Posts
- ARC Raiders Riven Tides Key Room Guide: Best Hotel Keys, Loot Routes, Secure & Crane Storage
- ARC Raiders Damage Fireflies Trial Guide: Best Farm Method on Buried City Night Raid
- ARC Raiders Riven Tides Update: New Map & Items, ARC Turbine, Rewards, and Best Early Strategy
- ARC Raiders Bettina Guide: Best Build, Buffs, and How to Use It Against ARC
- ARC Raiders Solo Search Supply Drops Guide: Best Buried City Route, Beacon Locations
- Arc Raiders Season 4 Riven Tides Update, Rewards, Safe Skins, and Release Timeline
Popular Category Lists
- Grow a Garden / (286)
- ARC Raiders / (263)
- CoD: Black Ops 7 / (166)
- Monopoly Go / (146)
- MLB 26 / (145)
- Star Citizen / (114)
- Steal a Brainrot / (89)
- ARK Survival Ascended / (72)
- Sailor Piece / (68)
- Forza Horizon 6 / (62)
- Diablo IV / (61)
- Blox Fruits / (60)
- CoD: BLACK OPS 6 / (55)
- Adopt Me / (53)
- Path of Exile 2 / (48)
- Monster Hunter Wilds / (46)
- Windrose / (44)
- Grow a Garden 2 / (41)
- Path of Exile / (40)
- Bee Swarm Simulator / (36)


