



 0
0 Created: Mar 2,2026 | ARC Raiders
Arc Raiders Farming Coins No-PvP Loot Route on Stella Montis

Making millions Coins fast in Arc Raiders isn't magic loot—it's repeatable timing. When we treat each raid like a small business loop (time in → high-value items out → clean extraction), the credits stack up almost automatically. Below is the exact Stella Montis routine we run when we want steady Coins with minimal player contact, plus the profit math so you can sanity-check your own numbers.
- The Stella Montis Coins Loop
- 1) The Profit Math We Actually Use (So This Doesn't Become Vibes)
- 2) Loadout Philosophy (No PvP Means Slots + Speed)
- Route A: The Assembly God Spawn Opener
- 1) The Core Idea
- 2) Loot Priority (What to Hit First, In Order)
- 3) Timing Rules (This Is Where the No PvP Part Actually Happens)
- 4) Assembly Run SOP (Copy/Paste)
- Route B: Medical Research (The Stable Income Route)
- 1) Why Medical Works Even When RNG Is Meh
- 2) The Money Containers You Must Respect
- 3) PvE Handling Without Losing Pace
- 4) Medical Run SOP (7-Minute Baseline)
- What to Loot vs What to Ignore (So Your Inventory Doesn't Betray You)
- 1) Our Simple Loot Rule
- How We Keep It No PvP in a PvPvE Game
- The three rules we follow
- FAQ
- 1) Do we need the Assembly opener to hit 1M per 2 hours?
- 2) What if our run is underwhelming and we only hit ~60–65k?
- 3) Should we do night raids for Coins?
- 4) Do we ever take processors/sensors/wires?
- 5) What's the most common mistake that kills the million-per-2-hours pace?
- Closing Takeaways
The Stella Montis Coins Loop
1) The Profit Math We Actually Use (So This Doesn't Become Vibes)
We don't chase one huge run. We chase repeatable average.
- Baseline target: 7 minutes per raid
- Baseline net profit: 75,000 Coins per raid
- Pace: ~7 raids/hour
- Result: ~525,000 credits/hour
- Result in 2 hours: ~1,050,000 Coins
That's the core loop: speed + consistency beats occasional jackpot.
| Metric | Conservative Baseline | What It Means |
|---|---|---|
| Time per raid | 7 min | Keeps you ahead of most rotations and reduces PvP exposure |
| Net profit per raid | 75k | After considering what you brought in (your stake) |
| Raids per hour | ~7 | Enough volume for RNG to smooth out |
| Profit per hour | ~525k | Business-like steady income |
| Profit per 2 hours | ~1.05M | The million milestone without gambling on perfect loot |
2) Loadout Philosophy (No PvP Means Slots + Speed)
If we're playing no PvP, we're not gearing to win fights—we're gearing to finish the route.
What we prioritize
- A roomy backpack (more slots = fewer painful decisions mid-run).
- Mobility + reliability (anything that keeps movement smooth and downtime low).
- PvE control tools (enough to delete AI quickly and keep moving).
What we avoid
Over-investing in expensive weapons just in case.
Because if you're truly avoiding PvP, the best fight is the one you never schedule.
Practical meaning: your kit should feel like a delivery van, not a sports car.
Route A: The Assembly God Spawn Opener
1) The Core Idea
If we spawn at Assembly at the very start of a fresh raid, we get a short uninterrupted window before other players arrive. That window is where the insane credits/hour comes from.
Because early minutes are quiet, so we loot high-value containers first and exit before the area heats up.
2) Loot Priority (What to Hit First, In Order)
Run this like a checklist:
1. White desks with pull-out shelves
2. Yellow toolboxes
3. Blue cabinets (the small blue storage units)
4. Only after that: breaches for processors/sensors/wires (optional)
Why we delay breaches: breaches are slower per credit in this loop. If you breach first, you burn your quiet minute doing lower-efficiency actions.
3) Timing Rules (This Is Where the No PvP Part Actually Happens)
- If we get the ideal spawn and the first sweep is clean, we can be out in ~3 minutes with strong profit.
- If the area feels off (footsteps, doors opening, shots nearby), we shorten the route and leave immediately.
Condition triggers
- If you hear another team entering Assembly, then stop one more container thinking and rotate out.
- If toolboxes spawn light, then don't emotionally compensate by overstaying—swap to Medical route and recover profit there.
4) Assembly Run SOP (Copy/Paste)
| Step | Action | Stop Condition |
|---|---|---|
| 1 | Sprint to white desks → loot fast | Another team arrives / audio cues spike |
| 2 | Hit all yellow toolboxes on your line | Inventory hits 80–90% full |
| 3 | Sweep blue cabinets if on path | If it forces detours, skip |
| 4 | Optional: breaches last | Only if area still quiet |
| 5 | Extract (prefer fast exit) | Don't shop once profit is secured |
What this means: we're not trying to vacuum the map. We're trying to bank profit before the lobby converges.
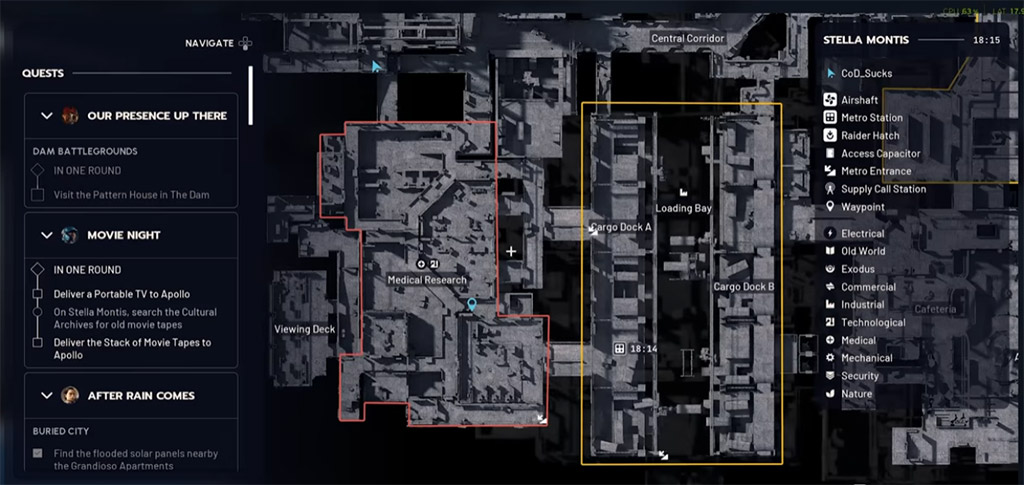
Route B: Medical Research (The Stable Income Route)
1) Why Medical Works Even When RNG Is Meh
Medical has a specific advantage: dense, repeatable container value, especially in spots many players under-check. Our best consistency comes from focusing on the lower medical area, not just the obvious top sweep.
2) The Money Containers You Must Respect
- White lockers: these often contain high-demand items (and yes, they're infamous for spawning Geiger counters).
- White desks: good for valuable small electronics and tools.
- Drawers: not always flashy, but fast to check and occasionally high value.
Condition triggers
- If you're on a strict Coins mission, then skip slow, low-yield interactions.
- If you specifically need crafting components (processors/wires/sensors), then add PC checks—but accept your credits/hour will dip.
3) PvE Handling Without Losing Pace
AI is only a problem if it steals time.
- If multiple shredders (or similar threats) stack in your route, then clear them fast with your PvE tools and keep moving.
- If it's a night raid and AI density feels higher, then treat it as a risk premium run: either bring extra PvE control or avoid night runs for pure Coins.
Because night runs can force more combat stops, so your average time per raid inflates and the 7-minute target gets harder.
4) Medical Run SOP (7-Minute Baseline)
| Segment | What We Do | What We Skip (Money-Only Mode) |
|---|---|---|
| Bottom Medical | Prioritize white lockers → quick desk/drawer taps | Long PC scanning loops |
| Mid desks | Tap the obvious fast opens | Detours for low-value bins |
| Top pass (optional) | Quick glance for untouched lockers/desks | Full-room clears |
| Exit | Leave once profit threshold is met | Just one more room behavior |
What to Loot vs What to Ignore (So Your Inventory Doesn't Betray You)
1) Our Simple Loot Rule
Coins/hour is dominated by:
- Value per slot
- Value per second
- How often it forces detours
So we use a slot tax mentality: if something is bulky, slow, or low-value, it has to justify its existence.
| Category | Usually Take | Usually Skip | Why |
|---|---|---|---|
| High value/slot | Counters, analyzers, converters, compact valuables | — | Best value density |
| Tool containers | Yellow toolboxes, desk drawers | — | Fast interaction time |
| Crafting bulk | Crude explosives, wires, batteries | If Coins-only | Can be useful, but often worse credits/hour |
| Breach loot | Only when area is quiet | Early in the run | Too slow during the safe window |
Condition trigger:
If your bag is filling and you're below target profit, then replace low value/slot items first, not your high-density valuables.
How We Keep It No PvP in a PvPvE Game
No PvP doesn't mean nobody shoots. It means we remove reasons to meet people.
The three rules we follow
1. Time-box the hotspot (Assembly: you're there early, then you're gone).
2. Avoid commitment actions when contested (breaches, long looting animations).
3. Extract once the run is paid for.
If your bag already covers your loadout cost plus target margin, staying is optional—and optional time is where accidents happen.
FAQ
1) Do we need the Assembly opener to hit 1M per 2 hours?
No. It helps spike your average, but Medical alone can carry the baseline if you keep raids short and disciplined. The Assembly spawn just turns a good hour into a great hour more often.
2) What if our run is underwhelming and we only hit ~60–65k?
We treat it as normal variance. If you keep the time target, the volume of raids smooths RNG out. Also, underwhelming loot is a signal to leave earlier, not stay longer.
3) Should we do night raids for Coins?
If your goal is pure credits/hour, night raids often add friction (more PvE interruptions and slower movement). If you enjoy night raids or you're farming specific items, they're fine—just don't expect them to be the best Coins sprint format.
4) Do we ever take processors/sensors/wires?
Yes—when we need them for crafting. But if you're benchmarking yourself against the 75k/7-min baseline, treat those as crafting runs, not Coins runs, because they can lower your profit tempo.
5) What's the most common mistake that kills the million-per-2-hours pace?
Over-looting. The pattern is predictable: you get a good first sweep, then you stay to chase perfection, then you meet another team. The fix is mechanical: set a profit threshold and leave when you hit it.
Closing Takeaways
This route works because we're not gambling on rare drops—we're standardizing decisions: loot the fastest, highest-density containers first, respect the early quiet window, and extract as soon as the run is profitable. When we keep raids around seven minutes and defend that tempo, the million-per-two-hours target becomes a scheduling exercise, not a miracle.

Most Popular Posts
- ARC Raiders Update 1.42: Phantom Targets Farming Guide (Glitched Wasps, Rewards, Regional Conditions)
- ARC Raiders Hullcracker Blueprints: Fastest Way to Complete The Major's Footlocker
- ARC Raiders Best Pop Trigger Strategy: Fast Phantom Targets Damage Guide
- ARC Raiders Subway Skin Guide: Unlock the Subterranean Outfit
- ARC Raiders Looting Mk. 3 Survivor Blueprint Guide: Best Blue Gate Route and Drop Locations
- ARC Raiders Medium & Heavy Gun Parts Blueprint Guide: Best Farm Route, Locations, and Refiner Crafting
Popular Category Lists
- ARC Raiders / (354)
- Grow a Garden / (294)
- CoD: Black Ops 7 / (167)
- Star Citizen / (163)
- MLB 26 / (159)
- Monopoly Go / (153)
- ARK Survival Ascended / (128)
- Steal a Brainrot / (99)
- Blox Fruits / (74)
- Adopt Me / (74)
- Forza Horizon 6 / (72)
- Sailor Piece / (68)
- Grow a Garden 2 / (68)
- Diablo IV / (62)
- CoD: BLACK OPS 6 / (55)
- Aion 2 / (53)
- Path of Exile 2 / (48)
- Monster Hunter Wilds / (46)
- Windrose / (44)
- COD: Modern Warfare 4 / (43)






