


 0
0ARC Raiders Fastest Ways to Kill ARCs: Shredder, Bastion, Bombardier and More
- KITE
- Share
- ARC Raiders
- 12/25/25
- 9595
If ARC Raiders combat ever felt like I did everything right and it still took forever, the new grenade blueprints change that math.
I've been testing a simple idea: kill speed isn't only about DPS—it's about forcing ARCs into damage they can't dodge. Trailblazer, Deadline, and Seeker grenades do exactly that, but only if you use them with the right spacing, timing, and terrain (doors and corners are secretly your best weapons).
Below is my current fastest-kill playbook for each ARC, plus the Stella Montis Lobby loot route I use to keep Trailblazers/Deadlines craftable without turning my stash into a bankruptcy simulator.
- 1) The Fastest-Kill Cheat Sheet (Use This First)
- 2) Why These Methods Work (Mechanics That Actually Matter)
- 2.1 Trailblazer is a damage line, not a single explosion
- 2.2 Trailblazer damage stacks (and that changes the grenade meta)
- 2.3 Shredder's dodge is real—so doors become part of your kit
- 2.4 Deadline is best-in-slot, but only if you can plant it safely
- 3) Step-by-Step SOPs (What I Actually Do In-Raid)
- 3.1 Leaper: Wall Pin + Trailblazer Finish
- 3.2 Shredder: Door Trap Method (Trailblazer Guaranteed Value)
- 3.3 Bastion: Two Fast Options (Pick Based on What You Have)
- 3.4 Bombardier: Stealth Approach + Lure Window + Deadline
- 3.5 Rocketeer: Still Wolfpack (But Seeker Has a Niche)
- 3.6 Wasps & Hornets: Seeker Grenades for Sanity
- 4) Blueprints & Crafting Reality: What You'll Run Out Of
- 4.1 Where the new grenade blueprints come from
- 4.2 The real bottleneck is materials (not Arc circuitry)
- 5) Stella Montis Lobby Route: Farming Fuel + Explosive Compound (and the Blueprints)
- 5.1 Route logic (why this loop works)
- 5.2 The route as an executable checklist
- 5.3 What a good run looks like (a real example)
- 6) Loadout Recommendations (So You Don't Overpay for Speed)
- FAQ
- 1) Why do I need to stand so close for Trailblazer?
- 2) Why does Trailblazer feel inconsistent on Shredder?
- 3) Is Deadline always better than Trailblazer for Bastion/Bombardier?
- 4) Wolfpack vs Seeker grenades for Rocketeer—what's the point of Seekers?
- 5) Where should I farm the new grenade blueprints?
- Summary
↖ 1) The Fastest-Kill Cheat Sheet (Use This First)
If you just want the answer without the theory, start here.
| ARC | Fastest Practical Method | What You Need | Execution Summary | Why It's Fast |
|---|---|---|---|---|
| Leaper | Trailblazer + a few Anvil shots (by a wall/building) | Trailblazer, Anvil | Pull aggro → pin it on a wall → throw Trailblazer while hugging it → finish with Anvil | Forces full trail damage + quick cleanup |
| Shredder | Trap + Trailblazer + close door | Trailblazer, a small room with a door | Bait into a small room → throw Trailblazer inside → shut door | Shredder otherwise sidesteps the trail |
| Bastion | 3–4 Trailblazers (stacked) + distraction OR Deadline knee break plant | Trailblazers + Lure / Showstopper OR Deadline | Distract turret ~10s → throw Trailblazers very close; or prep-knee → break knee near building → plant Deadline on top | Trailblazer stacks; Deadline can delete instantly if placed |
| Bombardier | 3–4 Trailblazers close-range OR Deadline via lure + cover | Trailblazers OR Deadline + Lure | Use buildings to approach → lure to create window → plant Deadline; watch shockwaves | Deadline is a one-shot when you stick it safely |
| Rocketeer | Wolfpack (1–2) + Anvil shots | Wolfpack, Anvil | Toss Wolfpack (close enough) → finish | Still the time-to-kill king |
| Rocketeer (budget) | ~15 Seeker grenades | Seeker grenades | Throw near target; seekers acquire inside radius | Works from farther away than Wolfpack |
| Wasps | 1 Seeker grenade | Seeker grenade | Toss anywhere near | One-button annoyance removal |
| Hornets | Seeker grenades (more than wasps) | Seeker grenades | Toss near; expect more throws | Armor slows it down, still efficient |
If you're under-geared, then Trailblazer + terrain is your best multiplier.
If you're rich or speedrunning, then Deadline plant windows are how you delete big ARCs on schedule.
↖ 2) Why These Methods Work (Mechanics That Actually Matter)
↖ 2.1 Trailblazer is a damage line, not a single explosion
Trailblazer doesn't just pop once. It creates a trail to the throw point and a blast line that leads back toward you. Anything inside that trail takes damage.
This means positioning matters more than aim:
- The closer you stand when you throw, the more of that trail overlaps the ARC's body.
- If you throw from far away, you often paint the floor instead of painting the target.
↖ 2.2 Trailblazer damage stacks (and that changes the grenade meta)
Unlike some grenades that don't reward dumping multiple at once, Trailblazer benefits from stacking. So you can front-load damage.
This means you should treat Trailblazers like a burst combo:
- For Bastion/Bombardier: throw 3–4 quickly during a safe window.
- Don't overthink spacing—your priority is maximizing trail overlap.
↖ 2.3 Shredder's dodge is real—so doors become part of your kit
Shredder can physically move out of the Trailblazer trail if it has space and time.
If you throw into an open area, then it often sidesteps and you feel betrayed.
If you trap it in a small room and close the door, then it can't dodge the line and you get the full value.
↖ 2.4 Deadline is best-in-slot, but only if you can plant it safely
Deadline can delete Bastion/Bombardier quickly, but it asks for something specific: a short window where you can run up and stick it.
This means Deadline is less about damage and more about:
- creating a plant window (disables, lure, distraction),
- and using terrain so you aren't exposed during the sprint.
↖ 3) Step-by-Step SOPs (What I Actually Do In-Raid)
↖ 3.1 Leaper: Wall Pin + Trailblazer Finish
Goal: force overlap and end the fight before it turns into a stun-loop.
1. Get inside/near a building and tag the Leaper to pull aggro.
2. Wait until it's pressed against the wall/building edge.
3. Walk up close (yes, uncomfortably close).
4. Throw Trailblazer so the trail runs across its body.
5. Finish with a few Anvil shots.
If you notice it's not hugging the wall, then don't waste the throw—reposition to re-pin it first.
↖ 3.2 Shredder: Door Trap Method (Trailblazer Guaranteed Value)
1. Bait Shredder into a small room with a door.
2. Step out / create space so you don't get clipped.
3. Throw Trailblazer into the room.
4. Close the door immediately.
Don't throw Trailblazer at Shredder in an open hallway and expect miracles.
Do force geometry to do the work for you.
↖ 3.3 Bastion: Two Fast Options (Pick Based on What You Have)
Here's the real decision: are you trying to save grenades, or save time?
| Bastion Option | What You Bring | When I Pick It | SOP |
|---|---|---|---|
| Trailblazer burst | 3–4 Trailblazers + 1 Lure OR Showstopper | Early wipe / consistent craft | Lure to distract turret (~10s) → stand close → dump 3 Trailblazers fast |
| Deadline plant | Deadline (plus the discipline to set it up) | When I want the cleanest delete | Prep a knee to near-break → let it approach a building → break knee to disable → plant Deadline on top → retreat |
Why the Lure works: it buys you a predictable window.
Why the Showstopper works: it briefly disables the turret, which is all you need to throw.
If you don't trust your timing, then use Showstopper first. It's the training wheels version that still works.
↖ 3.4 Bombardier: Stealth Approach + Lure Window + Deadline
Bombardier is easy only if you respect two things: sightlines and shockwaves.
1. Use buildings/cover to get close without being spotted.
2. When you're in planting range, throw a Lure grenade to pull its fire.
3. Sprint in and plant Deadline.
4. Back out immediately and avoid shockwave range.
If you get greedy and hug it too long, then the shockwave stun can turn the plant into a death certificate.
↖ 3.5 Rocketeer: Still Wolfpack (But Seeker Has a Niche)
- Fastest: Wolfpack (often 1 + a couple Anvil shots; otherwise 2).
- Budget/utility: Seeker grenades (~15 for a Rocketeer).
Why Seeker is interesting: it doesn't require a long throw distance like Wolfpack. You just need to throw it close enough for it to acquire the target inside its radius.
This means you can harass a Rocketeer more safely from positions where Wolfpack throws are awkward.
↖ 3.6 Wasps & Hornets: Seeker Grenades for Sanity
- Wasps: Seeker grenades are a clean one-shot tool.
- Hornets: armored, so it takes more—but still a good craftable convenience.
I treat Seekers like a quality-of-life slot: cheap to carry, and they prevent death-by-annoyance while I'm focused on bigger fights.
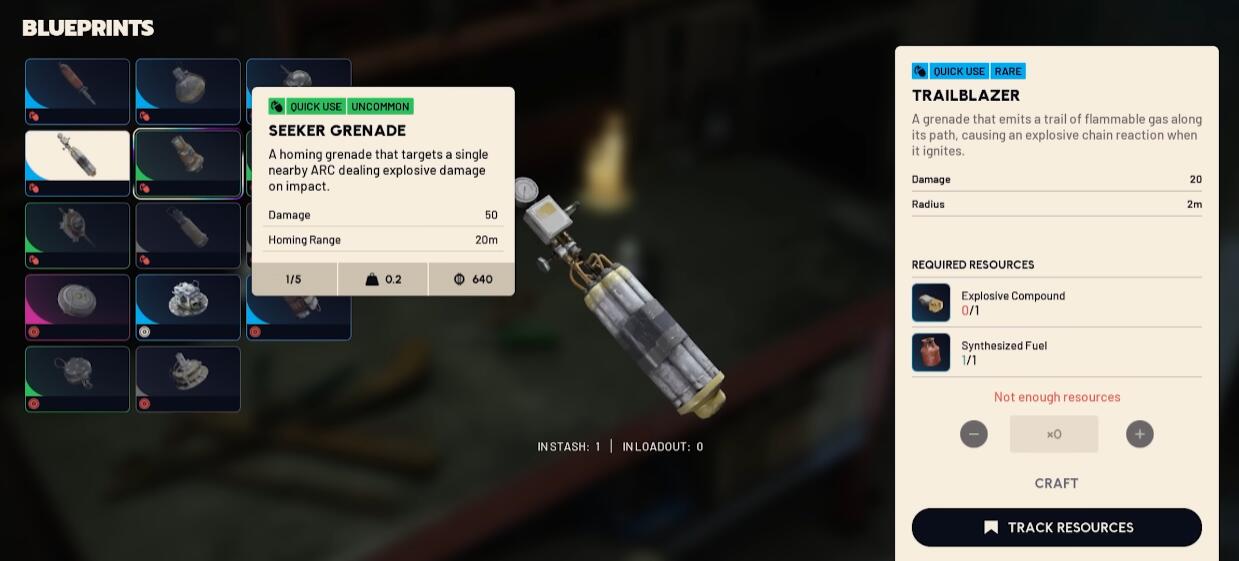
↖ 4) Blueprints & Crafting Reality: What You'll Run Out Of
These methods are only fast if you can keep crafting.
↖ 4.1 Where the new grenade blueprints come from
In my experience, the Trailblazer/Deadline/Seeker blueprints are Stella Montis drops, and the drop rate is common enough that open lots of containers is a real plan.
If you loot Stella consistently, then probability does the boring work for you.
↖ 4.2 The real bottleneck is materials (not Arc circuitry)
- Arc circuitry: manageable—kill ARCs, refine as needed.
- Pain points: Explosive compound and Synthesized fuel (these limit Trailblazer/Deadline volume).
Here's the crafting dependency simplified:
| Item | Core Materials Mentioned | What Usually Becomes the Bottleneck |
|---|---|---|
| Seeker grenade | crude explosives, arc alloy | rarely (easier pipeline) |
| Trailblazer | explosive compound, synthesized fuel | both can pinch quickly |
| Deadline | arc circuitry, explosive compound | explosive compound most often |
↖ 5) Stella Montis Lobby Route: Farming Fuel + Explosive Compound (and the Blueprints)
When I need to restock Trailblazers/Deadlines, I run a Lobby-centered loop because it gives me three wins in one:
1) lots of containers (blueprint chance),
2) black boxes/cabinets that can roll explosive compound,
3) multiple spots for fuel canisters.
↖ 5.1 Route logic (why this loop works)
- It clusters high-value container types without forcing long cross-map travel.
- It has good enough escape paths, so you aren't married to a doomed raid.
- It naturally passes by locations that can also roll other valuable drops (including certain augment-related containers).
↖ 5.2 The route as an executable checklist
| Stop | What to check | What you're hoping for | Skip condition |
|---|---|---|---|
| Lobby start rooms | black boxes + nearby containers | explosive compound, related explosives | if you spawned late and it's already stripped |
| Hallway/side rooms | cabinets + extra black boxes | more explosive compound | if shots are stacking nearby, keep moving |
| Possible breach/security spot | breach reward container(s) | chance for grenade drops/blueprint value | if you're solo and it's clearly camped |
| Exterior car/cart checks | cars/carts that can hold cans | synthesized fuel canisters | if PvP is active in open sightlines |
| Upper floor loop | stairwell loop + containers | more rolls, more compound chance | if you're over-weight or bag is good enough |
| Drop/jump transitions | controlled drop to next area | time saved | don't do it if you're low HP |
| Medical-style container area | med-like containers + nearby loot | extra blueprint chances + fuel | only if the area isn't a warzone |
↖ 5.3 What a good run looks like (a real example)
On one clean loop, I've walked out with numbers like:
- 6 fuel canisters
- 2 explosive compound
- 7 crude explosives (sometimes these roll into compound instead, but don't count on it)
This means a few runs can stock you for multiple Trailblazer/Deadline crafts, assuming you survive the PvP tax Stella loves to charge.
If you're running naked or free kit, then keep one safe pocket open for the highest-scarcity material (usually explosive compound). Die later, craft sooner.
↖ 6) Loadout Recommendations (So You Don't Overpay for Speed)
You don't need a museum-grade kit to do this.
| Goal | Recommended Loadout | Why |
|---|---|---|
| Farm materials/blueprints on Stella | light kit or free kit + safe pocket discipline | minimizes death cost; maximizes attempts/hour |
| Kill big ARCs quickly | bring the specific grenade package (Trailblazer stack / Deadline + setup tool) | speed comes from the combo, not the rifle |
| General roaming + safety | Anvil + a few utility grenades | Anvil finishes fights consistently after grenade burst |
↖ FAQ
↖ 1) Why do I need to stand so close for Trailblazer?
Because Trailblazer's damage is applied along its trail. The closer you are, the more trail overlaps the ARC's hitbox, and the more damage you get per throw.
↖ 2) Why does Trailblazer feel inconsistent on Shredder?
Shredder can move out of the trail before damage completes if it has space. Trap it in a small room, throw inside, and close the door to deny the dodge.
↖ 3) Is Deadline always better than Trailblazer for Bastion/Bombardier?
Deadline is faster when you can plant it safely. Trailblazer is more consistent because it doesn't require the same planting window—just proximity and a distraction tool.
↖ 4) Wolfpack vs Seeker grenades for Rocketeer—what's the point of Seekers?
Wolfpack is still the fastest. Seekers are cheaper and can be used from positions where a long-distance Wolfpack throw is awkward; they only need to be tossed near enough to acquire.
↖ 5) Where should I farm the new grenade blueprints?
Stella Montis. Loot lots of containers, and treat it like probability: volume wins. If you're also short on fuel/compound, the Lobby route doubles as your supply chain.
↖ Summary
This whole system is built around one idea: force ARCs into unavoidable damage, then finish with a consistent weapon like the Anvil.
- Trailblazer deletes Leapers when you pin them and throw close.
- Doors turn Shredder from annoying into solved.
- Bastion/Bombardier die fastest when you either stack Trailblazers during a distraction window or plant Deadline during a disable/lure window.
- Rocketeer still respects Wolfpack, but Seekers offer a workable budget path and amazing anti-wasp utility.
- Stella Montis isn't just a blueprint map—it's the supply line for explosive compound and synthesized fuel if you run the Lobby loop with discipline.
If you play this like a route + recipe (not a heroic duel), your time-to-kill drops hard—and your stash stops bleeding.

Most Popular Posts
- ARC Raiders Riven Tides Key Room Guide: Best Hotel Keys, Loot Routes, Secure & Crane Storage
- ARC Raiders Damage Fireflies Trial Guide: Best Farm Method on Buried City Night Raid
- ARC Raiders Riven Tides Update: New Map & Items, ARC Turbine, Rewards, and Best Early Strategy
- ARC Raiders Bettina Guide: Best Build, Buffs, and How to Use It Against ARC
- Arc Raiders Season 4 Riven Tides Update, Rewards, Safe Skins, and Release Timeline
- ARC Raiders Solo Search Supply Drops Guide: Best Buried City Route, Beacon Locations
Popular Category Lists
- Grow a Garden / (286)
- ARC Raiders / (262)
- CoD: Black Ops 7 / (166)
- Monopoly Go / (146)
- MLB 26 / (144)
- Star Citizen / (111)
- Steal a Brainrot / (89)
- Sailor Piece / (68)
- ARK Survival Ascended / (66)
- Diablo IV / (61)
- Forza Horizon 6 / (60)
- Blox Fruits / (60)
- CoD: BLACK OPS 6 / (55)
- Adopt Me / (53)
- Path of Exile 2 / (48)
- Monster Hunter Wilds / (46)
- Windrose / (44)
- Path of Exile / (40)
- Grow a Garden 2 / (38)
- Bee Swarm Simulator / (36)


