


 0
0ARC Raiders Hotshot Solo Trials Guide: Best Loadouts, Routes, and Score Targets
- ELSA
- Share
- ARC Raiders
- 06/27/26
- 178
If you want to hold Hotshot solo, stop chasing perfect raids. Bank strong scores, extract alive, and only push when the route is clean. This guide gives you the loadouts, maps, and score targets that actually work in live raids.

- Best Solo Hotshot Trials Strategy
- Best Loadouts for ARC Raiders Solo Trials
- Flanking Augment Build
- Best Weapons by Trial
- Dam Battlegrounds ARC Probes and Couriers Route
- Route
- Target Score
- Spaceport Flying ARC Damage Trial
- Recommended Loadout
- Best Positioning
- Snitch Scanner Method
- Target Score
- Buried City Supply Drop Trial
- Route Priorities
- Safety Rules
- Dam and Riven Tides Leaper Trial
- Best Maps
- Dam Leaper Spots
- How to Kill Leapers Safely
- Dam Pops Trial Route
- Best Pop Farming Route
- Best Weapon
- Loot Priority During Trials
- PvP Rules for Solo Trials
- Raider Behavior Checklist
- Weekly Hotshot Score Plan
- FAQ
- What is the best solo augment for ARC Raiders Trials?
- Is Jupiter better than Hullcracker for flying ARC?
- What Hotshot score should solo players aim for?
- What is the safest map for Pop farming?
- Should I extract after three stars?
- Summary
↖ Best Solo Hotshot Trials Strategy
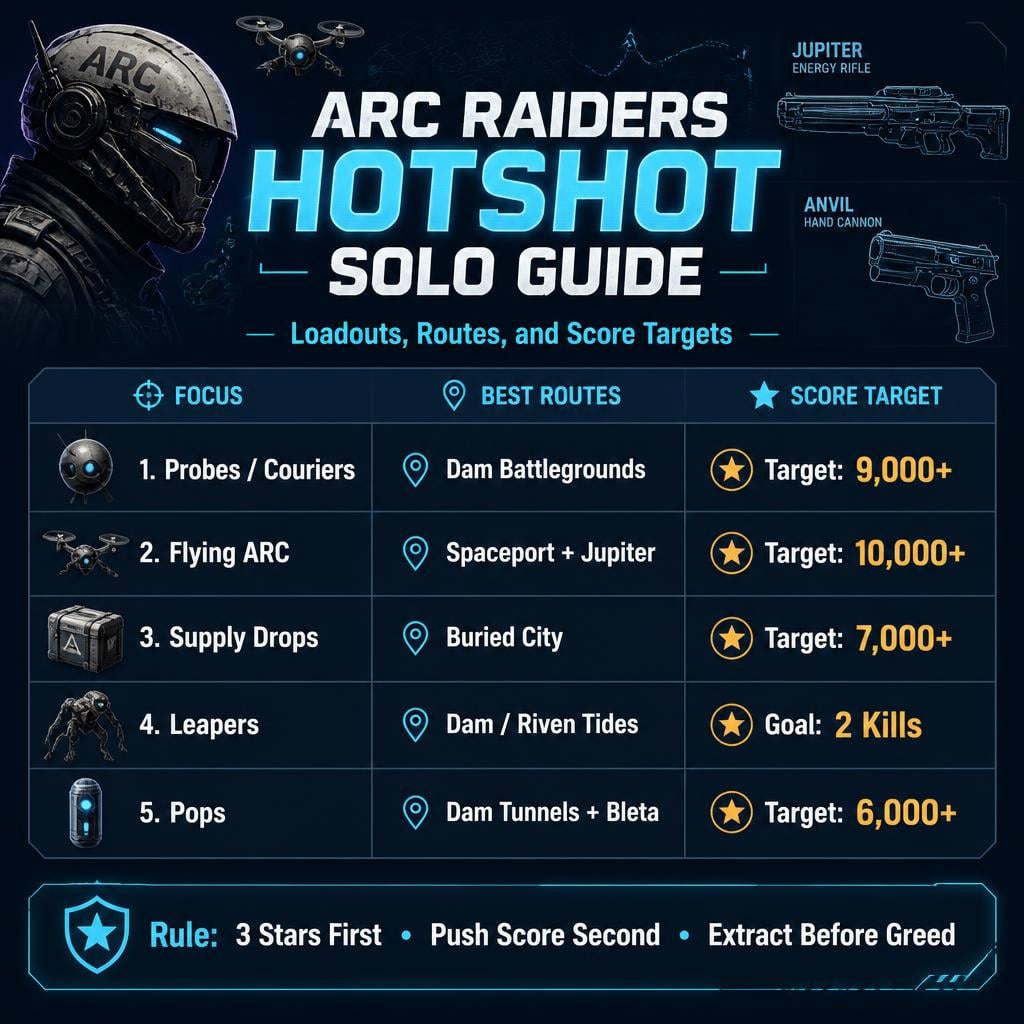
Hotshot is not about one miracle run. It is about stacking safe, repeatable scores across all five Trials.
| Trial Type | Safe Target | Strong Solo Target | Best Map |
|---|---|---|---|
| ARC Probes / Couriers | 6,000+ | 9,000+ | Dam Battlegrounds |
| Flying ARC Damage | 8,000+ | 10,000–11,000+ | Spaceport |
| Supply Drops | 5,000+ | 7,000+ | Buried City |
| Leaper Kills | 3 Stars | 2–3 Leapers | Dam / Riven Tides |
| Pops | 5,000+ | 6,000+ | Dam Battlegrounds |
The rule is simple: three stars first, score push second.
If you already have a strong score, leave. Dying for one extra Courier or Pop is how good runs turn into wasted gear.
↖ Best Loadouts for ARC Raiders Solo Trials
Use weapons that solve specific problems. Do not bring expensive gear just because it looks good.
↖ Flanking Augment Build
Flanking Augment is one of the best Trial augments because it gives fast handling, good storage, and strong pistol/hand cannon synergy.
| Slot | Best Pick | Use Case |
|---|---|---|
| Augment | Flanking Augment | Fast weapon swaps, good backpack |
| Main Weapon | Anvil | Flexible PvE/PvP |
| Secondary | Osprey / Bleta | Range or quiet farming |
| Shield | Medium Shield | Safe without killing mobility |
| Utility | Smokes, Seekers, Hatch Key | Reset fights and escape |
| Burst Tool | Wolf Pack | Leapers, Rocketeers, panic clears |
Use Flanking when you want speed. Use Survivor Augment when the Trial is risky and survival matters more than handling.
↖ Best Weapons by Trial
| Weapon | Best For | Why It Works |
|---|---|---|
| Jupiter | Flying ARC, Rocketeers | Hitscan, huge PvE damage |
| Anvil | General Trials | Reliable, flexible, strong damage |
| Osprey | Snitches, long-range ARC | Clean precision, safe angles |
| Bleta + Silencer III | Pops, quiet farming | Extremely quiet, fast, cheap |
| Hullcracker | Heavy ARC | Strong burst, less flexible than Jupiter |
For flying ARC, Jupiter beats Hullcracker. It is not close. Hitscan matters when targets move constantly.
↖ Dam Battlegrounds ARC Probes and Couriers Route
Dam is the best solo map for ARC Probe and Courier Trials. Spawns are dense, rotations are readable, and extracts are manageable.
↖ Route
Start near Red Lakes if possible.
Then rotate:
1. Red Lakes
2. Swamp
3. Research/Admin
4. Water Treatment
5. Safest extract or hatch
Prioritize Couriers over Probes.
| Target | Priority | Reason |
|---|---|---|
| Courier | High | Quiet, fast, safe |
| Probe | Medium | Good score, loud |
| Husk | Low | Usually wasted time |
Open your map often. Nearby objective ARC can show up when you are close enough. This saves minutes.
↖ Target Score
- 6,000+ = usable
- 9,000+ = strong Hotshot score
- 10,000+ = great, but risky
If you hit 9,000+, extract unless the next targets are free.
↖ Spaceport Flying ARC Damage Trial
For this Trial, bring a Jupiter. Do not overthink it.
↖ Recommended Loadout
| Item | Purpose |
|---|---|
| Jupiter | Main flying ARC damage |
| Anvil | Backup and Raider defense |
| Snitch Scanners | Controlled extra spawns |
| Barricades | Rooftop protection |
| Wolf Pack | Emergency Rocketeer clear |
| Seekers | Escape and reset |
| Extra Energy Ammo | Jupiter burns ammo on long runs |
↖ Best Positioning
Use rooftops near:
- Departures
- Trench
- Wall-side buildings
- Any roof with cover and escape routes
Place Barricades before farming. Block ladder angles and long sightlines.
↖ Snitch Scanner Method
Do not throw every scanner at once.
Use this rhythm:
1. Secure rooftop.
2. Place barricades.
3. Throw 2–3 Snitch Scanners.
4. Clear targets.
5. Reload.
6. Repeat.
This keeps the fight controlled and lowers the chance of getting rushed.
↖ Target Score
| Score | Result |
|---|---|
| 8,000 | Good |
| 10,000 | Strong |
| 11,000+ | Excellent solo score |
Once you hit 10,000+, start thinking about extraction. Do not lose a Jupiter for one extra Hornet.
↖ Buried City Supply Drop Trial
Buried City is the cleanest map for Supply Drop Trials. Multiple stations are close together, and other players often call drops for you.
↖ Route Priorities
Check these areas first:
1. Gas station
2. Apartments
3. Overpass
4. Library / parking area
5. Any already-called drop nearby
You get value from searching drops even if another Raider called them. Let them loot first if needed. Then search it for score.
↖ Safety Rules
- Smoke exposed drops.
- Watch rooftops.
- Do not stand still after searching.
- If you reach 7,000+, leave.
| Score | Result |
|---|---|
| 4,000 | Acceptable |
| 6,000 | Good |
| 7,000+ | Strong solo score |
Buried City turns ugly late. Bank the score.
↖ Dam and Riven Tides Leaper Trial
For Leaper kills, we want two kills minimum for a clean three-star run.
↖ Best Maps
| Map | Why Pick It | Risk |
|---|---|---|
| Dam Battlegrounds | More Leaper spots, better side loot | Longer rotations |
| Riven Tides | Predictable Leaper spawns | More competition |
Dam is better if you also need ARC Resin, Baron Husk loot, or general resources.
↖ Dam Leaper Spots
Check:
- Red Lakes
- Swamp
- Water Treatment
- Dome edge
- Central lowlands
↖ How to Kill Leapers Safely
Do not ego-fight in the open.
Use:
- Wolf Pack for burst
- Seekers to create space
- Osprey / Anvil for clean damage
- Zipline or high ground when possible
- Hatch Key after two kills
If you kill two Leapers, you have the job done. A third is optional, not mandatory.
↖ Dam Pops Trial Route
Dam is safer than Stellar Montis for solo Pop Trials if you know the underground route.
↖ Best Pop Farming Route
Run this loop:
1. Tunnels under Primary / Research
2. Research/Admin interiors
3. Underground return path
4. Water Treatment
5. Back through tunnels after respawns
6. Hatch out
The goal is to keep moving through dense indoor spawns without exposing yourself to long sightlines.
↖ Best Weapon
Use Bleta + Silencer III.
It is quiet, fast, and perfect for small ARC. The Anvil also works, but Bleta is cleaner for this job.
| Score | Result |
|---|---|
| 4,000 | Acceptable |
| 5,000+ | Good |
| 6,000+ | Strong solo score |
If you hit 6,000+, extract. Pops are not worth dying over.
↖ Loot Priority During Trials
Do not loot everything. Grab what funds more Trial runs.
| Keep | Why |
|---|---|
| Rocketeer Drivers | Craft Wolf Packs |
| ARC Resin / Synthetic Resin | Upgrades and crafting |
| Crude Explosives | Seeker Grenades |
| Blueprints | Progression and value |
| High-tier Attachments | Use or sell |
| Trinkets | Fast money |
Skip low-value junk if it slows the run.
Trials burn through gear fast. Hatch keys, Wolf Packs, ammo, smokes, and repairs cost money. Keep your economy healthy or you will start playing scared.
↖ PvP Rules for Solo Trials
Other Raiders are often more dangerous than ARC.
↖ Raider Behavior Checklist
| Behavior | Read | Action |
|---|---|---|
| Talks and leaves | Probably safe | Continue, stay alert |
| Follows silently | Suspicious | Break line of sight |
| Aims while talking | Dangerous | Move immediately |
| Asks about your gear | Suspicious | Leave |
| Shoots once then acts friendly | Unsafe | Extract or fight |
Use voice chat, but do not trust voice chat.
Good phrases:
- Friendly, doing Trials.
- You can loot first.
- I'm leaving.
- Careful, Leaper behind you.
Short. Clear. No debate.
↖ Weekly Hotshot Score Plan
Do this in order.
| Step | Goal |
|---|---|
| 1 | Get 3 stars on every Trial |
| 2 | Push the easiest high-score Trial |
| 3 | Improve Spaceport or Dam scores |
| 4 | Stop once safely above demotion |
| 5 | Recheck standings before reset |
A strong solo Hotshot board usually looks like this:
| Trial | Target |
|---|---|
| Probes / Couriers | 9,000+ |
| Flying ARC | 10,000+ |
| Supply Drops | 7,000+ |
| Leapers | 3 Stars |
| Pops | 6,000+ |
| Total | 35,000–40,000+ |
That range is usually competitive for Hotshot. Thresholds move, so check late in the week.
↖ FAQ
↖ What is the best solo augment for ARC Raiders Trials?
Flanking Augment is best for speed and weapon handling. Survivor Augment is better when the run is dangerous and survival matters more than tempo.
↖ Is Jupiter better than Hullcracker for flying ARC?
Yes. Jupiter is better for flying ARC Trials because it is hitscan, accurate, and safer from rooftops. Hullcracker hits hard, but Jupiter is more consistent.
↖ What Hotshot score should solo players aim for?
Aim for 35,000–40,000+ total weekly points. That usually means strong scores in Probes, flying ARC, supply drops, and three-star clears elsewhere.
↖ What is the safest map for Pop farming?
Dam Battlegrounds. Use tunnels, Research/Admin, and Water Treatment. Stellar Montis can score well, but it is riskier for solo players.
↖ Should I extract after three stars?
Yes, if the raid is getting messy. Three stars bank rewards. Push higher only when the route is safe, time is healthy, and extraction is realistic.
↖ Summary
For solo Hotshot Trials, play disciplined.
Use Jupiter for Spaceport flying ARC.
Use Bleta + Silencer III for Pops.
Use Anvil for flexible runs.
Use Osprey for safe precision.
Use Flanking Augment when speed matters.
Use Survivor Augment when dying would ruin the run.
The winning pattern is simple:
Three stars first. Strong score second. Extract before greed kills the run.
Target board:
| Trial | Good Solo Goal |
|---|---|
| Probes / Couriers | 9,000+ |
| Flying ARC | 10,000+ |
| Supply Drops | 7,000+ |
| Leapers | 2 kills / 3 Stars |
| Pops | 6,000+ |
| Weekly Total | 35,000–40,000+ |
Bank clean runs. Reset bad spawns. Leave suspicious players. That is how you hold Hotshot solo.

Most Popular Posts
- ARC Raiders Riven Tides Key Room Guide: Best Hotel Keys, Loot Routes, Secure & Crane Storage
- ARC Raiders Damage Fireflies Trial Guide: Best Farm Method on Buried City Night Raid
- ARC Raiders Riven Tides Update: New Map & Items, ARC Turbine, Rewards, and Best Early Strategy
- ARC Raiders Bettina Guide: Best Build, Buffs, and How to Use It Against ARC
- ARC Raiders Solo Search Supply Drops Guide: Best Buried City Route, Beacon Locations
- Arc Raiders Season 4 Riven Tides Update, Rewards, Safe Skins, and Release Timeline
Popular Category Lists
- Grow a Garden / (286)
- ARC Raiders / (266)
- CoD: Black Ops 7 / (166)
- Monopoly Go / (146)
- MLB 26 / (145)
- Star Citizen / (116)
- Steal a Brainrot / (89)
- ARK Survival Ascended / (74)
- Sailor Piece / (68)
- Forza Horizon 6 / (63)
- Diablo IV / (61)
- Blox Fruits / (60)
- CoD: BLACK OPS 6 / (55)
- Adopt Me / (53)
- Path of Exile 2 / (48)
- Monster Hunter Wilds / (46)
- Windrose / (44)
- Grow a Garden 2 / (42)
- Path of Exile / (40)
- Bee Swarm Simulator / (36)


