0
0Arc Raiders Modded Weapons: Real Tests, Ratings and Best Builds
- KIVRI
- Share
- ARC Raiders
- 12/10/25
- 5818
- Dispersion / Bloom Mods: The Most Important System to Understand
- Bullet Velocity: Boring on Paper, Amazing at Range
- Recoil Mods: Making Your Spray Actually Stay on Target
- Equip & Unequip Time: The Red Text That's Usually Overrated
- Durability Burn Rate: Yes, It's a Real Cost, But It's Not Brutal
- Noise Reduction / Silencers: Not John Wick Quiet, but a Big Deal in PvP
- ADS Speed: Small Negative, Big Impact on Some Guns
- Magazine Size: The Unsung Hero of Winning Fights
- Overall Mod Value: What's Actually Worth Crafting?
- Weapon‑Specific Recommendations
- FAQ
- Final Take: My Personal MVP Mods and How You Should Think About Them
If you've ever crafted a big mod in Arc Raiders, slapped it on your gun and then thought, Wait… did anything actually change?, you're not alone.
I went into the practice range, recorded slow‑mo footage, frame‑by‑frame comparisons, and tested the major mod categories on multiple weapons: Pharaoh, Stitcher, Kettle, Betina, Il Toro, Osprey, and more.
Below you'll find a breakdown of each major mod type, what it really does, how it behaved in testing, when it's worth the trade‑offs, and which guns actually love it.
If you only remember one concept, let it be this: dispersion = bloom = crosshair behavior, and that's the single biggest family of mods to understand.
↖ Dispersion / Bloom Mods: The Most Important System to Understand
Dispersion in Arc Raiders is just a slightly fancier word for bloom — how much your crosshair expands and how your bullets spread inside that cone.
Four separate stats talk about it:
- Base Dispersion
- Max Shot Dispersion
- Per Shot Dispersion
- Dispersion Recovery Time
You can think of all of them as how big the cone gets and how quickly it shrinks back.
The Core Concept: Your Crosshair = Your Lottery Circle
Here's the simple rule the game is following:
- When your crosshair is tight, most bullets land near the center.
- When your crosshair is wide, bullets land anywhere in the circle, randomly.
Stand still with a Pharaoh and ADS:
- The crosshair tightens, you shoot, the bullet goes exactly where you expect.
Start jumping like a sugar‑high toddler:
- Your crosshair balloons out, and when you fire, your shot can land anywhere in that big circle.
Everything dispersion‑related is about controlling how that balloon grows and shrinks.
Base Dispersion: How Tight the Cone Is By Default
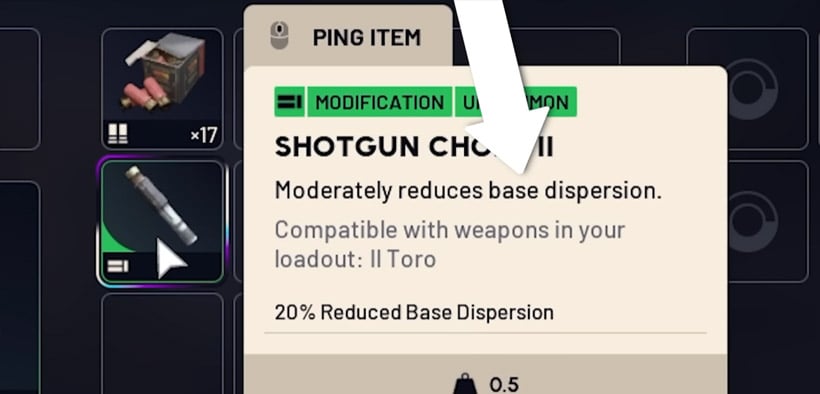
Where you see it: mainly on shotgun chokes.
- Plain English: Lower base dispersion = your crosshair is naturally tighter all the time.
- Test example:
- Il Toro without a choke: wider default crosshair.
- Il Toro + Shotgun Choke 3: noticeably smaller crosshair even when just standing still.
At mid‑ish range on a dummy, I fired Il Toro:
- With no choke, sometimes I'd land one sad pellet even though I was aimed correctly.
- With a choke, far more pellets stayed inside the hitbox.
Why this matters:
For shotguns, base dispersion is directly tied to how many pellets actually hit per shell. The farther you are, the more a big cone punishes you. It's the difference between deleting someone and doing meme damage.
When to use it:
- Any time you're using a shotgun seriously, run a choke.
- Il Toro becomes significantly more consistent with a choke.
My rating: 5 Stars
Verdict: For shotguns, this is non‑negotiable. Use it.
Max Shot Dispersion: How Bad Things Get at Full Spray
Where you see it: compensators and similar muzzle mods.
- Plain English: Lower max shot dispersion = even after dumping a whole mag, your crosshair never balloons as ridiculously.
- Test example with Betina:
- Mag‑dumpped into the air, recorded the crosshair size on the last shot.
- No mod: crosshair huge.
- Compensator 2 (‑20% max dispersion): clearly tighter.
So if you're the type who just holds the trigger down, max dispersion is literally your how ugly does this get at the end stat.
Best on:
- Stitcher
- Kettle
- Any AR/SMG you tend to full‑auto
My rating: 4 Stars
Verdict: Strong on high‑ROF guns; helps your worst‑case accuracy a lot.
Per Shot Dispersion: How Fast the Cone Bloats Per Bullet
Where you see it: again, mainly compensators.
- Plain English: Lower per shot dispersion = each bullet makes the cone grow a bit less.
- Test example with Betina:
- Took screenshots on the 7th shot in the mag.
- No mod: cone noticeably larger.
- With Compensator: cone smaller.
- On the first shot of the mag: difference basically invisible to the human eye.
I even did the swap the images trick: most people couldn't reliably tell them apart on shot 1. By shot 7–10? Much easier.
Why it matters:
The longer you stay on the trigger, the more those tiny per‑shot differences stack. In the first two bullets, you won't see much. By bullet 10 or 15, you absolutely will.
Best on:
- Stitcher and Kettle when you're spraying or long‑bursting
- Any weapon you use for extended bursts instead of strict tap‑fire
My rating: 4 Stars
Verdict: Invisible on shot 1, very visible across a mag. Great on spammy guns.
Dispersion Recovery Time: How Fast Your Crosshair Resets
Where you see it: especially on stocks like Stable Stock 2/3.
- Plain English: Lower recovery time = your crosshair shrinks back to tight faster after you shoot.
- Test example with Pharaoh:
- No stock: fire, crosshair blooms, you can watch it slowly tighten back.
- Stable Stock 2: the big → small animation clearly happens faster, especially in slow‑mo side‑by‑side.
With Pharaoh, this is mostly academic because you fire once, then reload or rechamber anyway. On a full‑auto gun, it becomes more interesting.
Why it matters:
If your pattern is more like burst‑burst‑burst instead of full spray, fast recovery lets each new burst start from that tight, accurate state instead of shooting from a half‑bloomed cone.
Best on:
- High ROF burst‑style play on Stitcher / Kettle
- Players who consciously burst to control recoil and bloom
My rating: 3 Stars
Verdict: Nice to have, but not as impactful as the main dispersion stats.
Quick Summary: Dispersion Mod Priority
Here's a quick at‑a‑glance summary of dispersion‑related mods:
| Mod Type | What It Really Does | Best On | Rating |
|---|---|---|---|
| Base Dispersion | Tighter default crosshair | Shotguns (Il Toro, etc.) | 5 Stars |
| Max Shot Dispersion | Limits how huge bloom gets at full auto | Stitcher, Kettle, AR/SMG | 4 Stars |
| Per Shot Dispersion | Slows how fast bloom grows per bullet | Stitcher, Kettle | 4 Stars |
| Dispersion Recovery | Crosshair returns to tight faster | Burst‑style high‑ROF weapons | 3 Stars |
If you want concrete advice: if it reduces bloom in any way, it's probably worth crafting for your autos and SMGs.
↖ Bullet Velocity: Boring on Paper, Amazing at Range
Bullet velocity is straightforward: bullets in Arc Raiders travel, they're not hitscan. Increasing bullet velocity makes them reach the target sooner.
Test Result: Yes, It's Visibly Faster (If You Look Close Enough)
Using Pharaoh at range:
- No velocity mod: bullet impact happens a few frames later.
- With an Extended Barrel (velocity boost): same shot, impact hits a few frames earlier in slow‑mo.
In a tight corridor at five meters, that's irrelevant. At long range against a strafing target, those frames decide how much you have to lead.
When Velocity Actually Helps You Win
If you're taking long‑range fights, higher velocity means:
- Less lead needed on moving targets
- Easier head/body tracking on someone sprint‑strafing
- Fewer the shot looked right, why did I miss? moments
If you're purely brawling up close, velocity is relatively low impact.
Best on:
- Pharaoh
- Osprey
- Renegade
Any gun you treat as a primary long‑range option.
My rating: 3 Stars
Verdict: Not sexy, but legitimately helpful for long‑range play. Low priority on close‑range guns.
↖ Recoil Mods: Making Your Spray Actually Stay on Target
Recoil in Arc Raiders is split into three bits:
- Horizontal Recoil (left/right wobble)
- Vertical Recoil (upward climb)
- Recoil Recovery Time (how fast the gun returns to start point)
Let's look at how each behaves when you actually empty a mag.
Horizontal Recoil: Kill the Sideways Randomness
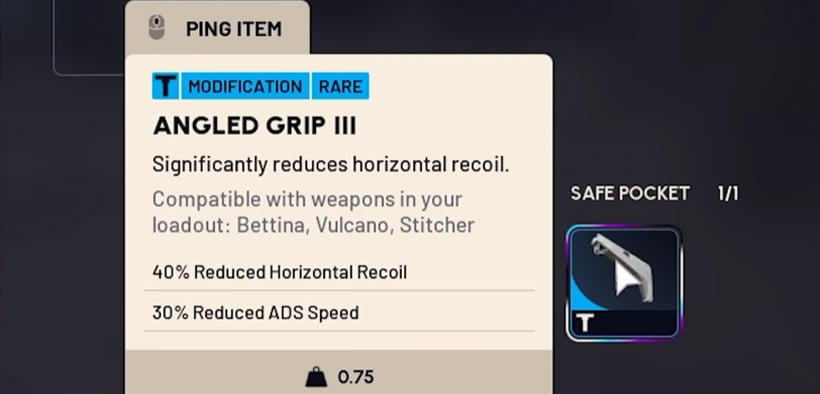
Where you see it: angled grips and similar.
- Plain English: Less horizontal recoil = your spray climbs mostly straight up, not zigzagging left/right.
- Test example with Stitcher:
- No mod: recoil pattern climbs diagonally, wobbling left and right.
- Angled Grip 3: pattern is far more vertically oriented, with much less sideways drift.
This is huge because:
- You can manually pull down to counter vertical recoil.
- Horizonal randomness is almost impossible to pre‑learn because it's not perfectly consistent.
So cutting sideways recoil makes your sprays dramatically easier to control.
Best on:
- Stitcher
- Kettle
- Any high‑ROF gun you spray with
My rating: 4 Stars
Verdict: One of the best feel mods in the game; makes your gun actually obey you.
Vertical Recoil: Less Pole‑Climbing
Where you see it: vertical grips, etc.
- Plain English: Less vertical recoil = your gun doesn't climb as high per shot.
- Test example with Stitcher:
- No mod: vertical recoil pattern is a long, tall line.
- Vertical Grip 3: that line visibly shrinks.
The catch? Vertical‑recoil mods often come with some negative stat, usually ADS speed. I'll talk about that later.
Best on:
- Tempest, Patina, Rattler, Kettle
- Any gun you keep on full auto for more than a short burst
Bad on:
- Pharaoh and other one‑shot reload weapons. You fire once, reload; recoil barely matters.
My rating: 3 Stars
Verdict: Good on autos, overrated on single‑shot weapons. Weigh it against its negatives.
Recoil Recovery Time: Faster Bounce Back Between Bursts
Where you see it: some grips/stocks as a side stat.
- Plain English: Faster recoil recovery = after the gun kicks up, it comes back down to your starting aim point quicker.
- Test example with Betina:
- No mod: dump a mag, watch the sights slowly settle back.
- With reduced recovery time: the sight returns to its original level noticeably faster.
If you like firing in short, controlled bursts, this helps you reset faster for the next burst and for target switching.
Best on:
- Multi‑target engagements where you spray, recover, flick to the next target
- Weapons you don't just mag‑dump blindly
My rating: 3 Stars
Verdict: Useful but very comfort‑oriented. Strength depends on your playstyle.
Recoil Mod Priority Overview
| Mod Type | Real Benefit | Best On | Rating |
|---|---|---|---|
| Horizontal Recoil | Less sideways wobble, easier tracking | Stitcher, Kettle, autos | 4 Stars |
| Vertical Recoil | Less climb, easier downward pull | Autos, not Pharaoh | 3 Stars |
| Recoil Recovery | Faster reset for burst & target switching | Burst players, multi‑target | 3 Stars |
If you're not sure where to start: fix horizontal recoil first, then add vertical if you still struggle.
↖ Equip & Unequip Time: The Red Text That's Usually Overrated
Some of the stronger stability mods (like Stable Stock 3) come with a downside:
- Increased equip time
- Increased unequip time
How Bad Is It Actually?
In testing:
- Weapon swap with the negative: slightly slower.
- Weapon swap without the negative: slightly faster.
You can see it side‑by‑side, but the difference is not oh my god this mod ruined my gun.
Most fights in Arc Raiders aren't about frame‑perfect instant weapon swaps. You're usually pre‑selecting the weapon for the engagement range before it starts.
When the Trade‑Off Is Worth It
If a stock or grip is giving you:
- Big dispersion recovery gains
- Noticeably better recoil control
then sacrificing a bit of swap speed on an AR/SMG isn't a big deal.
I'd absolutely run something like Stable Stock 3 on guns like:
- Stitcher
- Kettle
- Autos in general
as long as I'm not building a hyper‑specialized quick‑swap combo build.
Verdict: Don't panic when you see equip/unequip time increased. Look at what you gain first.
↖ Durability Burn Rate: Yes, It's a Real Cost, But It's Not Brutal
High‑impact mods like Silencer 3 often have a downside: increased durability burn rate.
Test Result: How Much Faster Does It Burn?
Using an Osprey at 56/100 durability:
- No mod, 8 shots (full mag) → durability drops from 56 → 50.
- With Silencer 3, 8 shots → 56 → 49.
So with the mod, you lose one extra point of durability per mag compared to stock.
What That Means for You
You are not going to destroy a gun in two fights because of one mod.
You will have to repair a bit more often.
Given what silencers offer, that's a perfectly reasonable trade in my book — especially once you're past the very early every resource matters stage.
Verdict: Acceptable downside for strong mods. Don't let this stat scare you away from silencers.
↖ Noise Reduction / Silencers: Not John Wick Quiet, but a Big Deal in PvP
Silencers don't make you magically inaudible, but the noise drop is very clear.
Pharaoh & Il Toro With and Without Silencer
- Pharaoh unsuppressed: loud, sharp report, everyone knows you're there.
- Pharaoh with silencer: volume drops, the shot gets thicker and less piercing; easier to miss in the chaos.
Shotgun silencers (like on Il Toro) show the same pattern:
- Still audible.
- But less of that room‑alerting boom, more of a muffled blast.
Why Noise Matters in PvP
Sound is information. When you fire:
- Enemies can guess your direction and often approximate your distance.
- Loud guns are basically audio flares.
Reducing noise helps you:
- Third‑party fights more safely.
- Hold off‑angles without instantly broadcasting your position.
- Punish distracted squads that don't have someone hard‑listening.
Best on:
- Pharaoh / Osprey / Renegade when you're playing off‑angles
- Any mid‑to‑long‑range build that wants to stay less obvious
My rating: 4 Stars
Verdict: You won't be invisible, but you will be harder to track. Very solid on tactical weapons.
↖ ADS Speed: Small Negative, Big Impact on Some Guns
Some powerful recoil mods (Vertical Grip 3, Stable Stock 3, etc.) come with reduced ADS speed.
Test Result: Yes, It's Slower, But Not Drastic
Side‑by‑side:
- No negative: ADS comes up snappier.
- With ADS penalty: the transition has a slightly longer spinup.
You can definitely tell if you watch them next to each other. You may or may not notice it mid‑fight depending on your sensitivity to timings.
The Bigger Question: What Gun Are We Talking About?
If you're on something like Pharaoh:
- You rely hard on fast scope‑up to land quick picks.
- Slower ADS can absolutely cost you first shots and duels.
If you're on Tempest / Patina / Rattler / Kettle:
- Your value comes from sustained fire.
- You can afford a slightly slower ADS in exchange for much more controllable recoil.
Practical rule of thumb:
- Snipers / one‑shot precision guns: Be very careful with ADS penalties.
- Autos / SMGs: Taking an ADS hit for major stability is usually worth it.
Verdict: This negative is very build‑dependent. Don't blindly avoid it; think about your weapon class.
↖ Magazine Size: The Unsung Hero of Winning Fights
Mag size doesn't look flashy. No one screenshots +5 mag for the drip.
But in practice, it's one of the strongest win‑more, fail‑less stats in the game.
Testing It on Stitcher: 17 Bullets to Kill, 20 in the Mag
On the practice dummy:
- The dummy dies in 17 hits.
- Stitcher has 20 rounds stock.
In theory, that sounds safe. In reality:
- Without a mag mod, with recoil and bloom, you might miss enough that your 20‑round mag isn't enough to kill the dummy in one go.
- Add +5 rounds via a mag mod: now you can miss several more shots and still get the down before reload.
That extra breathing room is enormous in actual PvP, where people move, strafe, jump and jiggle.
Who Loves Extra Mag the Most?
- Stitcher: High ROF, high damage, and extremely punishing if you reload at the wrong time.
- Kettle: When you're using it as a mainline rifle, more bullets = more sustained pressure.
- Ventor: Already lethal; a deeper mag means you can mow through more enemies per mag.
My rating: 4 Stars
Verdict: It won't make your gun feel cooler, but it will quietly win you fights. Do not sleep on it.
↖ Overall Mod Value: What's Actually Worth Crafting?
Here's a consolidated view of how I rate the common mod families, based on testing and real matches:
| Mod Category | Real Impact | Ideal Weapons | My Rating |
|---|---|---|---|
| Dispersion (all types) | Controls bloom; massively affects accuracy | Stitcher, Kettle, all shotguns | 5 Stars (top tier) |
| Dispersion Recovery | Faster reset, smoother burst mechanics | High‑ROF burst play | 3 Stars |
| Bullet Velocity | Easier long‑range hits, less leading | Pharaoh, Osprey, Renegade | 3 Stars |
| Horizontal Recoil | Removes sideways RNG, easier tracking | All autos, especially Stitcher/Kettle | 4 Stars |
| Vertical Recoil | Less climb, easier to hold on target | Autos, SMGs (not single‑shot guns) | 3 Stars |
| Recoil Recovery | Faster re‑center for multi‑target fights | Burst / flick players | 3 Stars |
| Equip/Unequip Time | Slightly slower swaps for more stability | Autos; mostly acceptable trade | Situational |
| Durability Burn Rate | More frequent repairs for strong effects | Silencer builds | Acceptable |
| Noise Reduction (Silencer) | Less obvious positioning in PvP | Long‑range, flanking builds | 4 Stars |
| ADS Speed | Faster first shot vs. more stability | Critical on snipers only | Weapon‑dependent |
| Magazine Size | Higher forgiveness and kill potential | Stitcher, Kettle, Ventor, autos | 4 Stars |
If you're resource‑limited, you can treat that like a shopping list and start at the top.
↖ Weapon‑Specific Recommendations
Now let's translate all of this into actual what to put on what for a few key guns.
Pharaoh (Long‑Range Precision)
What matters most:
- Bullet Velocity: makes leading easier and shots more reliable at range.
- Slight dispersion help if available.
- Staying away from heavy ADS speed negatives, because your value is quick pick potential.
What matters less:
- Recoil, dispersion recovery: you fire once, then reload/rechamber.
- Vertical recoil reduction is almost wasted here.
Simple build logic:
- Extended barrel or any velocity‑boosting barrel.
- Only pick stocks/grips that don't tank your ADS.
- Consider a silencer if you value staying off audio radar over raw sound power.
Stitcher (High‑ROF AR Bully)
Stitcher is the poster child for modded right, this thing is disgusting.
High‑priority stats:
- Max Shot Dispersion & Per Shot Dispersion
- Horizontal Recoil
- Magazine Size
You want:
- Tight crosshair even mid‑burst.
- Minimal sideways drift when spraying.
- Enough bullets to burn someone down through missed shots, armor, cover peeks, etc.
Build this right and you'll feel like you're suddenly landing way more bullets without changing your aim.
Kettle (My Favorite Low‑Level All‑Rounder)
Kettle really wakes up once you start treating it like a cheap but modded workhorse.
Priority:
- Dispersion mods, especially Compensator 2.
- Magazine size.
- Some recoil smoothing if you feel it's jumpy.
Compensator 2 in particular is like adding scallions and soft‑boiled egg to instant ramen: small upgrade on paper, big upgrade in your mouth. A bit of dispersion control turns Kettle from meh into this actually slaps.
Il Toro (Shotgun)
For Il Toro and friends, life is simple:
- Shotgun Choke = mandatory if you care about consistency.
- Optional shotgun silencer if you want to make your engages a bit less obvious.
Because every pellet matters, anything that tightens your pattern directly translates to damage and kills.
↖ FAQ
Q1: The numbers on mods look tiny. Do they really matter?
Yes. On a single bullet, the difference is subtle. Across an entire magazine and an entire fight, dispersion and recoil mods can be the difference between I swear I was on target and actually getting the down. Small percentages stack over time.
Q2: If I'm resource‑poor, what should I craft first?
For autos/SMGs:
1. Dispersion mods (Compensator‑type, Chokes for shotguns)
2. Magazine size
3. Horizontal recoil
If you main long‑range weapons like Pharaoh, prioritize bullet velocity + reasonable stability over fancy recoil mods.
Q3: Does increased durability burn make my gun unusable?
No. It just makes you repair a bit more frequently. In testing, Silencer 3 only cost about 1 extra durability per mag compared to no mod. It's nowhere near this will eat your weapon alive levels.
Q4: My aim isn't great. Should I optimize recoil or dispersion first?
If you struggle to hit even when you're trying:
- Start with dispersion + mag size so the cone itself is less punishing and you have more bullets to work with.
If you're decent at tracking but feel the gun fights you:
- Start with horizontal recoil so your aim and your gun finally agree on where the bullets go.
Q5: Is recoil reduction ever worth it on Pharaoh?
Almost never. Pharaoh is a one‑shot‑then‑reload style weapon; recoil doesn't get to stack. You get way more value from bullet velocity, positioning, and ADS responsiveness.
↖ Final Take: My Personal MVP Mods and How You Should Think About Them
After a lot of slow‑mo testing and way too many practice‑range mag dumps, my own MVP list of Arc Raiders weapon mods looks like this:
1. Dispersion Mods (especially Compensators & Shotgun Chokes)
- These are my personal top tier.
- On guns like Kettle and Stitcher, they transform the experience; your hits go up, your frustration goes down.
2. Magazine Size Mods
- Less glamorous, more effective.
- Extra bullets directly translate into more completed kills and fewer I ran dry at 10 HP moments.
3. Horizontal Recoil & Reasonable Vertical Control
- Once you're comfortable aiming, stabilizing the spray will feel like you unlocked a new gun.
- Don't be afraid to eat a bit of ADS penalty on autos if the recoil improvements are substantial.
4. Bullet Velocity & Silencers
- The more you play long‑range or flanking styles, the more value you'll get from these.
- Velocity helps your shots connect; silencers help you not get dog‑piled right after.
If you walk into Arc Raiders today and want to invest smart:
- On Kettle/Stitcher:
- Grab Compensator‑type mods + mag size, then fix horizontal recoil.
- On Pharaoh/Osprey:
- Invest in bullet velocity, keep ADS penalties minimal, consider silencers for sneaky angles.
- On Il Toro and shotguns:
- Slap on a choke and stop letting pellets vacation outside the hitbox.
When a weapon feels theoretically good but practically underwhelming, it's often not the gun that's the problem — it's that you haven't given it the two or three mods it's secretly designed to shine with. Once you find that combination, the whole kit suddenly snaps into place.

Most Popular Posts
- Arc Raiders Canto Guide: Best Build, Solo vs Trios Tips, and Blueprint Farm
- ARC Raiders Assessors Guide: Easy Solo Loot Strategy With or Without Smoke Grenades
- ARC Raiders Riven Tides Key Room Guide: Best Hotel Keys, Loot Routes, Secure & Crane Storage
- ARC Raiders Damage Fireflies Trial Guide: Best Farm Method on Buried City Night Raid
- ARC Raiders Scrappy Guide: Best Fruits, and What Apricots & Agave Actually Drop
- ARC Raiders Riven Tides Update: New Map & Items, ARC Turbine, Rewards, and Best Early Strategy
Popular Category Lists
- Grow a Garden / (283)
- ARC Raiders / (251)
- CoD: Black Ops 7 / (164)
- Monopoly Go / (145)
- MLB 26 / (134)
- Star Citizen / (100)
- Steal a Brainrot / (87)
- Sailor Piece / (67)
- CoD: BLACK OPS 6 / (55)
- Forza Horizon 6 / (54)
- Blox Fruits / (54)
- ARK Survival Ascended / (51)
- Path of Exile 2 / (48)
- Adopt Me / (47)
- Monster Hunter Wilds / (46)
- Diablo IV / (45)
- Windrose / (43)
- Path of Exile / (40)
- Battlefield 6 / (34)
- Bee Swarm Simulator / (32)