0
0ARC Raiders Raider Caches Guide: Scored 20K+ Solo on Dam Battlegrounds During Hurricane
- KITE
- Share
- ARC Raiders
- 04/11/26
- 398
If you're trying to push 20K+ Trial points from Search Raider Caches in ARC Raiders, the cleanest solo setup we've tested is on Dam Battlegrounds during Hurricane. The challenge itself is straightforward, but high scores usually come down to a few practical decisions: bring enough sustain, route around the wind, search cache areas efficiently, and leave before greed ruins the run.
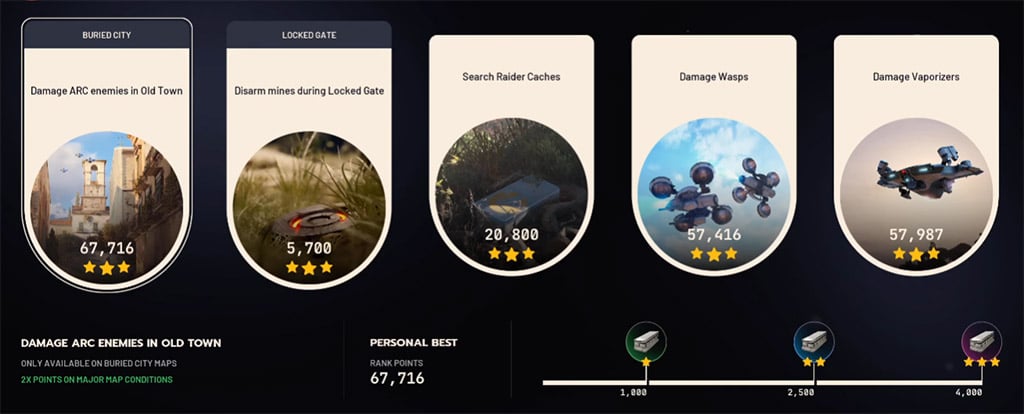
We've had runs land at 20,800 points solo, and the pattern is consistent: the players who do well are not always the ones fighting better—they're the ones wasting less time.
- Why This Method Works
- What matters most
- Best Loadout for Solo Cache Runs
- Practical note
- Route Planning: Follow the Wind, Not Habit
- Example route logic
- Route rule we follow
- How We Search Raider Caches Faster
- Faster search method
- Why this works
- Looting and Combat: Keep Both Under Control
- Looting rule
- Combat rule
- Stamina and Audio Tips That Actually Help
- Stamina timing
- Audio setting
- When to Extract
- FAQ
- How many Trial points can we realistically get solo?
- Do we need a full PvP loadout?
- Should we loot every cache fully?
- What is the biggest mistake in this Trial?
- Final Thoughts
↖ Why This Method Works
This Trial rewards volume and pacing more than combat.
On Dam Battlegrounds, Raider Cache spawns are spread well enough that we can chain multiple search zones in one run. During Hurricane, the danger is real, but the mode also creates a predictable rhythm: keep moving, manage shield and stamina, and avoid anything that slows the route.
↖ What matters most
- Wind direction decides the route more than spawn location does.
- Adrenaline management keeps the run alive.
- Fast cache searching matters more than looting everything.
- Safe extraction is part of the score strategy, not an afterthought.
↖ Best Loadout for Solo Cache Runs
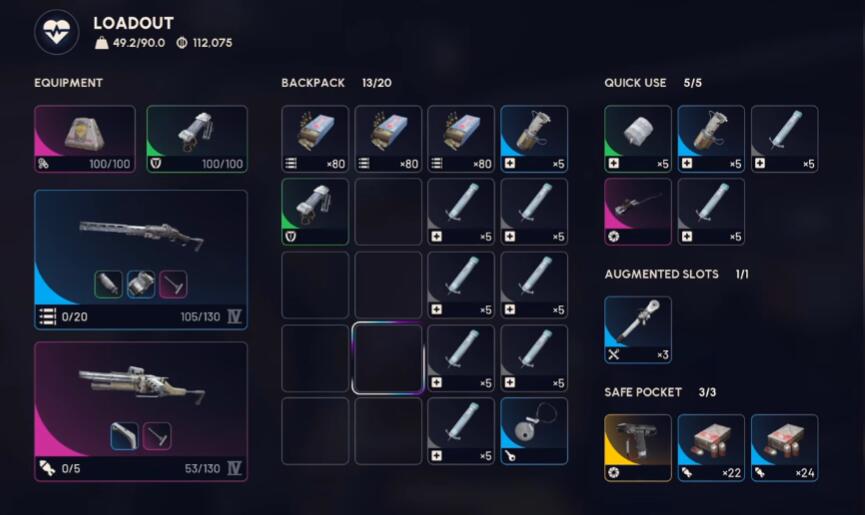
You do not need a heavy combat build here. We've had the best results with a light, practical setup that covers sustain first.
| Item | Recommendation | Why We Bring It |
|---|---|---|
| Shield sustain | Surge Shield Rechargers | Hurricane constantly drains shield pressure, so these are essential. |
| Stamina sustain | 8–10 stacks of Adrenaline Shots | This sounds like a lot, but headwind sections burn stamina fast. |
| Weapon | A simple, reliable gun like the HolecR | Enough for Comets and Fireflies without slowing the run. |
| Utility | Snap Hook or Zipline | Useful if terrain or wind gets you stuck. |
| Extraction | Raider Hatch Key | Lets us secure the score safely once the run is done. |
↖ Practical note
The most common mistake we see is bringing too little stamina recovery. If you have to stop and recover naturally, your score starts dropping long before you notice it.
↖ Route Planning: Follow the Wind, Not Habit
This is the part that usually separates a 12K run from a 20K run.
We do not run the exact same route every time. Instead, we check:
- where we spawned,
- which way the wind is blowing,
- and which path gives us the fewest long headwind stretches.
↖ Example route logic
If we spawn on the west side near places like:
- Pale Apartments
- Old Battleground
- Swamp
and the wind is pushing east to west, we often get better results by going:
1. Ruby Residence
2. Pattern House
3. Power Generation
4. then rotating toward the lower cache zones
That opening can feel bad because you're pushing into wind early. But over the full route, it usually saves stamina and time.
↖ Route rule we follow
If you notice that the easy opening sends you into repeated headwind later, change it immediately. A short bad section is often better than a long bad route.
↖ How We Search Raider Caches Faster
A lot of players lose time by treating map markers as exact placements. That usually doesn't work.
Interactive maps are useful, but cache icons are often approximate, not perfectly precise. So when we enter a cache zone, we search the area, not the pin.
↖ Faster search method
- Listen for the beeping before overchecking visually.
- Sweep the zone in a short zigzag.
- Check open dirt first, then brush and foliage.
- If a cache is clearly looted already, tap it and move.
↖ Why this works
Some caches are obvious and sitting out in the open. Others are buried in grass or tucked near rocks. If you only run to the exact marker, you will miss enough caches to hurt the run.
↖ Looting and Combat: Keep Both Under Control
This challenge rewards discipline.
↖ Looting rule
If you are clearly the first player to open a cache, it is worth taking a quick look because fresh caches can contain strong items, including valuable blueprints.
If someone else already looted it:
- search for credit,
- skip the leftovers,
- keep moving.
↖ Combat rule
You usually do not need to fight much on this route. Most runs only involve occasional Comets or Fireflies.
That means our goal is simple:
- avoid unnecessary fights,
- clear blockers quickly,
- and protect route momentum.
If you start playing for kills instead of pace, the score usually suffers.
↖ Stamina and Audio Tips That Actually Help
Small optimizations matter here because the run is decided by seconds.
↖ Stamina timing
We usually use an Adrenaline Shot at around 25% stamina.
That timing works because:
- it avoids forced downtime,
- it keeps movement smooth,
- and it gives us margin if the next section turns into a headwind push.
↖ Audio setting
We've had better consistency with Night Mode audio, mainly because cache beeping seems easier to pick out during Hurricane. It is not mandatory, but it helps enough to be worth testing.
↖ When to Extract
A lot of good runs die because players stay too long.
Once the score is where you want it, leave.
And yes—Raider Hatches can be used during Hurricane.
| Situation | Best Move |
|---|---|
| Score is secured and hatch is nearby | Take the Raider Hatch |
| Resources are getting low | Extract immediately |
| Route still has value and you're healthy | Continue, but stay disciplined |
| Standard extract looks risky | Favor the safer hatch option |
Our rule is simple: bank the points before the map takes them back.
↖ FAQ
↖ How many Trial points can we realistically get solo?
A strong solo run can break 20,000 points, and 20,800 is absolutely realistic with a clean route and decent wind.
↖ Do we need a full PvP loadout?
No. A lighter setup is usually better because this is a movement-focused Trial, not a fighting build.
↖ Should we loot every cache fully?
No. Check fresh caches quickly, skip low-value leftovers, and keep the route moving.
↖ What is the biggest mistake in this Trial?
Ignoring the wind. A bad route into repeated headwind drains stamina, time, and score.
↖ Final Thoughts
The best solo Raider Cache runs on Dam Battlegrounds are built on simple habits: bring enough sustain, adapt your route to the wind, search broadly instead of chasing exact pins, and extract before the run turns sloppy.
That approach is what consistently gets us into the 20K+ range, and it does so without needing fancy mechanics or high-risk fights. A clean run beats a flashy one almost every time.

Most Popular Posts
- ARC Raiders Riven Tides Key Room Guide: Best Hotel Keys, Loot Routes, Secure & Crane Storage
- ARC Raiders Bettina Guide: Best Build, Buffs, and How to Use It Against ARC
- Best ARC Raiders Attachments for Every Weapon: Complete Weapon Mod Guide
- ARC Raiders Turbine Boss Guide: Spawn Time, Weak Points, Best Weapons, and Loot
- Arc Raiders Patch 1.27: Regional Pricing, Augment Rework, and Expedition Catch-Up
- ARC Raiders Update Guide: Best Nomadic Envoy Trades, Rascal Grenade Launcher, Durability Buffs
Popular Category Lists
- ARC Raiders / (291)
- Grow a Garden / (286)
- CoD: Black Ops 7 / (166)
- MLB 26 / (150)
- Monopoly Go / (148)
- Star Citizen / (128)
- ARK Survival Ascended / (90)
- Steal a Brainrot / (90)
- Sailor Piece / (68)
- Forza Horizon 6 / (67)
- Diablo IV / (62)
- Blox Fruits / (62)
- Adopt Me / (58)
- Grow a Garden 2 / (57)
- CoD: BLACK OPS 6 / (55)
- Path of Exile 2 / (48)
- Monster Hunter Wilds / (46)
- Windrose / (44)
- Path of Exile / (40)
- Bee Swarm Simulator / (37)