


 0
0ARC Raiders Rocketeer Guide (2026): How To Avoid, Dodge, and Kill Them Reliably
- KITE
- Share
- ARC Raiders
- 02/06/26
- 960
Rocketeers feel unfair because they punish the 2 things we do most topside: Sprint In Straight Lines And Peek Lazy Cover. The good news is they're not magic—just extremely lethal within a few very specific windows.
We've tested their sight lines, measured safe-ish distances in real fights, and intentionally forced different attack patterns until the results became repeatable. Here's how we keep raids from ending in a one-second knock, and how we turn Rocketeers from run away into free scrap—carefully.
- 1) Rocketeer Aggro
- Consistently Observed
- The Aggro Rules
- Rocketeer Vision
- 2) Sus Mode Manipulation
- The Cleanest Manipulation
- 3) Dodging & Surviving
- One rule we never break: rockets lead your movement
- Attack A — Single Rocket (Most Dodgeable)
- Attack B — Stationary Triple Barrage (3-Rocket Burst)
- Attack C — Strafing Run Barrage (Moving Spray)
- 4) Quick Dodge Cheatshee
- 5) Fighting Back: 2 Reliable Kill Plans
- Loadout Note
- Kill Plan 1 — The 80m Leash (safe, consistent)
- Kill Plan 2 — Thruster Break
- Niche Tactic — Underbelly Juggling
- 6) Cover, Obstacles, and the Assume Every Rocket Hits Rule
- The Cover Discipline That Saves Us
- Terrain Interactions We Exploit
- FAQs
- 1) What's The Safest Distance To Avoid Rocketeer Aggro?
- 2) Why Does It Sometimes Swap Targets When We're The Ones Shooting?
- 3) I Can't Dodge The Barrage - What Am I Doing Wrong?
- 4) Should We Aim For The Body Or The Thrusters?
- 5) What's The Simplest Survival Habit To Build?
- Final Takeaways
↖ 1) Rocketeer Aggro
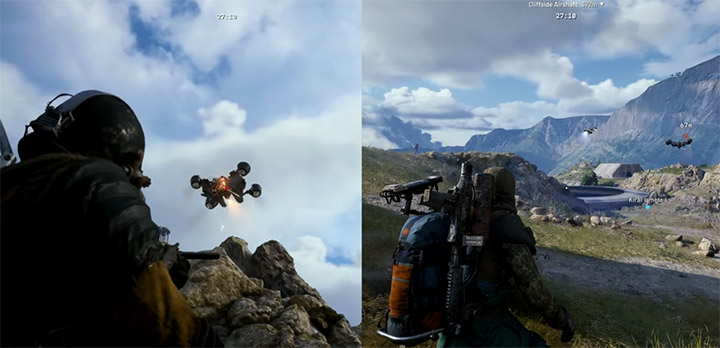
Rocketeers don't aggro like a normal FPS enemy. They behave like a paranoid turret with legs: they react to line of sight, sound, and the origin of your shots—and they can swap targets if someone else is visible.
↖ Consistently Observed
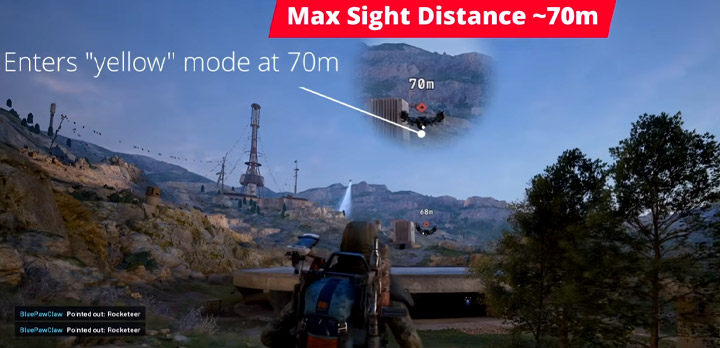
- Max hard aggro we've seen: about 70 meters.
- Practical safety buffer: treat 80m+ as don't gamble distance if you must cross in front.
- Footstep/hearing danger zone: inside roughly 20m, they can turn even if you're in a blind spot.
↖ The Aggro Rules
If you're shooting any ARC and another Raider is in its peripheral and in line of sight, it may switch aggro to them. That's annoying, but it also means we can sometimes survive a mistake if the Rocketeer has another problem visible.
This Means: When your squad is spread, you can unintentionally donate a Rocketeer to your teammate. If you notice it tracking someone else, don't celebrate—reposition so you're not the next visible target.
↖ Rocketeer Vision
Rocketeers feel omniscient until you treat them like a camera with a limited cone.
| Zone around the Rocketeer | How safe it is | Why it works | What breaks it |
|---|---|---|---|
| Directly in front | Worst | Unpredictable aggro + clean lead shots | Any peek, any noise |
| Off to the sides (near the front thrusters line) | Often safe | Side peripheral seems to end around the front thrusters | If it turns toward sound/shot origin |
| Directly beneath (when it's high) | Surprisingly strong | They struggle to aim far downward | Staying too long → it repositions |
| Within ~20m anywhere | Bad | It hears you and rotates | Sprinting, sloppy pathing |
↖ 2) Sus Mode Manipulation
Rocketeers have a very exploitable habit: they rotate toward where a shot/impact came from, sometimes pausing patrol to check.
↖ The Cleanest Manipulation
- Don't shoot near it unless you want it on you.
- If you need to cross a lane, fire a shot away from your path (or throw an impact nade) to pull its attention.
Why this works: It's not just reacting to you, it's reacting to the origin point of the disturbance.
If You Find It's patrolling into the exact corridor you need, then create a sound/impact off-angle, wait for the turn, and rotate past its side—never its front.
↖ 3) Dodging & Surviving
When a Rocketeer locks on, just hide is still the best answer. But we don't always get that luxury. So we treat each attack like a mini-pattern.
↖ One rule we never break: rockets lead your movement
If you run in one direction, it leads that direction until it fires. That's your window.
This Means: last-second movement changes matter more than speed.
↖ Attack A — Single Rocket (Most Dodgeable)
Best at: mid-range pressure
Your goal: force a bad lead
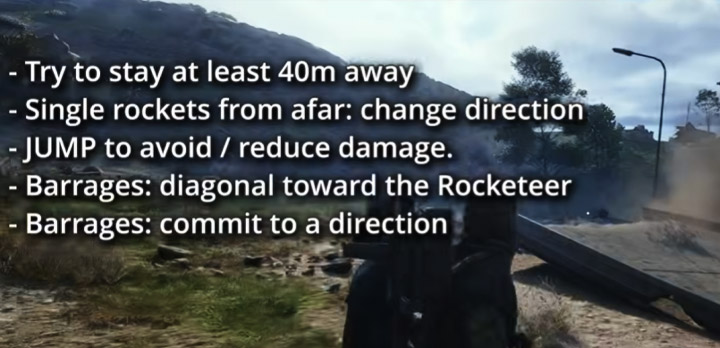
If it's around 40–50m away, we can reliably dodge by:
- 1. Move in one direction (commit for a beat).
- 2. Switch direction with a dodge roll or a sharp cut.
- 3. Jump away from the blast if it still lands close.
If you're trying to escape and your timing isn't perfect, do this instead:
- Run a mild serpentine.
- Jump right before you expect the shot to leave.
- Even when we fail, jumping away often reduces damage enough to avoid the instant knock.
Our single biggest survival upgrade: We jump away from rockets by default, even when we think we're clear.
↖ Attack B — Stationary Triple Barrage (3-Rocket Burst)
Best at: deleting panicked runners
Your goal: stop feeding it a straight-line lead
- The most consistent dodge is to run diagonally toward it (not directly at it).
- Once you choose your diagonal, commit—indecision is what gets you clipped by splash.
Why Diagonal Works: the lead calculation and splash pattern punishes lateral-only movement. Diagonal closes distance while shifting your hitbox off the expected arc.
↖ Attack C — Strafing Run Barrage (Moving Spray)
Best At: catching us out of cover
Your Goal: cut behind its path, deny overhead
- If you see it start moving while charging a barrage, assume a strafing run is coming.
- Cut a diagonal behind it, not in front of its travel line.
If it gets directly overhead at close range, dodging becomes messy.
In that case, we stop trying to be perfect and focus on jump timing to reduce damage and avoid the full burst.
↖ 4) Quick Dodge Cheatshee
Here's the we're getting shot right now table.
| Situation | What we do | What we avoid | Why |
|---|---|---|---|
| Single rocket at 40–50m | Cut/roll last-second; jump away from splash | Straight-line sprint | It leads you; direction change breaks the lead |
| Triple barrage (stationary) | Diagonal toward it; commit | Stutter-steps | Hesitation keeps you inside splash lanes |
| Strafing barrage | Diagonal behind its path; keep eyes on it | Crossing in front | You run into the spray and eat multiple hits |
| No cover available | Jump timing + committed direction | Panic zig-zag | Panic increases time spent in blast radius |
↖ 5) Fighting Back: 2 Reliable Kill Plans
We like killing Rocketeers for one reason: they're lethal, but predictable once you control distance.
↖ Loadout Note
A Pharaoh + bullets is a practical Rocketeer solution. We've done it fast with Pharaoh 4, but even Pharaoh 1 works if you respect spacing.
↖ Kill Plan 1 — The 80m Leash (safe, consistent)
If you have space behind you, you can turn the fight into a slow walk for the Rocketeer.
- After aggro, it often approaches quickly until around ~100m, then creeps if it keeps line of sight.
- If we stay over 70m (we aim for 80m to be safe), it doesn't start shooting in many cases.
- We then backpedal and keep firing.
Shot-to-kill (body): roughly ~30 shots when we hit the middle of the body consistently.
If you find it keeps repositioning, then you're breaking line of sight—so it's trying to regain vision. Either commit to full cover play (peek only after detonation) or move to a lane with cleaner visibility.
↖ Kill Plan 2 — Thruster Break
Shooting thrusters can shorten time-to-kill—but only if you're accurate.
| Target choice | Approx. effort | Risk level | When we pick it |
|---|---|---|---|
| Body center mass | ~30 shots | Lower | When we're playing from cover or under player threat |
| Thrusters | ~8–10 shots per thruster | Higher | When we have clean sight, stable aim, and low PvP pressure |
Why body is often better: in real raids, the biggest threat isn't the Rocketeer—it's getting third-partied while you're wide-peeking for thruster shots.
↖ Niche Tactic — Underbelly Juggling
If the Rocketeer is high enough, there's a strange pocket directly beneath where it can't angle down effectively.
- We can juggle between where it can/can't shoot downward.
- But if we stay directly under too long, it often repositions.
- If it's low and we try to force this, we tend to get erased.
We treat this as a trick, not a plan.
↖ 6) Cover, Obstacles, and the Assume Every Rocket Hits Rule
When fighting from cover, we assume every rocket is perfect.
↖ The Cover Discipline That Saves Us
- 1. Get deep into cover (not half behind it).
- 2. Wait for the detonation sound.
- 3. Peek only after the explosion.
This means: we stop trading peeks with a rocket launcher. We turn it into a rhythm game we can actually win.
↖ Terrain Interactions We Exploit
| Obstacle | What it enables | The catch |
|---|---|---|
| Fences (some types) | We can shoot through while it can't | Strafing run can still arc above and splash us |
| Trees / forest | Breaks targeting, sometimes blocks rockets | Don't rely on a single trunk—keep moving diagonally |
| Tight cover corners | Safe peeks after detonation | Greedy re-peeks = splash knock |
↖ FAQs
↖ 1) What's The Safest Distance To Avoid Rocketeer Aggro?
We treat 80m+ as our don't gamble buffer because the furthest consistent aggro we've seen is about 70m. If you must cross its front, distance is your insurance—though we still avoid that lane whenever possible.
↖ 2) Why Does It Sometimes Swap Targets When We're The Ones Shooting?
Because line of sight and peripheral visibility can override who dealt damage. If another Raider is visible, the Rocketeer may choose them. If you notice this happening, reposition so you're not the next clean target in its cone.
↖ 3) I Can't Dodge The Barrage - What Am I Doing Wrong?
Most failures come from changing your mind mid-dodge. For stationary triple barrages, pick a diagonal toward it and commit. For strafing runs, cut behind its path, not across the front.
↖ 4) Should We Aim For The Body Or The Thrusters?
If PvP pressure is high or you're working from cover, body shots are safer and still consistent (~30 hits). If you have clean aim and space, thrusters can be faster (about 8–10 hits to break one), but missed shots are expensive.
↖ 5) What's The Simplest Survival Habit To Build?
Jump away from rockets. Even when the rocket lands near you, jumping often reduces splash damage enough to avoid the instant knock—especially when you combine it with a committed direction change.
↖ Final Takeaways
Rocketeers become manageable when we stop treating them as random and start treating them as distance + angle + commitment.
- We avoid the front, use sides/underbelly only when safe, and respect the ~20m hearing zone.
- When locked, we dodge by breaking lead (single rockets) and committing to diagonals (barrages).
- When killing, we pick the plan that matches the lobby: body shots from cover under threat, thrusters only when we can afford the aim and exposure.
- And when in doubt, we play cover like every rocket is perfect—because on the day we assume it isn't, it will be.

Most Popular Posts
- ARC Raiders Riven Tides Key Room Guide: Best Hotel Keys, Loot Routes, Secure & Crane Storage
- ARC Raiders Damage Fireflies Trial Guide: Best Farm Method on Buried City Night Raid
- ARC Raiders Riven Tides Update: New Map & Items, ARC Turbine, Rewards, and Best Early Strategy
- ARC Raiders Bettina Guide: Best Build, Buffs, and How to Use It Against ARC
- Arc Raiders Season 4 Riven Tides Update, Rewards, Safe Skins, and Release Timeline
- ARC Raiders Solo Search Supply Drops Guide: Best Buried City Route, Beacon Locations
Popular Category Lists
- Grow a Garden / (286)
- ARC Raiders / (262)
- CoD: Black Ops 7 / (166)
- Monopoly Go / (146)
- MLB 26 / (145)
- Star Citizen / (112)
- Steal a Brainrot / (89)
- Sailor Piece / (68)
- ARK Survival Ascended / (67)
- Diablo IV / (61)
- Forza Horizon 6 / (60)
- Blox Fruits / (60)
- CoD: BLACK OPS 6 / (55)
- Adopt Me / (53)
- Path of Exile 2 / (48)
- Monster Hunter Wilds / (46)
- Windrose / (44)
- Path of Exile / (40)
- Grow a Garden 2 / (40)
- Bee Swarm Simulator / (36)


