0
0ARC Raiders: The Best Way To Quickly and Cheaply Kill Rocketeers
- KITE
- Share
- ARC Raiders
- 03/05/26
- 587
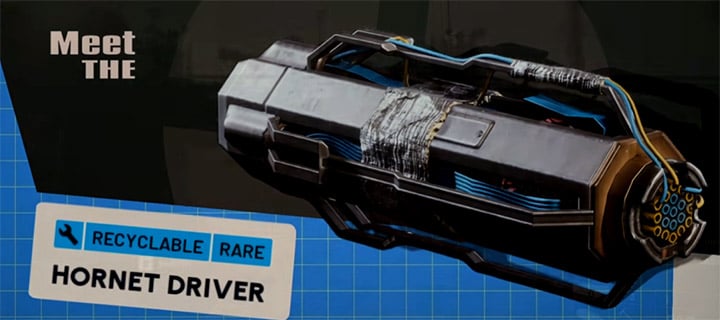
Rocketeers feel expensive to fight because the obvious tools either cost too much (Wolfpack now asking for a Rocketeer Driver… rude) or don't land consistently when the target is airborne. What's surprised us in real runs is how cheap and repeatable the Hornet Driver can be—if we treat it like a timed, positioning tool rather than a normal impact grenade.
Below we'll explain why Hornet has a sweet spot, how to force it to zap two thrusters, and what to do when the Rocketeer faceplants but refuses to die.
- The Basic
- 1) The Sweet Spot
- 2) Our Priority
- 3) The Highest Consistency Setup
- 4) Angle Rules & Common Fails
- Decision Table
- When It Falls But Doesn't Die
- 1) Don't mount it unless it's clearly already burning
- 2) Two reliable finish options
- Loadout Logic
- FAQ
- 1) What's The Minimum Distance For Hornet Driver To Reliably Stun A Rocketeer?
- 2) Why Does Hornet Sometimes do Nothing Even When It Lands Near The Rocketeer?
- 3) What's The Most Reliable Throw Angle?
- 4) Can We Kill A Rocketeer From Behind With Hornet Driver?
- 5) The Rocketeer Dropped But Didn't Die—what's The Safest Finisher?
- Closing Notes
↖ The Basic
↖ 1) The Sweet Spot
Hornet Driver doesn't reward direct hits the way some throwables do.
- Mechanic we play around: Hornet has a short arming delay, then an active window where it zaps targets that enter its range.
- What this means: If you throw it too close, you often get nothing (it hasn't started zapping yet), and if you throw it into the wrong geometry/angle, it may zap the wrong component.
Practical Rule: Stand ~20m or more away before committing the throw.
If you're closer than that, then the driver's active window often starts too late to catch the Rocketeer where you want.
↖ 2) Our Priority
A Rocketeer can die from imperfect zaps, but the most repeatable kill path is:
- Goal: Hornet zaps two thrusters during its active window
- Avoid: zapping gun or core (tends to be low value for a clean knockdown/kill)
Why do we care so much about thrusters?
Because when you cripple propulsion, you convert a dangerous flying DPS platform into a falling problem. And falling problems are easier to finish.
↖ 3) The Highest Consistency Setup
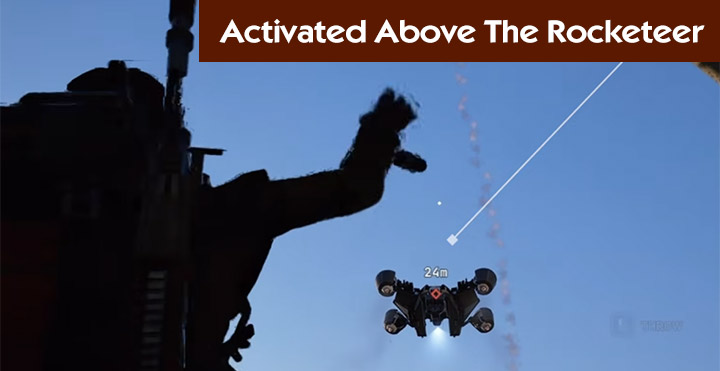
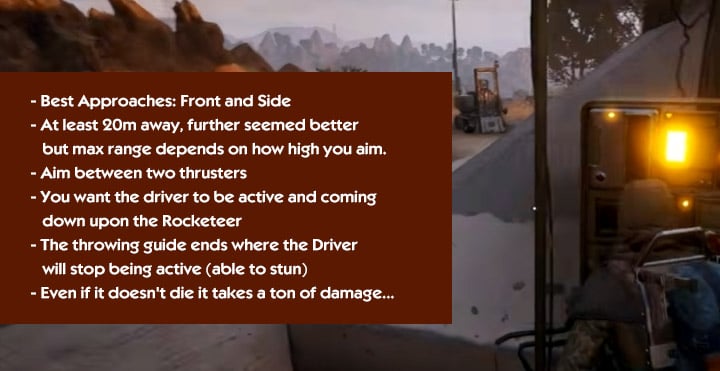
If you only remember one thing, remember this: front approach + throw above.
- Positioning: We approach from the Rocketeer's front arc (not behind).
- Throw shape: We float the Hornet above the Rocketeer so the active window starts while it's hovering near its top-side thruster cluster.
- Targeting effect: When the driver activates above/forward, it's more likely to acquire the two nearest thrusters first.
Why above?
Because throwing low/below increases the odds the zap picks up the underside components (including the gun), and throwing too far behind tends to give you gun + one thruster—which is the classic it lived scenario.
↖ 4) Angle Rules & Common Fails
Here's the nuance that makes this method stop feeling RNG.
A) Don't throw from directly behind
If you throw from behind, then the driver more often catches:
- gun + one thruster, or
- one thruster only
Either way, the Rocketeer frequently survives.
B) Don't throw too far above (vertical overshoot)
If you throw too high above, then:
- the driver may only zap one thruster, or
- it may zap nothing meaningful before the active window ends.
C) Side throws work—if your throw line clears the body
If you're forced to throw from the side, then you can still win:
- throw so the arc goes over the Rocketeer, not into its belly
- this keeps the zap priority on the upper thruster area rather than underside components
↖ Decision Table
Use this as a quick mid-fight brain substitute.
| Your position | Best throw | Why it works | Most common mistake | Fix if it fails |
|---|---|---|---|---|
| Front / slightly below or level | Throw above its front | Activates near top-side → likely double thruster zap | Throwing too low → zaps gun/core | Back up, re-throw with higher arc |
| Side | Throw so arc passes over the body | Keeps zap away from underside | Arc intersects belly | Step out + raise arc so it clears |
| Behind | Avoid if possible | Inconsistent targeting | Gun + one thruster | Reposition to front; if stuck, throw over it (high arc) |
| Too close (<20m) | Don't force it | Arming delay wastes the zap window | It did nothing | Create distance, then throw |
| Too far above | Lower the apex | Active window misses components | Single thruster zap | Aim to hover the driver just above it |
↖ When It Falls But Doesn't Die
Sometimes the Rocketeer hits the ground and still refuses to explode. Annoying, but it's usually already in a terrible state.
↖ 1) Don't mount it unless it's clearly already burning
- If you see it on fire, then a quick finish can work.
- If it's not burning, then jumping on is usually a donation to the arc gods.
↖ 2) Two reliable finish options
1. Second Hornet Driver
If you have another driver, just repeat. The second knockdown/impact usually ends it.
2. Shoot the weak spot under the wing (armpit/shoulder area)
If you can see the underside gap along the wing root, that area tends to be less protected. If you land shots there, then even average ammo can finish what the thruster damage started.
Even when the one-throw kill doesn't happen, the first throw usually turns the fight into a predictable cleanup.
↖ Loadout Logic
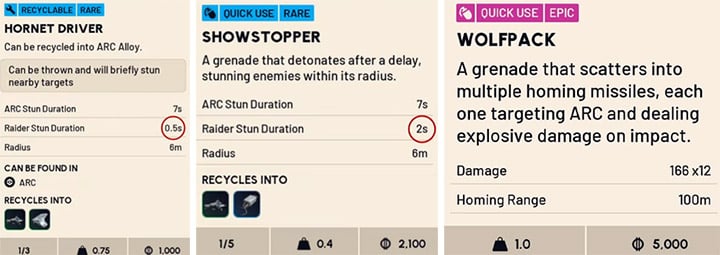
We're not saying other tools are bad—just that Hornet hits a sweet spot of cost, access, and repeatability.
| Tool | Strength | Weakness | Where it fits |
|---|---|---|---|
| Hornet Driver | Cheap, widely usable, great vs Rocketeer thrusters with correct throw | Needs spacing + correct arc; not impact-based | Rocketeer hunting with positioning discipline |
| Showstopper | Can act more like an impact detonation; strong radar-stun feel | Harder to consistently tag flying targets; one moment detonation | Tight engagements or when you can predict pathing |
| Wolfpack | Excellent clearing utility; strong in certain PvE flows | Recipe/driver cost makes it painful to spam | Ark clearing and planned high-value runs |
↖ FAQ
↖ 1) What's The Minimum Distance For Hornet Driver To Reliably Stun A Rocketeer?
We treat ~20m as the practical minimum. If you're closer, the arming delay often causes the zap window to start too late.
↖ 2) Why Does Hornet Sometimes do Nothing Even When It Lands Near The Rocketeer?
Because it doesn't activate on impact. It arms, then starts zapping during an active window. If the Rocketeer isn't in the right position during that window—or the driver targets an unhelpful component—you get a disappointing result.
↖ 3) What's The Most Reliable Throw Angle?
From the front, arcing the throw above the Rocketeer so the driver activates near its upper thrusters. This increases the odds of a double-thruster zap.
↖ 4) Can We Kill A Rocketeer From Behind With Hornet Driver?
Sometimes, yes—but it's less consistent. If you're stuck behind, then the best salvage is to throw over the Rocketeer so the zap starts on the upper side rather than catching the gun.
↖ 5) The Rocketeer Dropped But Didn't Die—what's The Safest Finisher?
Either:
- throw a second Hornet Driver, or
- shoot the under-wing root (armpit) area that tends to be less armored.
If you don't see it burning, avoid climbing onto it.
↖ Closing Notes
Hornet Driver becomes easy mode against Rocketeers once we stop treating it like an impact grenade and start treating it like a timed zap field. If you keep 20m+ spacing, approach from the front, and arc the throw just above the Rocketeer to bias the zap toward two thrusters, you'll see the kill rate jump from maybe to repeatable.
And when it doesn't instantly die, that's not failure—it's just phase two: finish with a second driver or the under-wing weak spot, no hero jumps required.

Most Popular Posts
- ARC Raiders Riven Tides Key Room Guide: Best Hotel Keys, Loot Routes, Secure & Crane Storage
- ARC Raiders Bettina Guide: Best Build, Buffs, and How to Use It Against ARC
- Best ARC Raiders Attachments for Every Weapon: Complete Weapon Mod Guide
- ARC Raiders Turbine Boss Guide: Spawn Time, Weak Points, Best Weapons, and Loot
- Arc Raiders Patch 1.27: Regional Pricing, Augment Rework, and Expedition Catch-Up
- ARC Raiders Update Guide: Best Nomadic Envoy Trades, Rascal Grenade Launcher, Durability Buffs
Popular Category Lists
- ARC Raiders / (291)
- Grow a Garden / (286)
- CoD: Black Ops 7 / (166)
- MLB 26 / (150)
- Monopoly Go / (148)
- Star Citizen / (129)
- ARK Survival Ascended / (91)
- Steal a Brainrot / (90)
- Sailor Piece / (68)
- Forza Horizon 6 / (67)
- Diablo IV / (62)
- Blox Fruits / (62)
- Adopt Me / (58)
- Grow a Garden 2 / (57)
- CoD: BLACK OPS 6 / (55)
- Path of Exile 2 / (48)
- Monster Hunter Wilds / (46)
- Windrose / (44)
- Path of Exile / (40)
- Bee Swarm Simulator / (37)