


 0
0ARC Raiders Weapons Stella Farming, Patch 1.12.0 Survival & Advanced Boss Tactics
- KITE
- Share
- ARC Raiders
- 01/21/26
- 582

ARC Raiders Patch 1.12.0 might look small on paper, but between lingering exploit risks and the constant pressure to keep your stash stocked with Venators and Anvils, the game demands a smarter approach right now. You don't need to just win more PvP to succeed; you need a repeatable materials loop and a combat playbook that protects your gear.
- 1) The Patch 1.12.0 Reality: Safety First
- 1.1 Exploits are Reduced, Not Gone
- 1.2 World Hints: The Smoke on Blue Gate
- 2) The Economy: Why You Are Always Out of Guns
- 2.1 The Crafting Bottleneck
- 3) The Solution: The Stella Loading Bay Route
- 3.1 The Loadout: Bring a Hullcracker
- 3.2 The Route (Copy-Paste This Loop)
- 3.3 What to Loot (The Don't Craft Rule)
- 4) Advanced Combat: Saving Your Kit
- 4.1 Fast Surveyor Kills
- 4.2 Boss Weakpoints: Legs vs. Core
- 4.3 Positioning: Dam vs. Blue Gate
- 5) Blueprints: The Bobcat Reality Check
- 5.1 You Don't Need the Interior
- FAQ
- Summary
↖ 1) The Patch 1.12.0 Reality: Safety First
Before we talk about farming, we have to talk about survival. The latest patch notes were brief, but they changed how we need to move through the map.
↖ 1.1 Exploits are Reduced, Not Gone
If you expected Patch 1.12.0 to completely delete wall/out-of-bounds abuse, you need to temper that expectation. Reports and in-raid behavior suggest some routes still exist, particularly around high-value vault zones.
Why this matters: An exploiter only needs one unfair angle to turn your 20-minute run into a donation.
If you notice any of these, adjust immediately:
Impossible Audio: If you hear shots coming through solid structure lines, break line-of-sight and rotate; do not ego-peek.
Vanishing Loot: If loot disappears from a sealed area too fast, assume an exploit route is active and leave.
Mitigation: We currently run one insurance kit tier down during exploit-heavy weeks. We also extract earlier with high-value items rather than pushing for one more room.

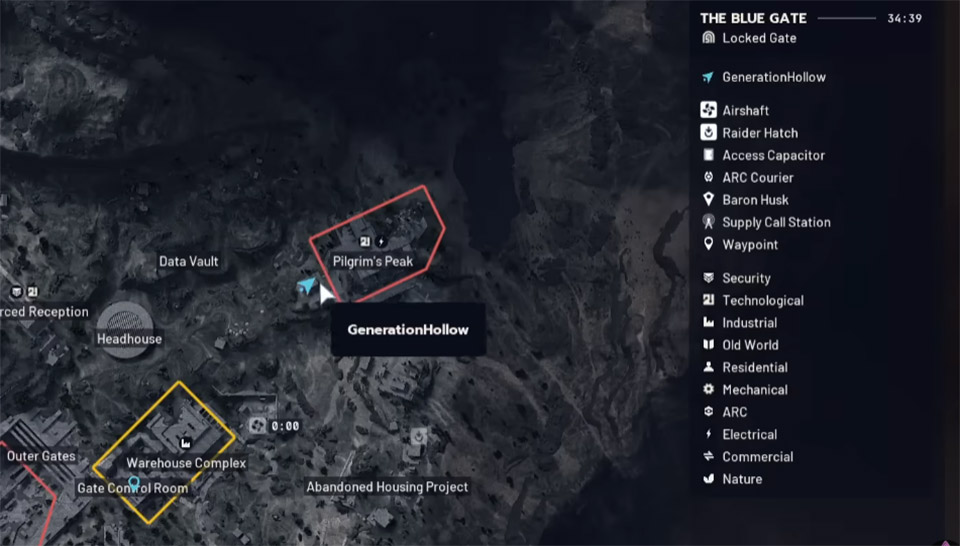
↖ 1.2 World Hints: The Smoke on Blue Gate
While surviving, keep an eye on the horizon. Players have spotted a large dark plume with distant flashes on the Blue Gate map.
The Theory: Given the Italian-inspired setting, this likely foreshadows a volcanic or hot zone biome event.
The Takeaway: Watch for skybox lighting changes or new ambient rumble audio—these are usually the countdown clocks for new content.
↖ 2) The Economy: Why You Are Always Out of Guns
The mistake most players make is thinking the bottleneck is finding guns. In reality, the bottleneck is craft inputs you can't reliably loot on demand.
↖ 2.1 The Crafting Bottleneck
Here is the resource picture we plan our farming routes around:
| Weapon | Key Upgrade Needs | The Real Bottleneck | How We Fix It |
|---|---|---|---|
| Anvil | Heavy parts + Mech components | Mechanical Components | Farm Shredders (Guaranteed drops) |
| Venator | Advanced components + Magnets | Magnets & Medium Parts | Target specific Stella containers |
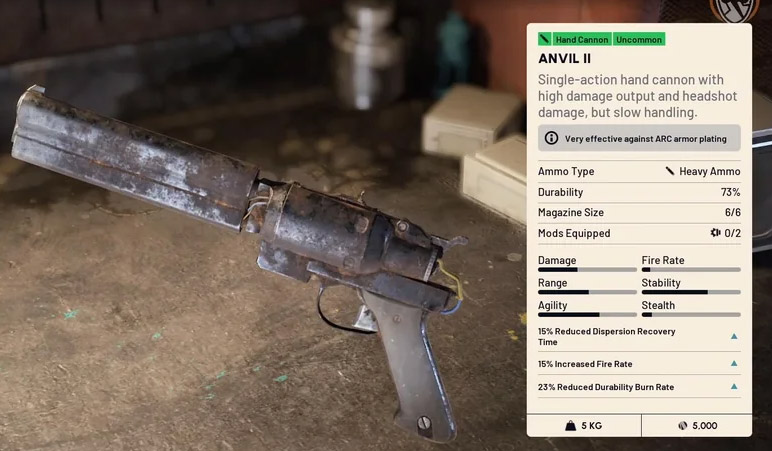

Why this matters: If you can turn your runs into guaranteed mechanical components via Shredders, you stop bleeding time crafting basics and start printing guns.
↖ 3) The Solution: The Stella Loading Bay Route
We pick Stella because the route density is high, and the targets align perfectly with the materials we need.
↖ 3.1 The Loadout: Bring a Hullcracker
You can run your normal kit, but there is one non-negotiable for efficiency: Buy a Hullcracker.
Data/Threshold: Shredders die in 2 good shots with a Hullcracker, or 3 if you hit armor.
The Logic: Faster kills = more mechanical components per minute.
Warning: If you try to save money by skipping the Hullcracker, you will lose more time (and health) than you save.
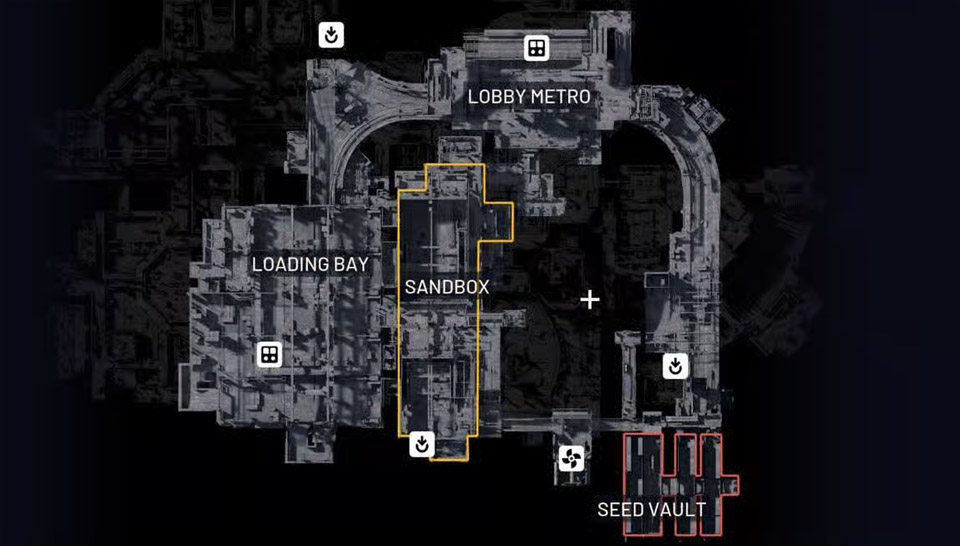
↖ 3.2 The Route (Copy-Paste This Loop)
This loop stacks high-yield containers with guaranteed Shredder spawns.
1. Spawn & Rush: Head straight to the Loading Bay.
2. Side Pods: Loot the shipping container side pods on both sides and both levels.
3. The Bastion Rule:Skip the middle pods if the Bastion is alive. We don't burn health just for two extra boxes.
4. Exit-Side Shredder: Rotate to the exit side; kill the guaranteed Shredder spawn.
5. Robotics Sandbox: Move here next to clear more Shredders.
6. The Office: Loot the desks and drawers near the Metro Lobby thoroughly.
7. Extract: Leave once your bag hits critical mass.
↖ 3.3 What to Loot (The Don't Craft Rule)
A big reason this route works is psychological: many players open containers looking only for blueprints and leave boring materials behind. If you arrive and pods are open, check them anyway.
| Target | Loot Priority | Why We Care |
|---|---|---|
| Shredders | Shredder Gyro | Breaks down into 3 Mechanical Components. Never craft these again. |
| Shipping Pods | Simple parts, Springs | High density; solves the basic mats shortage. |
| Office Drawers | Duct tape, Wires, Magnets | Often skipped by players, but essential for mods. |
Field Note: Across two test runs, we extracted 28 Mechanical Components and 14 Magnets. This was enough to immediately queue up Anvil production without touching our existing stash.
↖ 4) Advanced Combat: Saving Your Kit
Farming is useless if you die to the environment. Here is how we handle the biggest threats efficiently.
↖ 4.1 Fast Surveyor Kills
Surveyors punish sloppy fights. You don't need a long gunfight; you need a script.
The Trick: Wait for the open phase where the core glows.
The Execution: Throw two Seeker Grenades.
Why: Seekers track the core while you stay behind cover. If one lands during the exposed window, the Surveyor usually crumbles immediately.
↖ 4.2 Boss Weakpoints: Legs vs. Core
Everyone knows shoot the core, but the core is often hard to hit when a Queen or Matriarch is moving.
The Alternative: Both bosses have yellow weak joints on their legs.
The Strategy: If you can't get a clean line on the core, focus fire on a single leg joint. You can strip the armor, pop the plating, and access a high-damage weakpoint that is much easier to track than the core.
If your shots aren't landing on the core for more than 5 seconds, switch to the legs. Half-committing to the core is the biggest DPS loss in boss fights.
↖ 4.3 Positioning: Dam vs. Blue Gate
Where you fight matters more than what you shoot.
| Map / Boss | Difficulty | Recommended Position | Why |
|---|---|---|---|
| Blue Gate Matriarch | Easy | Interior rooms with pillars | Designed cover allows safe peek-and-shoot cycles. |
| Dam Matriarch | Hard | Elevated platforms with rear drops | The area is exposed. You need a vertical drop (zipline/bunker) to reset aggro instantly. |
↖ 5) Blueprints: The Bobcat Reality Check
Finally, let's address the hunt for the Bobcat blueprint.
↖ 5.1 You Don't Need the Interior
During the locked gate event, many players assume the blueprint only spawns inside the high-risk lab interior. In practice, the spawn condition is linked to the event being active, not just the specific room.
Our Strategy:
1. Confirm the locked gate event is active.
2. Run an outer-ring loop hitting black lockers and square military crates.
3. If you are solo: Extract the moment you find a blueprint or rare attachment. Greed is how solos get collected.
We have pulled event-tied blueprints from non-interior lockers multiple times. Don't force the chokepoint if the lobby feels too aggressive.
↖ FAQ
1. Why Stella specifically—can't I do this on other maps?
You can, but Stella's container density combined with guaranteed Shredder spawns makes it the mathematical winner for materials per minute.
2. Is the Hullcracker actually mandatory?
For this specific route, yes. Without it, Shredders take too long to kill, increasing the risk of third-party attacks and slowing down your component income.
3. What is the biggest bottleneck for Venators specifically?
Usually Medium Gun Parts. While this route solves the Magnet and Spring issue, Medium parts are still RNG-dependent. Expect to run the loop 2-3 times to fully stock up on these.
4. Should I craft Mechanical Components?
No. If you follow this guide, you will be drowning in Shredder Gyros. Break them down for 3 components each. Save your crafting time for the actual guns.
5. Is the Smoke on Blue Gate dangerous?
Not yet. Currently, it appears to be a visual hint for future content (likely a volcanic biome), but it does not deal damage or affect gameplay... for now.
↖ Summary
We treat Venators and Anvils like ammo you craft, not treasures you hoard. The key to this mindset is the Stella Loop: Loading Bay pods for parts, Shredders for components, and Office drawers for magnets.
By bringing a Hullcracker, respecting the reduce exploit risk rules of Patch 1.12.0, and using leg-meta DPS on bosses, you stabilize your economy. If you follow the route cleanly and extract consistently, you'll stop feeling that post-death sting—because you'll have replacements ready in the crafting queue before you even load back in.

Most Popular Posts
- ARC Raiders Riven Tides Key Room Guide: Best Hotel Keys, Loot Routes, Secure & Crane Storage
- ARC Raiders Damage Fireflies Trial Guide: Best Farm Method on Buried City Night Raid
- ARC Raiders Riven Tides Update: New Map & Items, ARC Turbine, Rewards, and Best Early Strategy
- ARC Raiders Bettina Guide: Best Build, Buffs, and How to Use It Against ARC
- Arc Raiders Season 4 Riven Tides Update, Rewards, Safe Skins, and Release Timeline
- ARC Raiders Solo Search Supply Drops Guide: Best Buried City Route, Beacon Locations
Popular Category Lists
- Grow a Garden / (286)
- ARC Raiders / (263)
- CoD: Black Ops 7 / (166)
- Monopoly Go / (146)
- MLB 26 / (145)
- Star Citizen / (113)
- Steal a Brainrot / (89)
- ARK Survival Ascended / (70)
- Sailor Piece / (68)
- Forza Horizon 6 / (61)
- Diablo IV / (61)
- Blox Fruits / (60)
- CoD: BLACK OPS 6 / (55)
- Adopt Me / (53)
- Path of Exile 2 / (48)
- Monster Hunter Wilds / (46)
- Windrose / (44)
- Path of Exile / (40)
- Grow a Garden 2 / (40)
- Bee Swarm Simulator / (36)


