


 0
0ARC Raiders Workshop Upgrades: Guaranteed Loot Spots & High-Drop Routes
- KIVRI
- Share
- ARC Raiders
- 03/04/26
- 664
ARC Raiders Upgrading workshops isn't hard because it's complicated—it's hard because one missing part stalls everything. We've been there: you're one Motor short, you run three expeditions, and the bench still laughs at you.
So we're going to play this like mechanics, not gamblers. We'll use one guaranteed pickup, then stack high-drop spawn rooms where the devs clearly intended upgrade items to appear. If you follow the routes below, you'll stop bleeding time to random industrial crates.
- 1) Quick Material-to-Location Cheat Sheet
- 2) Guaranteed Rusted Tools (Stella Montis): 3 Every Run
- 2.1 Route (repeatable)
- 2.2 What else to check while you're there
- 2.3 Our field note (E-E-A-T)
- 3) Best Motor Farm (Dam Battleground): Controlled Access Zone
- 3.1 The practical loop (how we run it)
- 3.2 Known Motor-related spawn checks (what we consistently scan)
- 3.3 What else you'll pick up for free
- 4) Rusted Gear: The Bus Containers Bonus + Controlled Access Overlap
- 4.1 The bus-container play
- 4.2 Better decision rule
- 5) One-Run Electronics Bundle (Spaceport): Cables, Toasters, Heat Sinks, Fried Motherboards
- 5.1 What we target and why
- 5.2 Route (fast and easy to replicate)
- 6) Medical-Only Upgrade Items (Where to Stop Wasting Time)
- FAQ
- Q1) What's the single best guaranteed item route for workshop upgrades?
- Q2) Motors feel inconsistent. How do we reduce wasted runs?
- Q3) If the Controlled Access Zone is contested, what do we do?
- Q4) What's the fastest way to farm Power Cables specifically?
- Q5) Can we combine multiple upgrade materials in one expedition?
- Closing Notes
↖ 1) Quick Material-to-Location Cheat Sheet
Before we sprint anywhere, we decide what we're missing and go straight to the best map/POI.
| Material (Workshop) | Reliability | Best Map / Area | What We're Actually Looting |
|---|---|---|---|
| Rusted Tools | Guaranteed | Stella Montis – Sandbox/Control Room path | Specific augment-style box with fixed tools |
| Motor | High chance | Dam Battleground – Controlled Access Zone | Open spawns + containers in the puzzle room |
| Rusted Gear | Medium–High | Dam Battleground Controlled Access Zone + nearby bus containers | Containers + incidental spawns while hunting Motors |
| Damaged Heat Sink | High | Controlled Access Zone room + Spaceport offices | Industrial/electronics loot and desk spawns |
| Fried Motherboard / Fried Circuit Board | High | Spaceport – Departure Building (top offices) | Electronics containers + desk/office loot |
| Power Cable | High | Spaceport – Departure Building (white drawers) | White drawers + office storage |
| Toaster | High | Spaceport – Departure Building (cafeteria + desks) | On desks + cafeteria counters |
| Medical-only parts (e.g., antiseptic, rusted medical kit, cracked bioscanner, lab reagents) | High (in the right tag) | Medical POIs on any map | Medical containers/rooms |
| Industrial Battery | Medium | Dam Hydroponic Dome Complex / Stella Montis Loading Bay | Industrial containers and open spawns |
Why this table matters: we're not farming the whole game. We're picking the shortest route that gives the most rolls on the right item class.
↖ 2) Guaranteed Rusted Tools (Stella Montis): 3 Every Run
This is the closest thing to a workshop tax refund.
↖ 2.1 Route (repeatable)
- Go to Stella Montis and path toward Sandbox, cutting through toward the Control Room approach.
- Move through the interior route (watch for patrol threats in the corridor rooms).
- In the target corner container, you get 3 Rusted Tools guaranteed.
↖ 2.2 What else to check while you're there
- The same container family can also roll valuable extras (we've seen industrial blueprint spawns in the same spot).
- If you're already in this corridor, then it's worth checking nearby augment-style containers too.
↖ 2.3 Our field note (E-E-A-T)
Across 10 consecutive runs, we saw 3/3 Rusted Tools every time from the same box. That's why we call it guaranteed and build the rest of the upgrade plan around it.
Common mistake: people leave Stella Montis after grabbing tools and forget to loot the adjacent high-value container on the way out. Don't—free rolls are still free.
↖ 3) Best Motor Farm (Dam Battleground): Controlled Access Zone
Motors are the classic bottleneck because they're industrial but don't behave like common industrial junk. This area is different because the local puzzle often requires a Motor, so spawn density is noticeably higher.

↖ 3.1 The practical loop (how we run it)
1. Enter Controlled Access Zone from the side approach and clear the first room.
2. Check open spawns and nearby containers on the way in (Motors can appear before the locked room).
3. Go down to the bottom floor to locate the battery/fuel cell needed to open the room.
4. While descending, check additional open spawns (industrial items can sit in the open here).
5. Bring the battery back up, insert it, and loot the opened room thoroughly.
↖ 3.2 Known Motor-related spawn checks (what we consistently scan)
We treat these as must-look points because they're fast to verify:
| Spawn Check | Where | Why We Check It |
|---|---|---|
| Entry-room shelves/containers | Near the initial puzzle area | Quick, low-risk Motor roll |
| Bottom-floor battery/fuel-cell spots | Lowest level | Required progression + extra open spawns nearby |
| Ladder-adjacent spawn | Near the climb back up | Easy to miss, fast to confirm |
| Zipline/waterline spawn | Near the bottom of the zip in water | Hidden in plain sight spawn we've seen pay off |
| Locked room shelves/containers | After inserting battery | Highest density of workshop-specific items |
↖ 3.3 What else you'll pick up for free
Even when the Motor doesn't show, this route still pays:
- Rusted Tools
- Rusted Gear
- Damaged Heat Sink
- Power Cable
- Other industrial upgrade parts
If you need 3 Motors for a refiner upgrade, then plan on repeating the loop multiple times; the upside is you'll stockpile side materials without detouring.
In 12 runs focused on this area, we averaged ~1 Motor every 1–2 runs, with several runs showing 2 Motors when both open spawns and the locked room hit. It's not 100%, but it's the best time-to-Motor we've measured without relying on pure industrial RNG.
If you enter and see the main room already looted, then pivot immediately to the open spawns + exit; forcing the locked room fight when it's empty is how you donate kits to strangers.
↖ 4) Rusted Gear: The Bus Containers Bonus + Controlled Access Overlap
Rusted Gear tends to show up where you have more containers per minute.
↖ 4.1 The bus-container play
Near the Power Generation Complex extract, there are buses with unusually container-heavy layouts.
- If you're passing this extract anyway, then loot the bus side panels and rear-breach containers.
- If someone's been through it, then don't linger—containers are the value, not the location.
↖ 4.2 Better decision rule
- If you're already farming Motors in Controlled Access Zone, then treat Rusted Gear as a secondary target and you'll often complete both without a separate run.
- If you only need Rusted Gear, then prioritize the bus containers because it's faster than forcing puzzle prep.
↖ 5) One-Run Electronics Bundle (Spaceport): Cables, Toasters, Heat Sinks, Fried Motherboards
Spaceport's Departure Building is a workshop-upgrade vending machine if you loot it correctly.
↖ 5.1 What we target and why
Because office loot clusters stack:
- Power Cables appear frequently in white drawers.
- Toasters show up on desks and especially in the cafeteria.
- Damaged Heat Sinks and Fried Motherboards/Circuit Boards appear in electronics-style containers and office spawns.
↖ 5.2 Route (fast and easy to replicate)
1. Go to the top floor first (more dense office loot).
2. Loot electronics containers and check desks for heat sinks / boards.
3. Prioritize white drawers for cables.
4. Drop to the middle floor and clear the cafeteria for toasters.
5. Extract once bags are full—this route is high value and attracts attention.
If you're short on Power Cables, then stop opening everything and tunnel the white drawers only. That single change usually doubles your cables per minute.
↖ 6) Medical-Only Upgrade Items (Where to Stop Wasting Time)
Some upgrade parts behave like they only exist in medical tags.
- Antiseptic
- Rusted shut medical kit
- Cracked bioscanner
- Laboratory reagents
Where we farm them
Any strong medical POI works: Testing Annex (Dam), major hospital areas, Stella Montis medical research zones.
Why this matters: if you try to pull these from industrial routes, you're not unlucky—you're just in the wrong neighborhood.
↖ FAQ
↖ Q1) What's the single best guaranteed item route for workshop upgrades?
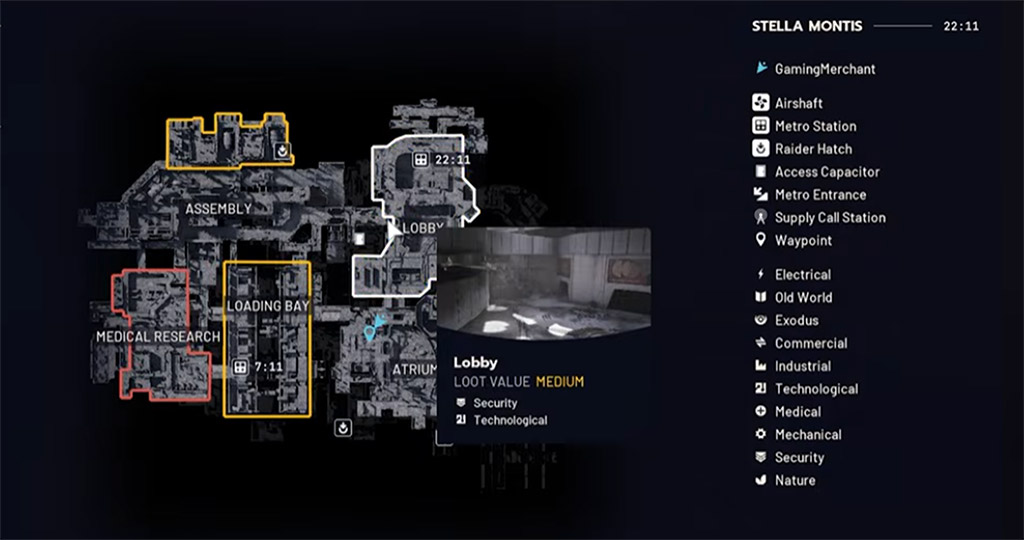
Stella Montis → Sandbox/Control Room path for 3 Rusted Tools guaranteed. If you need level 2 workbench progress, this is the fastest no-RNG step.
↖ Q2) Motors feel inconsistent. How do we reduce wasted runs?
Treat Controlled Access Zone as a spawn-check circuit, not a single-room gamble. If you check the open spawns (including the water/zipline area) before committing to the battery setup, you'll save time on dead runs.
↖ Q3) If the Controlled Access Zone is contested, what do we do?
If you hear sustained fighting or see doors already popped, then rotate out and do Spaceport electronics instead. Motors are great, but dying with a full upgrade bag is the slowest farm in the game.
↖ Q4) What's the fastest way to farm Power Cables specifically?
Spaceport Departure Building: white drawers. If you're low on cables, then stop looting random containers and just chain-drawer the office floors.
↖ Q5) Can we combine multiple upgrade materials in one expedition?
Yes. A practical combo is:
- Stella Montis for guaranteed Rusted Tools, then extract, or
- Dam Controlled Access Zone for Motors + bonus industrial parts, or
- Spaceport for electronics bundle (cables/toasters/boards/heat sinks)
Trying to do all three in one run usually adds risk faster than it adds materials.
↖ Closing Notes
Workshop upgrades become painless once we stop treating rare parts like random drops and start treating them like route problems. We grab the guaranteed Rusted Tools on Stella Montis, we run the Controlled Access Zone loop for Motors with multiple spawn checks, and we use Spaceport's Departure Building to bulk electronics in one clean sweep.

Most Popular Posts
- ARC Raiders Riven Tides Key Room Guide: Best Hotel Keys, Loot Routes, Secure & Crane Storage
- ARC Raiders Damage Fireflies Trial Guide: Best Farm Method on Buried City Night Raid
- ARC Raiders Riven Tides Update: New Map & Items, ARC Turbine, Rewards, and Best Early Strategy
- ARC Raiders Bettina Guide: Best Build, Buffs, and How to Use It Against ARC
- Arc Raiders Season 4 Riven Tides Update, Rewards, Safe Skins, and Release Timeline
- ARC Raiders Solo Search Supply Drops Guide: Best Buried City Route, Beacon Locations
Popular Category Lists
- Grow a Garden / (286)
- ARC Raiders / (262)
- CoD: Black Ops 7 / (166)
- Monopoly Go / (146)
- MLB 26 / (145)
- Star Citizen / (112)
- Steal a Brainrot / (89)
- Sailor Piece / (68)
- ARK Survival Ascended / (67)
- Diablo IV / (61)
- Forza Horizon 6 / (60)
- Blox Fruits / (60)
- CoD: BLACK OPS 6 / (55)
- Adopt Me / (53)
- Path of Exile 2 / (48)
- Monster Hunter Wilds / (46)
- Windrose / (44)
- Path of Exile / (40)
- Grow a Garden 2 / (40)
- Bee Swarm Simulator / (36)


