


 0
0Best Windrose Builds Guide: S-Tier Weapons, Stats, Gear, and Talents
Windrose gives us a lot of freedom, but not every weapon feels equal once enemies start hitting harder. After testing melee, ranged, crit, and sustain setups, one thing becomes obvious: the best builds either let us perfect block safely or deal enough burst damage that enemies barely get a chance to fight back.
We are not chasing perfect theory numbers here; we are focusing on builds that actually feel strong in real fights, including bosses, ship boarding, group fights, and solo exploration.
- Best Windrose Builds at a Glance
- Why Some Weapons Are Better Than Others
- Core Stats and Gear Rules
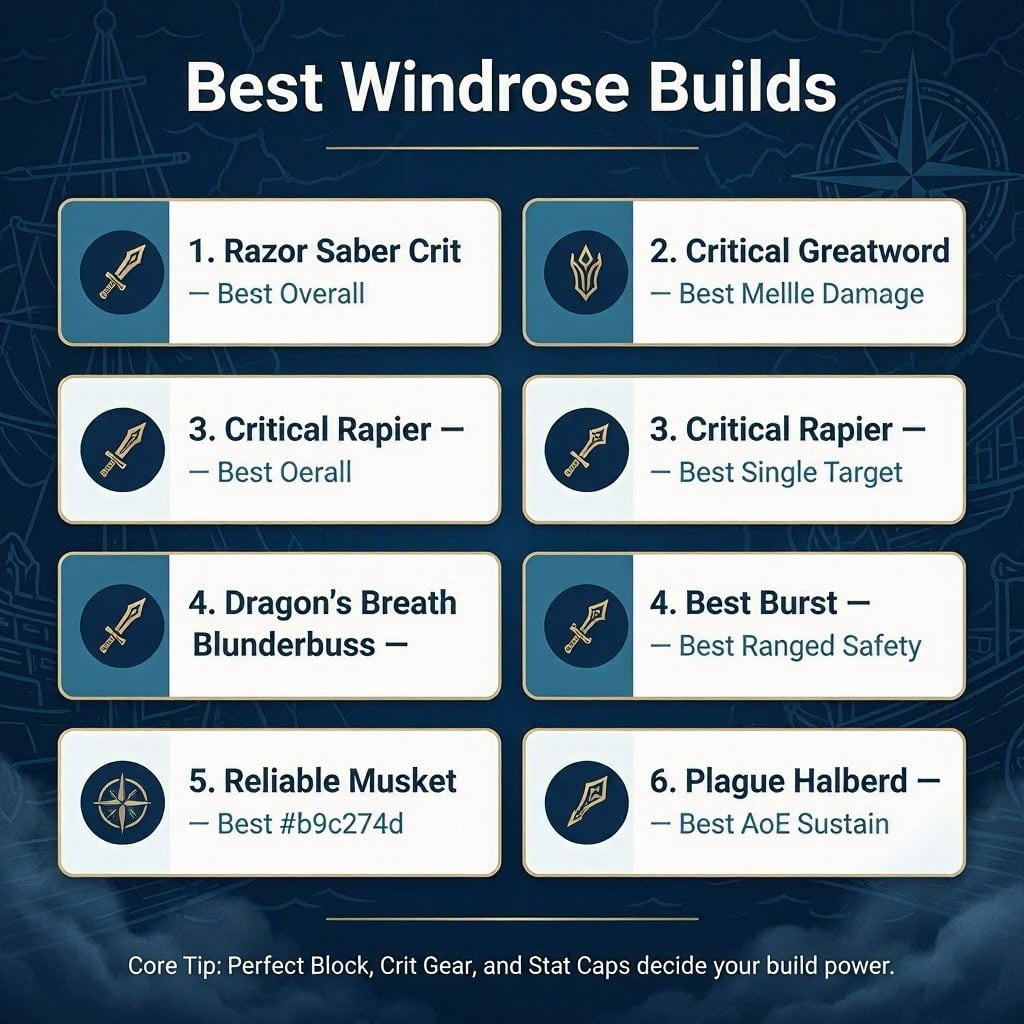
- S-Tier Build 1: Razor Saber Crit
- S-Tier Build 2: Critical Greatsword
- S-Tier Build 3: Critical Rapier
- S-Tier Build 4: Dragon's Breath Blunderbuss
- S-Tier Build 5: Reliable Musket Sniper
- S-Tier Build 6: Plague Halberd Tank Build
- Which Windrose Build Should You Choose?
- FAQ
- What is the best overall build in Windrose?
- What is the highest damage build in Windrose?
- Is Greatsword better than Saber?
- Is Rapier good in Windrose?
- Why is Mace not recommended?
- Should we stop at 20 Mastery?
- What is the best solo build?
- Final Takeaway
↖ Best Windrose Builds at a Glance
If you just want a quick recommendation, start here. These are the builds that felt the most consistent and useful across different combat situations.
| Build | Best Weapon | Main Strength | Best For |
|---|---|---|---|
| Critical Saber | Razor | Fast, safe, flexible | Best all-round melee |
| Critical Greatsword | Stalwart / Dueling Greatsword | Big crits, strong reach | Bosses and duels |
| Critical Rapier | Sturdy Rapier | Fast single-target DPS | Precision play |
| Dragon's Breath Blunderbuss | Dragon's Breath Blunderbuss | Huge burst damage | Elite enemies, co-op |
| Musket Sniper | Reliable Musket | Safe ranged kills | Open-world fights |
| Plague Halberd | Plague Halberd | AoE sustain | Ship boarding, groups |
The safest recommendation for most players is Razor Saber Crit. It is fast, forgiving, can perfect block, and still gives us pistol utility. If you want the biggest damage spikes, go with Dragon's Breath Blunderbuss.
↖ Why Some Weapons Are Better Than Others
The biggest divider in Windrose is simple: can the weapon perfect block or not?
Perfect blocking lets us deflect attacks, damage enemy posture, and eventually stun them. Regular blocking may reduce damage, but it costs our own posture and does not pressure the enemy back. That matters a lot in harder fights.
| Weapon Type | Perfect Block? | Current Value |
|---|---|---|
| Saber | Yes | Excellent |
| Rapier | Yes | Excellent |
| Greatsword | Yes | Excellent |
| Halberd | No | Strong in groups, weaker in duels |
| Mace | No | Not recommended right now |
This is why Saber, Rapier, and Greatsword feel so much better in boss fights. We can defend and create openings at the same time.
The Halberd is different. It cannot perfect block, but the Plague Halberd still works because it gives us AoE damage and healing potential. The Mace, however, feels too slow and too limited right now, so we would not build around it unless it gets buffed later.
↖ Core Stats and Gear Rules
Most strong Windrose builds follow the same basic logic: hit the main stat breakpoint, get enough Mastery for crit chance, then use gear to multiply the damage.
| Build Type | Main Stat Target | Mastery | Best Armor | Best Ring |
|---|---|---|---|---|
| Saber Crit | 40 Agility | 20 | Privateer | Major Jaguar Ring |
| Greatsword Crit | 40 Agility | 20 | Privateer | Major Jaguar Ring |
| Rapier Crit | 40 Precision | 20 | Privateer | Major Jaguar Ring |
| Blunderbuss Burst | High Agility | 20 or damage-focused | Privateer / Marksman | Jaguar / Cutthroat |
| Musket Sniper | 60 Precision | Optional | Marksman | Cutthroat Ring |
| Plague Halberd | 50 Strength | Skip | Pikeman | Warrior's Ring |
Mastery is useful, but we usually stop at 20 Mastery because the value drops after that. If you keep adding Mastery and your damage still feels low, the problem is probably your gear or talents, not your crit chance.
For crit builds, Privateer Armor is the most important set because it gives critical chance and bonus critical damage. For ranged builds, Marksman is cleaner. For Halberd, Pikeman makes more sense.
↖ S-Tier Build 1: Razor Saber Crit
The Razor Saber is probably the best everyday weapon in Windrose. It has fast attacks, wide swings, perfect block access, and lets us use a pistol on the side.
That means this build works well whether we are exploring, fighting bosses, or cleaning up groups.
| Slot | Recommended Choice |
|---|---|
| Weapon | Razor |
| Main Stat | 40 Agility |
| Mastery | 20 |
| Armor | Privateer set |
| Ring | Major Jaguar Ring |
| Elixir | Elixir of Concentration |
| Talents | Surgical Cuts, Deadly Finale, Quick Strikes / Perfect Counter |
If you are fighting groups, take more general damage talents like Quick Strikes. If you are fighting a boss, Perfect Counter and Duelist feel better because they reward clean parries.
In our testing, this was the easiest melee build to recommend because it rarely feels bad. The damage is strong, the moveset is smooth, and the weapon does not punish small mistakes as hard as Greatsword or Rapier.
↖ S-Tier Build 2: Critical Greatsword
Greatsword is slower than Saber, but it hits harder and has better reach. If you like parrying, stunning enemies, and landing heavy punishment, this is one of the most satisfying builds in the game.
| Weapon | Why Use It |
|---|---|
| Stalwart Greatsword | More consistent crit damage |
| Dueling Greatsword | Higher ceiling if you keep parry stacks active |
The Stalwart Greatsword is the safer pick. The Dueling Greatsword can deal more damage when its stacks are active, but losing those stacks after taking damage makes it less forgiving.
| Slot | Recommended Choice |
|---|---|
| Main Stat | 40 Agility |
| Mastery | 20 |
| Armor | Privateer set |
| Ring | Major Jaguar Ring |
| Elixir | Elixir of Concentration |
| Talents | Perfect Counter, Duelist, Deadly Finale |
If you find Greatsword too slow, do not chase enemies constantly. Let them attack first, perfect block, break posture, then punish during the stun window. That is where this build feels powerful.
↖ S-Tier Build 3: Critical Rapier
Rapier is fast, sharp, and better for single-target fights than messy group brawls. It also gives us pistol access, which adds either extra damage or sustain.
| Weapon / Sidearm | Use Case |
|---|---|
| Sturdy Rapier | Main damage option |
| Rapier of a Thousand Cuts | Bleed stacking |
| Drake's Double Barrel Pistol | Vulnerability support |
| Plague Pistol | Healing and sustain |
For most players, Sturdy Rapier is enough. If you want to push damage further, apply bleed with Rapier of a Thousand Cuts, then swap back to Sturdy Rapier for stronger hits.
| Slot | Recommended Choice |
|---|---|
| Main Stat | 40 Precision |
| Mastery | 20 |
| Armor | Privateer set |
| Ring | Major Jaguar Ring |
| Elixir | Elixir of Concentration |
| Talents | Deep Impact, Surgical Cuts, Deadly Finale |
If you notice you are using too many healing Windrose items, equip the Plague Pistol. If you play with friends, Drake's Double Barrel Pistol is great because vulnerability helps everyone deal more damage.
↖ S-Tier Build 4: Dragon's Breath Blunderbuss
This is the delete button build. The Dragon's Breath Blunderbuss can trigger fire explosions on top of its normal shot damage, and once we stack crit chance, crit damage, and firearm talents, the burst gets wild.
In practical testing, this setup can drop dangerous enemies in only a few clean shots. It is especially strong when another player, pet, or terrain gives us enough space to reload.
| Slot | Recommended Choice |
|---|---|
| Weapon | Dragon's Breath Blunderbuss |
| Main Stat | Agility-focused |
| Mastery | Around 20 if using crit setup |
| Armor | Four-piece Privateer |
| Ring | Major Jaguar Ring |
| Elixir | Elixir of Concentration |
| Talents | Deep Impact, Firearm Training, Sniper's Focus, Bull's Eye |
The trick is Sniper's Focus. We do not need to aim at an enemy to build the bonus; we just need to aim. So before starting a fight, aim for a few seconds, let the damage bonus build, then open with a massive shot.
If you are playing solo, this build is powerful but risky. If you are playing co-op, it becomes much easier to use because someone else can keep enemies busy while we reload.
↖ S-Tier Build 5: Reliable Musket Sniper
The Reliable Musket is less flashy than Dragon's Breath, but it is safer. Instead of standing close, we kill enemies from range with headshots.
| Slot | Recommended Choice |
|---|---|
| Weapon | Reliable Musket |
| Main Stat | 60 Precision |
| Armor | Marksman set |
| Ring | Cutthroat Ring |
| Elixir | Elixir of Concentration |
| Talents | Bull's Eye, Firearm Training, Sniper's Focus, Bullet Storm |
This build shines in open areas. If we can start fights from far away, enemies may lose half their health or die before they even reach us.
The downside is that tight spaces and ship fights can make aiming awkward. If you are constantly being rushed, swap to a Blunderbuss or melee build instead.
↖ S-Tier Build 6: Plague Halberd Tank Build
The Plague Halberd does not have perfect block, so it will never feel as clean in duels as Saber or Greatsword. But in group fights, it is excellent.
The build works by landing hits, charging the special attack, then using AoE damage and healing to stay alive.
| Slot | Recommended Choice |
|---|---|
| Weapon | Plague Halberd |
| Main Stat | 50 Strength |
| Secondary Stat | Vitality |
| Armor | Pikeman set |
| Ring | Warrior's Ring |
| Elixir | Elixir of Firm Hand |
| Talents | Massive, Berserk, Dominating Presence / You Will Answer for This |
Because the special attack does not rely on crit, we do not need Mastery. Strength and Vitality are much more useful.
If you are boarding ships or fighting packed enemies, this build feels great. If you are dueling a boss with punishing attacks, the lack of perfect block becomes a real weakness.
↖ Which Windrose Build Should You Choose?
Pick the build that matches how you actually play. A best build only matters if it fits your habits.
| Your Playstyle | Best Build |
|---|---|
| You want the safest melee build | Razor Saber Crit |
| You like heavy parry punishment | Critical Greatsword |
| You prefer fast single-target damage | Critical Rapier |
| You want huge burst damage | Dragon's Breath Blunderbuss |
| You like safe long-range fights | Reliable Musket |
| You fight groups often | Plague Halberd |
If you are new, start with Razor Saber Crit.
If you already have good parry timing, try Critical Greatsword.
If you want the most explosive damage, build around Dragon's Breath Blunderbuss.
If you keep getting surrounded, use Plague Halberd or Saber instead of Rapier.
↖ FAQ
↖ What is the best overall build in Windrose?
The best overall build is Razor Saber Crit. It has strong damage, fast attacks, perfect block access, and pistol utility. It works well in most situations without needing complicated setup.
↖ What is the highest damage build in Windrose?
The highest burst build is Dragon's Breath Blunderbuss with Privateer Armor, Major Jaguar Ring, Elixir of Concentration, and firearm talents like Sniper's Focus and Firearm Training.
↖ Is Greatsword better than Saber?
Greatsword hits harder and has better reach, but Saber is faster and easier to use. Greatsword is better for patient parry players. Saber is better for general gameplay.
↖ Is Rapier good in Windrose?
Yes, Rapier is very good for single-target damage. It becomes even stronger if we use bleed from Rapier of a Thousand Cuts or add pistol support.
↖ Why is Mace not recommended?
Mace is slow, cannot perfect block, and does not currently have enough defensive tools to compete with Saber, Rapier, Greatsword, or Halberd.
↖ Should we stop at 20 Mastery?
For most crit builds, yes. After 20 Mastery, the crit chance gain becomes much less efficient. It is usually better to invest in main stats, Vitality, Endurance, or better gear bonuses.
↖ What is the best solo build?
For solo play, Razor Saber Crit and Critical Greatsword are the most reliable. If you struggle with groups, Plague Halberd is also a strong choice.
↖ Final Takeaway
The strongest Windrose builds are strong for clear reasons. Saber, Rapier, and Greatsword dominate melee because they can perfect block and turn defense into damage windows. Dragon's Breath Blunderbuss wins on burst damage. Plague Halberd earns its place through AoE sustain, even without parries.
For most players, the best starting point is simple:
| Goal | Best Pick |
|---|---|
| Best overall build | Razor Saber Crit |
| Best melee damage | Critical Greatsword |
| Best burst damage | Dragon's Breath Blunderbuss |
| Best ranged safety | Reliable Musket |
| Best group sustain | Plague Halberd |
If we want one build that feels good almost everywhere, we choose Razor Saber Crit. If we want to watch enemy health bars disappear, we load up Dragon's Breath Blunderbuss and enjoy the chaos.

Most Popular Posts
- Windrose Best Weapons Tier List, Traits, and Build Picks
- Windrose Completion Guide: Max Comfort, Weapons, Armor, Quests and Missable Items
- Windrose Agility Build Guide: Best Stats, Weapons, Talents, Food and Boss Setup
- Windrose Best Currency Making Guide: Fastest Silver Farm With Piracy
- Windrose Best Early-Midgame Builds: Strong Setups for the Foothills
- Best Windrose Builds Guide: S-Tier Weapons, Stats, Gear, and Talents
Popular Category Lists
- Grow a Garden / (286)
- ARC Raiders / (267)
- CoD: Black Ops 7 / (166)
- Monopoly Go / (147)
- MLB 26 / (146)
- Star Citizen / (122)
- Steal a Brainrot / (89)
- ARK Survival Ascended / (77)
- Sailor Piece / (68)
- Forza Horizon 6 / (65)
- Diablo IV / (61)
- Blox Fruits / (61)
- CoD: BLACK OPS 6 / (55)
- Adopt Me / (55)
- Path of Exile 2 / (48)
- Grow a Garden 2 / (48)
- Monster Hunter Wilds / (46)
- Windrose / (44)
- Path of Exile / (40)
- Bee Swarm Simulator / (36)


