


 0
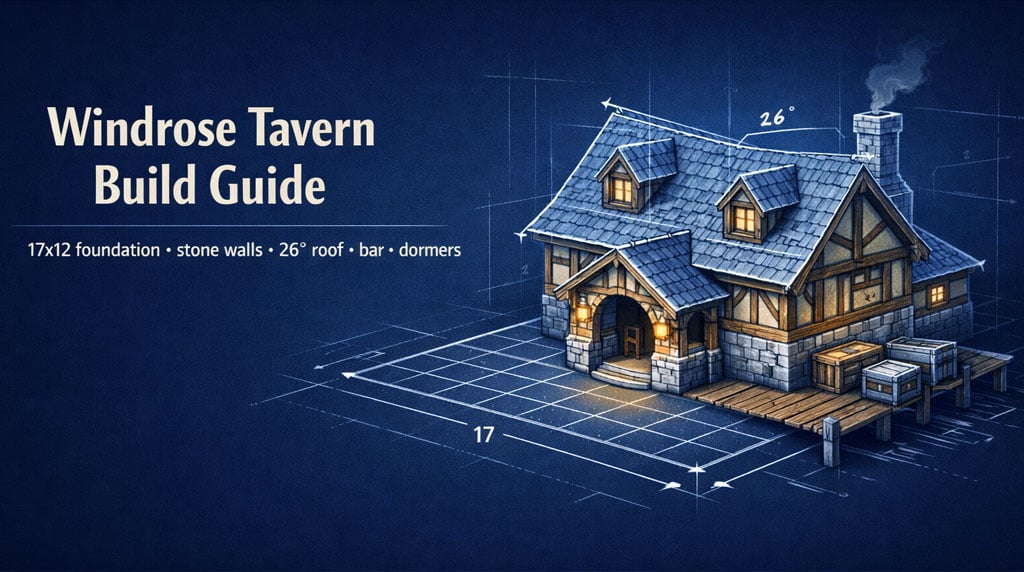
0Windrose Tavern Build Guide: 17x12 Stone Tavern Layout, Roof, Bar, Stairs, and Dormers
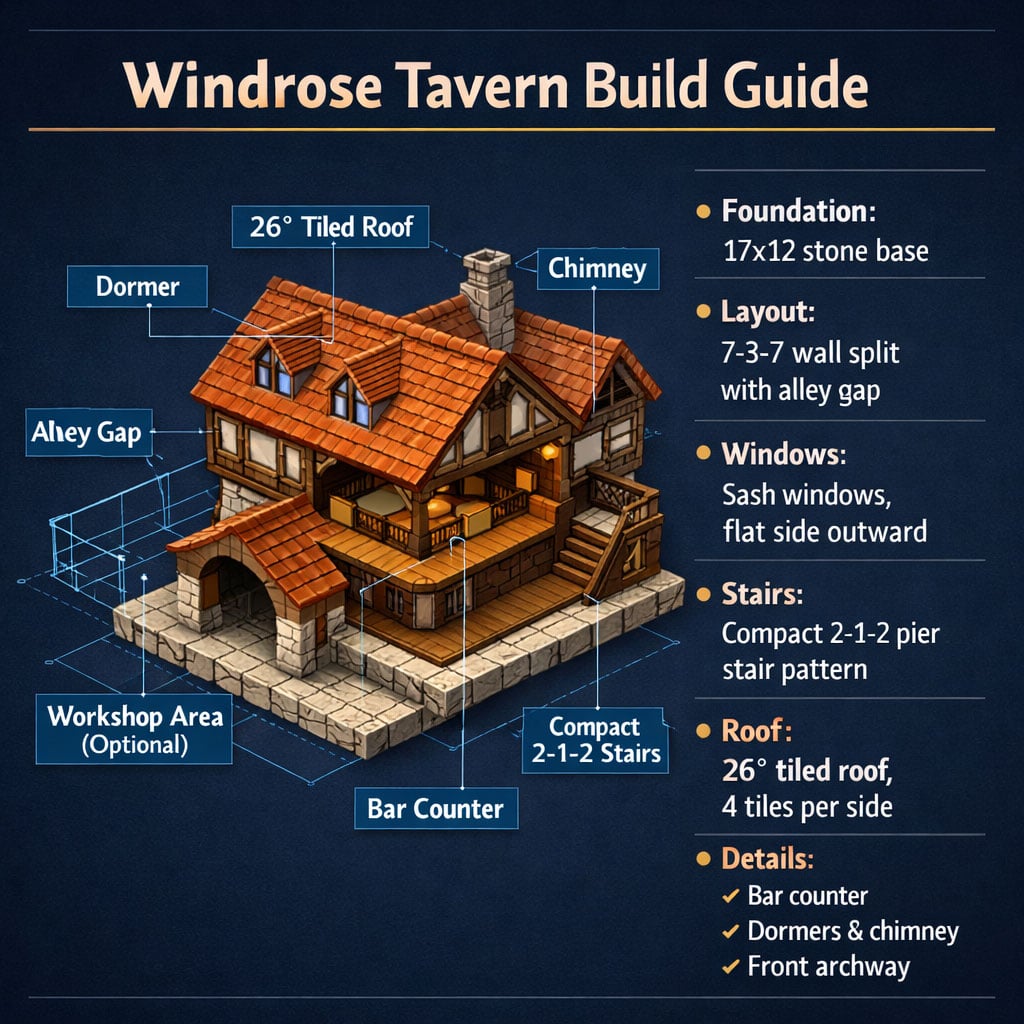
The Windrose Tavern is a practical port-style build: big enough for a bar, stairs, upper room, fireplace, and roof detail, but not so huge that it turns into an empty box. The whole build depends on three things: accurate 17x12 foundations, clean window spacing, and a proper 26° roof overhang.
- Windrose Tavern Build Requirements
- Windrose Tavern Foundation Layout
- Foundation Plan
- Build the Exterior Shell
- Cut the Door Openings
- Main Front Entrance
- Side Double Door
- Place the Sash Windows Correctly
- Window Placement Cheat Sheet
- Finish the Wall Layers
- Build the Interior Bar Area
- Bar Counter
- Build the Compact Staircase
- Stair Pattern
- Add the Upper Floor
- Build the 26° Roof Overhang
- Place the Main 26° Tiled Roof
- Cap the Gables and Add Upper Windows
- Add Upper Mahogany Walls
- Build the Dormer Roof Windows
- Add Fireplace and Chimney
- Build the Front Entrance Roof
- Optional Workshop Alley Connection
- Exterior and Interior Decoration Tips
- Best Exterior Details
- Best Interior Details
- Common Mistakes and Fast Fixes
- FAQ
- What is the Windrose Tavern foundation size?
- Which way should sash windows face?
- How do you build the Windrose Tavern roof?
- Where should the staircase go?
- Do I need to build the workshop too?
- Summary
↖ Windrose Tavern Build Requirements
Start with the main pieces ready. The build is forgiving, but fixing a bad footprint later is a pain.
| Part | Use | Key Note |
|---|---|---|
| Stone foundations | Main base | 17 long x 12 wide |
| Stone and timber large walls | Exterior shell | First wall layer |
| Limestone single walls | Window infill | Stop at window-top height |
| Wood plank walls | Upper wall band | Above windows |
| Mahogany walls/floors | Interior and upper floor | Warmer tavern look |
| Sash windows | Exterior windows | Flat side out, sill side in |
| Stone pillars + archway | Main entrance | Open tavern front |
| Pier stairs | Interior staircase | Compact turn layout |
| 26° tiled roof | Main roof | Four tiles per side |
| 26° triangle/inverted walls | Gables and dormers | Roof finishing |
| Fireplace + chimney cap | Upper floor detail | Adds strong roof silhouette |
↖ Windrose Tavern Foundation Layout
Place a 17x12 stone foundation rectangle.
That is the full footprint for the tavern, alley, and future workshop side. Do not freestyle this size unless you want the roof and window spacing to fight you later.
↖ Foundation Plan
| Direction | Count |
|---|---|
| Length | 17 foundations |
| Width | 12 foundations |
If you are building this in a port, add dock pieces around the edge as a walkway. Purely optional. The tavern itself does not rely on them.
↖ Build the Exterior Shell
Place stone and timber large walls around the full foundation edge.
On the long 17-wall side, split the front into:
| Section | Count |
|---|---|
| Left wall run | 7 walls |
| Middle alley gap | 3 walls deleted |
| Right wall run | 7 walls |
This creates the core layout: tavern on one side, workshop space on the other, alley in the middle.
From each side of the 3-wall gap, drag walls straight back. You now have two long rectangles with a clean alley between them.
↖ Cut the Door Openings
Door placement matters. Bad doors make the whole tavern feel crooked.
↖ Main Front Entrance
On the tavern front:
- Count 2 walls in from each side.
- Delete the center entrance space.
- Add small wall sections to frame it.
- Place stone pillars on both sides.
- Add a stone archway on top.
Keep it open. No door needed. It reads better as a tavern entrance.
↖ Side Double Door
On the side wall:
- Count 3 walls from the front.
- Delete the 4th and 5th wall sections.
- Add a small wall piece on the 3rd wall side.
- Place your preferred double door.
This works well as a service entrance or alley access.
↖ Place the Sash Windows Correctly
This is the mistake players make most: sash windows facing the wrong way.
Rule: place every sash window with the flat side outward and the window sill inward.
↖ Window Placement Cheat Sheet
| Wall | Placement |
|---|---|
| Front wall | 1 window one wall in from each side of the entrance |
| Long outer side | Window, 2-wall gap, window, 1-wall gap, window, 2-wall gap, window |
| Back wall | Count 3 walls in, place window, leave 1-wall gap, place window |
| Alley side | Count 2 walls in, window, 2-wall gap, window, plus one near front |
If a wall looks too plain, do not spam windows. Use canopies, barrels, and lighting later. Over-windowing makes the tavern look like a greenhouse.
↖ Finish the Wall Layers
Use limestone single walls to fill around the lower window gaps.
Stop at the top of the window frame. Do not take limestone all the way up.
Then place wood plank walls above the windows as the upper band.
| Layer | Material | Why It Works |
|---|---|---|
| Lower shell | Stone and timber | Heavy tavern base |
| Window infill | Limestone | Breaks up dark walls |
| Upper band | Wood plank | Adds texture |
| Corners | Stone pillars | Cleans the silhouette |
Add stone pillars on every corner. Extend them to the full wall height. Also continue the entrance pillars upward.
This gives the tavern a framed, intentional shape instead of a flat rectangle.
↖ Build the Interior Bar Area
Go inside.
Count 6 foundations from the front. Place a mahogany wall across the tavern width.
This becomes the bar/service divider.
Add a door into this wall. The best option is the door with small windows along the top. It looks like a staff access door, not a prison gate.
↖ Bar Counter
Place small marble floor tiles along the back of the mahogany wall.
Cap the end with a small mahogany wall.
| Bar Part | Piece |
|---|---|
| Back wall | Mahogany wall |
| Countertop | Small marble floor tiles |
| End cap | Small mahogany wall |
| Access | Window-top door |
Result: a clean bar line with almost no wasted space.
↖ Build the Compact Staircase
Use pier stairs near the back window.
This layout saves space and still reaches the upper floor cleanly.
↖ Stair Pattern
| Step | Piece | Action |
|---|---|---|
| 1 | Pier stairs | Go up 2 sections |
| 2 | Mahogany floor | Add landing |
| 3 | Pier stairs | Rotate, go up 1 section |
| 4 | Mahogany floor | Add second landing |
| 5 | Pier stairs | Rotate, go up 2 sections |
| 6 | Mahogany floor | Connect to upper floor |
Add beams at the stair corners. Then place rope handrails up the stairs.
On the upper edge, use single rake fence as railing. Leave one short fence section at the turn so the upstairs wall aligns properly later.
↖ Add the Upper Floor
Fill the upper level with mahogany floors.
Leave an L-shaped opening above the stairs. Do not cover the stairwell.
If your floor plank direction looks wrong, rotate the pieces before filling the full level. It sounds minor, but mismatched floor beams are ugly once lights are added.
↖ Build the 26° Roof Overhang
Use beams to make the roof overhang frame.
At each corner:
- Build a small T-shape with beams.
- Complete a small square frame at the front and back corners.
- Repeat on all four corners.
This creates a proper overhang for the roof to snap onto.
| Overhang Part | Purpose |
|---|---|
| T-beams | Push roof beyond wall line |
| Corner square frames | Support clean roof edges |
| Repeated corners | Keeps roof symmetrical |
Do this carefully. If the frame is off, the roof peak will be off too.
↖ Place the Main 26° Tiled Roof
Snap 26° tiled roof pieces to the overhang frame.
Build up from both long sides.
| Roof Side | Count |
|---|---|
| Left slope | 4 roof tiles up |
| Right slope | 4 roof tiles up |
| Center | Natural peak |
If the roof refuses to line up, check the beam overhang first. The roof is usually not the problem. The frame is.
↖ Cap the Gables and Add Upper Windows
Use 26° triangle plank walls in the front and back gable corners.
Then fill the gable face with small plank walls.
Delete the center four wall pieces and place a sash window in the gap.
Repeat on the opposite end.
| Gable Part | Piece |
|---|---|
| Sloped corners | 26° triangle plank walls |
| Main fill | Small plank walls |
| Center opening | Delete 4 wall pieces |
| Window | Sash window |
This stops the roof from looking like a dead slab.
↖ Add Upper Mahogany Walls
Inside the upper floor, place mahogany large walls along both roof sides.
They should snap between the floor and roof slope. Run them front to back.
This creates a clean upstairs room instead of an awkward attic cavity.
Mahogany is the better choice here. It looks warmer and matches the tavern interior.
↖ Build the Dormer Roof Windows
Dormers are the detail that makes this build pop.
On one roof side:
- Move in roughly 1.5 roof tiles from the front.
- Delete the roof and wall pieces where the dormer will sit.
- Place 2 sash windows.
- Frame them with small mahogany walls.
- Use inverted triangle walls to close the angled gaps.
- Add small 26° roof pieces over the dormer.
- Finish the front with 26° mahogany triangle pieces.
- Add half roof tiles for the small overhang.
Repeat on the other side.
| Dormer Part | Use |
|---|---|
| 2 sash windows | Main dormer face |
| Small mahogany walls | Window frame |
| Inverted triangles | Close side gaps |
| 26° roof tiles | Dormer roof |
| Half roof tiles | Front overhang |
Use mahogany triangle pieces if possible. They look cleaner than plain plank.
↖ Add Fireplace and Chimney
Go upstairs.
Place the fireplace on the left side as you come up the stairs, about one wall in from the end.
Delete the roof tiles above it first.
Then:
1. Place the fireplace.
2. Go outside.
3. Add the chimney cap.
4. Replace the 26° roof tiles around it.
| Fireplace Part | Placement |
|---|---|
| Fireplace | Upstairs, left side from stair entry |
| Chimney cap | Outside, above fireplace |
| Roof tiles | Replaced around chimney |
The chimney breaks the roofline. That matters. Perfectly symmetrical roofs often look fake.
↖ Build the Front Entrance Roof
At the open front archway, add a small porch roof.
Use:
- Timber pillars
- Timber beams
- 26° tiled roof
- 26° half roof tiles
Build two beams out from the wall, support them with pillars, then roof both sides.
| Part | Piece |
|---|---|
| Supports | Timber pillars |
| Frame | Timber beams |
| Roof | 26° tiled roof |
| Lip | Half roof tiles |
This gives the tavern a proper front profile.
↖ Optional Workshop Alley Connection
If you plan to add the workshop later, prepare the alley now.
Place:
- 2-high pillars on both sides.
- Arch beams across the top.
- One limestone wall row above.
- Another arch beam cap on top.
| Alley Part | Piece |
|---|---|
| Side supports | Pillars |
| Main arch | Arch beams |
| Upper fill | Limestone wall |
| Top finish | Arch beam cap |
This keeps the whole port build modular and clean.
↖ Exterior and Interior Decoration Tips
Do not overdecorate the structure before it works. Finish the shell first. Then add clutter.
↖ Best Exterior Details
| Detail | Best Spot |
|---|---|
| Canopies | Ground-floor windows |
| Barrels | Side door and alley |
| Lanterns | Front arch, alley, dock |
| Crates | Rear wall, service door |
| Sign | Above front entrance |
↖ Best Interior Details
| Area | Good Additions |
|---|---|
| Bar | Bottles, mugs, shelves, candles |
| Main room | Tables, benches, rugs |
| Stair corner | Lanterns, barrels |
| Upper floor | Beds, chests, fireplace seating |
| Dormers | Desk, small chair, storage |
Keep paths open around the bar and stairs. A tavern that blocks movement is just a pretty screenshot.
↖ Common Mistakes and Fast Fixes
| Problem | Fix |
|---|---|
| Windows look wrong | Rotate sash windows: flat side out |
| Roof peak does not meet | Recheck the beam overhang frame |
| Arch will not snap | Place pillars first |
| Dormer looks flat | Add half roof tile overhang |
| Stairs take too much space | Use the 2-1-2 pier stair pattern |
| Interior feels cramped | Remove furniture near stair and bar paths |
| Exterior looks boxy | Add pillars, canopies, and mixed wall materials |
↖ FAQ
↖ What is the Windrose Tavern foundation size?
The full layout uses a 17x12 stone foundation rectangle. This includes the tavern, alley gap, and future workshop side.
↖ Which way should sash windows face?
Place sash windows with the flat side facing outward and the window sill facing inward. This is the cleanest look from both sides.
↖ How do you build the Windrose Tavern roof?
Use a beam overhang frame first. Then snap 26° tiled roof pieces to it and build up four tiles per side until the roof peaks.
↖ Where should the staircase go?
Place the staircase near the back window. Use pier stairs in a compact 2 stairs, landing, 1 stair, landing, 2 stairs pattern.
↖ Do I need to build the workshop too?
No. The tavern works alone. But leaving the 3-wall alley gap and adding the optional archway makes the later workshop connection much cleaner.
↖ Summary
The Windrose Tavern works because the layout is disciplined.
Use a 17x12 foundation. Split the long side into 7 walls, 3-wall alley gap, 7 walls. Keep sash windows facing the right way. Build the compact stair layout. Frame the roof before placing the 26° tiled tiles. Add dormers, chimney, and a small front porch roof last.
Priority checklist:
| Priority | Must Get Right |
|---|---|
| Foundation | 17x12 rectangle |
| Building split | 7-3-7 wall layout |
| Windows | Flat side out, sill in |
| Stairs | 2-1-2 pier stair pattern |
| Roof | Beam overhang before tiles |
| Dormers | Mahogany frame + half roof lip |
| Interior | Open paths around bar and stairs |
Build the shell clean. Decorate after. That is how this tavern stays both good-looking and playable.

Most Popular Posts
- Windrose Best Weapons Tier List, Traits, and Build Picks
- Windrose Completion Guide: Max Comfort, Weapons, Armor, Quests and Missable Items
- Windrose Best Rings, OP Necklaces, Blackbeard Maps & Upgrade Tips
- Windrose Best Starter Build Guide: OP Rapier + Pistol Setup for Early to Mid Game
- Windrose Agility Build Guide: Best Stats, Weapons, Talents, Food and Boss Setup
- Windrose OP Guide: Combat, Skills, Gear, Food, Jewelry, and Armor Sets
Popular Category Lists
- Grow a Garden / (286)
- ARC Raiders / (266)
- CoD: Black Ops 7 / (166)
- Monopoly Go / (146)
- MLB 26 / (145)
- Star Citizen / (120)
- Steal a Brainrot / (89)
- ARK Survival Ascended / (75)
- Sailor Piece / (68)
- Forza Horizon 6 / (64)
- Diablo IV / (61)
- Blox Fruits / (60)
- CoD: BLACK OPS 6 / (55)
- Adopt Me / (54)
- Path of Exile 2 / (48)
- Grow a Garden 2 / (47)
- Monster Hunter Wilds / (46)
- Windrose / (44)
- Path of Exile / (40)
- Bee Swarm Simulator / (36)


