


 0
0Black Ops 7 Season 1 Endgame Boss Fast Passing Guide: Colossus of Avalon & Toxic Tyrant Z‑Rex
- ELSA
- Share
- CoD: Black Ops 7
- 12/05/25
- 17664
If you've been dropping into Avalon in Black Ops Endgame mode, you've probably seen one of two things happen: either a massive robot slams into the map and starts one-shot stomping people, or a toxic T-Rex shows up, wipes half the lobby, and then somehow someone ends up riding it. On paper, these look like classic massive HP sponge bosses. In reality, both events are structured like lightweight raid fights: clear steps, clear mechanics, and a big difference between randomly shooting and playing the script.
- How World Events Work in Avalon & Why They Matter
- The Real Reward: Exotic Skills and Combat Rating
- Colossus of Avalon (Origins Robot) – Full Guide
- Toxic Tyrant Z-Rex – Full Guide
- FAQ: Common Questions About These World Events
- Conclusion: Treat Them Like Light Raids, Not Just Giant Bullet Sponges
This guide does two things for you:
- Breaks Colossus of Avalon and Toxic Tyrant Z-Rex into simple, repeatable steps so you can beat them consistently.
- Explains why each step matters, so if something goes wrong you know exactly what to adjust instead of just blaming damage numbers or bad lobby.
If you're around combat rating 60, want Exotic skills, and don't want to stand under a robot foot wondering why nothing is dying, this is the playbook you want.
↖ How World Events Work in Avalon & Why They Matter
Before diving into each boss, it helps to understand the shared rules: when they spawn, how many per match, and what you actually get for winning.
Spawn Logic: One World Event per Match (Most of the Time)
When you load into an Avalon match:
Within roughly 5–10 minutes, one of the two world events will trigger:
- Colossus of Avalon (Origins robot), or Toxic Tyrant (Z-Rex)
- Current behavior strongly suggests:
- Only one world event per match is intended in Season 1.
- The game wants you to have enough time to properly clear one boss, not stress over two timers.
If you've been in the server for about 10 minutes and see a world event marker, you can safely assume that's your only boss for this run. Plan your contracts, ammo, and rotations around that event.
↖ The Real Reward: Exotic Skills and Combat Rating
You don't do these bosses just for a bit of loot on the ground. You do them for Exotic skills and their upgrades.
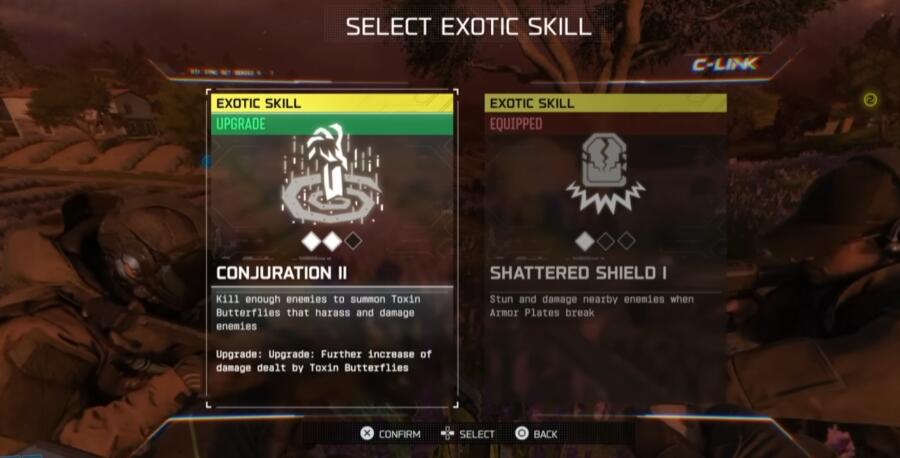
Here's how the reward flow works:
1. Each clear gives access to Exotic skill progression:
You either:
- Gain an upgrade for an Exotic skill you already own, or
- Get to pick a new Exotic skill from the world boss loot case.
2. Hard cap: one Exotic skill per character
- You cannot hold multiple Exotics on a single operator.
- After beating a world boss, the loot case lets you swap to another Exotic if you want, but you'll still end up with exactly one equipped.
3. Combat rating bump: 60 → 63
If you're at combat rating 60, fully upgrading one Exotic skill (3 upgrades) raises your rating up to 63.
That extra rating translates into:
- Easier Tier 4 contracts
- More forgiveness in mistakes
- Shorter boss phases because your damage and survivability scale up
You can track and plan all of this from the main menu:
Main Menu → Operators & Abilities → Progression
- See which Exotic skill you've unlocked
- Check current tier and bonuses
- Decide which one to invest in long-term
If you already know which playstyle you enjoy (burst damage, control, survivability, mobility), it's better to stick with one Exotic and max it instead of swapping every time you beat a boss. You'll hit rating 63 faster and make Tier 4 contracts feel much more manageable.
Why Legendary Weapons and a Rocket Launcher Are Mandatory
You hear this in the commentary for a reason: Make sure you guys have legendary weapons, especially a rocket launcher…
Here's why that advice is dead-on:
Both bosses have very high HP, especially Z-Rex.
Both events spawn a lot of adds (including beefy specials like rhinos).
A legendary rocket launcher does double duty:
- Crowd control – cleans big packs so your team doesn't drown in adds.
- Burst on boss weak points – when shields drop or weak points show, a few well-placed rockets outperform random spraying by a wide margin.
If you notice:
- Boss health barely moving
- Your team getting overwhelmed by adds
- The fight dragging close to the timer
then it often means:
No one brought reliable AOE, or Everyone is using low-burst rifles instead of leveraging rockets + Exotics during damage windows.
↖ Colossus of Avalon (Origins Robot) – Full Guide
This fight is not just shoot the big robot. The fun part is getting inside the robot and solving a mini-puzzle that disables its shield.
Think of it as: enter the mech → route power via plates → shoot red nodes → drop shield → damage phase.
Pre-Spawn Phase: Locked-Down Zone & Add Waves
Once the Colossus event triggers, you'll notice:
- A designated area on the map becomes the event zone.
- The game effectively locks that zone down: You get waves of enemies, including special units that are noticeably tankier.
Your actual goals in this stage are simple:
- Keep the area under control so nobody gets overwhelmed.
- Use this window to:
- Restock ammo
- Reload Exotics
- Clear the immediate area before the robot drops in
It's tempting to treat this as normal farming, but if your team gets sloppy now, you go into the real boss phase already behind.
Robot Drop: Don't Get Smashed, Don't Hug the Feet
When the Colossus makes its entrance:
- You'll see danger zone indicators where it's about to drop or move.
- It then slams down / emerges, and its landing/stomp can instantly kill you.
Two simple rules:
- When you hear/see he's coming down or see the danger zone: back off the center.
- Don't idle directly under its feet. The stomp is not a joke; it's a genuine one-shot.
At the same time, you actually want to pay attention to those feet, because that's your doorway inside the robot.
Getting Inside: Foot Weak Point & Entry Hatch
At some point in the early phase, the commentary notes: A foot popped open… I'm going in.
This is your key mechanic:
1. One of the Colossus's feet will open up, revealing an internal hatch area.
2. If you run to that foot when it opens, you'll be able to enter the mech's interior.
3. Multiple players can go inside; it's not a solo instance.
Recommended: send at least 2–4 players inside:
- One can stand on plates.
- One can focus on shooting energy nodes.
- Others can clear internal adds and help call out node positions.
If you keep getting stepped on instead of getting inside, try this:
- Watch both feet; look for the one that briefly reveals an opening or glows differently.
- Approach from an angle when the Colossus pauses or after it takes a step, instead of sprinting under a moving leg.
- Don't tunnel vision: glance at your minimap and the model's animation.
Inside the Mech: Plates, Red Energy, and Node Shooting
Inside, the fight turns into a mechanics puzzle:
Stand on pressure plates → track red energy pulses → shoot every charged fixture → strip shield.
The Interior Layout
You'll notice:
- A multi-level space – lower floor, mid platforms, and an upper level.
- Key interactive elements:
- Red glowing pressure plates on the floor
- Light fixtures / energy devices along walls and structures that can receive energy
How the Mechanic Actually Works
You can think of it as a short Simon Says with electricity:
1. A player stands on a red pressure plate.
- This triggers a pulse of red energy that travels along cables and conduits.
2. Watch the energy flow.
- The pulse moves through the environment and ends in several fixtures / devices that light up red once charged.
3. Shoot every charged device in time.
- Any fixture that receives energy turns bright red.
- You need to shoot all of them within a small time window to complete that cycle.
From the footage:
- The lower-level plate usually routes power to about 2 fixtures.
- The upper-level plate can route power to around 4 fixtures.
If you miss even one or take too long:
- The devices recharge.
- The shield doesn't drop.
- You have to wait roughly 15 seconds before the plate can pulse again.
That's why it can feel like we're doing something, but nothing is happening if people aren't coordinated.
Practical Team Setup Inside
A simple, effective split:
1 player – Plate holder
- Stands on the pressure plate.
- Calls out pulses (Pulsing now, Next wave, watch top left, etc.).
1–2 players – Node shooters
- Focus on following the red energy path.
- Each takes responsibility for a side/level – e.g., left vs. right, low vs. high.
1 player – Add control / backup shooter
- Keeps the plate holder alive.
- Helps finish any nodes that others miss.
If you find that:
- You're constantly shooting something but the shield never drops,
- Or the plate seems dead a lot of the time,
then the usual suspect is missed nodes or nobody committing to standing on the plate during the whole pulse cycle.
Breaking the Shield & Damage Windows
Once you successfully:
Trigger plate → Hit all energized fixtures in a cycle,
the Colossus's immunity shield drops for a period.
That's your damage window:
- Dump rockets, heavy weapons, and Exotic bursts into the mech.
- Aim for any obvious glowing weak points on its body, not just generic torso.
- Outside players should already be positioned to take advantage of this moment.
If you've run the interior loop several times and the boss is still barely dented, double-check:
- Are people outside actually shooting the boss when the shield is down, or are they busy farming adds?
- Do you have at least one or two players using high-burst weapons (especially launchers)?
- Are interior players consistently completing node cycles without timeouts?
Exfil: Grapple Into the Head and Get Launched Out
After enough successful cycles:
- The internal cores are destroyed.
- The shield is gone for good.
- The Colossus finally dies.
For the finale:
- You can grapple into the robot's head, which becomes your exfil point.
- Inside the head, you trigger exfil and get launched out in a very cinematic way.
From a content-creator perspective, this is one of those moments you absolutely want on clip. From a player perspective, it's a neat payoff that makes the whole mech interior sequence feel worth it.
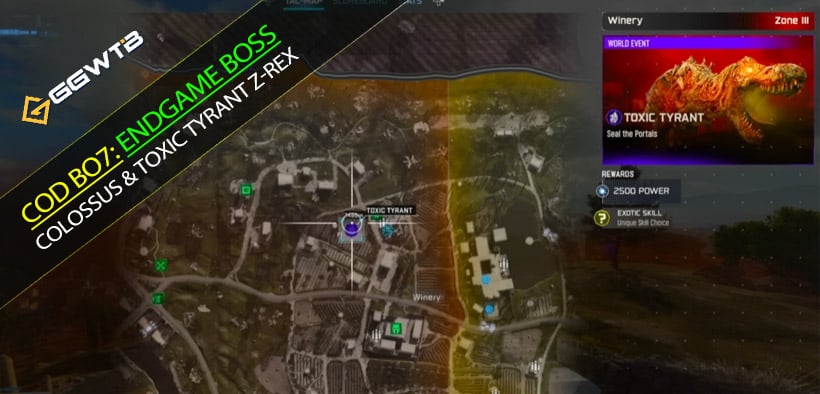
↖ Toxic Tyrant Z-Rex – Full Guide
The Z-Rex world event is more about closing rifts first and then handling a long, attrition-style boss fight with some flashy interactions like riding the T-Rex.
Think of it as: kill enemies → collect shards → seal portals → spawn Z-Rex → manage weak points and positioning → optionally ride it.
1. Step One: Clear the Area and Collect Elemental Shards
When the Toxic Tyrant event spawns:
- A marker leads you to a zone filled with:
- Enemies (human-type plus zombies),
- Special units,
- And eventually, elemental shards on the ground.
Important details:
- Elemental shards:
- Often drop from killed enemies.
- May also appear naturally in the area.
- They're used as keys to seal portals in the sky.
Your first objective is not to rush the boss. It's to:
- Maintain control of the area.
- Pick up every elemental shard you see.
- Avoid getting sidetracked by chasing kills too far away from where shards drop.
If you see portal markers and hints about sealing them, but nothing seems interactable yet, it usually means you just need more shards from killing enemies.
2. Sealing Portals: One Shard per Portal
If you look up, you'll notice multiple glowing portals/rifts in the sky.
Mechanic rule of thumb: > One elemental shard seals one portal.
Workflow:
1. Look up and note where the portals are.
- They'll often have light beams or clear visual effects.
- Mentally divide them into left, right, far, close if you're in a squad.
2. Carry a shard to each portal's ground marker.
- Near each portal there's typically a corresponding ground interaction spot.
- You'll see prompts like Use artifact / Use shard.
3. Use the shard to close that portal.
- The portal shuts, and that source of enemies stops spawning.
- Overall wave pressure begins to drop as more portals close.
In practice:
- Portals are spread out, not stacked in one spot.
- Your team should fan out:
- Some players focus on shard pickup + sealing,
- Others focus on protecting them and keeping pressure off.
If your squad is just running in circles killing everything and ignoring the sky, you're going to feel stuck. The event only really progresses when the portals close.
3. Once All Portals Are Closed: Z-Rex Appears
After sealing all portals:
- The system spawns the Toxic Tyrant Z-Rex.
- It usually appears in a specific direction rather than dropping from the air.
- You get about 17 minutes (give or take) to kill it.
That timer is fairly generous, but it's not infinite. If:
- Your team is undergeared, or
- People are ignoring weak points,
you can absolutely run close to the timer and fail.
4. Fighting Z-Rex: Weak Point, Positioning, and Surviving the Chaos
The Main Weak Point: Its Face
The footage and callouts are pretty clear:
> The weak spot… yeah, the eye/face is definitely a weak spot.
Mechanically:
- Head/face is the primary weak point.
- You should prioritize:
- High-accuracy LMGs,
- Solid assault rifles,
- Rocket launchers aimed directly at its face, not just the body.
If you spray its torso all fight long, you're basically nerfing your own DPS for no reason.
Positioning: Get High Ground, Don't Stack in a Line
A simple way to make this fight easier:
- Some players on rooftops/high ground:
- They draw aggro.
- They maintain a stable angle on the head.
- They keep Z-Rex's big frontal attacks pointed away from the whole lobby.
- Others on mid-ground/low ground, using buildings as cover:
- Flank and shoot the head from different angles.
- Avoid stacking directly in front of the mouth or behind the tail.
Why this matters:
- Z-Rex has:
- Chomp/bite attacks that destroy people too close to the front.
- Tail sweeps that smash anyone behind him.
- Toxic attacks that can wipe groups if you clump.
- If everyone stands in one straight line, one tail or breath can delete half your lobby.
If you keep seeing multiple teammates go down at once, that's usually a positioning problem, not a numbers problem.
Managing Toxic Attacks and Ammo
On top of physical damage, Z-Rex brings toxin effects into the fight:
- Toxic breaths or ground effects shred your HP quickly.
- Staying in them just a bit longer to finish a mag is how people go down.
You should:
- Bail early out of obvious toxin zones.
- Use rooftops/ledges to create natural safe spots.
- Time ammo box usage and launcher refills during short lulls or while Z-Rex focuses on someone else.
The commentary even mentions running dry on launcher ammo mid-fight and needing to go grab more. That's normal. Plan around those moments instead of waiting until you're totally empty and panicking.
Riding Z-Rex: Cool but Optional Advanced Tech
One of the coolest moments in the run is: I'm on him. I'm on him. You got it. You're on it!
Yes, you can ride Z-Rex here, similar to Shattered Veil.
From what we see and know:
How to Get On
While the exact prompt timing can be tricky, the pattern is:
1. Wait for tail attacks.
- When Z-Rex winds up and slams or sweeps its tail, there's a brief window.
2. Approach from behind during/after the tail animation.
- You need to be at the right spot and angle.
3. Look for an interaction prompt.
- Something like Interact / Ride / Use artifact appears for a moment.
4. Hit the interaction button at the right time.
- You'll mount the T-Rex and ride it.
You'll probably fail a few attempts at first. That's normal. The window is short and the risk is high.
Why Bother Riding?
You don't have to ride Z-Rex to beat the fight. It's more of a:
- High-style move – insane clip potential.
- High-risk, high-reward interaction – if it behaves like Shattered Veil, you may get:
- Amazing vantage points,
- A chance to apply damage or effects,
- Or at least a morale boost for the lobby watching you do it.
If you're the main DPS and the fight is tight on time, prioritize safe headshots over trick riding. If the fight is under control and you want a highlight, then go for it.
After the Kill: Bones, Loot, and Exotic Progress
Once Z-Rex goes down:
- The environment is left with a full bone skeleton.
- Importantly, it's solid, not just visual – you can walk on the bones instead of clipping through.
- The event rewards you with:
- World boss loot (including potential exotic-tier weapons in the environment),
- Exotic skill options/upgrades in the loot case,
- Progress toward making Tier 4 runs safer and more profitable.
If you're making content, this kill and the skeleton walk-around are perfect outro shots or thumbnails.
↖ FAQ: Common Questions About These World Events
Q1: Can both Colossus and Z-Rex spawn in the same match?
Current behavior suggests no for normal play:
- A typical Avalon match will trigger one of the two world events within the first 5–10 minutes.
- The design is clearly focused on giving you enough time to fully clear one boss, not juggle two timers.
Edge cases or future updates could adjust this, but for Season 1, treat it as one boss per match.
Q2: What combat rating should I have before seriously going for these bosses?
There's no strict lock, but practical experience points to:
- Around combat rating 60 as a comfortable baseline.
- Exotic skills upgraded to 3 tiers let you hit 63 and noticeably smooth out:
- World boss attempts,
- Tier 4 contracts,
- General survivability.
You can join world boss fights below that, but you'll feel much squishier and more dependent on other people carrying the damage.
Q3: I already have an Exotic skill. Do I still gain anything from killing more world bosses?
Absolutely.
- You can get upgrades for your existing Exotic skill until it's fully maxed (3 upgrades).
- You can also swap to another Exotic in the world boss loot case if you decide you'd rather invest in a different one.
- Long-term, more kills mean:
- More flexibility to try different Exotics,
- Faster progression to max rating,
- More backup Exotics leveled in case you want to change playstyle later.
Q4: We're inside the Colossus and shooting stuff, but its shield never seems to drop. What are we doing wrong?
Most of the time it's one of these:
1. Plate holder not staying on the plate.
- If they step off too early, the pulse doesn't finish routing.
2. Missed energy nodes.
- Someone sees one or two red fixtures, shoots them, and assumes the job is done.
- Meanwhile, another fixture on an upper level stayed charged, so the cycle fails.
3. Not resetting between failed cycles.
- After failing a set, the team doesn't wait out the ~15-second cooldown and tries to brute-force it.
Fix it by:
- Assigning a dedicated plate player.
- Assigning specific shooters to specific arcs (e.g., you own top left, I own bottom right).
- Calling out when a cycle is successful so everyone knows a real damage window is coming.
Q5: On Z-Rex, I keep hitting the body and feel like I'm doing no damage. How do I reliably hit the head?
Try this sequence:
- Grab elevation whenever possible.
- Rooftops, balconies, any platform with a clear sightline.
- Fight at mid-range instead of max-range.
- Too far and spread/recoil make headshots unreliable.
- Too close and you risk chomp or tail swipe deaths.
- Use cover to reposition, not just to hide.
- When Z-Rex aggro's you, move through cover to a new angle, then re-peek the head.
- Don't just crouch in the same spot; you'll eventually get line-of-sight'd by a cone attack.
If multiple people hold stable headshot angles, the health bar will melt much faster than if everyone is random spraying torsos.
Q6: Is it worth engaging world bosses as a mostly solo player?
Yes, but with realistic expectations:
- World events are intentionally lobby-scale content.
- As a solo, your success depends heavily on:
- How many people in the lobby actually show up,
- Whether they understand basic mechanics like plates and portals.
Still, there are a few things you can do:
- Rotate early to the event area so others see someone is taking it seriously.
- Toss quick, clear text pings like Foot opened – go inside robot or Seal portals with shards first, then shoot dino.
- Focus on being the player who knows mechanics:
- You can personally carry the plate logic inside Colossus,
- Or commit to sealing multiple portals efficiently on Z-Rex.
Even in random Bot lobbies, one informed player can radically improve the odds of a clear.
↖ Conclusion: Treat Them Like Light Raids, Not Just Giant Bullet Sponges
Colossus of Avalon and Toxic Tyrant Z-Rex look intimidating the first time you see them, but the moment you treat them as mechanic-driven light raids instead of oversized elites, everything clicks into place:
- For Colossus:
- Get inside via the foot hatch.
- Respect the plate → energy pulse → node shooting loop.
- Coordinate a real damage window when the shield drops, and let heavy weapons and Exotics do their job.
- For Z-Rex:
- Seal portals first using elemental shards so you're not fighting infinite spawns.
- Focus head/face as the weak point, don't stand in a tail line, and use rooftops intelligently.
- Ride it if you're feeling spicy, but don't forget the timer.
If you're sitting at combat rating 60 and wondering what will actually push your account into comfortable Tier 4 territory, these world events are exactly that bridge: they give you Exotic skills, they reward you for understanding mechanics, and they turn chaotic public lobbies into something that feels a lot closer to a proper co-op raid—just with more screaming, more rockets, and the occasional player surfing on a toxic dinosaur.

Most Popular Posts
- Black Ops 7 Endgame Exotic Affinity Weapons Guide: Best Bonuses, Full Weapon List, and Farming Tips
- Black Ops 7 Zombies Totenreich Easter Egg Guide: Fast Solo & Co-Op Main Quest Walkthrough
- Black Ops 7 Season 04 Endgame META: Best 5 Weapons After the XR3 Ion Nerf
- Black Ops 7 Cherry Fizz Guide: Fastest Illicit Cargo Event Route for Season 4
- Black Ops 7 Season 4 Release Date, Maps, Weapons, Zombies, Warzone, and MW4 Reveal Prep
- Black Ops 7 Zombies Fast KOWAKUJO Easter Egg Guide: Cat Wonder Weapon, Evidence Puzzles
Popular Category Lists
- Grow a Garden / (286)
- ARC Raiders / (283)
- CoD: Black Ops 7 / (166)
- MLB 26 / (149)
- Monopoly Go / (148)
- Star Citizen / (128)
- Steal a Brainrot / (90)
- ARK Survival Ascended / (85)
- Sailor Piece / (68)
- Forza Horizon 6 / (66)
- Diablo IV / (62)
- Blox Fruits / (62)
- Adopt Me / (57)
- CoD: BLACK OPS 6 / (55)
- Grow a Garden 2 / (54)
- Path of Exile 2 / (48)
- Monster Hunter Wilds / (46)
- Windrose / (44)
- Path of Exile / (40)
- Bee Swarm Simulator / (37)


