0
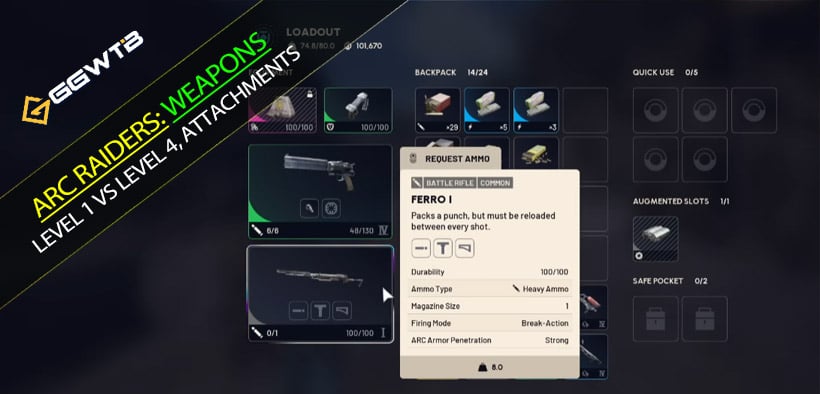
0ARC Raiders Best Weapons Guide: Level 1 vs Level 4, Attachments, and the Real PvP/PvE Meta
- JEANE
- Share
- ARC Raiders
- 12/04/25
- 4149
- Core Mechanics: Hit Zones & The Feel Factor
- Stats vs. Reality
- Phase I: Level 1, No Mods (The Budget Kings)
- Phase II: Level 1 + Attachments (The Mod Carriers)
- Phase III: Level 4, No Mods (Raw Power)
- Phase IV: Level 4 + Mods (The Meta)
- FAQ: Common Questions
- Summary: Build for the Role, Not the Rarity
When you ask, What's the best gun in ARC Raiders?, you usually get a simple S-Tier to F-Tier graphic.
The reality? Those lists are often useless. In this game, the best weapon changes completely based on three variables:
- Level: Are you holding a Level 1 pea shooter or a Level 4 rapid-fire monster?
- Mods: Is it running naked, or does it have the specific attachment that fixes its recoil?
- Target: Are you stripping Arc armor, or trying to delete a player in 0.5 seconds?
This guide ditches the spreadsheets to answer the real question: For your current budget and level, what should you actually run?
We'll look at why a Level 1 Pharaoh is a farmer's best friend, why the Anvil is a beast without a single mod, and why hitting legs is the worst mistake you're making.
Let's start with the basics of where your bullets land.
↖ Core Mechanics: Hit Zones & The Feel Factor
Before we talk about specific guns, you need to understand how damage actually works.
The Three Hit Zones: Stop Shooting Legs
ARC Raiders uses a silent three-zone system:
- Head: High damage multiplier (applied aftershield mitigation).
- Body: Your base damage.
- Legs: Damage penalty.
What does this mean for you?
If you take a heavy-hitting Anvil:
- Body Shot: You deal standard damage.
- Headshot: You trigger a massive multiplier that can two-tap medium shields.
- Leg Shot: You are literally doing lessdamage than a body shot.
The Rule:
Unless you are panicking, never aim for the legs. You are voluntarily nerfing your own TTK (Time-To-Kill).
↖ Stats vs. Reality
On paper, weapons like the Arpeggiohave the fastest theoretical kill time—ifyou land every bullet of the burst on the head.
In reality? Burst spread and enemy movement make that nearly impossible.
A good gun isn't just about math; it's about consistency.
↖ Phase I: Level 1, No Mods (The Budget Kings)
You just spawned, you're broke, or you're doing a zero-to-hero run. What works right out of the box?
Best for PvE (Arc Farming)
The Equalizer – The Armor Stripper
If you need to break armor, this is the technical best.
The Role: It's a tool, not a primary weapon. It shreds armor on Bombardier joints or Queen legs.
The Catch: It doesn't upgrade. Use it to open the weak point, then swap to your main gun.
The Pharaoh – The Farmer's Best Friend
For a standard weapon, the Level 1 Pharaoh is absurdly efficient.
Why it works: It uses Heavy Ammo and deals 40 damage per shot.
Real talk: You can break a Matriarch's leg with a Level 1 Pharaoh just as easily as a high-level gun. Upgrading it only gives reload speed, not damage. So, for budget farming? It's perfect as-is.
Best for PvP (Player Killing)
The Torrent – The Level 1 Spray God
The Strat: Crouch (to reduce recoil), anchor your aim, and spray.
The Result: Even at Level 1, the fire rate is high enough to melt light shields in about a second if you hit upper chest/head.
The Toro – The Movement Teacher
At Level 1, the pump action is slow. This is actually a hidden benefit.
The Rhythm: Shoot → Slide/Roll → Shoot.
Why it wins: The forced downtime makes you play evasively. You aren't standing still trading damage; you're dancing. Two clean shots will end most fights.
↖ Phase II: Level 1 + Attachments (The Mod Carriers)
Some weapons are mediocre at Level 1 but become monsters if you slap the right attachments on them.
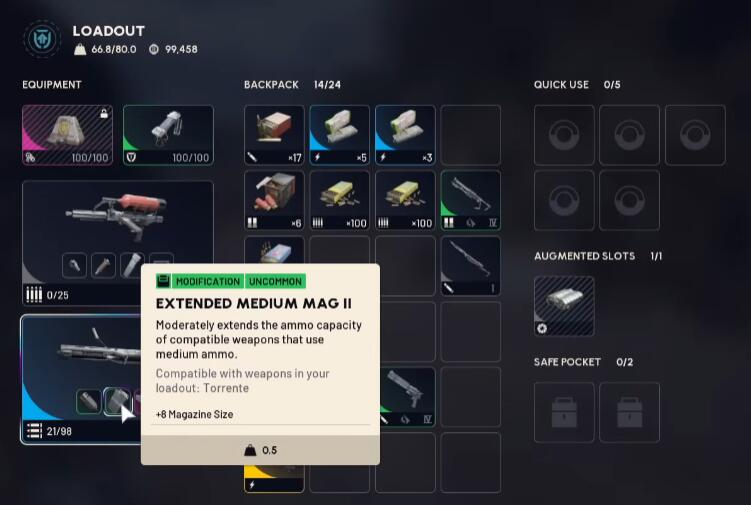
Torrent + Extended Mag + Muzzle = Hipfire Demon
The Torrent scales harder with mods than almost anything else.
The Build: Add an extended mag and a recoil-control muzzle.
The Playstyle: Stop aiming down sights. Slide into the room and hipfire. The volume of fire combined with mobility lets you delete players before they can track you.
Toro + Choke
A shotgun without a choke is a lottery ticket. A shotgun witha choke is a sniper.
The Difference: The Choke tightens your spread, making those 2-shot kills consistent rather than lucky. If you run Toro, prioritize the Choke over weapon levels.
↖ Phase III: Level 4, No Mods (Raw Power)
Now we get to the upgrades. Some weapons transform at Level 4 so drastically that they don't even need attachments to be OP.
The All-Round King: Anvil (Level 4)
If you only master one gun, make it the Anvil.
- The Level 4 Buff: You get a massive 75% Fire Rate increaseand faster dispersion recovery.
- Why it's broken: The crosshair resets so fast between shots that you don't need a compensator. You can tap-fire heads rapidly with near-perfect accuracy.
- Versatility: It two-taps players in PvP and staggers Rocketeers in PvE. It is the definition of Old Reliable.
The Precision Sidearm: Kettle (Level 4)
The Buff: Huge increase in bullet velocity and reload speed.
The Feel: At Level 1, bullets feel floaty. At Level 4, they are lasers. It's the best budget dueling pistol if you have good aim.
↖ Phase IV: Level 4 + Mods (The Meta)
This is endgame territory. If you have the materials, these are the guns that dominate the server.
The PvE Boss Killer: Renegade (Level 4 + Stock)
For pure weak-point damage against Arc, nothing touches the Renegade.
The Critical Mod: The Stock.
- Without Stock: Recoil kicks up and sideways.
- With Stock: Recoil is vertical and snaps back instantly.
The Combo: Reveal a weak point with an Equalizer, then dump the Renegade mag into the glowing spot. You will see health bars vanish.
The PvP Eraser: Ventor (Level 4 + Mods)
Even after nerfs, the Ventor is the undisputed king of PvP.
The Stats: ~0.57s TTK vs Light Shields.
The Build: You need Vertical/Horizontal recoil control and an Extended Mag.
Why it's unfair: It fires two bullets per shot. If you control the recoil, you are effectively hitting the enemy with double damage every time you pull the trigger. A 22-round mag can wipe a full squad.
The Budget Ventor: Stitcher
Can't afford a Ventor? Build a Stitcher.
The Secret: It uses cheap (Gray) mods to eliminate almost all recoil.
The Tech: Use the Kinetic Converter Stock. It boosts fire rate by 15%. It turns the Stitcher into a close-range buzzsaw that competes with Epic weapons for a fraction of the cost.
↖ FAQ: Common Questions
Q1: Should I upgrade my weapon level or craft attachments first?
A: It depends on the gun.
Torrent / Kettle / Stitcher:Go for Attachmentsfirst. They fix the gun's flaws immediately.
Anvil / Renegade / Ventor:Prioritize Level 4. The fire rate and mechanic buffs from leveling up are far more important than any scope or grip.
Q2: I mostly play PvE. What is the ideal progression?
- Starter: Equalizer (for armor) + Level 1 Pharaoh (for cheap damage).
- Mid-Game: Level 4 Anvil (Heavy ammo, good for everything).
- Endgame: Level 4 Renegade with a Stock (The ultimate boss killer).
Q3: Why am I losing fights with a Gold gun against a White gun?
A:Two likely reasons:
Headshots: Are you hitting them? A Level 1 gun hitting heads beats a Level 4 gun hitting legs every time.
Range: Are you trying to duel a sniper with a shotgun? Or using an Arpeggio in close quarters against a hip-firing Torrent? Play to your weapon's effective range.
↖ Summary: Build for the Role, Not the Rarity
If you take one thing away from this guide, let it be this: Context is king.
Farming on a budget? A Level 1 Pharaoh is all you need.
Aggressive PvP on a budget? Take a Level 1 Torrent, mod it for hipfire, and slide into their face.
Want to dominate everything? Invest in the Level 4 Anvil.
Stop looking for a magic I Win button. Pick the gun that fits your level and your target, aim for the head, and the wins will follow.

Most Popular Posts
- ARC Raiders Riven Tides Key Room Guide: Best Hotel Keys, Loot Routes, Secure & Crane Storage
- ARC Raiders Riven Tides Update: New Map & Items, ARC Turbine, Rewards, and Best Early Strategy
- ARC Raiders Bettina Guide: Best Build, Buffs, and How to Use It Against ARC
- Best ARC Raiders Attachments for Every Weapon: Complete Weapon Mod Guide
- ARC Raiders Turbine Boss Guide: Spawn Time, Weak Points, Best Weapons, and Loot
- Arc Raiders Patch 1.27: Regional Pricing, Augment Rework, and Expedition Catch-Up
Popular Category Lists
- Grow a Garden / (286)
- ARC Raiders / (283)
- CoD: Black Ops 7 / (166)
- MLB 26 / (149)
- Monopoly Go / (148)
- Star Citizen / (128)
- Steal a Brainrot / (90)
- ARK Survival Ascended / (85)
- Sailor Piece / (68)
- Forza Horizon 6 / (66)
- Diablo IV / (62)
- Blox Fruits / (62)
- Adopt Me / (57)
- CoD: BLACK OPS 6 / (55)
- Grow a Garden 2 / (54)
- Path of Exile 2 / (48)
- Monster Hunter Wilds / (46)
- Windrose / (44)
- Path of Exile / (40)
- Bee Swarm Simulator / (37)