0
0 Created: Aug 1,2026 | Maplestory Classic
MapleStory Classic Early Leveling Guide: Best Maps, Fastest Route, Real Player Tips

Forget just kill whatever's in front of you. From 1–30, map choice beats monster level almost every time. A dense, compact map with weaker mobs will out-EXP a scattered map with stronger ones — every single time. Here's the route that actually works, level by level, with backups for when the good spots are jammed.
- Quick Route
- 1–8: Maple Island
- 8–15: First Job Grinding
- Ellinia
- Henesys
- Perion
- Kerning City
- 12–18: Step It Up
- 15–25+: Line 1 Area 1 — Bubblings
- 20–28: Sturges (Subway Transfer Area)
- 21–30: Kerning Party Quest
- 23–30: Ant Tunnel 1 vs Ant Tunnel 4
- 26–30: Cave of Evil Eye 2/3
- 25–30+: Land of Wild Boar
- Backup Map Cheat Sheet
- Route by Playstyle
- FAQ
- What's the best map from level 1–10?
- What's the best map around level 15?
- Is Kerning Party Quest worth it at 21?
- Are Sturges good for warriors?
- Ant Tunnel 1 or Ant Tunnel 4?
- Bottom Line
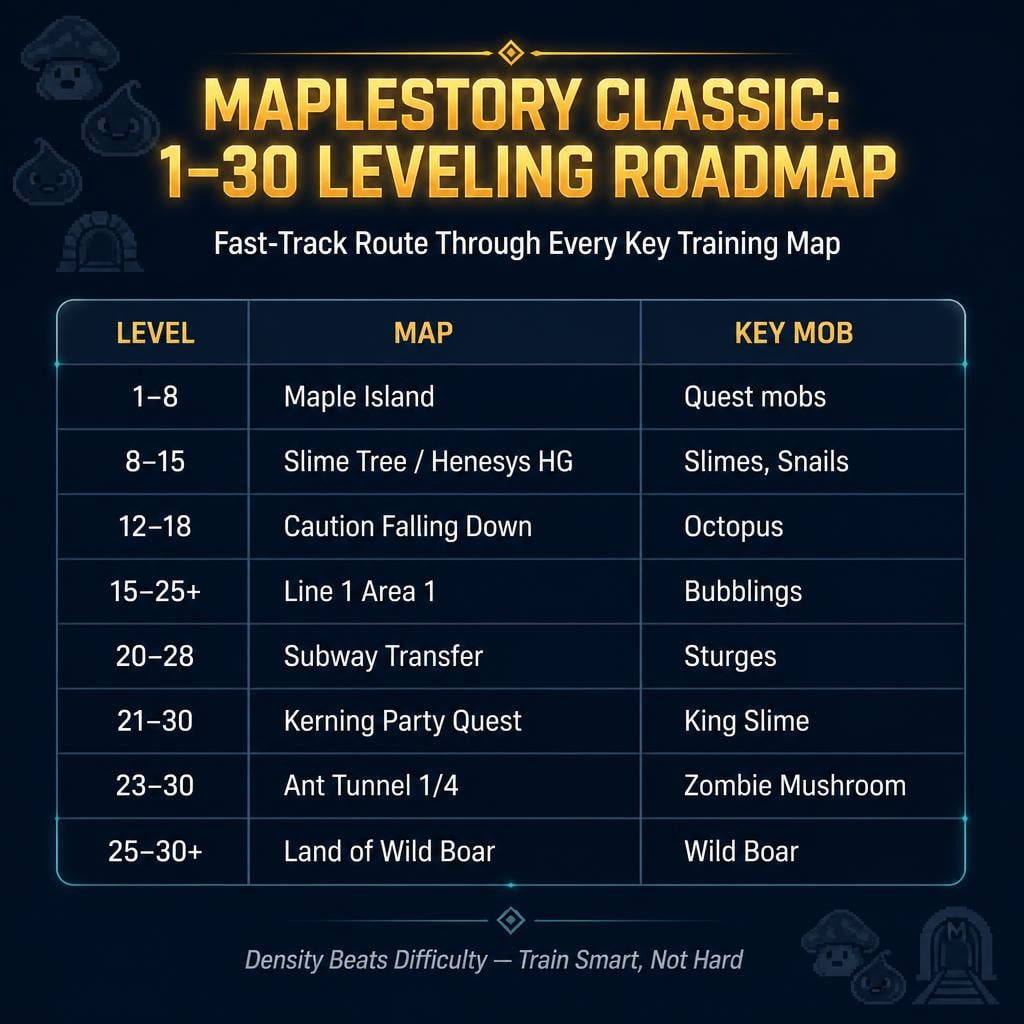
Quick Route
| Level | Map | Monsters | Notes |
|---|---|---|---|
| 1–8 | Maple Island quests | Snails, mushrooms | Do ALL of them |
| 8–15 | Slime Tree / Henesys HG / Perion Street Corner | Slimes, snails, stumps | Safe first-job grinding |
| 12–18 | Caution Falling Down / Forest of Wisdom | Octopus, mushrooms | Crowded but strong EXP |
| 15–25+ | Line 1 Area 1 | Bubblings | Best all-around spot |
| 20–28 | Subway Transfer Area | Sturges | Bad for warriors |
| 21–30 | Kerning PQ | King Slime | Instanced, no competition |
| 23–30 | Ant Tunnel 1/4 | Horny/Zombie Mushrooms | Scroll drops |
| 26–30 | Cave of Evil Eye 2/3 | Evil Eyes | Watch Junior Boogies |
| 25–30+ | Land of Wild Boar | Wild Boars | Best late-game density |
1–8: Maple Island
Do every quest. No exceptions. You'll hit level 7–8 in under an hour, and skipping quests just means you show up to Victoria Island underleveled and potion-broke.
8–15: First Job Grinding
Pick based on your town — they're all roughly equal in efficiency.
Ellinia
- Slime Tree (Southern Forest 1 Dungeon): Tall, narrow, slimes only. Zero pressure. Best pick if your damage is still weak post-job-advancement.
- The Tree That Grew: Vertical layout, splits well for 4–6 player parties.
Henesys
- Henesys Hunting Ground: Wide flat platforms, always populated. Green mushrooms up top can wreck low-accuracy characters — stay low if you're struggling.
- Hill East of Henesys: No green mushrooms. Go here if HHG feels rough.
Perion
- Perion Street Corner: Warriors' go-to. Simple terrain, no flying/awkward mobs.
- East Rocky Mountain 1: Same mobs, use it when Street Corner is full.
Kerning City
- Construction Site (west): Flat and easy on lower platforms; Octopus/Green Mushrooms up top get tougher.
- Construction Site (north): Less crowded alternative, same mob pool.
12–18: Step It Up
Your first job skills are online now. Time to ask can I kill fast enough to justify being here instead of can I survive.
Caution Falling Down (hidden portal, top of west Construction Site): Octopus + orange/blue mushrooms. Strong EXP, but expect a crowd — it's famous. If you're missing hits constantly or burning potions, go back a tier for a few levels.
Northern Top of Construction Site: Nearly identical mob mix, usually less contested. Check here first if Caution Falling Down is packed.
Forest of Wisdom: Big map, spreads well across a full party. Feels empty solo, shines with 5–6 players. Southern Forest 2/3 Dungeons are the compact backup — same mobs, tighter layout.
15–25+: Line 1 Area 1 — Bubblings
This is the map. High density, easy access from Kerning, always has an open party slot. In practice, it stays relevant well into the mid-to-late 20s if you've got a good party clearing spawns.
Bubblings are forgiving — easy kills, fast respawns, low commitment. Only got 20 minutes to play? This is the map where that's still worth it.
Drop to watch: Fish Spear. Check the market before you vendor a good roll — early warrior weapon demand can surprise you.
20–28: Sturges (Subway Transfer Area)
Better EXP than Bubblings, lower defense — but they fly. That changes everything depending on your class.
| Class | Feel |
|---|---|
| Warrior | Rough — short reach struggles vs flying mobs |
| Mage/Archer/Thief | Smooth — range/magic handles it fine |
If Sturges feel bad, don't force it. Go back to Bubblings, Ant Tunnel, or Wild Boars.
Bonus drops: potions, low-level ores — useful if potion money is tight.
Backup: Dangerous Steam (Sleepywood area) — mostly Sturges plus stray Horny/Zombie Mushrooms. More dangerous for low 20s, fine if funded or partied.
21–30: Kerning Party Quest
Available at level 21, 4-player instanced content. This is your escape valve when every public map is slammed.
- Multiple co-op stages, simple puzzles
- Ends in a King Slime fight
- Mystery box rewards — chance at scrolls, earrings, even the legendary Squishy Shoes
- Bonus room is tight and efficient for a 4-person group
Trade open-world chaos for guaranteed, steady progress.
23–30: Ant Tunnel 1 vs Ant Tunnel 4
Iconic mid-20s zone. Horny Mushrooms + Zombie Mushrooms, with Zombie Mushrooms occasionally dropping Claw Attack 60% and other useful scrolls.
| Map | Pro | Con |
|---|---|---|
| Ant Tunnel 1 | Easiest to find a party | Very crowded |
| Ant Tunnel 4 | Cleaner platform layout, fewer falls | Farther in, harder to fill solo |
Ant Tunnel 4 feels smoother than Ant Tunnel 1 once you've already got a group — less time climbing back up, more time attacking.
26–30: Cave of Evil Eye 2/3
Evil Eyes hit harder for better EXP, but watch out for Junior Boogies — their debuffs (accuracy/jump reduction) can tank your clear speed, especially for warriors already fighting accuracy issues.
Only train here if:
- You kill Evil Eyes fast
- Your accuracy is solid
- You're not eating constant debuffs
Missing too much? Fall back to Ant Tunnel or Wild Boars.
25–30+: Land of Wild Boar
Best all-around late map. Simple layout, dense spawns, splits well for 4–5 players, and remains viable past 30.
- Dark Axe Stumps drop Wooden Top throwing stars — sells well early
- ETC drops feed into crafting/professions
- Junior Boogies show up here too, same warning applies
Backup Map Cheat Sheet
| If This Is Full | Go Here |
|---|---|
| Slime Tree | The Tree That Grew, Southern Forest maps |
| Henesys Hunting Ground | Hill East of Henesys |
| Caution Falling Down | Northern Top of Construction Site |
| Forest of Wisdom | Southern Forest 2/3 |
| Line 1 Area 1 | Sturges, KPQ, Ant Tunnel |
| Ant Tunnel 1 | Ant Tunnel 4 |
| Cave of Evil Eye 2/3 | Wild Boars, Ant Tunnel |
| Land of Wild Boar | Ant Tunnel 4, Evil Eyes |
Route by Playstyle
| Playstyle | Route |
|---|---|
| Unfunded/New | Slime Tree → Forest of Wisdom → Bubblings → KPQ/Ant Tunnel |
| Warrior | Perion maps → Bubblings → Ant Tunnel → Wild Boars |
| Mage | Slime Tree → Caution Falling Down → Bubblings → Sturges → KPQ |
| Archer | Henesys maps → Forest of Wisdom → Bubblings → Sturges/Ant Tunnel |
| Thief | Kerning maps → Caution Falling Down → Bubblings → Sturges → Wild Boars |
| Party-focused | Forest of Wisdom → Bubblings → KPQ → Ant Tunnel/Wild Boars |
| Solo | Slime Tree → Southern Forest 2/3 → Bubblings → Ant Tunnel 4 |
FAQ
What's the best map from level 1–10?
Finish Maple Island quests first (hits level 7–8). Then Slime Tree, Henesys Hunting Ground, or Perion Street Corner.
What's the best map around level 15?
Line 1 Area 1 (Bubblings). Dense, party-friendly, stays useful into the 20s.
Is Kerning Party Quest worth it at 21?
Yes. Instanced, no map competition, decent rewards including a shot at Squishy Shoes.
Are Sturges good for warriors?
Not really — flying mobs punish short reach. Stick to Bubblings, Ant Tunnel, or Wild Boars instead.
Ant Tunnel 1 or Ant Tunnel 4?
Tunnel 1 for finding a party fast. Tunnel 4 if you already have one — smoother platforms, fewer falls.
Bottom Line
Maple Island quests → Slime Tree/Henesys/Perion → Caution Falling Down or Forest of Wisdom → Line 1 Bubblings → KPQ → Ant Tunnel/Evil Eyes/Wild Boars.
The famous map isn't always the best map — it's just the most crowded one. Keep a backup ready, prioritize density and easy movement over stronger monsters, and party whenever the map allows it. That's how you hit 30 without burning a week's worth of potions on nothing.

Most Popular Posts
- MapleStory Classic World CBT2: The No-BS Guide to 3rd Job, Orbis, and Class Reworks
- MapleStory Classic World Early Best Maps, PQ, and Party Spot): The No-BS 1-30 Leveling Guide
- MapleStory Classic Early Leveling Guide: Best Maps, Fastest Route, Real Player Tips
- MapleStory Classic World Release Date Guide: Launch Date, Founder Access
- MapleStory Classic World Priest Guide: Skills, Nerfs and Holy Arrow build
- MapleStory Classic Jump Quest Guide, Rankings, and Survival Tips
Popular Category Lists
- ARC Raiders / (354)
- Grow a Garden / (294)
- CoD: Black Ops 7 / (167)
- Star Citizen / (163)
- MLB 26 / (159)
- Monopoly Go / (153)
- ARK Survival Ascended / (128)
- Steal a Brainrot / (99)
- Blox Fruits / (74)
- Adopt Me / (74)
- Forza Horizon 6 / (72)
- Sailor Piece / (68)
- Grow a Garden 2 / (68)
- Diablo IV / (62)
- CoD: BLACK OPS 6 / (55)
- Aion 2 / (52)
- Path of Exile 2 / (48)
- Monster Hunter Wilds / (46)
- Windrose / (44)
- Maplestory Classic / (42)