0
0Star Citizen 4.8.1 Armored Cargo Haul Guide: aUEC Master Rank Kovac Run
- RCHM
- Share
- Star Citizen
- 06/15/26
- 332
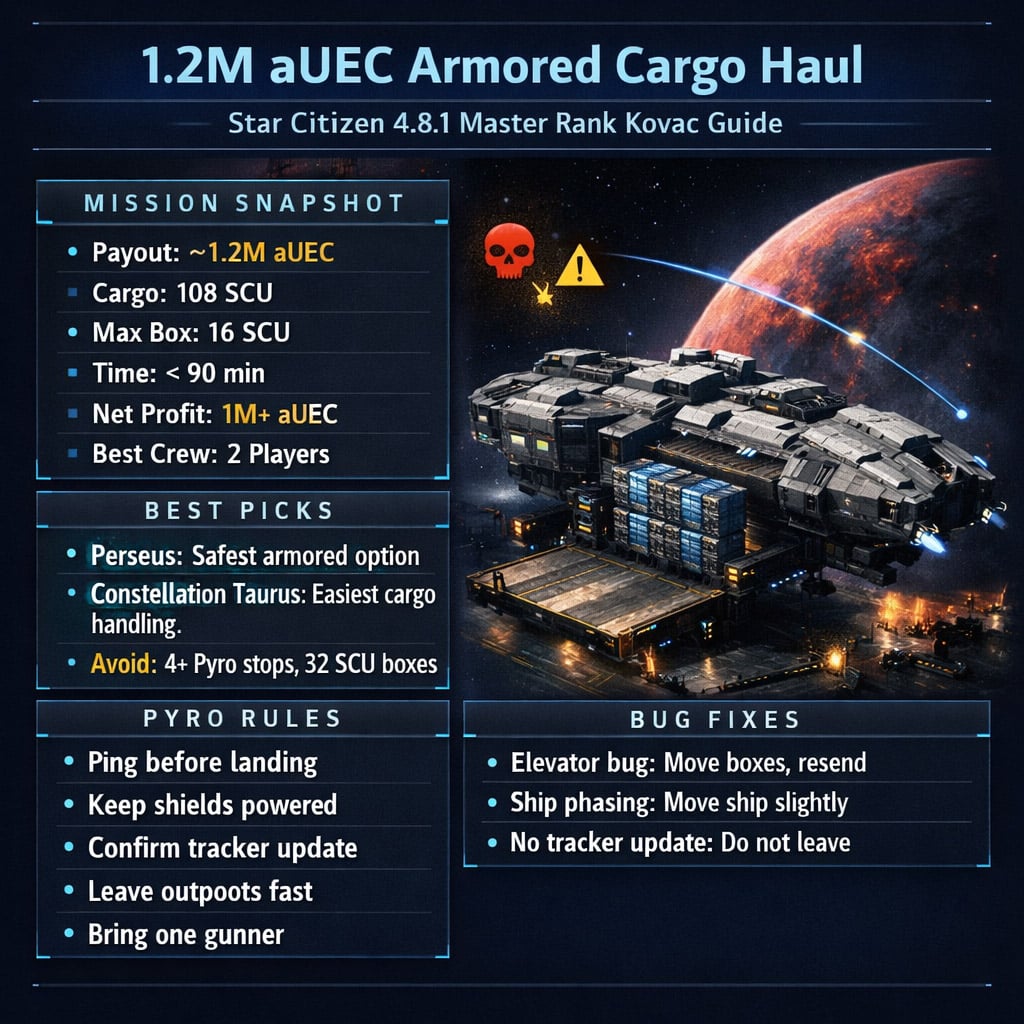
Master Rank Kovac cargo haul can pay close to 1.2M aUEC for only 108 SCU of cargo. That is excellent money—if you survive Pyro, avoid bad routes, and know how to work around freight elevator bugs.
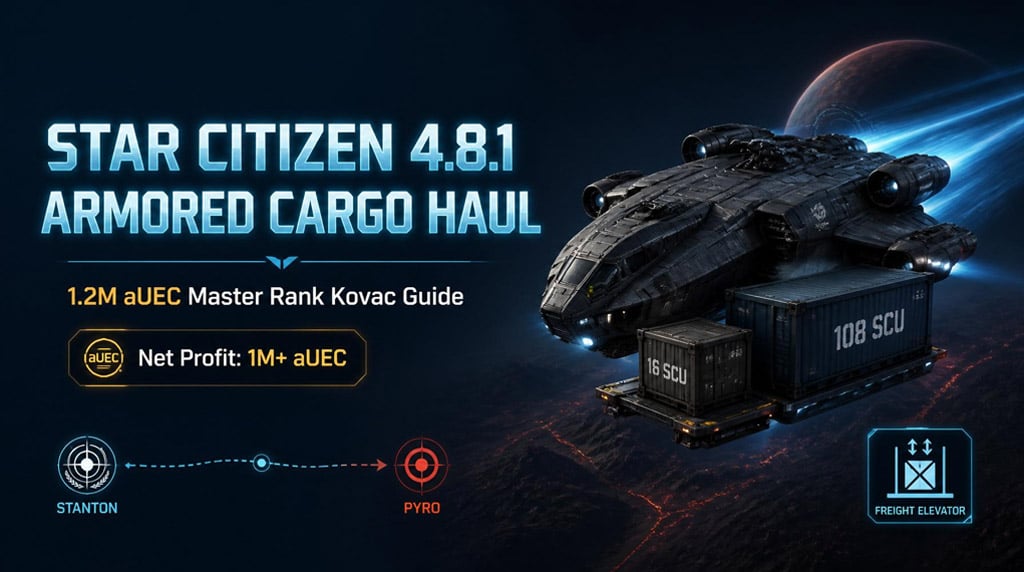
This run took just under 90 minutes and cleared over 1M aUEC net profit after fuel and restock costs. The mission was not hard because of the cargo. It was hard because of Pyro risk, NPC attacks, ship access bugs, and delivery elevators.
- Star Citizen 4.8.1 Master Rank Cargo Haul Overview
- Pick the Right Kovac Mission: Reroll Bad Routes
- Best Ship for Armored Cargo Hauling in Pyro
- Recommended Ship Criteria
- Ship Options
- Cargo Loading: Keep It Fast and Safe
- Loading Rules
- Pre-Flight Checklist Before Entering Pyro
- Route Execution: Stanton to Pyro
- Delivery Tactics for Pyro Outposts
- Stop 1: Shepherd's Rest
- Stop 2: Bueno Ravine
- Stop 3: Chawla Beach
- Final Stop: Canard View
- Freight Elevator and Ship Bug Fixes
- Freight Elevator Not Counting Cargo
- Phasing Through Ship
- Profit Breakdown: Is 1M+ aUEC Cargo Hauling Worth It?
- Best Crew Setup for Armored Cargo Hauling
- Quick Rules for 1M+ Kovac Hauling
- FAQ
- What is the best ship for a 1M+ aUEC armored cargo haul?
- Can this Master Rank Kovac cargo mission be done solo?
- How much profit does this cargo haul make?
- Should you reroll Kovac hauling missions?
- What should you do if the freight elevator bugs out?
- Summary
↖ Star Citizen 4.8.1 Master Rank Cargo Haul Overview
| Item | Run Data |
|---|---|
| Mission Type | Master Rank Kovac hauling |
| Patch | Star Citizen 4.8.1 |
| Gross Payout | ~1.2M aUEC |
| Cargo Volume | 108 SCU |
| Pickup | Everus Harbor |
| Delivery Area | Pyro |
| Largest Box | 16 SCU |
| Completion Time | <90 minutes |
| Best Crew Size | 2 players |
The key number is 108 SCU. For a million-plus payout, that is light.
The second key number is 16 SCU. A 16 SCU box is still manageable with common tractor tools. If the mission gives you 32 SCU boxes, loading becomes slower and more annoying.
↖ Pick the Right Kovac Mission: Reroll Bad Routes
Do not blindly accept the first 1M+ contract.
Some Kovac hauling missions send you to four Pyro planets. That is bad value. More stops means more danger, more bugs, and more time parked at exposed outposts.
If you can abandon without reputation loss in your current patch state, reroll until the route improves.
| Route Type | Verdict |
|---|---|
| 2 Pyro planets | Best |
| 3 Pyro planets | Acceptable |
| 4+ Pyro planets | Reroll |
| 32 SCU boxes | Avoid unless prepared |
| 16 SCU max boxes | Good run candidate |
Rule: take the payout only when the route is clean. A bad route can turn a 90-minute job into a two-hour headache.
↖ Best Ship for Armored Cargo Hauling in Pyro
For this mission, cargo capacity alone is not enough. You need a ship that can survive.
Pyro is lawless. You may face players, NPC ships, ground campers, or all three while your cargo ramp is open.
↖ Recommended Ship Criteria
| Requirement | Why It Matters |
|---|---|
| 108+ SCU usable space | One-trip completion |
| Strong shields / hull | Survive Pyro pressure |
| Good quantum range | Fewer refuel stops |
| Turrets or strong weapons | Defend while unloading |
| Easy cargo access | Faster delivery |
↖ Ship Options
| Ship | Cargo Fit | Pyro Safety | Verdict |
|---|---|---|---|
| Perseus | Enough with loose cargo | High | Best armored pick |
| Constellation Taurus | Excellent | Medium | Best practical hauler |
| Mercury Star Runner | Good | Medium | Fast, but softer |
| Freelancer MAX | Good | Low | Works, but risky |
| Hercules A2 | Excellent | High | Strong but bulky |
| Caterpillar | Excellent | Medium | Too slow for this run |
| Zeus CL | Good | Low-Medium | Fragile in Pyro |
| Polaris | Overkill | Very High | Too large |
We used the Perseus.
Officially, it has 96 SCU of cargo grid, but it can hold 108 SCU with careful loose placement. Not elegant. Very effective.
Why it worked:
- Strong defensive profile
- Turret support
- Enough usable space
- Fast enough for its size
- Less fragile than normal haulers
If you want smoother cargo handling, use a Constellation Taurus. If you want better survival, use the Perseus.
↖ Cargo Loading: Keep It Fast and Safe
At Everus Harbor, load by box size and destination.
Do not make a cargo sculpture. Keep lanes clear. Pyro will punish slow unloading.
↖ Loading Rules
| Cargo Rule | Reason |
|---|---|
| Snap large boxes first | Reduces shifting and desync |
| Keep small boxes accessible | Faster final sorting |
| Group by destination | Less searching at outposts |
| Avoid blocking doors | Prevents soft-locks |
| Keep loose cargo stable | Loose boxes can bug or vanish |
Most cargo should be snapped to the grid. Loose cargo is acceptable only if it is stable and reachable.
In this run, small boxes fit in side spaces and interior areas. The main grid carried the larger boxes.
↖ Pre-Flight Checklist Before Entering Pyro
Do this before leaving Everus Harbor.
| Check | Target |
|---|---|
| Cargo count | 108 SCU confirmed |
| Largest box | 16 SCU max |
| Weapons | Restock if worth it |
| Quantum fuel | Enough for Pyro route |
| Crew | One gunner recommended |
| Route | Nearest stop first |
| Power | Shields and weapons ready |
We paid about 35K aUEC to restock torpedoes. They were not used, but the cost was acceptable on a 1.2M aUEC run.
Do not cheap out on survival prep. You only get paid after delivery.
↖ Route Execution: Stanton to Pyro
The first leg was Everus Harbor to Pyro Gateway, then into Pyro.
| Leg | Time / Note |
|---|---|
| Everus Harbor to Pyro Gateway | ~2.5 minutes |
| Gateway transition | Wait 15–20 seconds before jumping |
| Pyro entry | Confirm route before moving |
| Pyro planet jump | ~4+ minutes depending on stop |
At the gateway, wait briefly before committing the jump. Rushing the process can cause routing weirdness.
Once inside Pyro, run the route by distance. Closest stop first unless the mission layout forces otherwise.
↖ Delivery Tactics for Pyro Outposts
Every Pyro stop follows the same pattern:
1. Ping before landing
2. Identify ships
3. Land close to the freight elevator
4. Keep shields and weapons powered
5. Unload only the required cargo
6. Confirm mission progress
7. Leave immediately
Do not sightsee. Do not reorganize outside longer than needed. Do not trust a quiet outpost.
↖ Stop 1: Shepherd's Rest
Cargo delivered: Agriculture supplies
A nearby ship was present but not a major threat. The delivery counted cleanly.
Key move: after delivery, we snapped loose boxes more safely before moving on.
↖ Stop 2: Bueno Ravine
Cargo delivered:
| Commodity | Amount |
|---|---|
| Fresh food | 6 SCU |
| Scrap | 16 SCU |
NPC ships showed up during this stop. The gunner handled them while cargo work continued.
This is exactly why a second player matters. One player unloads. One player keeps the ship alive.
↖ Stop 3: Chawla Beach
Cargo delivered: Fresh food
This stop had the real problem: bugs.
- Freight elevator acted up
- Cargo grid did not behave cleanly
- Ship access bug caused phasing through the ship
The fix was simple but only possible because we had a second player: move the cargo from another position, then move the ship slightly to restore access.
↖ Final Stop: Canard View
Remaining cargo delivered successfully.
More elevator issues appeared, so we sent boxes carefully and watched the tracker after every delivery.
The mission completed and paid out close to 1.2M aUEC.
↖ Freight Elevator and Ship Bug Fixes
These bugs are common enough that they should be part of your plan.
↖ Freight Elevator Not Counting Cargo
| Problem | Fix |
|---|---|
| Box does not count | Move it off and back on |
| Elevator returns upward | Wait, then resend |
| Cargo grid missing | Try sending unsnapped |
| Mission tracker not updated | Do not leave |
| Platform stuck | Re-trigger elevator interaction |
Always watch the mission tracker. If it does not update, the delivery is not done.
↖ Phasing Through Ship
If you cannot enter your ship:
1. Stop forcing the entry point
2. Use another ramp or door
3. Have your teammate move the ship slightly
4. Try again after repositioning
5. Avoid backspacing until the mission is complete
In our run, moving the ship fixed access. Without a teammate, the mission likely would have failed.
↖ Profit Breakdown: Is 1M+ aUEC Cargo Hauling Worth It?
Yes, if the route is good.
| Item | Approx. Value |
|---|---|
| Gross payout | ~1.2M aUEC |
| Torpedo restock | ~35K aUEC |
| Quantum fuel | ~5.8K aUEC |
| Optional hydrogen fuel | ~10K aUEC |
| Net profit | ~1.14M–1.16M aUEC |
| Time | <90 minutes |
| Profit rate | ~760K–800K aUEC/hour |
This is strong for cargo hauling because the load is only 108 SCU.
The risk is not the cargo volume. The risk is losing time or the whole run to Pyro chaos.
↖ Best Crew Setup for Armored Cargo Hauling
Bring two players.
Not three. Not four. Two.
| Role | Job |
|---|---|
| Pilot / Cargo Lead | Route, landing, cargo tracking |
| Gunner / Support | Defense, bug recovery, extra tractor work |
More players split profit too much. Solo keeps more money but adds too much failure risk.
For Master Rank Pyro hauling, one gunner is the sweet spot.
↖ Quick Rules for 1M+ Kovac Hauling
Use this as the short version.
| If You See… | Do This |
|---|---|
| 4+ Pyro stops | Reroll |
| 32 SCU boxes | Skip or bring proper gear |
| 16 SCU max | Good candidate |
| Unknown ship nearby | Ping, identify, stay ready |
| Elevator bug | Reposition cargo |
| Tracker not updated | Do not leave |
| Ship access bug | Move ship slightly |
| Solo run | Expect higher failure risk |
↖ FAQ
↖ What is the best ship for a 1M+ aUEC armored cargo haul?
The Perseus is excellent if you value survival. It can fit this 108 SCU run with careful loose cargo placement. The Constellation Taurus is better for clean cargo handling and easier loading.
↖ Can this Master Rank Kovac cargo mission be done solo?
Yes, but it is risky. In our run, a second player saved the mission when ship access broke. Solo hauling gives better profit on paper, but bugs can end the run.
↖ How much profit does this cargo haul make?
The gross payout was about 1.2M aUEC. After torpedo restock and fuel, net profit was around 1.14M–1.16M aUEC in under 90 minutes.
↖ Should you reroll Kovac hauling missions?
Yes. Reroll routes with 4+ Pyro stops or bad cargo sizes. A clean 2–3 planet route is faster, safer, and usually better profit per hour.
↖ What should you do if the freight elevator bugs out?
Move the cargo off the platform, place it back, and resend the elevator. If the grid does not work, try sending boxes unsnapped. Never leave until the mission tracker updates.
↖ Summary
This Star Citizen 4.8.1 Master Rank Kovac armored cargo haul is worth doing when the route is clean.
The winning setup:
- 108 SCU cargo
- 16 SCU max box size
- Perseus or Constellation Taurus
- One gunner
- Reroll bad Pyro routes
- Confirm every delivery
- Leave each outpost fast
The run paid close to 1.2M aUEC, took under 90 minutes, and cleared over 1M aUEC net profit.
Treat it like a combat logistics job, not a peaceful delivery. In Pyro, the cargo is only half the mission. The other half is getting out alive.

Most Popular Posts
- Star Citizen Covalex Cargo Hauling 4.8: Fast Reputation Route, Best Ships, and Master Unlocks
- Star Citizen 4.8 Solo Ship Guide: Best Purchasable PvP & PvE Ships, Loadouts, Components
- Star Citizen 4.8.3 XenoThreat Event Guide: Fast Points, Best Missions, Rewards, and Ship Strategy
- Star Citizen 4.8 Best Component Blueprints: Fast Farming Roadmap for Crafting
- Star Citizen 4.8 aUEC Farming Guide: Best Money Methods, First Ships, and Fast Progression
- Star Citizen 4.8 aUEC Guide: 3M+ Money per Hour with Salvage Cargo Runs
Popular Category Lists
- Grow a Garden / (286)
- ARC Raiders / (285)
- CoD: Black Ops 7 / (166)
- MLB 26 / (149)
- Monopoly Go / (148)
- Star Citizen / (128)
- Steal a Brainrot / (90)
- ARK Survival Ascended / (85)
- Sailor Piece / (68)
- Forza Horizon 6 / (66)
- Diablo IV / (62)
- Blox Fruits / (62)
- Adopt Me / (57)
- Grow a Garden 2 / (56)
- CoD: BLACK OPS 6 / (55)
- Path of Exile 2 / (48)
- Monster Hunter Wilds / (46)
- Windrose / (44)
- Path of Exile / (40)
- Bee Swarm Simulator / (37)