0
0Star Citizen Covalex Cargo Hauling 4.8: Fast Reputation Route, Best Ships, and Master Unlocks
- KETE
- Share
- Star Citizen
- 05/09/26
- 27182
Covalex rep is a hauling grind. The mistake is running contracts one by one. The faster route is stacking same-route missions, using enough cargo space, sorting boxes properly, and abusing short travel loops.
If you want Master Covalex for interstellar hauling and military quantum drive blueprint access, this is the route I would run.

- Covalex Reputation Route in Star Citizen 4.8
- Best Ships for Covalex Hauling in 4.8
- Best Starting Ship
- Trainee to Rookie: Do the Intro Contract
- Rookie to Junior: Stack Baijini to Riker
- Rookie Stack
- Execution
- Partial Submission: When Missing Cargo Is Not Worth the Trip
- Junior to Member: Add Medium Contracts
- Recommended Ships Here
- Member to Experienced: Move to Everus Harbor
- Why Everus Harbor Works
- 4.8 Mission Cap
- Cargo Sorting Method for 10-Mission Stacks
- Clean Method
- Distribution Center Delivery Order
- Experienced to Senior: Use Hull C Only If It Works
- Why C2 + ATLS Is the Safe Setup
- Senior to Master: Fastest Covalex Reputation Method
- Method A: Full Senior Routes
- Method B: Partial-Submit Stacking
- Execution
- Why It Works
- Master Covalex Rewards
- Best Tools for Faster Cargo Hauling
- Fast Covalex Leveling Checklist
- Rules That Save Time
- FAQ
- What is the fastest way to level Covalex reputation in 4.8?
- What is the best ship for Covalex cargo hauling?
- Is the Hull C worth using in 4.8?
- How does partial submission work in cargo hauling?
- Why grind Covalex to Master?
- Summary
↖ Covalex Reputation Route in Star Citizen 4.8
| Rank Step | Best Method | Target Route / Hub | Ship Needed |
|---|---|---|---|
| Trainee → Rookie | Complete intro Covalex contract | First Covalex hauling job | Any cargo ship |
| Rookie → Junior | Stack small contracts | Baijini Point → Riker Memorial | 70+ SCU |
| Junior → Member | Add Junior medium contracts | Baijini → Riker | 200+ SCU preferred |
| Member → Experienced | Stack distribution contracts | Everus Harbor hub | Caterpillar / Hull B / C2 |
| Experienced → Senior | Station-to-station hauling | Use C2 if Hull C bugs | Large hauler |
| Senior → Master | Lagrange partial-submit stacking | L-points → main stations | C2 strongly recommended |
| Master | Run interstellar hauling | Blueprint progression | Heavy hauler |
The grind gets harder because cargo volume and route complexity increase. Your real enemy is not distance. It is bad cargo sorting.
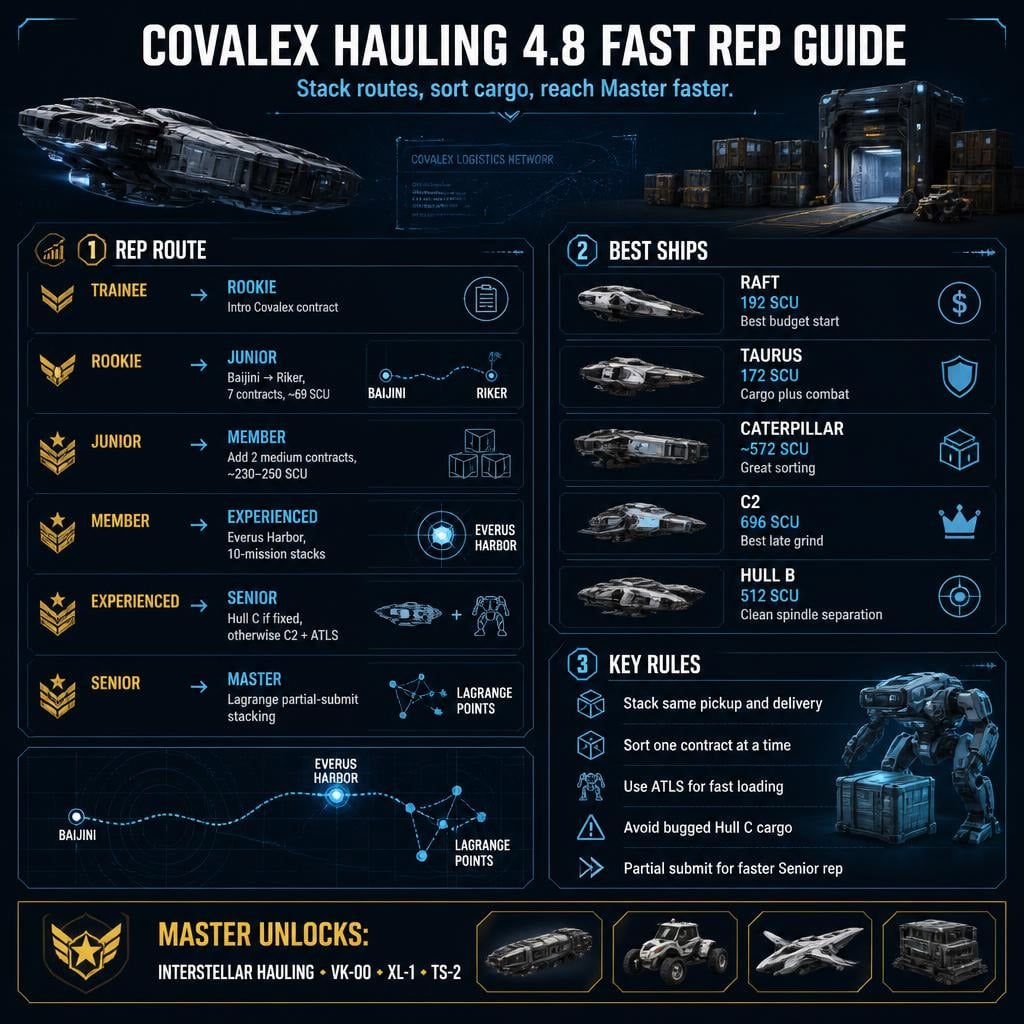
↖ Best Ships for Covalex Hauling in 4.8
Start bigger than you think. Small ships work, but they waste time.
| Ship | Cargo | Availability | Use Case | Verdict |
|---|---|---|---|---|
| MISC Hull A | 64 SCU | Rent / buy | Entry hauling | Works, slow |
| Drake Golem Ox | 64 SCU | Pledge-only | Early hauling | Good if owned |
| Argo RAFT | 192 SCU | Rent Lorville, buy ~3M aUEC | First serious grind | Best budget start |
| Constellation Taurus | 172 SCU | Rent New Babbage, buy ~8M aUEC | Cargo + combat | Best flexible pick |
| Anvil Asgard | 180 SCU | Buy Area18, ~18M aUEC | Armed hauling | Strong but pricey |
| RSI Hermes | 288 SCU | Pledge-only | Early/mid grind | Excellent if owned |
| MISC Hull B | 512 SCU | Pledge-only | Mid/late stacking | Great cargo separation |
| Drake Caterpillar | ~572 SCU | In-game buy | Member-rank stacks | Very reliable |
| Hercules C2 | 696 SCU grid | In-game buy | Late-rank grind | Best practical hauler |
| Drake Ironclad | Large cargo | 4.8 option | Heavy hauling | Strong future pick |
↖ Best Starting Ship
Use the Argo RAFT if credits are tight.
It has 192 SCU, rents for about 70k aUEC/day, and handles cargo cleanly.
Use the Constellation Taurus if you want a ship that can haul and still fight. It carries less than the RAFT, but it is tougher and more useful outside hauling.
Use the C2 as soon as late-rank hauling starts. It saves hours.
↖ Trainee to Rookie: Do the Intro Contract
Open Contract Manager → Hauling.
Find the first Covalex contract.
Complete it.
That should move you from Trainee to Rookie. No special route needed yet.
↖ Rookie to Junior: Stack Baijini to Riker
The first efficient route is:
Baijini Point → Riker Memorial Spaceport, Area18
This route is fast because Area18 has a low atmosphere exit requirement. Less climb. More contracts done.
↖ Rookie Stack
| Contract Type | Route | Stack Count | Total Cargo |
|---|---|---|---|
| Direct Extra Small Cargo Haul | Baijini → Riker | 6 | Small loads |
| Direct Small Cargo Haul | Baijini → Riker | 1 | Larger small load |
| Total | Same pickup / same drop-off | 7 contracts | ~69 SCU |
You only need about 4 rookie contracts to hit Junior, but take all 7. Same route. Same delivery. Easy rep.
↖ Execution
1. Accept all 7 contracts.
2. Pull cargo at Baijini.
3. Load everything.
4. Fly to Riker Memorial.
5. Store cargo through freight manager.
6. Submit contracts.
If one box disappears, do not lose your mind. Use partial submission.
↖ Partial Submission: When Missing Cargo Is Not Worth the Trip
Cargo hauling lets you submit incomplete contracts. You get reduced rewards.
| Delivered Cargo | Result |
|---|---|
| 0–24% | No useful reward |
| 25–49% | ~25% reward / rep |
| 50–74% | ~50% reward / rep |
| 75–99% | ~75% reward / rep |
| 100% | Full reward / rep |
If you are missing one 1 SCU box, submit and move on.
Reputation per hour matters more than chasing a bugged crate across Stanton.
↖ Junior to Member: Add Medium Contracts
Stay on:
Baijini Point → Riker Memorial
Now add Junior-rank medium hauling contracts.
| Contract Group | Count | Cargo Notes |
|---|---|---|
| Rookie Baijini → Riker | 7 | ~69 SCU total |
| Junior Direct Medium | 2 | Usually 81–86 SCU each |
| Total Stack | 9 missions | ~230–250 SCU |
If you only run rookie contracts, expect around 20 missions.
If you only run junior contracts, expect around 10 missions.
Best method: combine both. Two full stacked runs usually push you to Member.
↖ Recommended Ships Here
- Argo RAFT
- Constellation Taurus
- RSI Hermes
- Hull B
- Caterpillar
- C2
If your ship cannot hold the full stack, take fewer contracts. A clean smaller run beats a full cargo bay you cannot sort.
↖ Member to Experienced: Move to Everus Harbor
At Member rank, move your hauling base to:
Everus Harbor
This becomes the main hub for distribution routes and later rank progression.
↖ Why Everus Harbor Works
- Close to Hurston activity.
- Good reset point after Lorville drops.
- Useful for Member, Experienced, and Senior routes.
- Better for large-hauler loops.
↖ 4.8 Mission Cap
Patch 4.8 caps you at 10 accepted missions.
Older 20-contract stacking methods are dead for now. Plan around 10-mission batches.
| Goal | Method |
|---|---|
| Reach Experienced | Complete about 24 Member missions |
| Stack size | 10 contracts max |
| Best ships | Hull B, Caterpillar, C2 |
| Main risk | Mixing cargo destinations |
| Avoid if possible | Awkward Covalex center routes on Hurston / MicroTech |
↖ Cargo Sorting Method for 10-Mission Stacks
This is where bad haulers lose time.
Do not pull all cargo at once.
↖ Clean Method
1. Accept one contract.
2. Pull that cargo.
3. Load it into one ship section.
4. Label or write down the destination.
5. Accept the next contract.
6. Repeat.
Use whatever works:
- Spreadsheet
- Notepad
- Sticky notes
- Caterpillar modules
- Hull B spindles
- C2 floor sections
The rule is simple: one mission, one section.
| Ship | Sorting Advantage |
|---|---|
| Hull B | Separate spindles |
| Caterpillar | Separate cargo modules |
| C2 | Huge open bay |
| RAFT | Easy external loading, but limited late |
If you are asking where does this box go? you already loaded wrong.
↖ Distribution Center Delivery Order
Hit distribution centers first.
Save Lorville for last when possible.
| Stop | Priority | Reason |
|---|---|---|
| Distribution centers | First | Slowest and most awkward |
| Planetary facilities | Middle | Route-dependent |
| Lorville | Last | Fast return to Everus Harbor |
If you fly a large ship, request a hangar at the distribution center when available. It is cleaner than fighting terrain and exterior unload points.
↖ Experienced to Senior: Use Hull C Only If It Works
Experienced rank unlocks bigger hauling contracts, including Hull C-style jobs.
The problem: Hull C can bug out.
Known issue: cargo stacks incorrectly on one spindle, such as 1200 SCU appearing as one block, then refusing to unload.
| Hull C Behavior | Action |
|---|---|
| Loads and unloads normally | Use it |
| Cargo stacks on one spindle | Stop using it |
| Destination refuses cargo | Switch to C2 |
| Contracts fail due to bugs | Run smaller reliable stacks |
If Hull C works, it is the fastest option.
If not, use:
- Hercules C2
- ATLS
- Station-to-station contracts
You need about 26 Experienced missions to reach Senior.
↖ Why C2 + ATLS Is the Safe Setup
The C2 is fast for its size, easy to land, and has a huge bay.
The ATLS cuts loading time hard.
This setup is boring. That is why it works.
↖ Senior to Master: Fastest Covalex Reputation Method
Senior rank is the wall.
You need around 40 Senior missions to hit Master.
There are two ways through.
↖ Method A: Full Senior Routes
Use full Senior contracts from Everus Harbor to Hurston Lagrange points:
- HUR-L1
- HUR-L2
- HUR-L3
- HUR-L4
- HUR-L5
| Pros | Cons |
|---|---|
| Full payout | Slower |
| Full reputation per contract | More stops |
| Cleaner gameplay | More loading |
| Less exploit-like | Lower rep/hour |
Use this if you care about money and normal mission completion.
↖ Method B: Partial-Submit Stacking
This is the faster reputation method.
Look for Senior contracts that pick up at Lagrange points and deliver to main stations:
- Seraphim Station
- Port Tressler
- Everus Harbor
- Baijini Point
Pick one shared delivery station. Stack contracts that feed it.
↖ Execution
1. Accept several Senior contracts.
2. Choose one delivery station, like Everus Harbor.
3. Visit the listed Lagrange points.
4. Only collect cargo for that one station.
5. Deliver it.
6. Submit the partial contracts.
↖ Why It Works
| Approach | Result |
|---|---|
| 1 full Senior mission | Full payout, slower |
| 7 partial Senior missions | Lower payout, faster rep/hour |
| Shared delivery station | Less wasted travel |
| Ignore unrelated cargo | Faster cycle time |
This can push Senior → Master in about 6 hours under hard-grind conditions.
It is not the best money method. It is the best reputation method.
↖ Master Covalex Rewards
Master rank unlocks interstellar Covalex hauling.
That matters because Covalex Master is tied to blueprint progression for key military quantum drives.
| Unlock | Why It Matters |
|---|---|
| Interstellar hauling missions | Larger hauling progression |
| Military quantum drive blueprints | Crafting value |
| VK-00 | High-interest military drive |
| XL-1 | Popular fast quantum drive |
| TS-2 | Valuable blueprint target |
This is the real reason to grind Covalex. The credits are secondary.
↖ Best Tools for Faster Cargo Hauling
| Tool | Use | Why It Matters |
|---|---|---|
| ATLS | Fast cargo movement | Saves time every run |
| MaxLift | Manual box control | Better in tight spots |
| Spreadsheet | Contract tracking | Prevents cargo mix-ups |
| Sticky notes | Quick labels | Good for modules/spindles |
| External freight elevators | Large loading | Cleaner for big haulers |
If you use a C2 or Caterpillar, bring an ATLS.
If ATLS visibility gets bad, switch to MaxLift for precision.
↖ Fast Covalex Leveling Checklist
| Stage | Action |
|---|---|
| Trainee | Complete intro Covalex contract |
| Rookie | Stack 7 Baijini → Riker missions |
| Junior | Add 2 Junior medium Baijini → Riker missions |
| Member | Move to Everus, stack 10 distribution missions |
| Experienced | Use Hull C if fixed, otherwise C2 + ATLS |
| Senior | Use Lagrange partial-submit stacking |
| Master | Start interstellar Covalex hauling |
↖ Rules That Save Time
- Stack same pickup and same delivery.
- Use Area18 routes early.
- Sort cargo one contract at a time.
- Avoid broken Hull C cargo behavior.
- Use partial submission when it improves rep/hour.
- Upgrade to C2 before Senior if possible.
↖ FAQ
↖ What is the fastest way to level Covalex reputation in 4.8?
Stack contracts with the same pickup and delivery. Start with Baijini Point → Riker Memorial, move to Everus Harbor for Member routes, then use Lagrange partial-submit stacking at Senior rank.
↖ What is the best ship for Covalex cargo hauling?
For early grinding, use the Argo RAFT or Constellation Taurus. For serious grinding, use the Caterpillar, Hull B, or Hercules C2. For late ranks, C2 + ATLS is the safest setup.
↖ Is the Hull C worth using in 4.8?
Only if it loads and unloads correctly. If cargo stacks onto one spindle or refuses to unload, stop using it. Switch to the C2 and run reliable station-to-station contracts.
↖ How does partial submission work in cargo hauling?
You can submit incomplete hauling contracts. Deliver 25%, 50%, or 75%+ of the cargo to receive reduced reward and reputation. At Senior rank, stacking several partial submissions can beat full routes for rep/hour.
↖ Why grind Covalex to Master?
Master Covalex unlocks interstellar hauling missions and blueprint progression for military quantum drives, including VK-00, XL-1, and TS-2.
↖ Summary
Covalex hauling in Star Citizen 4.8 is about efficiency, not hero flying.
The best route is:
- Trainee → Rookie: finish the intro job.
- Rookie → Junior: stack Baijini → Riker contracts.
- Junior → Member: add medium contracts on the same route.
- Member → Experienced: use Everus Harbor and 10-mission stacks.
- Experienced → Senior: use Hull C only if fixed, otherwise C2 + ATLS.
- Senior → Master: stack Lagrange deliveries and submit efficient partials.
Bring enough cargo space. Track every contract. Sort before you fly.
That is how you turn Covalex from a painful grind into a controlled reputation farm.

Most Popular Posts
- Star Citizen Covalex Cargo Hauling 4.8: Fast Reputation Route, Best Ships, and Master Unlocks
- Star Citizen 4.8 Solo Ship Guide: Best Purchasable PvP & PvE Ships, Loadouts, Components
- Star Citizen 4.8 Salvage Guide: Best RMC Farming, Adagio Rep, and Ships to Use
- Star Citizen 4.8 Best Component Blueprints: Fast Farming Roadmap for Crafting
- Star Citizen 4.8.3 XenoThreat Event Guide: Fast Points, Best Missions, Rewards, and Ship Strategy
- Star Citizen 4.8 aUEC Farming Guide: Best Money Methods, First Ships, and Fast Progression
Popular Category Lists
- Grow a Garden / (286)
- ARC Raiders / (263)
- CoD: Black Ops 7 / (166)
- Monopoly Go / (146)
- MLB 26 / (145)
- Star Citizen / (113)
- Steal a Brainrot / (89)
- ARK Survival Ascended / (70)
- Sailor Piece / (68)
- Forza Horizon 6 / (61)
- Diablo IV / (61)
- Blox Fruits / (60)
- CoD: BLACK OPS 6 / (55)
- Adopt Me / (53)
- Path of Exile 2 / (48)
- Monster Hunter Wilds / (46)
- Windrose / (44)
- Path of Exile / (40)
- Grow a Garden 2 / (40)
- Bee Swarm Simulator / (36)