


 0
0Windrose Combat Guide: Guard, Weapon Scaling, Stats, and Boarding Tips
Windrose combat looks familiar at first: swing, block, dodge, upgrade gear, repeat. But after a few hours, many of us hit the same wall. A higher-rarity weapon feels worse than an old one. Damage stats do not seem to help much. Enemies suddenly hit way harder than expected.
The reason is simple: Windrose is not just about raw damage. Most fights are decided by guard control, stamina management, positioning, weapon level, and preparation.
- Windrose Combat Basics: Guard Comes First
- Stamina Management: Stop Swinging Until Empty
- Perfect Blocking Is the Skill That Changes Combat
- Weapon Level Matters More Than Rarity
- Damage Types: Use the Right Tool
- Stat Scaling: Why Damage Points Can Feel Weak
- Best Early Stats to Level
- Boarding Combat Tips
- Do Not Ignore Food Buffs
- Quick Fixes for Common Windrose Combat Mistakes
- FAQ
- Why does my rare or epic weapon feel weaker than a common weapon?
- Should I level damage stats first?
- What is the best way to break enemy guard?
- Can I block red attacks?
- What should I do if I keep dying during boarding?
- Are food buffs really worth using?
- Summary
Once we stop treating it like a standard RPG and start reading the combat system properly, fights become much more predictable. This guide breaks down the mistakes that cause most early deaths and explains what to do instead.
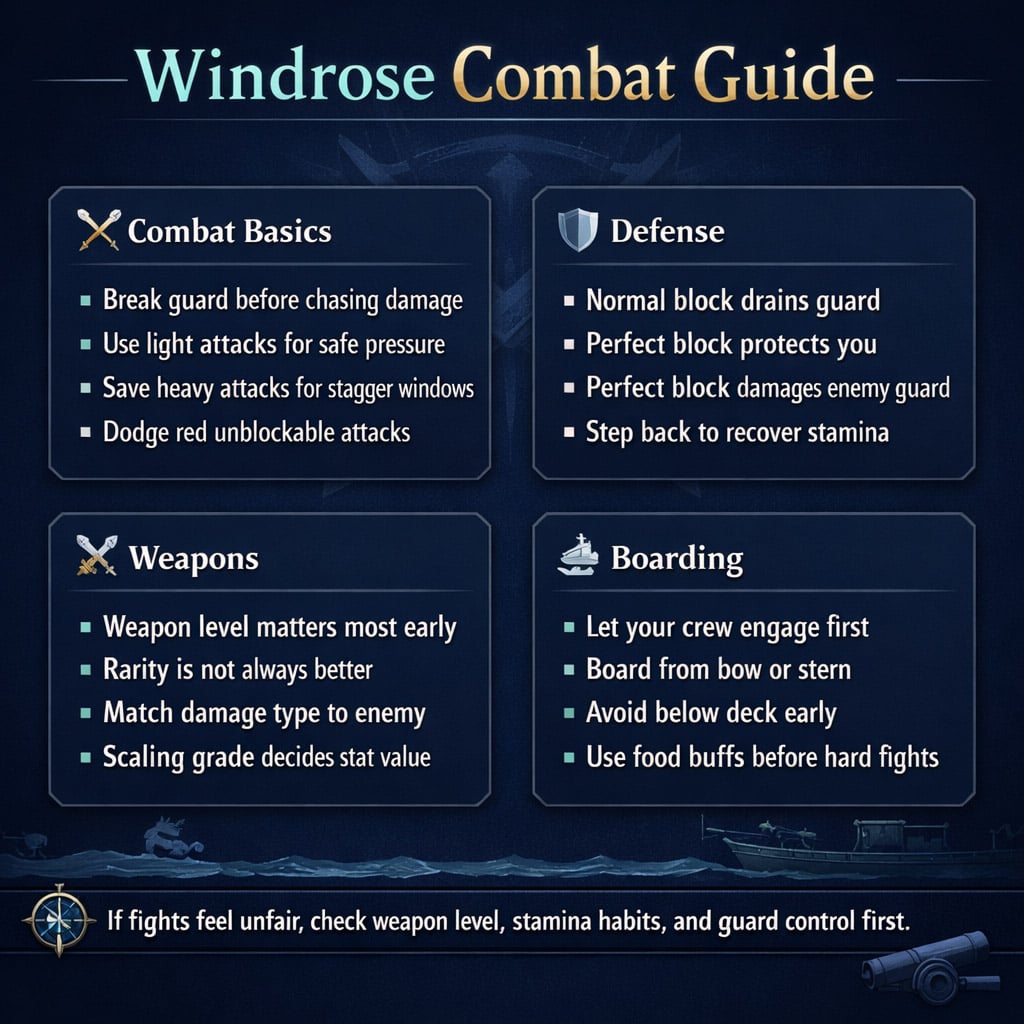
↖ Windrose Combat Basics: Guard Comes First
The biggest mistake many players make is focusing only on health bars. In Windrose, the real fight often starts with the guard meter.
Both you and your enemies have guard. When guard breaks, the character becomes staggered and vulnerable. That is your best damage window.
| Mechanic | What It Means | Practical Tip |
|---|---|---|
| Guard | Defensive meter before stagger | Protect yours, break theirs |
| Stagger | Target becomes vulnerable | Use heavy attacks here |
| Normal block | Blocks damage but drains guard | Do not hold block forever |
| Perfect block | Timed block that damages enemy guard | Core skill for harder fights |
| Red attack | Unblockable attack | Dodge or move away |
If you keep getting staggered and killed quickly, your guard is probably breaking before you realize it. Blocking helps, but blocking too much gets you punished.
↖ Stamina Management: Stop Swinging Until Empty
Stamina is your real combat budget. Every attack, dodge, and defensive mistake costs something.
A simple pattern works better than button mashing:
1. Use one or two light attacks.
2. Step back.
3. Let stamina recover.
4. Re-engage when the enemy commits.
Light attacks are reliable because they are fast and cheap. Heavy attacks hit harder, but they are risky unless the enemy is staggered, recovering, or clearly open.
| Action | Best Use | Common Mistake |
|---|---|---|
| Light attack | Safe pressure | Spamming nonstop |
| Heavy attack | Stagger punish | Using it as an opener every time |
| Dodge | Avoid red attacks | Panic dodging too much |
| Block | Emergency defense | Holding it until guard breaks |
| Step back | Reset spacing | Staying too close for too long |
If you often run out of stamina, the fix is not always more Endurance. Sometimes we just need to attack less greedily.
↖ Perfect Blocking Is the Skill That Changes Combat
Normal blocking is useful, but it slowly drains your guard. Perfect blocking is different.
If you block right as the enemy attack lands, you trigger a perfect block. This protects your guard and damages the enemy's guard, which leads to faster staggers.
This matters most against enemies with long combos. Instead of running away or eating the whole chain, you can perfect block several hits and turn their aggression into your advantage.
In my own early fights, the biggest improvement came from slowing down and learning enemy timing instead of trying to out-damage everything. Once perfect blocks started landing consistently, fights became shorter and much safer.
| Defense Option | When to Use It | Risk |
|---|---|---|
| Normal block | Small mistakes or weak hits | Medium |
| Perfect block | Predictable enemy attacks | Low once learned |
| Dodge | Red attacks and big swings | Medium |
| Run out of range | Slow heavy attacks | Low |
| Holding block | Only as a last resort | High |
If an attack flashes red, do not block it. Red attacks are unblockable. Dodge sideways or get out of range.
↖ Weapon Level Matters More Than Rarity
This is one of the most important things to understand in Windrose: a higher-rarity weapon is not automatically better.
Weapon power depends on several factors:
| Factor | Importance | Why It Matters |
|---|---|---|
| Weapon level | Very high | Affects damage against enemy level |
| Damage type | High | Some enemies resist certain types |
| Scaling grade | High | Decides how valuable stat points are |
| Rarity | Medium | Usually improves stats or perks |
| Perks | Situational | Strong only if they fit your build |
If your weapon is underleveled, your damage falls off quickly. Based on practical testing, being one weapon level behind can reduce your damage by roughly 12%. At two levels behind, the loss can approach 25%.
That also works against you defensively. Higher-level enemies can hit much harder, which is why a new zone can suddenly feel brutal.
| Level Difference | Approximate Effect | What It Feels Like |
|---|---|---|
| Equal level | Normal damage | Fair fight |
| 1 level under | About 12% less damage | Enemies feel tankier |
| 2 levels under | About 25% less damage | Fights drag badly |
| Enemy 1 level higher | About 12% more enemy damage | Mistakes hurt more |
| Enemy 2 levels higher | About 25% more enemy damage | Very punishing |
If your epic weapon feels weak, check its level before blaming the weapon.
↖ Damage Types: Use the Right Tool
Windrose weapons use different physical damage types. Matching the weapon to the enemy makes a noticeable difference.
| Damage Type | Best Against | Notes |
|---|---|---|
| Slash | Light or unarmored enemies | Good general use |
| Pierce | Armored enemies | Strong into tougher targets |
| Crude | Guard-heavy enemies | Good for breaking guard |
If armored enemies take forever to kill, try pierce. If an enemy's guard feels hard to break, crude damage may perform better.
This is where many players lose damage without realizing it. The weapon may not be bad. It may just be the wrong type for that fight.
↖ Stat Scaling: Why Damage Points Can Feel Weak
Every weapon has a scaling grade, usually from D to S. The better the grade, the more damage you gain from each stat point.
A weapon with poor scaling will not reward heavy stat investment very well. A weapon with A or S scaling can make those same points feel much stronger.
| Scaling Grade | Damage Gain Per Point | Should You Invest? |
|---|---|---|
| C | Low | Only if you love the weapon |
| B | Decent | Fine early-mid game |
| A | Strong | Good investment |
| S | Excellent | Best for focused builds |
Testing with pierce weapons showed a clear pattern: higher scaling grades gained more damage per stat point. Around 20 points, returns started to slow down, which suggests a soft cap.
That means dumping every point into damage early can be inefficient, especially if your weapon level is low or its scaling grade is weak.
↖ Best Early Stats to Level
Early on, survivability often gives better results than raw damage. More health and stamina make every fight easier to control.
| Stat | Early Value | Why It Helps |
|---|---|---|
| Vitality | Very high | More health, more room for mistakes |
| Endurance | Very high | More stamina for attacks and dodges |
| Mastery | Good | Crit chance stays useful |
| Damage stat | Situational | Best with good weapon scaling |
Vitality is especially safe because more health is always useful. Endurance is just as important if you keep going winded or cannot dodge when needed.
If you are dying before you can make use of your damage, then damage was not the problem. Survival was.
↖ Boarding Combat Tips
Boarding combat is land combat in a tighter, messier space. Bad positioning gets punished fast, especially below deck.
The biggest rule: do not rush in alone.
Let your crew engage first, then fight beside them. Your crew helps split enemy attention and gives you more room to breathe.
| Boarding Tip | Why It Works |
|---|---|
| Board from bow or stern | Keeps enemies in front of you |
| Let crew go first | Reduces early pressure |
| Avoid below deck early | Easy to get boxed in |
| Bring knockback weapons | Great in tight spaces |
| Use ranged attacks first | Weakens enemies before boarding |
| Upgrade crew gear | Crew survives longer |
Only board ships that are worth the risk. Ships with a gold chest icon usually give better silver rewards. If a ship has no valuable boarding reward, sinking it is often safer and faster.
If the fight gets messy, disengage. Jump back, heal, reload, and re-enter. Resetting is not cowardice; it is good seamanship.
↖ Do Not Ignore Food Buffs
Food is easy to overlook, but it can make difficult fights much smoother. Some meals give temporary bonuses to stats like Vitality or Endurance, and you can have two meals active at once.
| Food Buff Benefit | Why It Matters |
|---|---|
| More Vitality | Survive mistakes |
| More Endurance | More stamina flexibility |
| Higher rarity meals | Better bonuses |
| Two active meals | Stackable advantage |
Before a boss, new region, or valuable boarding attempt, eat first. It is one of the simplest ways to increase your odds without changing your build.
↖ Quick Fixes for Common Windrose Combat Mistakes
| Problem | Likely Cause | Fix |
|---|---|---|
| Epic weapon feels weak | Low weapon level or bad scaling | Compare level, type, and grade |
| Enemies feel too tanky | Weapon underleveled | Upgrade or swap weapons |
| You get staggered often | Guard is breaking | Perfect block more, block less |
| You run out of stamina | Overattacking | Use short combos and step back |
| Red attacks destroy you | Trying to block them | Dodge or move away |
| Boarding feels impossible | Bad entry or weak crew | Board from bow/stern, upgrade crew |
| Damage stats feel bad | Weak scaling or soft cap | Invest in Vitality/Endurance first |
This is the main loop: identify what is actually failing, then fix that specific part. Windrose becomes much less frustrating once we stop solving every problem with more damage.
↖ FAQ
↖ Why does my rare or epic weapon feel weaker than a common weapon?
Because rarity is not everything. Weapon level, damage type, and scaling grade can matter more. A common weapon at the right level can outperform an underleveled epic weapon.
↖ Should I level damage stats first?
Usually not early on. Vitality and Endurance often give better value because they help you survive longer and avoid stamina problems. Damage stats become better once you have a properly leveled weapon with good scaling.
↖ What is the best way to break enemy guard?
Use light attacks for pressure and perfect blocks when enemies attack. Perfect blocking is especially strong because it protects your guard while damaging theirs.
↖ Can I block red attacks?
No. Red flashing attacks are unblockable. Dodge sideways at the right moment or move out of range.
↖ What should I do if I keep dying during boarding?
Let your crew engage first, board from the bow or stern, avoid going below deck early, and bring a knockback weapon. If the fight turns bad, back out and reset.
↖ Are food buffs really worth using?
Yes. Food buffs can add useful health or stamina bonuses, and two meals can stack. They are especially useful before bosses, boarding fights, and new zones.
↖ Summary
Windrose combat becomes much easier when we focus on the right things. Guard matters more than raw aggression. Stamina matters more than long combos. Weapon level often matters more than rarity.
If fights feel unfair, check your weapon level, damage type, scaling grade, and stamina habits before changing your whole build. Use perfect blocks to break guard, save heavy attacks for real openings, and invest early points into stats that keep you alive.
Once those basics click, combat feels less random and much more rewarding. You are not just swinging harder. You are controlling the fight.

Most Popular Posts
- Windrose Best Weapons Tier List, Traits, and Build Picks
- Windrose Completion Guide: Max Comfort, Weapons, Armor, Quests and Missable Items
- Windrose Best Rings, OP Necklaces, Blackbeard Maps & Upgrade Tips
- Windrose Agility Build Guide: Best Stats, Weapons, Talents, Food and Boss Setup
- Windrose OP Guide: Combat, Skills, Gear, Food, Jewelry, and Armor Sets
- Windrose Best Currency Making Guide: Fastest Silver Farm With Piracy
Popular Category Lists
- Grow a Garden / (286)
- ARC Raiders / (267)
- CoD: Black Ops 7 / (166)
- Monopoly Go / (147)
- MLB 26 / (146)
- Star Citizen / (122)
- Steal a Brainrot / (89)
- ARK Survival Ascended / (77)
- Sailor Piece / (68)
- Forza Horizon 6 / (65)
- Diablo IV / (61)
- Blox Fruits / (61)
- CoD: BLACK OPS 6 / (55)
- Adopt Me / (55)
- Path of Exile 2 / (48)
- Grow a Garden 2 / (48)
- Monster Hunter Wilds / (46)
- Windrose / (44)
- Path of Exile / (40)
- Bee Swarm Simulator / (36)


