


 0
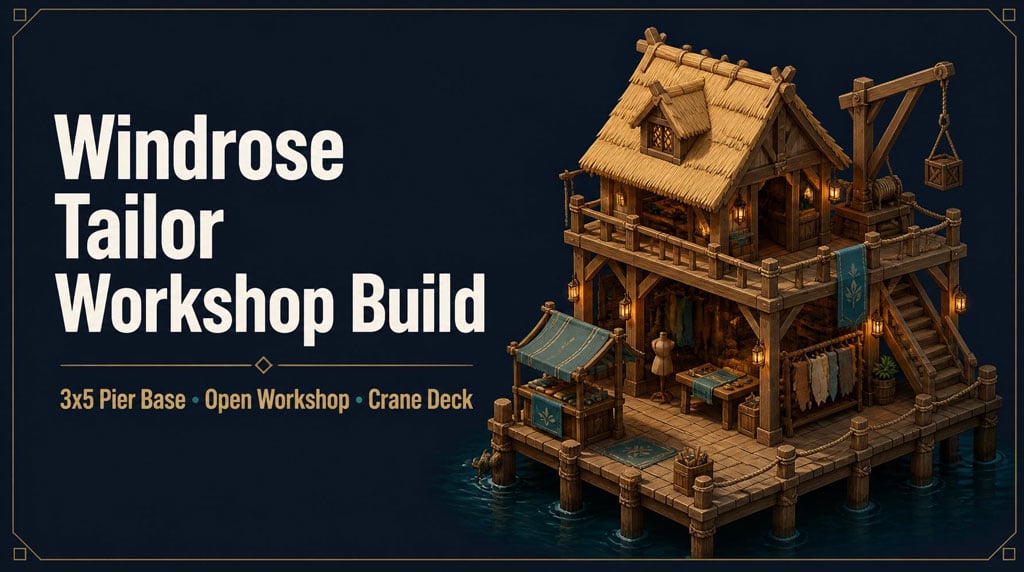
0Windrose Tailor Workshop Build Guide: 3x5 Dockside Wooden Workshop
Good Windrose Tailor Workshop should read as a workplace before you even enter it.
If it looks like a plain wooden house, the build has failed. The fix is simple: use a 3x5 pier base, keep the lower floor open, add hide racks, frame everything with beams, and stack the building upward with living space, goods deck, and attic storage.
The clean rule: work below, live in the middle, store above.
- Windrose Tailor Workshop Build Overview
- Required Pieces and Best Props
- Step 1: Lay the 3x5 Pier Foundation
- Step 2: Build the Market Stall Front
- Step 3: Add the Front Stairs and Deck
- Step 4: Frame the Open Lower Workshop
- Step 5: Add Tailor Workshop Details
- Step 6: Build the Middle Living or Shop Floor
- Step 7: Add a Back Balcony
- Step 8: Build the Upper Crane Deck
- Step 9: Shape the Roof and Attic
- Step 10: Final Beam Pass
- Suggested Interior Layout
- Common Tailor Workshop Mistakes
- FAQ
- What is the best foundation size for a Windrose Tailor Workshop?
- Where should I place the Tailor Workshop?
- What pieces are most important for this build?
- Should the lower workshop be open?
- How do I make the workshop look less flat?
- Summary
↖ Windrose Tailor Workshop Build Overview
This build fits best in a dock district, market street, or edge-of-town crafting area. Do not place it in the clean town center. Tailor and leather-work props look better near docks, crates, trade goods, and messy storage.
| Feature | Recommended Setup | Purpose |
|---|---|---|
| Footprint | 3x5 piers | Compact but usable |
| Main material | Wood | Pirate-town style |
| Lower floor | Open workshop | Shows function instantly |
| Middle floor | Living/shop room | Adds believable use |
| Upper floor | Crane deck | Goods handling |
| Attic | Storage | Uses roof space |
| Roof | Straw + steep reed | Better silhouette |
Why 3x5? In practice, 2-wide feels cramped, and 4-wide gets bulky fast. A 3x5 base gives enough space for stairs, work props, and vertical expansion without eating your dock.

↖ Required Pieces and Best Props
You do not need every decoration unlocked, but these pieces carry the build.
| Piece | Use | Priority |
|---|---|---|
| Wood piers / foundations | Base | Essential |
| Wood walls | Main shell | Essential |
| Pillars | Corners and supports | Essential |
| Beams | Frames, rails, braces | Essential |
| Stairs | Floor access | Essential |
| Windows / doors | Break flat walls | High |
| Straw roof | Side workshop roof | Medium |
| Steep reed roof | Main roof | High |
| Market stall | Shopfront | High |
| Hide/tanning racks | Tailor identity | High |
| Crates / barrels | Storage clutter | High |
| Crane | Upper deck detail | Optional, strong |
If you are short on materials, prioritize beams, pillars, and hide racks. Those three do the most visual work.
↖ Step 1: Lay the 3x5 Pier Foundation
Start with 3x5 wood piers.
This gives you:
- Front shop space
- Lower workshop
- Side work yard
- Stair access
- Room for vertical floors
Keep the footprint clean. Expand with decks, not a bigger rectangle. That keeps the build from becoming a wooden box.
| Base Size | Result |
|---|---|
| 2x5 | Too tight |
| 3x5 | Best balance |
| 4x5+ | Bulky unless heavily detailed |
| Irregular dock | Looks natural, harder to plan |
↖ Step 2: Build the Market Stall Front
Place a market stall near the front corner first. Use it as a size guide.
Then frame it:
- Pillars on both sides
- Beam across the top
- Window or wall behind it
- Optional vendor NPC in front
If snapping fights the placement, turn it off. The stall should feel tucked into the building, not bolted on later.
| Element | Best Placement | Effect |
|---|---|---|
| Market stall | Front corner | Defines the shop |
| Window | Behind stall | Adds depth |
| Pillars | Stall sides | Frames the front |
| Beam | Above stall | Makes it built-in |
Result: the workshop immediately reads as a working trader space.
↖ Step 3: Add the Front Stairs and Deck
Use a two-wide staircase. One-wide looks too small for a building that moves goods.
Add:
- Railings with beams
- Vertical supports under stairs
- Diagonal braces if it looks floaty
- Deck connection into the main floor
Rule from actual building: if a deck or stair looks heavy, support it visually. Windrose structures look much better when the supports make sense.
↖ Step 4: Frame the Open Lower Workshop
The lower level is the heart of the build. Keep it partly open.
Use closed walls at the back. Use windows on the sides. Leave the front or side open for the work area.
| Area | Build Choice | Why |
|---|---|---|
| Back wall | Closed + windows | Structure and light |
| Side wall | Wall + window mix | Breaks flat shape |
| Front | Open entrance | Shows workshop function |
| Counter | Short wall/ledge | Shop/work surface |
| Outer yard | Hide racks | Tailor theme |
Do not over-close this floor. If visitors cannot see the racks and work props, it just becomes another house.
↖ Step 5: Add Tailor Workshop Details
This is where the theme locks in.
Use visible materials. Hide racks matter more than fancy furniture.
| Prop | Best Use |
|---|---|
| Hide/tanning racks | Outside work yard |
| Crates | Under stairs, against walls |
| Barrels | Dock edges and corners |
| Workbench-style pieces | Inside workshop |
| Ropes / sacks | Near storage and crane |
| Lanterns | Entrances and work corners |
If the build still feels generic, add more raw material props. Tailor buildings need goods, racks, and storage in sight.
↖ Step 6: Build the Middle Living or Shop Floor
This level should be compact. Around three wall units high works well.
Add:
- Main door from the stairs
- Centered windows
- Beams between flat wall spans
- Small interior: bed, table, shelves, lanterns
| Feature | Recommendation |
|---|---|
| Height | About 3 wall units |
| Use | Living room, shop office, bedroom |
| Windows | Center major wall sections |
| Framing | Pillars + horizontal beams |
If a wall looks plain, do not add random clutter. Add structural rhythm: pillar, beam, window, beam.
↖ Step 7: Add a Back Balcony
The back wall will look dead without depth. Add a small balcony.
Use:
- Small floor extension
- Beam railings
- Supports underneath
- Door from middle floor
- One or two crates or a lantern
A balcony fixes three things at once: flat rear wall, weak silhouette, and lack of usable exterior space.
↖ Step 8: Build the Upper Crane Deck
The upper level is for goods.
Leave one side as a deck and place a crane if unlocked. Add crates, ropes, sacks, and railings.
| Upper Detail | Purpose |
|---|---|
| Crane | Shows goods movement |
| Deck | Loading platform |
| Crates/sacks | Storage story |
| Railings | Safety and shape |
| Beams | Support and weight |
The crane is optional, but it sells the whole build. Without it, the upper deck can feel decorative. With it, the building feels like it works.
↖ Step 9: Shape the Roof and Attic
Use mixed roofing.
- Straw roof for the side workshop
- Steep reed roof for the main structure
- Small attic opening or window
- Roof overhangs
- Beam details under roof edges
| Roof Area | Best Piece | Reason |
|---|---|---|
| Side workshop | Straw roof | Rough work-shed look |
| Main roof | Steep reed roof | Strong silhouette |
| Attic wall | Wall + window | Adds storage feel |
| Edges | Beams/overhangs | Adds depth |
The roof makes or breaks this build. A plain roof turns it into a box. A layered roof makes it look like a real dockside workshop.
↖ Step 10: Final Beam Pass
Do not skip this.
Walk around the whole building and add beams where the structure looks flat or unsupported.
Add beams to:
- Corners
- Floor edges
- Roof edges
- Under balconies
- Under stairs
- Around windows
- Under crane deck
- Side workshop roof
| Problem | Fix |
|---|---|
| Wall looks flat | Add vertical beams |
| Deck looks floaty | Add supports underneath |
| Roof looks pasted on | Add edge beams |
| Window looks empty | Add ledge or frame |
| Workshop lacks depth | Add side braces |
This final pass is the difference between placed pieces and finished build.
↖ Suggested Interior Layout
Keep paths clear. Use walls and corners for clutter.
| Level | Use | Details |
|---|---|---|
| Lower | Workshop/storage | Racks, crates, barrels |
| Middle | Living/shop office | Bed, table, shelves |
| Upper | Goods handling | Crane, sacks, crates |
| Attic | Overflow storage | Boxes, spare goods |
Do not fill every tile. A workshop should look busy, not annoying to walk through.
↖ Common Tailor Workshop Mistakes
| Mistake | Fix |
|---|---|
| Looks like a normal house | Add hide racks, stall, open work area |
| Too boxy | Add balcony, roof overhangs, side deck |
| Stairs look unsafe | Add beams and diagonal braces |
| Walls look flat | Use pillars and beam framing |
| Upper deck feels useless | Add crane, ropes, crates |
| Interior is cramped | Push storage to walls |
| Theme feels weak | Add more raw material props |
Fix the silhouette first. Decorations cannot save a bad shape.
↖ FAQ
↖ What is the best foundation size for a Windrose Tailor Workshop?
Use a 3x5 pier foundation. It gives enough room for a workshop, stairs, market stall, upper floor, and attic without becoming too bulky.
↖ Where should I place the Tailor Workshop?
Place it near docks, storage yards, or the edge of town. It fits best near trade goods, crates, hides, and working-class buildings.
↖ What pieces are most important for this build?
Prioritize wood piers, wood walls, pillars, beams, stairs, hide racks, market stall, and crates. Add a crane if unlocked.
↖ Should the lower workshop be open?
Yes. Keep it partly open so the work area is visible. This makes the building read as a Tailor Workshop instead of a regular house.
↖ How do I make the workshop look less flat?
Use a final beam pass. Frame corners, windows, roof edges, stairs, balconies, and decks. Add a small balcony or roof overhang if a wall still looks plain.
↖ Summary
Build the Windrose Tailor Workshop around function.
Start with a 3x5 pier base. Add a market stall, open lower workshop, hide racks, two-wide stairs, middle living floor, back balcony, upper crane deck, and attic storage.
Use wood, straw roofing, steep reed roofing, beams, and pillars to keep the silhouette strong.
The working formula is simple: work below, live in the middle, store above. That makes the build readable, useful, and believable in any pirate town.

Most Popular Posts
- Windrose Best Weapons Tier List, Traits, and Build Picks
- Windrose Completion Guide: Max Comfort, Weapons, Armor, Quests and Missable Items
- Windrose Agility Build Guide: Best Stats, Weapons, Talents, Food and Boss Setup
- Windrose Best Currency Making Guide: Fastest Silver Farm With Piracy
- Windrose Best Early-Midgame Builds: Strong Setups for the Foothills
- Best Windrose Builds Guide: S-Tier Weapons, Stats, Gear, and Talents
Popular Category Lists
- Grow a Garden / (286)
- ARC Raiders / (267)
- CoD: Black Ops 7 / (166)
- Monopoly Go / (147)
- MLB 26 / (146)
- Star Citizen / (122)
- Steal a Brainrot / (89)
- ARK Survival Ascended / (77)
- Sailor Piece / (68)
- Forza Horizon 6 / (65)
- Diablo IV / (61)
- Blox Fruits / (61)
- CoD: BLACK OPS 6 / (55)
- Adopt Me / (55)
- Path of Exile 2 / (48)
- Grow a Garden 2 / (48)
- Monster Hunter Wilds / (46)
- Windrose / (44)
- Path of Exile / (40)
- Bee Swarm Simulator / (36)


