


 0
0Arc Raiders Anvil Blueprint Farming & Build the Perfect Mid-Range Setup
- KITE
- Share
- ARC Raiders
- 01/25/26
- 2721
The Arc Raiders Anvil looks deceptively simple on paper—a slow, heavy-ammo hand cannon with a single mod slot. However, in the heat of a raid, it functions as two entirely different weapons depending on a single barrel attachment and your commitment to the upgrade bench. We've conducted side-by-side tests involving identical mag dumps and pacing to settle the debate: one specific setup meaningfully expands your win conditions, while the rest are merely comfort picks.
Here is our practical breakdown of how the Anvil scales from Tier I to IV, what the stats actually mean in a firefight, and the specific attachment choice that changes outcomes when you're trading shots at mid-range.
- 1. Defining the Anvil: High Stakes, Higher Rewards
- Why we rate it so highly
- 2. Crafting, Upgrades, and the Blueprint Route
- 2.1 The Upgrade Path
- 2.2 Maintenance and Economy
- 2.3 Where to find the Blueprint
- 3. The Performance Gap: Anvil I vs. Anvil IV
- 4. The Game-Changer: The Extended Barrel
- 4.1 The Muzzle Brake Trap
- 4.2 The Compensator (The Safety Net)
- 4.3 The Extended Barrel (The Winner)
- 5. Recommended Loadouts
- FAQ
- 1. Should I upgrade the Anvil immediately or run Tier I?
- 2. Is the vertical recoil on the Extended Barrel difficult to manage?
- 3. Why not use a Muzzle Brake for better control?
- 4. What if I can't find the blueprint at the Dam?
- Summary
↖ 1. Defining the Anvil: High Stakes, Higher Rewards
The Anvil is a single-action heavy-ammo hand cannon designed to reward clinical precision. If you are the type of player who can consistently place follow-up shots under pressure, it becomes a mid-range bully that still holds its own in frantic close-quarters scrambles.
↖ Why we rate it so highly
- Punchy Damage: 40 damage per shot places it in the upper echelon of heavy hitters.
- Surprising Cadence: A fire rate of ~16.3 makes it significantly more responsive than other heavy hand cannons.
- Reliable Reach: A base range of 50 provides a top-tier mid-range profile.
What does this mean in a real raid? The Anvil's true value isn't just high DPS. It's the ability to peek, land a heavy hit, and re-peek fast enough to maintain pressure without being trapped in a sluggish animation loop.
↖ 2. Crafting, Upgrades, and the Blueprint Route
Before discussing attachments, we must address a hard truth: a base Anvil I is a shadow of its Tier IV counterpart. If you judge this weapon based on its initial craft, you are severely underestimating its potential.
↖ 2.1 The Upgrade Path
The following table outlines the materials and perks required to reach the Anvil's peak performance.
| Tier | Ingredients | Requirements | Key Perks |
|---|---|---|---|
| Anvil I | 5× Mechanical, 6× Simple Gun Parts | Gunsmith 1 + Blueprint | Base Model |
| Anvil II | 1× Anvil I, 3× Mech, 1× Simple | Gunsmith 1 | +25% Fire Rate, -6.5% Dispersion Recovery |
| Anvil III | 1× Anvil II, 4× Mech, 1× Heavy | Gunsmith 1 | +50% Fire Rate, -12.5% Dispersion Recovery |
| Anvil IV | 1× Anvil III, 4× Mech, 1× Heavy | Gunsmith 1 | +75% Fire Rate, -18.75% Dispersion Recovery |
↖ 2.2 Maintenance and Economy
If you plan to main the Anvil, you need to account for repair costs. We've broken down the efficiency below.
| Item | Repair Cost | Durability Gained | Salvaging Result |
|---|---|---|---|
| Anvil I | 2× Mech, 2× Simple | +50 | 2× Simple Gun Parts |
| Anvil II | 3× Mech, 3× Simple | +55 | 3× Simple Gun Parts |
| Anvil III | 4× Mech, 4× Simple | +60 | 4× Simple Gun Parts |
| Anvil IV | 5× Mech, 5× Simple | +65 | 5× Simple Gun Parts |
↖ 2.3 Where to find the Blueprint
We consistently farmed the Anvil blueprint in Dam Battlegrounds. Specifically, look for a raider-cache spawn tucked into the gap under the raised highway where it terminates—situated between Raider Outpost East and East Broken Bridge. If you find this area spawning raider containers, route it early. If it's dry, rotate immediately rather than wasting time.

↖ 3. The Performance Gap: Anvil I vs. Anvil IV
We view the Anvil as two separate tools. Anvil I features a slower pacing with awkward gaps between shots, while Anvil IV offers a noticeably faster rhythm in both shooting cadence and handling.
In our timed tests for full cylinder dump + reload, the Tier IV upgrade completed the cycle roughly 28% faster. This reduces a ~14-second loop to under 10 seconds. If you are engaging in repeated mid-range peeks, this 4-second difference is what allows you to punish a healing enemy before they can reset.
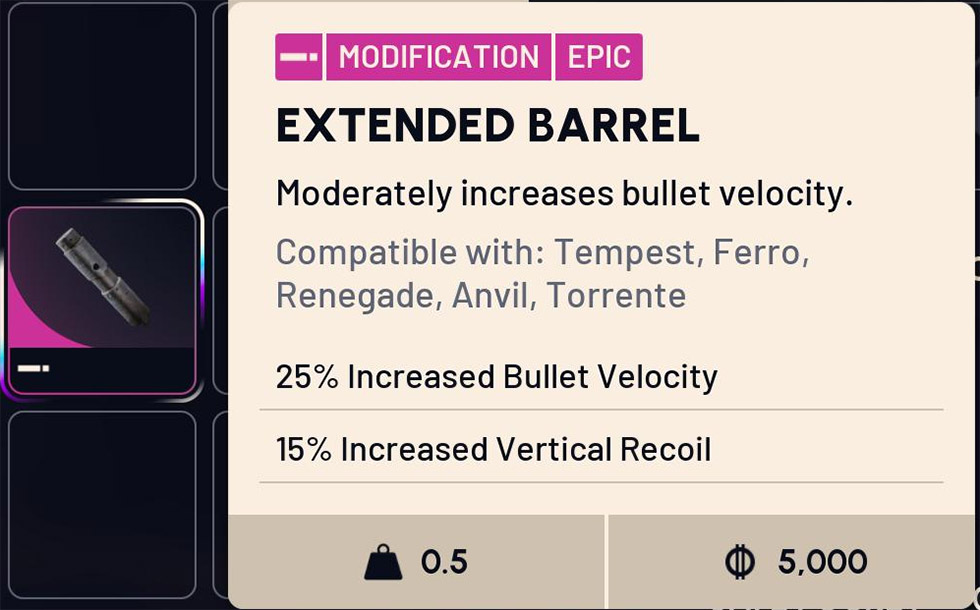
↖ 4. The Game-Changer: The Extended Barrel
We tested every barrel option by firing consistent strings into fixed targets at 20, 30, and 40 meters. Here is what we discovered about the meta choices.
↖ 4.1 The Muzzle Brake Trap
Muzzle brakes focus on recoil reduction, but in our testing, they offered only marginal improvements. If you are missing shots due to vertical climb, your primary issue is likely timing and reacquisition rather than raw recoil stats. We found this slot too valuable to waste on negligible stability gains.
↖ 4.2 The Compensator (The Safety Net)
Compensators tighten the spread slightly and are a respectable choice if you are on a budget. If you are still learning the Anvil's cadence, a compensator can reduce frustration while you build muscle memory.
↖ 4.3 The Extended Barrel (The Winner)
Despite the stated drawback of increased vertical recoil, we observed no meaningful handling penalty in actual gameplay. In exchange, you receive a significant boost to accuracy and consistency at range.
Why this matters: The Anvil already hits hard; the Extended Barrel ensures those hits actually connect. It expands the number of situations where a heavy-ammo shot converts into a down rather than a near miss.
↖ 5. Recommended Loadouts
Depending on your current stash and playstyle, we suggest the following configurations:
| Scenario | Best Barrel Choice | The Logic |
|---|---|---|
| The Professional | Extended Barrel | Maximizes effective range and kill conversion. |
| The Learner | Compensator | Provides a tighter grouping for those practicing follow-up timing. |
| The Ghost | Suppressor | Reduces third-party risk during long rotations. |
↖ FAQ
↖ 1. Should I upgrade the Anvil immediately or run Tier I?
Upgrade it as fast as possible. If you find the gun feels late when trying to re-engage, that is the Tier I fire-rate limitation holding you back.
↖ 2. Is the vertical recoil on the Extended Barrel difficult to manage?
Not in our experience. The Anvil is a semi-auto weapon, meaning you have time to reset your aim between shots. The accuracy benefits far outweigh the slight increase in kick.
↖ 3. Why not use a Muzzle Brake for better control?
Because the Anvil's recoil is already predictable. Using a slot to fix something that isn't broken—while ignoring the range benefits of other attachments—is an inefficient use of resources.
↖ 4. What if I can't find the blueprint at the Dam?
Blueprint spawns are subject to RNG, but the Dam Battlegrounds remain the most reliable high-density spot for raider caches. If it doesn't drop in three runs, try checking the caches near the collapsed tunnels.
↖ Summary
We view the Anvil as a discipline multiplier. If your aim is true and you take smart peeks, it rewards you with heavy-hitting tempo that most comparable weapons cannot match. The upgrade path is essential because Anvil IV isn't just a minor polish—it fundamentally changes the weapon's rhythm.
If you want to turn almost kills into successful extractions, commit to the Extended Barrel. It is the only attachment that consistently expands your winning range, turning a standard hand cannon into a mid-range powerhouse. Run it upgraded, aim for the head, and let the Anvil do the heavy lifting.

Most Popular Posts
- ARC Raiders Riven Tides Key Room Guide: Best Hotel Keys, Loot Routes, Secure & Crane Storage
- ARC Raiders Damage Fireflies Trial Guide: Best Farm Method on Buried City Night Raid
- ARC Raiders Riven Tides Update: New Map & Items, ARC Turbine, Rewards, and Best Early Strategy
- ARC Raiders Bettina Guide: Best Build, Buffs, and How to Use It Against ARC
- ARC Raiders Solo Search Supply Drops Guide: Best Buried City Route, Beacon Locations
- Arc Raiders Season 4 Riven Tides Update, Rewards, Safe Skins, and Release Timeline
Popular Category Lists
- Grow a Garden / (286)
- ARC Raiders / (266)
- CoD: Black Ops 7 / (166)
- Monopoly Go / (146)
- MLB 26 / (145)
- Star Citizen / (116)
- Steal a Brainrot / (89)
- ARK Survival Ascended / (74)
- Sailor Piece / (68)
- Forza Horizon 6 / (63)
- Diablo IV / (61)
- Blox Fruits / (60)
- CoD: BLACK OPS 6 / (55)
- Adopt Me / (53)
- Path of Exile 2 / (48)
- Monster Hunter Wilds / (46)
- Windrose / (44)
- Grow a Garden 2 / (42)
- Path of Exile / (40)
- Bee Swarm Simulator / (36)


