


 0
0ARC Raiders Best Blueprint Loot Farming Route Guides
- KITE
- Share
- ARC Raiders
- 02/23/26
- 731
Whether it's the excitement of a new piece of arsenal or the impatience of acquiring a new upgrade at a new hardware store, the diagram you want in ARC Raiders feels like it's buried deep in some designer black hole. However, once you know which containers hold the blueprint, you can stop guessing and start knowing.

In order to load map it out so it can hit as many of the varied containers as possible, each of which contains something different like tech, each tech, weapon, and attachments trick, schematic (yes, the explosives are schematics and not a physical entity), and all of the rest, to ensure each element at every level of gameplay is eventually in possession of the player.
- Phase 1: Testing Annex & The Lab (Medical & Augments)
- Start at Residential & Industrial
- Priority: The Lab
- Phase 2: The Vertical Detour (Raider & Electrical Loot)
- Raider Backpacks & Weapon Cases
- The Electrical Container Secret
- Phase 3: Research & Administration (The Hybrid Zone)
- Phase 4: Primary Facility (Explosives & Springs)
- The Industrial Heavyweight
- The Hidden Value: Springs
- Phase 5: Hydro & Ruby Residence (The Finish Line)
- Hydro: Weapon Cases
- Ruby Residence: The Attachment Haven
- Summary of Loot Tables
- FAQ: Common Questions
- Final Thoughts
IMPORTANT: MAP CONDITIONS
The second the mission launches, take a look to see how your map is configured so you know how to maximize your rewards.
- Storm Events: = Snap Hook blueprint
- Night Raids: = Tempest and Wolfpack
- Day Raids: = Harvester is the best squad distraction as it will allow you to access valuables.
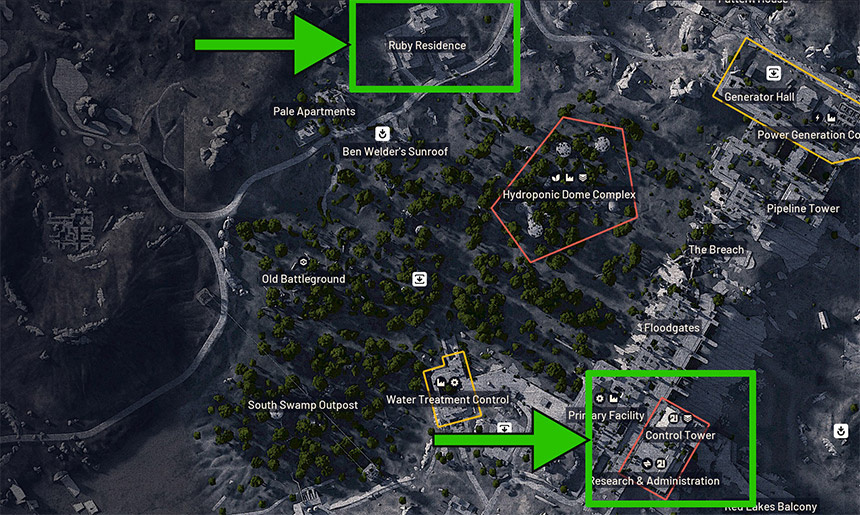
We will take the route to go from Testing Annex to Ruby Residence.
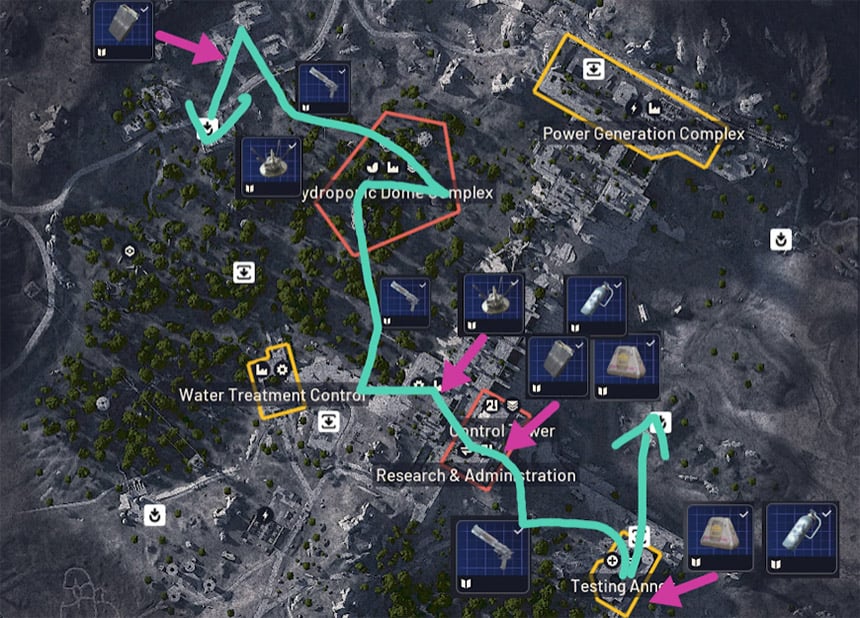
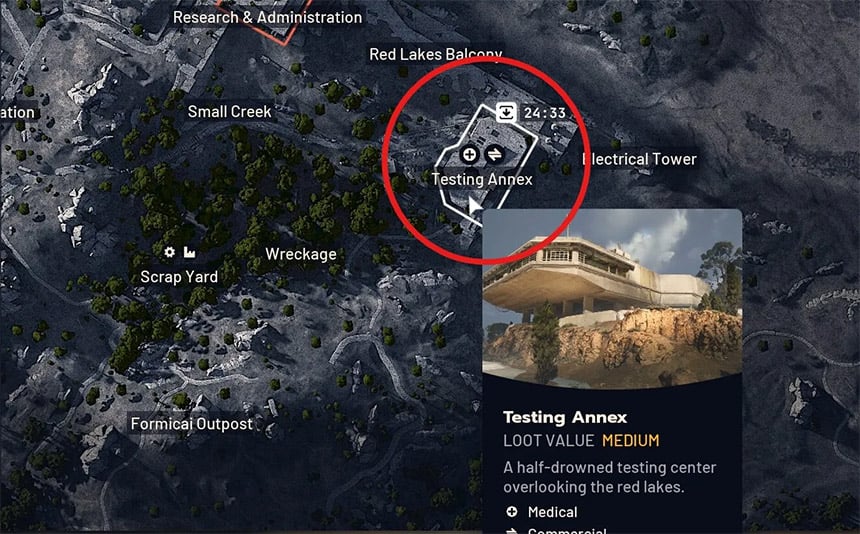
↖ Phase 1: Testing Annex & The Lab (Medical & Augments)
We will to go to Testing Annex. What other players do in this location is insignificant, the value of this place is exponential.
↖ Start at Residential & Industrial
When you first get in, look at the general residential containers. They may be standard, but they give out blueprints for standard attachments. Industrial containers shouldn't be ignored either, as they increase the probability volume.
↖ Priority: The Lab
With no doubt, the Lab is the most important place here. It has the blueprints for Medical and Augments.
Pro Tip: Many players seem to skip this room altogether, but it's the most important for the loot! Look for loot behind the open doors, and against the back walls. We often see medical crates tucked in the corners that most players seem to skip.
| Container Type | Potential Blueprint Drops |
|---|---|
| Medical Crates | Defibs, Fighter Spray, Fighter Shot, Augments |
| Security Breaches | Ventor, Il Toro (Rare), similar to Raider drops |
↖ Phase 2: The Vertical Detour (Raider & Electrical Loot)
As we exit the annex, we look up. Be careful of the patrolling Rocketeer, as it's important to obtain the higher loot.

↖ Raider Backpacks & Weapon Cases
We check upper ledges and obscure locations for Raider Backpacks. These Backpacks have a greater chance of containing loot than ordinary containers and will consistently drop early game Weapon Blueprints such as Osprey , Anvil, and Il Toro.
↖ The Electrical Container Secret
A lot of guides overlook this detail. If you want utility items, you need to open Electrical Style Containers. After years of testing and research, we have concluded that certain blueprints are exclusive to this type of container, specifically:
- Tagging Grenade
- Remote Raider Flare
- Barricade Kit
If you are looking for any of the above tactical items, open all the electrical containers on your way to Research.
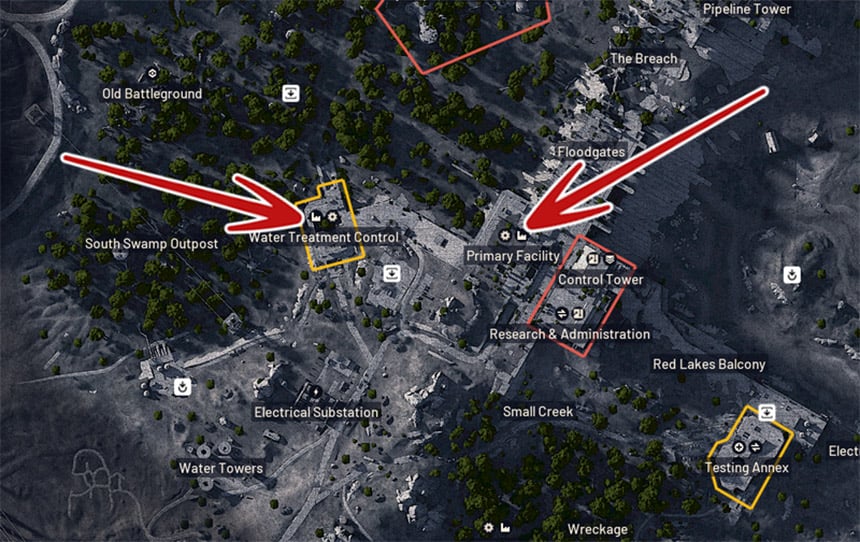
↖ Phase 3: Research & Administration (The Hybrid Zone)
This zone is a mix of all loot tables. It is a combination of Residential, Medical, and Industrial containers, all crammed together.
1. Lockers & Wardrobes: These are classified as residential loot. Here, you will find the most Smoke Grenades, as well as Level 1-2 attachments.
2. Industrial Containers: Located in the back rooms, these are essential for offensive utility. Blaze Grenades, Showstoppers, and Trigger Grenades are all located here.
Inventory Management Warning:
This space is tight. There will be batteries and chunky loot. If you are running a light rig, we recommend grabbing the blueprints and leaving the heavy loot.
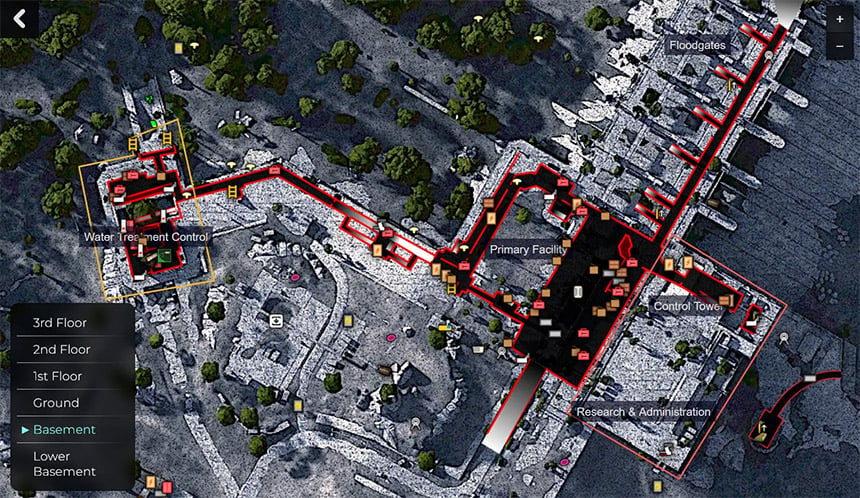
↖ Phase 4: Primary Facility (Explosives & Springs)
Underrated is the Primary Facility. Most squads skip it, we see it as a goldmine for 2 things: Explosives and Crafting Materials.
↖ The Industrial Heavyweight
Industrial breach boxes fill this location. If you still need blueprints for Explosive Mine or Trigger Grenade, this is your best chance for a single run.
↖ The Hidden Value: Springs
Even if a blueprint is not obtained, this route pays for itself here. The Rusted Tools found in these industrial containers break down into Springs and Mechanical Parts at base. Since Springs are a bottleneck resource for crafting, this facility should be looted every time.
↖ Phase 5: Hydro & Ruby Residence (The Finish Line)
Now that we are nearing extraction, we hit Hydro and then Ruby Residence.
↖ Hydro: Weapon Cases
Watch the terrain. Weapon cases spawn next to Natural Landmarks—especially large rocks and water. These cases provide high-value rolls for weapon schematic drops.
↖ Ruby Residence: The Attachment Haven
For the last stop of the run, we go to Ruby Residence. This place is almost completely filled with Residential boxes.
What to expect: This is the best farming location for Weapon Attachments (Scoping, Mags, and Muzzles)
The Reality: Due to the location being an Extraction Zone, it is often fully looted. If you're quick enough, and you spawn nearby, loot all the drawers and wardrobes.
↖ Summary of Loot Tables
Here's a quick reference based on our run data.
| Container Style | Primary Blueprint Drops |
|---|---|
| Residential (Wardrobes/Lockers) | Attachments, Smoke Grenades |
| Medical (White Cases/Medbags) | Healing Items, Augments, Stims |
| Industrial (Rusty Metal Boxes) | Grenades (Blaze/Trigger), Mines, Springs (Mats) |
| Electrical (Yellow/Power Boxes) | Tagging Grenade, Remote Flare, Barricade Kit |
| Raider/Weapon (Backpacks/Black Cases) | Weapons (Ventor, Osprey, Anvil), Rare Attachments |
↖ FAQ: Common Questions
Q: Will I get a blueprint on every single run?
A: No, and it is important to manage expectations. The drop rate is estimated to be around 3% per container. This route is about volume; by opening 50+ containers in a run, you statistically maximize your chances, but dry runs will happen.
Q: Can I run this route in reverse?
A: Absolutely. If you spawn near Ruby Residence, simply work your way backward toward the Testing Annex. The container types do not change.
Q: Why do I sometimes find Augments in Industrial containers?
A: There have been a few isolated cases of Augments being found in Primary Facilities Industrial containers, but it is not normal for Augments to be found in this type of container. For this reason, it is probably better to check out Medical facilities instead.
Q: Is this route safe for solo players?
A: It is possible, but definitely still a danger. The route goes over parts of the map where a lot of players tend to converge, for example Hydro. If you will be going solo, we advise you to grab a silencer and make sure to do it quickly so you do not get caught in the open between Primary Facility and Hydro.
↖ Final Thoughts
Shooting straight in ARC Raiders is not the only important thing to complete your blueprint library, but it is a key element. Taking this route will allow you to make sure you hit every item opportunity there is in a single deploy, from healing items to explosives.
Even if the blueprint doesn't shine, the Springs and materials you gather will help your next raid. There is a lot more to this game and you will learn it as you play, but we wish you luck Raiders.

Most Popular Posts
- ARC Raiders Riven Tides Key Room Guide: Best Hotel Keys, Loot Routes, Secure & Crane Storage
- ARC Raiders Damage Fireflies Trial Guide: Best Farm Method on Buried City Night Raid
- ARC Raiders Riven Tides Update: New Map & Items, ARC Turbine, Rewards, and Best Early Strategy
- ARC Raiders Bettina Guide: Best Build, Buffs, and How to Use It Against ARC
- Arc Raiders Season 4 Riven Tides Update, Rewards, Safe Skins, and Release Timeline
- ARC Raiders Solo Search Supply Drops Guide: Best Buried City Route, Beacon Locations
Popular Category Lists
- Grow a Garden / (286)
- ARC Raiders / (262)
- CoD: Black Ops 7 / (166)
- Monopoly Go / (146)
- MLB 26 / (145)
- Star Citizen / (112)
- Steal a Brainrot / (89)
- Sailor Piece / (68)
- ARK Survival Ascended / (67)
- Diablo IV / (61)
- Forza Horizon 6 / (60)
- Blox Fruits / (60)
- CoD: BLACK OPS 6 / (55)
- Adopt Me / (53)
- Path of Exile 2 / (48)
- Monster Hunter Wilds / (46)
- Windrose / (44)
- Path of Exile / (40)
- Grow a Garden 2 / (40)
- Bee Swarm Simulator / (36)


