


 0
0ARC Raiders Blueprints Farming: Low-Risk Loot Routes, Berry City Farming and Queen Cores Guides
- KITE
- Share
- ARC Raiders
- 01/03/26
- 1364

If you've ever had that ARC Raiders week where you run three raids, fight everyone, and still end up broke and blueprint-starved—I've been there. What finally fixed my progression wasn't better aim, it was running a repeatable system: low-risk loot routes to fund kits, a Berry City night ARC Raiders blueprints loop for steady unlocks, and a cheap Queen plan that doesn't require a rich stash or rare crafting.
- 1) Choose Your Goal Before You Spawn
- 1.1 The three objectives I rotate between
- 2) Low-Risk Rule Set (So the Rest of This Works)
- 2.1 How I judge a low-risk loot spot
- 2.2 Minimum kit I use for loot-first raids
- 3) Route A: Low-Risk Secret Loot Routes (Weapons, Meds, Ammo, Bags)
- 3.1 Quick cheat sheet (spot-by-spot)
- 3.2 My favorite low-risk route combos
- 4) Route B: The Easiest Blueprint Farm: Berry City Nighttime (Even in Late Raids)
- 4.1 Why late-night Berry City works
- 4.2 My blueprint farming loadout (cheap, repeatable)
- 4.3 The 10-minute loop I run
- 4.4 Extraction reality check (because that's where farms die)
- 5) Route C: Queen Cheap Harvester Puzzle + Safe Queen Core Farming
- 5.1 Know your drops (so you don't chase the wrong thing)
- 6) Strategy A (Queen) — Fast, Cheap Blueprint Ru
- 6.1 Cheap loadout that doesn't require rare crafting
- 6.2 Harvester puzzle steps (my repeatable sequence)
- 6.3 After puzzle completion
- 7) Jupiter Blueprint: Killing the Queen on a Budget
- 7.1 Where to shoot
- 7.2 Loot sustain during the fight
- 7.3 Core loot timing (the rats problem)
- 8) Strategy B (Queen): Safe Queen Core Farm (Leg Break + Loot Control)
- 8.1 Weapon choice: Why Patina is the leg-farm king
- 8.2 The terrain trick: ring-around-the-rock wrangling
- 8.3 Looting legs before someone else does
- 8.4 Weight management (the run ends when you're overweight)
- 9) Putting It All Together: A Simple Progression Path
- FAQ
- 1) What's the single easiest method for lots of blueprints fast?
- 2) How do I keep low-risk loot runs from turning into constant PvP?
- 3) Do I need to full-kill the Queen to craft Jupiter/Equalizer?
- 4) Why does everyone recommend Patina for leg farming?
- 5) What's the most common mistake in Harvester puzzle runs?
- Closing
↖ 1) Choose Your Goal Before You Spawn
Your raid goes smoother when you decide what winning looks like before you load in.
↖ 1.1 The three objectives I rotate between
| Objective | Best Module | Why it's efficient | When to pick it |
|---|---|---|---|
| Build cash + supplies reliably | Low-risk secret loot routes | Fast checks, fewer forced fights | If your stash is low or you're re-kitting |
| Farm general blueprints quickly | Berry City nighttime drawers | High blueprint rolls from scraps | If you need multiple unlocks fast |
| Get Equalizer/Jupiter + craft mats | Queen (Harvester + core/legs) | Direct blueprint path + guaranteed cores from legs | If you're ready to push endgame crafting |
What this means: you don't need every raid to be a jackpot. You need a loop that keeps your stash moving forward.
↖ 2) Low-Risk Rule Set (So the Rest of This Works)
Low-risk doesn't mean safe. It means you're minimizing forced PvP while keeping exit options.
↖ 2.1 How I judge a low-risk loot spot
A spot is worth it if it has 3+ of these:
- Low foot traffic (not on the main rotation lane)
- Quick open/close time (loot < ~20 seconds)
- Limited angles (you're not exposed from everywhere)
- Vertical access (ladders/ledges/zipline reduce surprises)
- Predictable PvE (one roaming threat you can plan around)
↖ 2.2 Minimum kit I use for loot-first raids
- One mobility option when possible (zipline/snap hook helps several routes)
- Budget heals/shields (chip damage is real)
- A backpack with at least one safe pocket if you're blueprint hunting
If you find you're hesitating to loot because your kit is expensive, then you're wearing the wrong kit for farming.
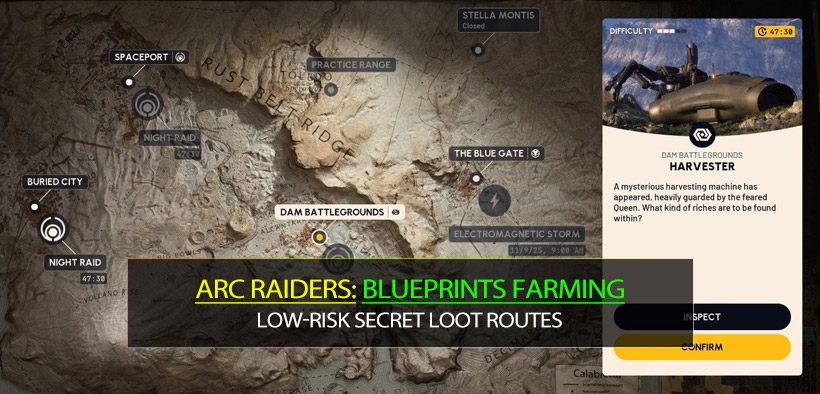
↖ 3) Route A: Low-Risk Secret Loot Routes (Weapons, Meds, Ammo, Bags)
These are the spots I run when I want consistent value without living in the hottest lanes. The goal is repeatable profit, not one dramatic room.
↖ 3.1 Quick cheat sheet (spot-by-spot)
| Map / Area | Spot | Tool Needed | Primary Loot | Risk Level | Chain Value |
|---|---|---|---|---|---|
| Blue Gate | Collapsed Highway drop-down | Breach recommended | Med bag, grenade case, containers | Low | Great early dip |
| Blue Gate | Adorned Wreckage | Optional zipline | Weapon crate | Medium (Leaper) | Quick weapon roll |
| Blue Gate | Bilgam's Peak rooftop | None | Weapon crate + grenade tube | Low–Med | Fast check |
| Blue Gate | Baron Clearing rock | None | Backpack spawn | Low | Spawn-side bonus |
| Dam | Traffic Tunnel | None | 2× weapon crates + suitcases | Medium | Best mini-loop |
| Dam | Umbrella structures | Zipline | Med/grenade containers | Low–Med | Hidden, high safety |
| Dam | Control Tower roof | Zipline | Grenade/med/ammo | Medium | Utility refill |
| Dam | Control Tower interior | None | Hidden bag + shelves | Low | Free add-on |
| Dam | Extraction pipes | None | Weapon crate | Medium | Exit bonus |
| Testella Montes | Control room ledge | None | Weapon crate chance | Low | Quick vertical check |
| Testella Montes | Assembly line top | Zipline/Snap Hook | Weapon crate | Medium | Tool advantage |
| Testella Montes | Lobby metro ledges | Parkour/zipline interaction | Ammo + weapon chance | Medium | Often skipped |
| Spaceport | Roof access locked building | Zipline | Bag + containers | Medium | Keyless profit |
| Spaceport | Checkpoint blue building | None | Weapon crate | Low | Drive-by |
| Spaceport | Vehicle Maintenance room | None | Red containers + weapon chance | Low–Med | Night raid gold |
| Spaceport | Arrival roof | None | Weapon crate + ammo | Medium | Arm-and-feed |
| Spaceport | Departure showers | Breach door | Weapon crate | Medium | Missed by most |
| Spaceport | Underground tunnel corner | None | Weapon crate | Low | Ultra-fast |
↖ 3.2 My favorite low-risk route combos
| Route Name | Where | What you get | Time Budget |
|---|---|---|---|
| Two-Crate Tunnel Sweep | Dam Traffic Tunnel | 2 weapon rolls + suitcases | 3–6 min |
| Roofline Refill | Spaceport Arrival + nearby checks | Weapon + ammo + quick rotate | 4–8 min |
| Tool Advantage Loop | Testella Montes vertical checks | Weapon crates others skip | 5–10 min |
| Event Distraction Dip | Blue Gate Collapsed Highway | Safe loot while others chase event | 2–5 min |
Rule of thumb: If you're already rotating past one of these, take it. If you have to cross the map through hot lanes, skip it.
↖ 4) Route B: The Easiest Blueprint Farm: Berry City Nighttime (Even in Late Raids)
Berry City night is chaotic, yes. That's exactly why it can be a blueprint mine.
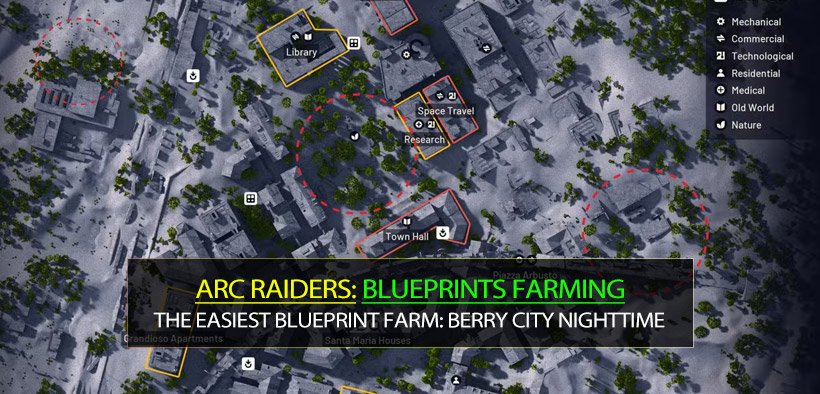
↖ 4.1 Why late-night Berry City works
Late spawns (e.g., ~18 minutes remaining) often mean premium rooms are empty. But players tend to:
- Chase PvP and exits
- Skip slow drawer-by-drawer looting
- Leave behind scraps that still roll blueprints
What this means: your blueprint EV (expected value) comes from container density, not from one famous room.
↖ 4.2 My blueprint farming loadout (cheap, repeatable)
| Item | What I bring | Why |
|---|---|---|
| Backpack | Small bag with 1 safe pocket | Blueprint insurance |
| Heals | Med bag + quick heal | Night chip damage + panic resets |
| Utility | Optional escape tool | Extractions get called early |
| Mindset | Pocket first, exit early | Greed loses runs |
If you loot a blueprint, then pocket it immediately. I treat that as a hard rule, not a suggestion.
↖ 4.3 The 10-minute loop I run
1. First 90 seconds: hit the first cabinet/drawer cluster you see.
2. Key rooms only if unlooted: if you have an Apartments-style key, check it quickly; if it's cleared, leave instantly.
3. Main farm: prioritize dark interiors with dense drawers/cabinets and blue suitcases when you spot them.
4. Extraction discipline: once you pocket 1–2 blueprints, start rotating out.
A real result pattern (what I've actually seen)
On a late raid where important zones were stripped, I extracted 4 blueprints largely off drawers/cabinets, plus trinkets worth additional cash. That won't happen every run, but it proves the method works even on scraps.
↖ 4.4 Extraction reality check (because that's where farms die)
- If someone calls the exit early, then pivot immediately to the final extraction option.
- If you're under ~3 minutes and you already pocketed value, then stop looting and move.
Blueprint farming is not a bravery contest. It's a repetition contest.
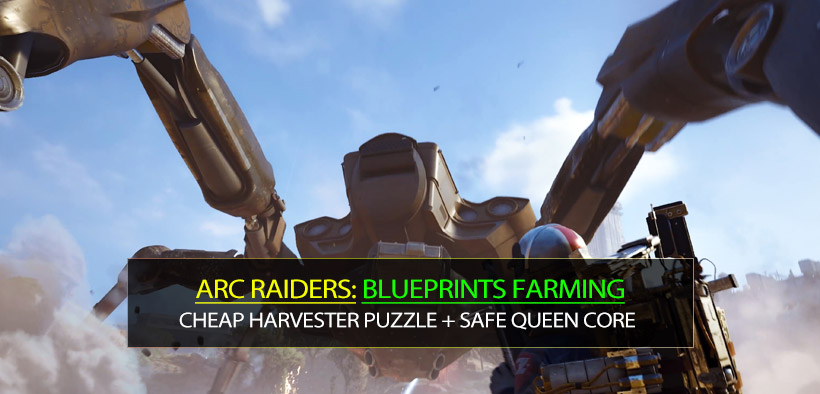
↖ 5) Route C: Queen Cheap Harvester Puzzle + Safe Queen Core Farming
This is the endgame module, but I'm keeping it accessible: cheap loadouts, clear mechanics, and realistic risk control.
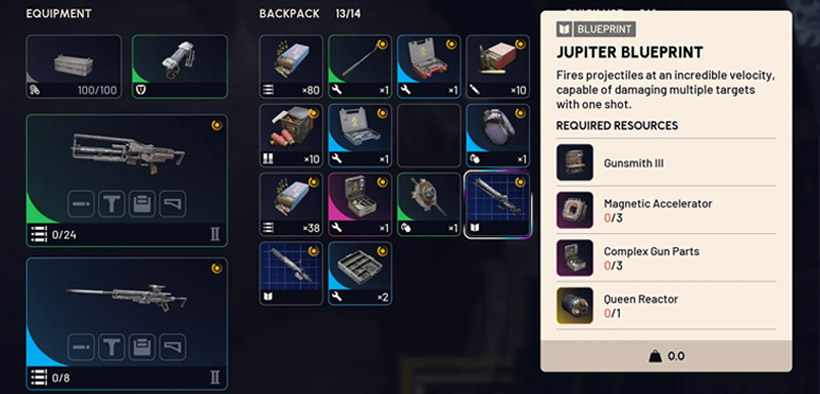
↖ 5.1 Know your drops (so you don't chase the wrong thing)
- Equalizer blueprint: from the Harvester puzzle reward.
- Jupiter blueprint: chance from the Queen's main core after a full kill.
- Queen Cores + crafting materials: from Queen legs you break and loot.
If you only need crafting materials, then don't full-kill the Queen—farm legs and leave.
↖ 6) Strategy A (Queen) — Fast, Cheap Blueprint Ru
↖ 6.1 Cheap loadout that doesn't require rare crafting
| Slot | Pick | Must-have? | Why it matters | Substitute |
|---|---|---|---|---|
| Primary | Renegade + Extended Medium Mag | Yes | Button phase speed; reload efficiency | Renegade with standard/medium mag (slower) |
| Secondary | Kettle + Extended Light Mag | Highly recommended | Dumps damage into exposed yellow joints | Stitcher (more PvP-oriented) |
| Mobility | Zipline | Yes | Clean entry/angles | None (more exposure) |
| Throwables | Lawnade | Optional | Creates space if Queen aggro blocks you | Skip if broke |
| Sustain | Budget shields + med bag | Yes | Mistakes happen; you need margin | More shields if rich |
Why Renegade matters: the puzzle rewards controlled burst and tempo.
What this means: attachments aren't vanity here—they're your time-to-completion.
↖ 6.2 Harvester puzzle steps (my repeatable sequence)
1. Approach from behind/side when possible; set zipline for a clean line.
2. Breach panels and locate cores/orbs.
3. Drop the cores down near the socket area first.
- Don't insert yet.
Color logic to save shields
- If it's blue: take off armor before the shockwave (you'll get stunned, armor avoids damage), then re-equip.
- If it's red: get outside immediately and re-enter on the safe timing.
4. Insert all three, then enter button phase.
5. Use Renegade to delete the glowing targets quickly; reload proactively.
If you get interrupted by PvP, then back off and reset rather than forcing the phase. A failed attempt costs less than a death.
↖ 6.3 After puzzle completion
- Secure the blueprint reward (Equalizer chance/roll depending on your drop).
- Decide: leave now, or stay to help kill the Queen for Jupiter main-core chance.
↖ 7) Jupiter Blueprint: Killing the Queen on a Budget
You can do meaningful damage with limited ammo if you shoot the right parts.
↖ 7.1 Where to shoot
- Prioritize yellow joints once armor starts breaking.
- When joints are exposed, the Kettle can melt them quickly.
↖ 7.2 Loot sustain during the fight
Loot fallen smaller enemies for ammo and ARC power cells.
↖ 7.3 Core loot timing (the rats problem)
When the Queen dies, it becomes a sprint.
- The main core can drop before the explosion animation finishes and can roll.
- If you want the core, then position close enough to react instantly, but not directly under stomp risk.
Rule of thumb: I would rather be 10 meters away with a clear lane than 2 meters away under her feet.
↖ 8) Strategy B (Queen): Safe Queen Core Farm (Leg Break + Loot Control)
Once you already have the blueprints, this is the cleanest way to craft Jupiter/Equalizer materials without core chaos.
↖ 8.1 Weapon choice: Why Patina is the leg-farm king
| Weapon | Job | Why it wins here |
|---|---|---|
| Patina (extended barrel) | Shred leg armor fast | Strong ARC armor penetration + high fire rate |
| Kettle | Backup + close defense | Flexible vs PvE and sudden players |
| Renegade | Optional | Works, just slower for leg-specific farming |
↖ 8.2 The terrain trick: ring-around-the-rock wrangling
1. Bait Queen toward a large rock/island feature (Dam-style terrain is ideal).
2. Rotate around cover to break line of sight.
3. Shoot legs when she peeks; keep moving through her missile/laser rhythm.
If missiles land, then tighten your cover loop.
If laser starts, then don't peek—reset behind cover.
↖ 8.3 Looting legs before someone else does
- Track where legs fall while you kite.
- If the Queen aggro shifts to another player, then loot immediately.
- If she de-aggros and walks home, then loot during her return path.
↖ 8.4 Weight management (the run ends when you're overweight)
Leg loot is heavy.
- If you're overweight, then stop at 2–3 legs and head to hatch.
- Drop heavy, low-priority materials if you need space.
What this means: the safest farm is the one you actually extract with.
↖ 9) Putting It All Together: A Simple Progression Path
If you want a clean progression ladder, this is the order I recommend.
| Stage | What you do | Why |
|---|---|---|
| Stage 1 | Run Route A low-risk routes | Funds kits and builds consistency |
| Stage 2 | Run Route B Berry City night drawers | Rapid blueprint unlock volume |
| Stage 3 | Run Route C Strategy A Harvester puzzle | Targets Equalizer + Jupiter chance |
| Stage 4 | Run Route C Strategy B Patina leg farm | Guarantees Queen Cores for crafting |
If you're broke, then Stage 1 is your reset button.
If you're blueprint-starved, then Stage 2 is your accelerator.
If you're crafting-focused, then Stage 4 is your endgame engine.
↖ FAQ
↖ 1) What's the single easiest method for lots of blueprints fast?
Berry City nighttime drawer/cabinet loops. If you spawn late and the map is stripped, then that's still fine—scraps can still roll multiple blueprints.
↖ 2) How do I keep low-risk loot runs from turning into constant PvP?
Don't chain through main lanes. If you hear layered footsteps or see freshly opened containers, then skip instantly. Low-risk is about refusing bad fights, not winning them.
↖ 3) Do I need to full-kill the Queen to craft Jupiter/Equalizer?
To craft (materials), no—you need Queen Cores, which come from legs.
To get Jupiter blueprint, you need a main-core chance, which requires the full kill.
↖ 4) Why does everyone recommend Patina for leg farming?
Because leg farming is an armor-penetration job. Patina's rate of fire and ARC armor performance makes limb breaks faster, which means fewer minutes exposed to third parties.
↖ 5) What's the most common mistake in Harvester puzzle runs?
Inserting cores as you find them and triggering pressure too early. Drop them first, stage the area, then execute. Also: ignoring the blue/red logic wastes shields.
↖ Closing
The cleanest ARC Raiders progression isn't play harder, it's play smarter on repeat. Use low-risk loot spots to stay funded, Berry City night runs to stack blueprints even on late raids, and a cheap-but-specific Queen setup to secure Equalizer/Jupiter opportunities and then farm Queen Cores with control. Once you build that loop, your stash stops feeling random—and starts feeling inevitable.

Most Popular Posts
- ARC Raiders Riven Tides Key Room Guide: Best Hotel Keys, Loot Routes, Secure & Crane Storage
- ARC Raiders Damage Fireflies Trial Guide: Best Farm Method on Buried City Night Raid
- ARC Raiders Riven Tides Update: New Map & Items, ARC Turbine, Rewards, and Best Early Strategy
- ARC Raiders Bettina Guide: Best Build, Buffs, and How to Use It Against ARC
- Arc Raiders Season 4 Riven Tides Update, Rewards, Safe Skins, and Release Timeline
- ARC Raiders Solo Search Supply Drops Guide: Best Buried City Route, Beacon Locations
Popular Category Lists
- Grow a Garden / (286)
- ARC Raiders / (262)
- CoD: Black Ops 7 / (166)
- Monopoly Go / (146)
- MLB 26 / (145)
- Star Citizen / (112)
- Steal a Brainrot / (89)
- Sailor Piece / (68)
- ARK Survival Ascended / (67)
- Diablo IV / (61)
- Forza Horizon 6 / (60)
- Blox Fruits / (60)
- CoD: BLACK OPS 6 / (55)
- Adopt Me / (53)
- Path of Exile 2 / (48)
- Monster Hunter Wilds / (46)
- Windrose / (44)
- Path of Exile / (40)
- Grow a Garden 2 / (40)
- Bee Swarm Simulator / (36)


