0
0Arc Raiders Easy Loot Farm: Blue Gate Underground Route, Battery Red Room, and Keycard Cheese
- KIVRI
- Share
- ARC Raiders
- 11/12/25
- 9827
Here's a structured overview of a quietly overperforming loot route in Arc Raiders: the Blue Gate underground. It isn't map-marked in yellow or red, yet run after run it spits out epic-tier gear, rare weapons, and—oddly often—blueprints. That's the why. The how is even better: three reliable hotspots plus a clever way to enter a keycard room without the card. Below is a step-by-step play that trims your time-to-loot while keeping your blueprint rate high.
- Context & Why This Route Works
- The Route, Step by Step
- Extraction & Looping
- Practical Tips, Risk Controls
- Quick Reference Table
- FAQ
- Summary
↖ Context & Why This Route Works
This path capitalizes on dense container placement, short traversal between rooms, and a mini-puzzle that points you to guaranteed spawns.
In practice, that means:
- - You get early wins in Area 1 (fast breach, high-quality lockers).
- - You get deterministic loot via a color terminal mini-game.
- - You unlock a high-value Red Room with batteries—small chore, big payoff.
- - You optionally perform a keycard cheese to access a sealed stash.
Why highlight it now? Because for many players (myself included), this spot has delivered a disproportionate number of blueprint drops. Your RNG will vary, but the loop efficiency is the real edge.
↖ The Route, Step by Step
This section walks you from surface entry to extraction with clear anchors, so you can execute even on a contested server.
1) Finding the Underground Entry
- - Go to the Blue Gate map. Watch for a staircase-like icon that appears only when you're close.
- - Enter the building; take the zipline to the bottom.
- - Quick scan: a nearby locker sometimes spawns decent items—loot if you're light on time.
Why this matters: Zipline entry puts you straight into the main hub corridor where the blue line on the floor begins—your breadcrumb to all three areas.
2) Area 1 — Fast Breach Locker Room (High ROI)
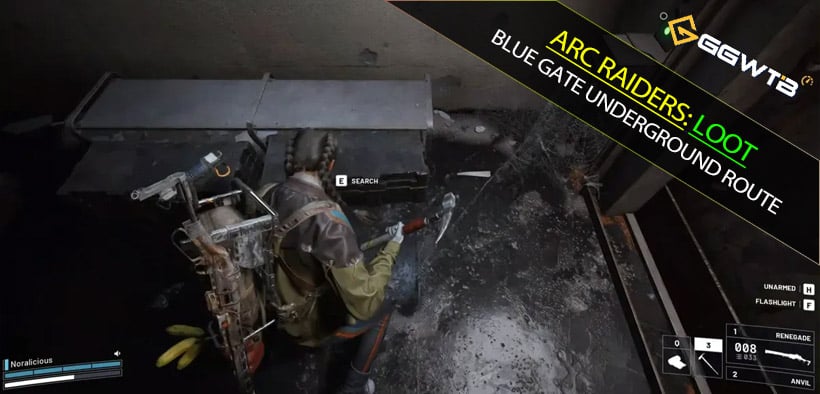
- - Follow the blue line until it merges with a red line.
- - Just before the merge point, turn left toward a door with yellow markings.
- - Enter, walk to the back-right, and breach the small door.
- - Loot the locker room thoroughly: Tall lockers, floor containers, and a small crate tucked low.
What to expect: Consistently strong early loot and a surprising blueprint frequency. If you're on a short timer, Area 1 alone is worth the run.
Action checkpoint: If backpack hits 60%+ capacity here, consider a quick extract plan—no need to overstay.
3) Area 2 — Color Terminal Mini-Game (Deterministic Cache)
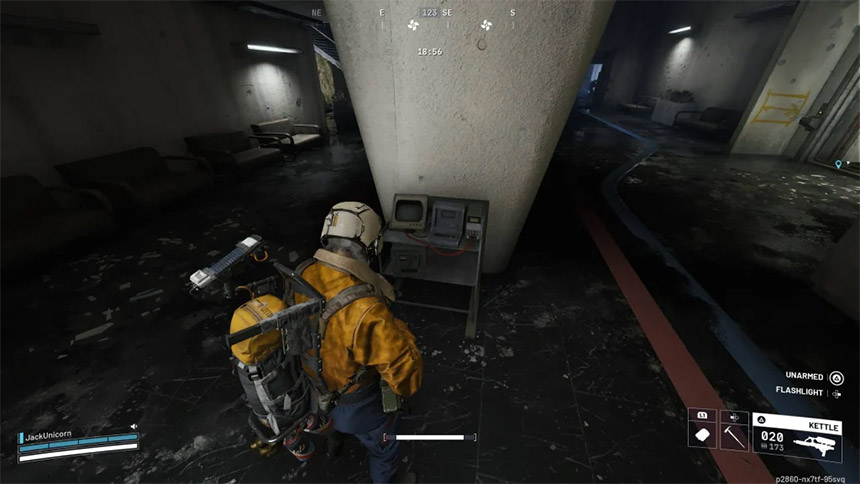
- From the facility entrance, follow the blue line to the blue+red merge.
- Search the nearby pillars for a small table with a computer terminal.
- Activate it; wait for the screen to stop flashing and show a color: red, blue, or yellow.
- Follow the wall-painted symbols that match the shown color (not the floor lines).
- Example (red): go left up the stairs, then right with the next red mark.
- You'll find an X painted on the floor with a lootable container beside it.
Why bother: It's quick, low-risk, and reliable. While it won't always beat Area 1, it's near-free value since you're already in the corridor.
If you find nothing at the X: Recheck color pathing; the lines on the floor are decoys—stick to wall symbols.
4) Area 3 — Battery-Locked Red Room (Top-Tier Chest)
- Identify the target door: along the blue line path, a left-side door hides Area 3.
- Find the battery panel: somewhere in the facility (up to 4 RNG spawn spots), a wall panel holds three removable batteries.
- Deliver all three batteries—one at a time—to the sockets next to the Area 3 door.
- Open the room (the Red Room) and prioritize the weapon chest at the back.
Why this pays: The Red Room houses some of the most valuable spawns in this circuit, often upgrading your run's value floor.
Critical warning: If someone closes the door while you're inside, there's no internal release.
To avoid grief traps:
- Keep the door propped with a teammate in the threshold.
- If solo, loot fast and avoid entering with unknown squads nearby.
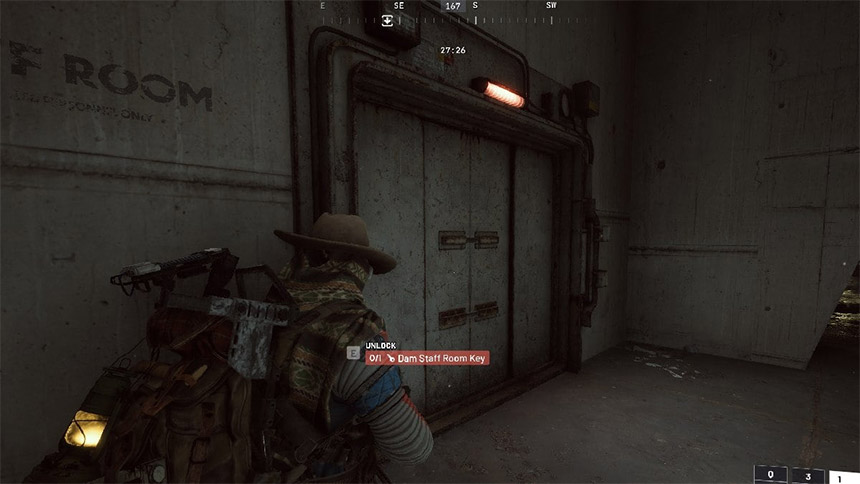
5) Optional: Keycard Cheese Entry (No Card Needed)
- From the yellow-marked door used for Area 1, take an early right down a large staircase.
- At the bottom is a keycard-locked section.
- Look at the back wall: climb the large structure.
- Sprint and tumble through the open window to enter without a card. Expect several tries; angle and timing are finicky.
- After looting, you can open the door from inside to exit—even without a card.
What this means: You gain access to a sealed stash earlier in progression, accelerating blueprint and component accumulation.
If you keep missing the window: Try a diagonal approach, starting your sprint a step earlier and turning mid-air to narrow your body profile.
↖ Extraction & Looping
- To leave, follow the blue floor line back toward the zipline building.
- If you've hit Area 1 + Area 3, you're typically at a strong value threshold—extract rather than overfarming under pressure.
- For blueprint-targeted loops: prioritize Area 1 → Area 3 → Area 2 → Cheese (time permitting).
Why loop order matters: It frontloads high-yield rooms and backloads traversal-heavy tasks, maximizing value-per-minute.
↖ Practical Tips, Risk Controls
- Drop Quality Experience: Across ~15 test runs on Blue Gate, I saw blueprints in ~70% of runs, with 1–3 per hit when they dropped. Not a guarantee, but notable compared to other hubs.
- Time-to-Value: Area 1 is sub-2 minutes when uncontested. Red Room adds ~4–7 minutes depending on battery RNG and pathing.
- Squad Etiquette: Call door states. One teammate should watch the Red Room door to prevent a trap; rotate looting in clockwise order to avoid collision.
- Inventory Discipline: If you find a high-value weapon early, lock it and stop re-rolling low-impact containers. Protect your win.
- Re-entry Logic: If you drift into clearly different architecture or lose the blue line for more than 20 seconds, reverse—RNG battery spawns shouldn't pull you out of bounds.
↖ Quick Reference Table
A compact view of the three core areas and their roles.
| Area | Access Time | Loot Quality | Key Mechanics | Risk |
|---|---|---|---|---|
| Area 1 (Breach Locker) | Very fast | High for time spent | Yellow door → breach small door | Low |
| Area 2 (Color Terminal) | Fast | Moderate, deterministic | Terminal color → follow wall symbols → X | Low |
| Area 3 (Red Room) | Moderate (battery run) | High, weapon chest | Find 3 batteries → socket → open | Medium (door trap) |
| Keycard Cheese | Variable (skill check) | High burst | Climb → sprint roll through window | Medium (fail attempts) |
Takeaway: Hit Area 1 first, then decide: batteries spotted? Go Red Room. No batteries? Run the color terminal and reassess.
↖ FAQ
Q: I can't find the battery panel. Am I missing it?
A: There are multiple RNG spawns. Sweep the main corridors branching off the blue line, checking alcoves and side halls. If you exit the feel of the facility, double back—panels won't spawn outside.
Q: The terminal keeps flashing. When does the color lock in?
A: Wait a few seconds after activation. When the white flicker stops, the solid color (red/blue/yellow) is your signal to move.
Q: Is the keycard cheese bannable?
A: It's an in-world movement exploit rather than a third-party tool; enforcement varies by developer policy. If you're cautious about fair play, skip it—the core route still pays.
Q: I got trapped in the Red Room. Any escape?
A: There's no internal release. Best prevention is keeping the door watched or partially blocked by a teammate. If solo, loot fast and avoid entering with others nearby.
Q: Best order for blueprint focus?
A: Area 1 → Area 3 → Area 2 → Cheese if you still have time. That sequencing has produced the most consistent blueprint appearances for me.
↖ Summary
You're aiming for a tight, repeatable circuit: enter Blue Gate underground via the zipline, snag the fast-hit breach room (Area 1), solve the color terminal for a deterministic cache (Area 2), and unlock the battery-gated Red Room (Area 3) for the big chest. If you're comfortable with movement tech, add the keycard window cheese for extra juice. If you find batteries early, prioritize Red Room; if not, keep your loop compact and extract once you cross your value threshold. This rhythm balances time, risk, and blueprint potential—and that's what turns a good spot into a farm.

Most Popular Posts
- ARC Raiders Riven Tides Key Room Guide: Best Hotel Keys, Loot Routes, Secure & Crane Storage
- ARC Raiders Bettina Guide: Best Build, Buffs, and How to Use It Against ARC
- Best ARC Raiders Attachments for Every Weapon: Complete Weapon Mod Guide
- ARC Raiders Turbine Boss Guide: Spawn Time, Weak Points, Best Weapons, and Loot
- Arc Raiders Patch 1.27: Regional Pricing, Augment Rework, and Expedition Catch-Up
- ARC Raiders Update Guide: Best Nomadic Envoy Trades, Rascal Grenade Launcher, Durability Buffs
Popular Category Lists
- ARC Raiders / (304)
- Grow a Garden / (286)
- CoD: Black Ops 7 / (166)
- MLB 26 / (152)
- Monopoly Go / (148)
- Star Citizen / (133)
- ARK Survival Ascended / (93)
- Steal a Brainrot / (92)
- Sailor Piece / (68)
- Forza Horizon 6 / (68)
- Diablo IV / (62)
- Blox Fruits / (62)
- Grow a Garden 2 / (59)
- Adopt Me / (58)
- CoD: BLACK OPS 6 / (55)
- Path of Exile 2 / (48)
- Monster Hunter Wilds / (46)
- Windrose / (44)
- Path of Exile / (40)
- Donut SMP / (37)