


 0
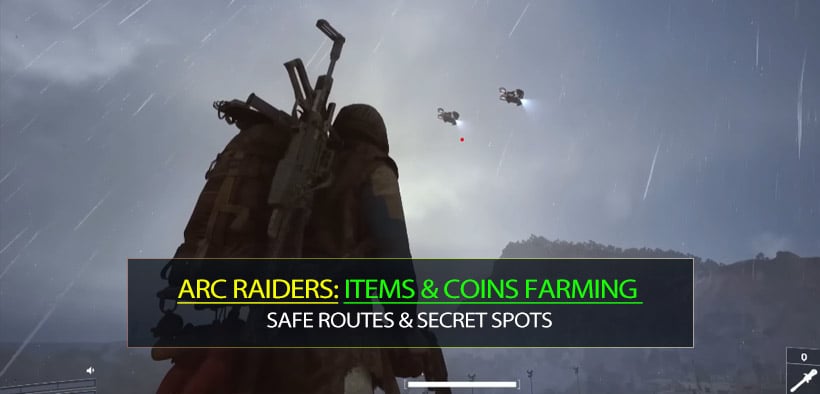
0ARC Raiders Solo Items Farming Guides: Safe Routes & Secret Spots
- KITE
- Share
- ARC Raiders
- 01/19/26
- 1310
We built this ARC Raiders guide for a specific kind of player: the solo, PvE-leaning blueprint hunter who is allergic to gambling a full backpack on a coin-flip PvP fight.
We collecting 61/75 rare blueprints through repeatable extractions, our biggest takeaway is simple: Safe Coins isn't about hitting one massive jackpot; it's about consistent, low-exposure loops.
This guide combines our safest patrol routes with the hidden secret spots that most players sprint past. We focus on minimal sightlines, high-value containers, and reliable exits. If you run this like a checklist, you will stack 100k+ coin raids without playing the hero.
- The Core Philosophy: How to Stay Alive
- 1. Avoid Heat Geometry
- 2. Manage Sound Debt
- 3. The Coin Engine Inventory Rule
- Map 1: DAM Battlegrounds
- The Route & Hidden Stashes
- Map 2: Buried City
- The Route & Hidden Stashes
- Map 3: Spaceport
- The Route & Hidden Stashes
- Map 4: Blue Gate
- The Route & Hidden Stashes
- Map 5: Stella Montis
- The Route & Hidden Stashes
- FAQ
- Final Thoughts
↖ The Core Philosophy: How to Stay Alive
Safety in ARC Raiders is mostly behavior, not gear. Before we look at the maps, here are the rules that keep these runs PvE-first.
↖ 1. Avoid Heat Geometry
We don't path through the obvious center lanes where players naturally collide. Instead, we favor edges, vertical bypasses, and tunnels with clear exits. If a room takes more than 60 seconds to loot, it's a trap.
↖ 2. Manage Sound Debt
Every noise you make is an invitation. If you trigger an alarm or linger in a turret's sightline, you are building debt that gets paid in bullets.
- Flashlights: Keep them off unless mandatory. Light attracts attention.
- Aggro: If you don't need to kill it, walk around it.
↖ 3. The Coin Engine Inventory Rule
You don't get paid for carrying junk just in case. If you are full and still looting, you must drop low-value weight.
- Drop First: Low-tier crafting mats.
- Keep Always: Weapon parts, rare trinkets, modules, and craft bottlenecks (Springs, Processors, Batteries).
The Golden Rule: If you are at 90k+ value and your route still has three risky stops, extract. That decision alone raises your weekly profit more than any one more room mentality.
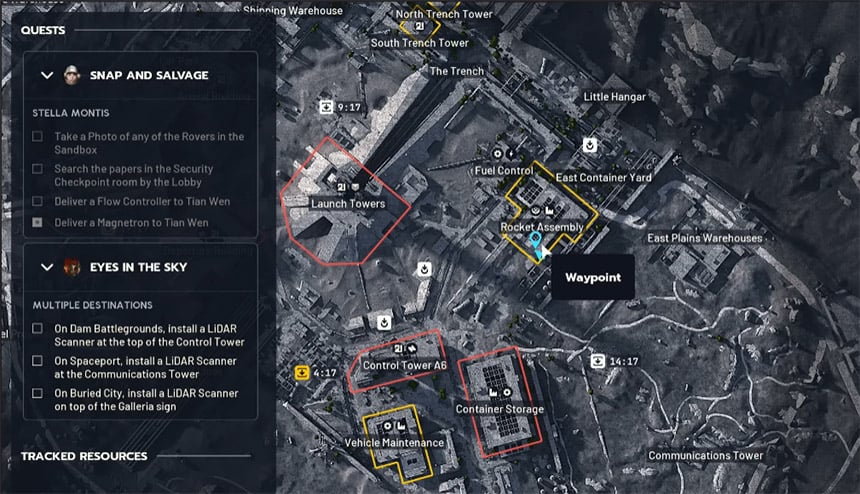
↖ Map 1: DAM Battlegrounds
Strategy: The Bridge + Power Rod Loop
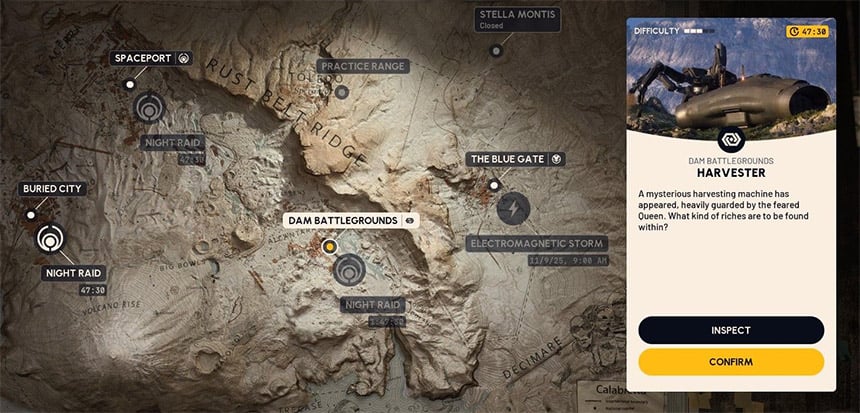
DAM is intimidating because the center can turn into a radar party instantly. The trick is to loot mid-value spots near the middle without committing to the danger zones, utilizing hidden caches along the way.
↖ The Route & Hidden Stashes
| Step | Location / Action | What We're Hunting | Safety Protocol (If... Then...) |
|---|---|---|---|
| 1 | Start: Formakai Outpost | Check the Rooftop Corner (climb the ledge). Hidden weapon crate + grenade case. | If the crate is empty, don't search harder. Keep moving. |
| 2 | South Swamp Outpost | Check behind the rear steps. There is a weapon crate that blends in like a rock. | Most people sprint past this. Grab it and go. |
| 3 | Red Locker Room | Hit the Red Lockers via outer access. | If you hear footsteps inside, leave immediately. Do not breach. |
| 4 | Control Tower (Exterior) | Zipline Required: Zip to the outside platform. Loot the outside button area. | Many players loot the key room but ignore the exterior. |
| 5 | Flood Access Tunnel | Enter the tunnel near the tower. Don't just zip out; check the side for a weapon crate. | If you take the zip immediately, you miss the free loot. |
| 6 | Power Complex | Power Rod Room (Lockers). | If it's hot, bail. Your coin total is likely already high. |
| 7 | Pump House Hatch | Extract. | Commit to the exit. Don't one more room yourself. |
Why this works: You are chaining high-value single stops (weapon cases, power-rod lockers) with low traversal exposure. You avoid the main bridge choke points almost entirely.
↖ Map 2: Buried City
Strategy: Rooftop Bypasses & The Half-Zip Trick
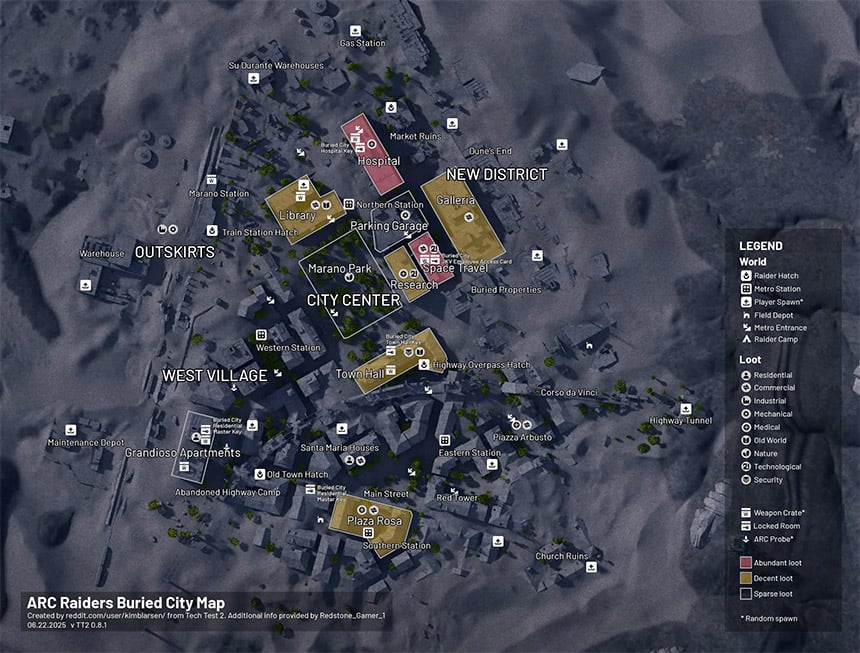
Buried City prints Coins due to trinket density, but solos die here by lingering in interiors. We path roof-to-roof, looting quickly and rotating before the city wakes up.
↖ The Route & Hidden Stashes
| Step | Location / Action | What We're Hunting | Safety Protocol (If... Then...) |
|---|---|---|---|
| 1 | Morama Station | Climb onto the Train Roof. There is often a weapon crate up there. | High value, low time. If looted, rotate to the next roof. |
| 2 | Plaza Rosa (Roof Entry) | Attachments + Drawers + Trinkets. | If doors are open, assume it's hit and move on. |
| 3 | Red Tower | Red Lockers + Med Bag spawn. | Loot lockers first; they are the time-efficient value. |
| 4 | The Half-Zip Room | Skill Check: Ride the back-area zipline but jump off halfway onto the left platform. | Contains multiple containers + weapon crate. Most ride past it. |
| 5 | Hospital Roof | Backpack + Med Bag. Zipline access is crucial here. | Only go if you have a zip + stamina to exit safely. |
| 6 | Parking Garage | Breach the door, take the zip down, and check the back corner. | Hidden behind a commitment action. If breach is open, leave. |
| 7 | Hatch Key Extract | Safe cash-out. | Don't path through the loudest streets to reach it. |
Pro Tip: If you are already full of trinkets, stop picking up low-tier crafting mats. They only slow your extraction.
↖ Map 3: Spaceport
Strategy: Staff Room, Tunnels & Roof Holes
Spaceport rewards players who know two things: where the red lockers concentrate, and how to enter towers without using keys. Our best consistent runs land ~125k here without a single forced PvP interaction.
↖ The Route & Hidden Stashes
| Step | Location / Action | What We're Hunting | Safety Protocol (If... Then...) |
|---|---|---|---|
| 1 | Arrival Building | Quick sweep for Red Lockers and Med Wing drawers. | If it's busy, take one lane and leave. |
| 2 | Departure Staff Room | Multiple Red Lockers + Breach + Trinkets. | Close the door behind you. Loot fast. |
| 3 | Underground Tunnel | Left-side run. Check the Corner Bag (literally in a dark corner). | If you hear players, shut doors and reroute. |
| 4 | Key Towers (Roof Entry) | Zipline Required: Look for a hole in the roof. Zip directly in to access a hidden weapon crate. | This bypasses the need for a key and avoids the main door. |
| 5 | North Trench Tower | Zip across to the tower. Weapon case on top. | If the key-room is occupied, don't contest. |
| 6 | Container Yard Console | Backpack spawn + Ammo box. | If over-encumbered, extract immediately. |
| 7 | Hatch Extract | Safe end. | This is the profit lock button. |
Why this is the best solo map: You can hit red lockers and weapon cases while spending very little time in open sightlines. The underground tunnels provide a reset button if things get hot.
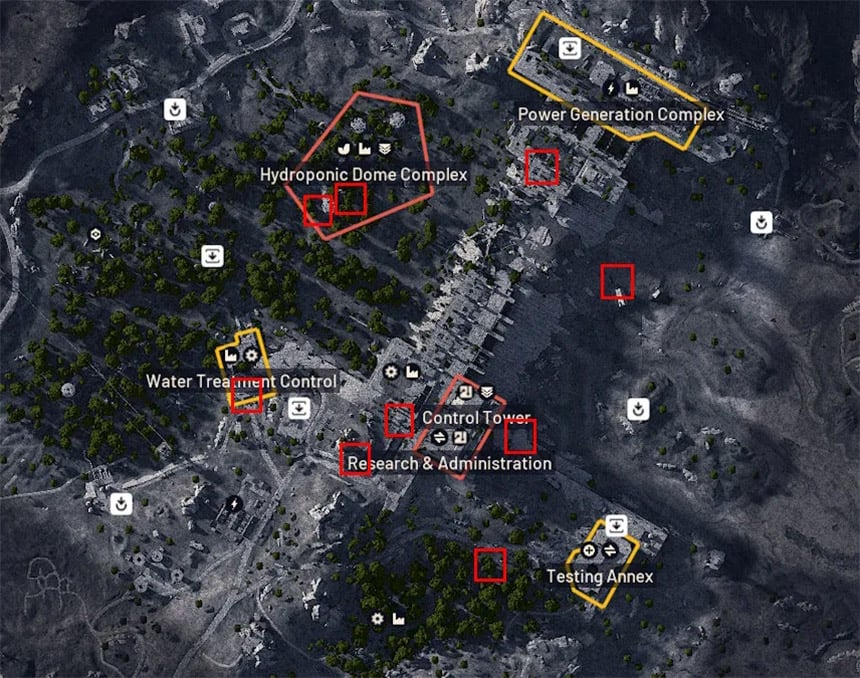
↖ Map 4: Blue Gate
Strategy: Topside Loop & The Puzzle Cache
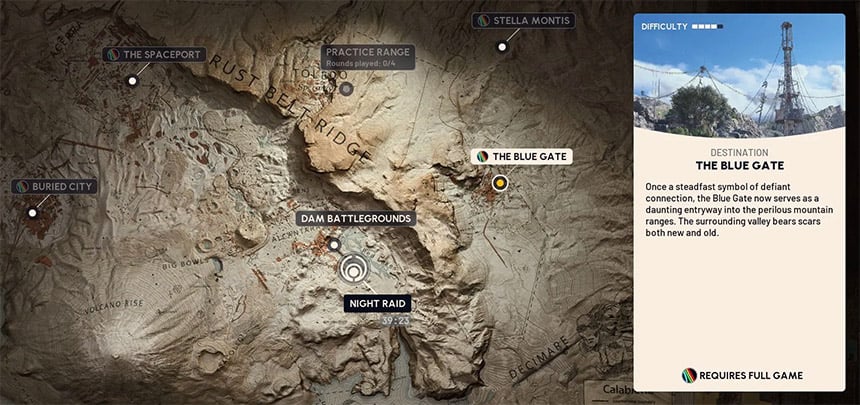
Blue Gate tempts you into the Security Wing drama. We don't take the bait. We use a topside loop and only dip underground where it's calmer.
↖ The Route & Hidden Stashes
| Step | Location / Action | What We're Hunting | Safety Protocol (If... Then...) |
|---|---|---|---|
| 1 | Village Outskirts | Check the Dry Stream Trail. Follow the dried water line to a hidden backpack. | Off main travel lines. Very safe. |
| 2 | Gate Control Room | Desk backpack spawn + Lockers. | Close the door to reduce turret line-of-sight. |
| 3 | Head House Corner | Drop into the corner of the circular pad. Backpack + chance for weapon crate. | Quick in-and-out. If the crate isn't there, don't circle twice. |
| 4 | Shallow Underground | Maintenance side only. Guaranteed weapon case lane. | Avoid the deep security paths. |
| 5 | Wreckage Puzzle | Abandoned Wreckage: Do the quick interact sequence for a cache of advanced components. | Only do this if the area is calm. If you hear gunfire, skip it. |
| 6 | Reinforced Hatch | Final case/med bag + Exit. | If Snitch aggro happens, break LoS, don't chase. |
The Puzzle Rule: If you are already carrying strong loot, the puzzle is optional. Your goal is extraction, not perfection.
↖ Map 5: Stella Montis
Strategy: Blueprint Rooms & The Secret Pocket
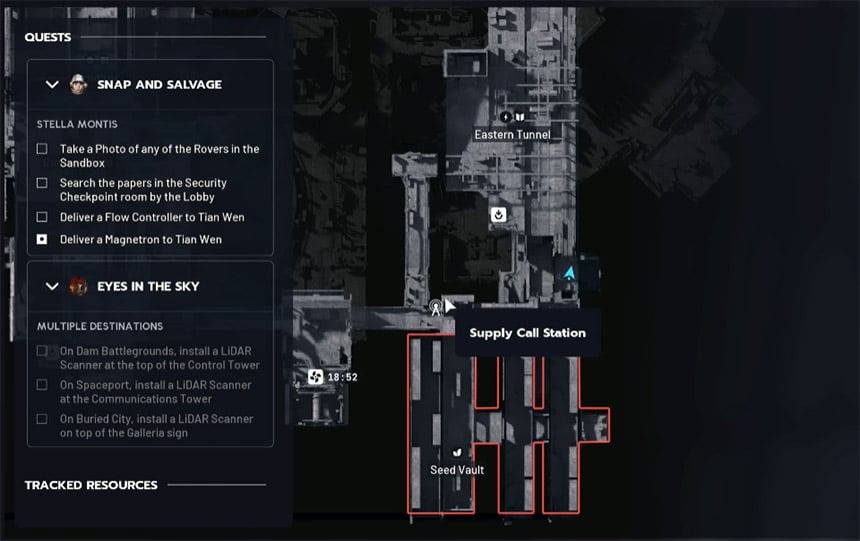
Stella Montis is where blueprint hunters get paid—if they stop trying to loot everything and instead hit the rooms that consistently produce container volume.
↖ The Route & Hidden Stashes
| Step | Location / Action | What We're Hunting | Safety Protocol (If... Then...) |
|---|---|---|---|
| 1 | Assembly Workshop | Top-tier containers, breaches. | High risk. If it's already cleaned, don't chase scraps. |
| 2 | Staff Room | Red Lockers + Med Bag chance. | If you hear death or looting sounds, assume PvP and leave. |
| 3 | The Secret Pocket | Hidden Texture: Drop down under the structure into a container pocket. | Critical: Do not go deeper past the safe exit line or you can get stuck. |
| 4 | Upper Ledges | Grenade tube / Backpack spawns. | Use verticality to stay above the fray. |
| 5 | Hatch Extract | Lock profit. | Use it when you are heavy or blueprint-rich. |
Why Stella is different: It rewards route knowledge more than aim. The Secret Pocket is a cash register: drop in, loot the visible containers, and leave the same way.
↖ FAQ
Q: How do we keep these routes PvE-first when players still exist?
We assume players exist and route around where they want to be. By avoiding long center crossings and preferring hatch extracts, you will still see raiders, but you won't be forced into coin-flip fights.
Q: Do I need a zipline for these routes?
It is highly recommended. Ziplines unlock the roof hole / exterior ledge class of secret spots (Spaceport towers, DAM control tower). If you don't have one, you can still farm most backpack and crate spots, but you lose the vertical bypass options.
Q: What if I arrive and a key room or crate is already looted?
We don't revenge loot. We rotate. If it's looted, someone was there recently, which means your PvP risk is high. Take the next low-exposure value stop instead.
Q: How do I actually increase blueprint gains?
Blueprints come from volume and survival. Prioritize med bags, ammo boxes, raider caches, and dense container rooms. It is better to extract with a good bag 5 times than a perfect bag once.
↖ Final Thoughts
We aren't trying to turn ARC Raiders into a stealth museum tour—bad luck happens, ARC aggro happens, and sometimes you spawn late. The point of these routes is that your plan still works when conditions aren't perfect.
You have alternate stops, you have early cash-out options, and your exits are chosen to minimize surprise contact. Run these like a loop you can repeat, not a one-time best possible sprint. That mindset is exactly how we reached 61/75 rare blueprints and kept our raids consistently in the 100k+ range without living in PvP hotspots.

Most Popular Posts
- ARC Raiders Riven Tides Key Room Guide: Best Hotel Keys, Loot Routes, Secure & Crane Storage
- ARC Raiders Damage Fireflies Trial Guide: Best Farm Method on Buried City Night Raid
- ARC Raiders Riven Tides Update: New Map & Items, ARC Turbine, Rewards, and Best Early Strategy
- ARC Raiders Bettina Guide: Best Build, Buffs, and How to Use It Against ARC
- ARC Raiders Solo Search Supply Drops Guide: Best Buried City Route, Beacon Locations
- Arc Raiders Season 4 Riven Tides Update, Rewards, Safe Skins, and Release Timeline
Popular Category Lists
- Grow a Garden / (286)
- ARC Raiders / (266)
- CoD: Black Ops 7 / (166)
- Monopoly Go / (146)
- MLB 26 / (145)
- Star Citizen / (116)
- Steal a Brainrot / (89)
- ARK Survival Ascended / (74)
- Sailor Piece / (68)
- Forza Horizon 6 / (63)
- Diablo IV / (61)
- Blox Fruits / (60)
- CoD: BLACK OPS 6 / (55)
- Adopt Me / (53)
- Path of Exile 2 / (48)
- Monster Hunter Wilds / (46)
- Windrose / (44)
- Grow a Garden 2 / (42)
- Path of Exile / (40)
- Bee Swarm Simulator / (36)


