0
0ARC Raiders Throw Snowballs at Rocketeers Trial Challenges: Easy SOLO Points Farming Methods
- KITE
- Share
- ARC Raiders
- 12/31/25
- 1573
This challenge isn't hard because Rocketeers are scary—it's hard because snowballs are slow and raid time is not. Once I stopped trying to do everything in one raid, my score skyrocketed.
As a solo raider, I managed to land 177 snowball hits on Rocketeers and earned 44,250 points. The trick is simple: separate snowball farming from your scoring raid, then lock a Rocketeer into a disabled state and dump your inventory as fast as possible. I use two approaches: one that relies on Showstoppers, and one that requires nothing but an Anvil (or Renegade) and patience.
Below is the exact workflow I'd recommend if you want repeatable high scores without depending on lucky spawns or heroic last-second extracts.
- 1) Why You Should Always Use a Two-Raid System
- 1.1 The time math (this is the real reason)
- 1.2 The two-raid workflow I actually run
- 2) Best Map Choice (and Why I Avoid Buried City)
- 2.1 Map recommendation
- 3) Loadout Setup (Solo Practical, Not Fancy)
- 3.1 What I bring
- 4) Method 1: Showstoppers Quick-Disable (Fastest Scoring)
- 4.1 SOP
- 4.2 Two rules that prevent most deaths
- 5) Method 2: No Showstoppers (Thruster-Only Disable With Anvil/Renegade)
- 5.1 SOP
- 5.2 The biggest failure mode (and how to avoid it)
- 6) Scoring Rhythm: How I Turn a Full Bag Into Leaderboard Points
- 6.1 My practical pace table
- FAQ
- Q1) Do I really need a prep raid to farm snowballs?
- Q2) How many snowballs should I aim for?
- Q3) Which map is best?
- Q4) What's safer: Showstoppers or thruster-only?
- Q5) Where should I stand when throwing snowballs?
- Summary
↖ 1) Why You Should Always Use a Two-Raid System
Snowball farming is the bottleneck. If you try to farm snowballs during the same raid you're chasing points, you'll spend most of your timer crafting instead of scoring.
↖ 1.1 The time math (this is the real reason)
- You can farm roughly 1 snowball every ~6 seconds from a single snow patch.
- A big bag like an MK2 can hold around ~100 snowballs if you keep your ammo/heals minimal.
That means, just to craft the snowballs:
Then add time spent warming up/defrosting (Cold Snap taxes your tempo), and you're commonly looking at ~15 minutes total.
What this means: your high score raid becomes a crafting simulator unless you split the process.
↖ 1.2 The two-raid workflow I actually run
| Raid Type | Your Goal | What You Do | Success Looks Like |
|---|---|---|---|
| Raid A: Prep raid | Fill inventory with snowballs | Rotate snow piles, craft, stay safe | Extract with a near-full bag of snowballs |
| Raid B: Scoring raid | Spend snowballs on disabled Rocketeers | Disable → dump throws → rotate | High hit count + safe extract |
If you notice Prep Raid A is full of players or you keep getting pressured, then extract earlier with good enough snowballs rather than dying and resetting to zero.
↖ 2) Best Map Choice (and Why I Avoid Buried City)
You want consistent Rocketeers and enough opportunities to find a second one if the first gets destroyed.
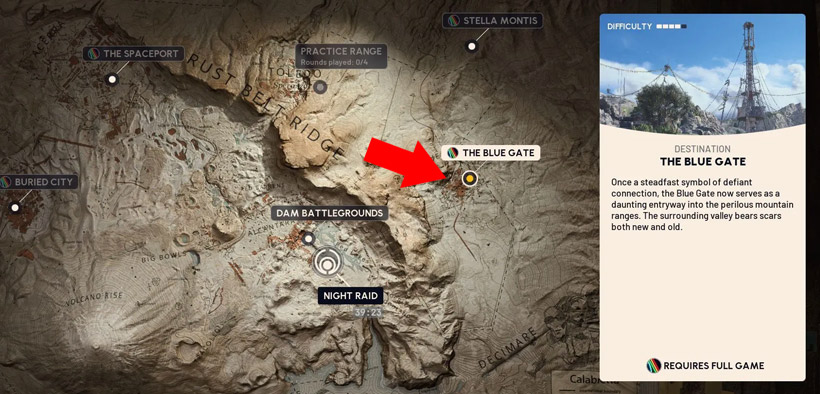
↖ 2.1 Map recommendation
| Cold Snap Map | Rocketeer availability (feel) | Risk of random raiders deleting your disabled Rocketeer | Best for high scoring? |
|---|---|---|---|
| Blue Gate | High (often 3–4 roaming) | Medium | Yes |
| Buried City | Lower | Higher (fewer targets = more grief impact) | Not ideal |
Why Blue Gate wins: more Rocketeers means lower downtime and better recovery if someone ruins your setup.
↖ 3) Loadout Setup (Solo Practical, Not Fancy)
Your goal is not win every fight, it's disable safely, score fast, leave alive.
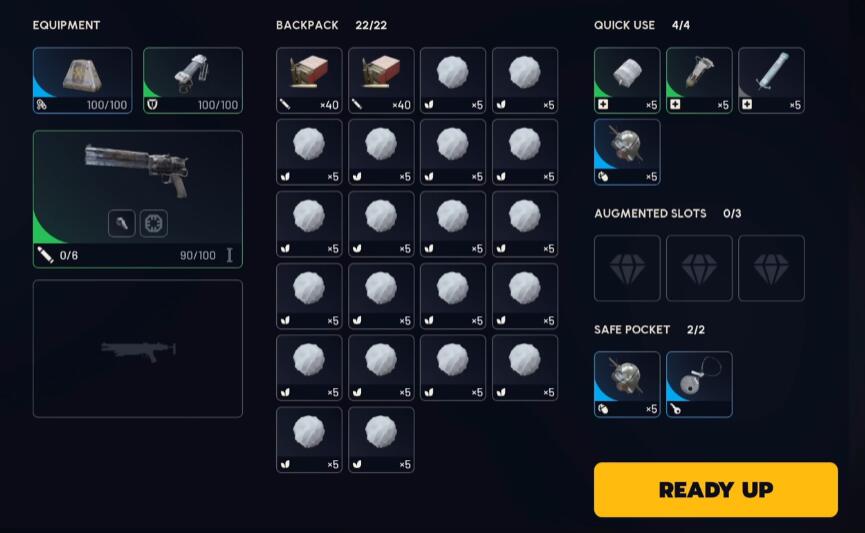
↖ 3.1 What I bring
| Slot | Recommended | Why it helps |
|---|---|---|
| Primary | Anvil (or Renegade) | Needed for the no-Showstoppers method: thruster destruction |
| Utility (Method 1) | Showstoppers (bring several) | Unless you know the sweet spot, you'll often need more than one |
| Sustain | Heals + shield recovery | You may eat rockets while learning angles |
| Bag | Bigger is better (MK2-style) | Snowballs are your ammo, capacity = points |
↖ 4) Method 1: Showstoppers Quick-Disable (Fastest Scoring)
This is the cleanest method when you have Showstoppers: force the Rocketeer into a disabled, flipped state and unload your snowballs.
↖ 4.1 SOP
1. Spawn in and head toward a Rocketeer patrol area (Blue Gate is my go-to).
2. Pick a scoring spot with:
- Hard cover (to break rocket line of sight)
- A place to warm up/defrost
- A rotation path toward a quick escape option (hatch/extract route)
3. Clear nearby stragglers first so you aren't interrupted mid-throw.
4. Aggro the Rocketeer and stay in cover until it gets close enough.
5. Use Showstoppers to disable it.
- In my experience, it often takes multiple Showstoppers, so bring a buffer.
6. When it flips and becomes paralyzed upside down, reposition to behind/side-behind it.
7. Dump your entire inventory of snowballs fast.
8. Refill from nearby snow piles (if time allows), then repeat on a second Rocketeer.
↖ 4.2 Two rules that prevent most deaths
- Do not throw from the front. It can still fire rockets forward even while disabled.
- Speed matters. The longer it sits disabled, the more likely a random raider shows up and deletes your score target.
If you find other raiders approaching while you're mid-dump, then prioritize finishing your throws quickly or resetting to a safer target—losing the Rocketeer is worse than losing a little loot.
↖ 5) Method 2: No Showstoppers (Thruster-Only Disable With Anvil/Renegade)
No Showstoppers? You can still do this consistently, but you must be disciplined: destroy only the two front thrusters.
↖ 5.1 SOP
1. Choose a small building with two exits as your control point.
2. Aggro the Rocketeer from as far as you can to create a brief damage window before it starts firing.
3. Peek-shoot in short bursts:
- 1–2 Anvil shots, then duck inside
- Swap to the other exit
- Repeat
4. Focus exclusively on front thrusters until both break.
5. Once it flips and becomes paralyzed, move to side-behind and unload snowballs.
6. Extract while you still have time—don't gamble on a zero-second button press.
↖ 5.2 The biggest failure mode (and how to avoid it)
If you damage the Rocketeer beyond thrusters, it can explode when it hits the ground after disabling.
If you notice you're hitting body armor instead of the thruster, then stop shooting and reposition. Thruster-only is the whole game.
↖ 6) Scoring Rhythm: How I Turn a Full Bag Into Leaderboard Points
High scoring is basically a tempo problem: you're racing the raid timer and other players, not the Rocketeer.
↖ 6.1 My practical pace table
| Phase | Time share | What you're doing | Common way it fails |
|---|---|---|---|
| Setup + clearing | 20% | Find cover, clear small threats | Over-rotating, getting tagged by rockets early |
| Disable | 40% | Showstoppers or thruster-only | Peeking too long, getting forced off angle |
| Snowball dump | 30% | Rapid throws from safe angle | Going too slow and getting your target stolen |
| Extract | 10% | Leave early, don't hero it | Mis-timing, freezing, getting intercepted |
If you realize the timer is getting tight, then leave. Dying with a high score run is the worst kind of productivity.
↖ FAQ
↖ Q1) Do I really need a prep raid to farm snowballs?
If your goal is a high score, yes. Crafting speed is slow enough that doing it in the scoring raid usually cuts your hit count dramatically.
↖ Q2) How many snowballs should I aim for?
I aim for near full bag, roughly ~100 if you're minimizing other ARC Raiders items. More snowballs = more points.
↖ Q3) Which map is best?
Blue Gate feels best because it typically has multiple Rocketeers roaming, so you can chain targets.
↖ Q4) What's safer: Showstoppers or thruster-only?
Showstoppers is faster and simpler. Thruster-only is consistent without special utility but demands careful aim and patience.
↖ Q5) Where should I stand when throwing snowballs?
Behind or side-behind the disabled Rocketeer. Avoid the front because rockets can still come out from that side.
↖ Summary
To farm massive points as a solo for Throw Snowballs at Rocketeers, you don't need perfect aim—you need a clean process: prep raid to stock snowballs, scoring raid to disable a Rocketeer and dump your inventory quickly. Use Showstoppers if you have them; if not, go thruster-only with an Anvil/Renegade and a two-exit building to safely chip the front thrusters.
The three rules I follow every run: don't craft snowballs in the scoring raid, don't throw from the front, and don't get greedy with the timer.

Most Popular Posts
- Arc Raiders Canto Guide: Best Build, Solo vs Trios Tips, and Blueprint Farm
- ARC Raiders Assessors Guide: Easy Solo Loot Strategy With or Without Smoke Grenades
- ARC Raiders Riven Tides Key Room Guide: Best Hotel Keys, Loot Routes, Secure & Crane Storage
- ARC Raiders Damage Fireflies Trial Guide: Best Farm Method on Buried City Night Raid
- ARC Raiders Scrappy Guide: Best Fruits, and What Apricots & Agave Actually Drop
- ARC Raiders Riven Tides Update: New Map & Items, ARC Turbine, Rewards, and Best Early Strategy
Popular Category Lists
- Grow a Garden / (283)
- ARC Raiders / (248)
- CoD: Black Ops 7 / (164)
- Monopoly Go / (145)
- MLB 26 / (133)
- Star Citizen / (99)
- Steal a Brainrot / (87)
- Sailor Piece / (67)
- CoD: BLACK OPS 6 / (55)
- Forza Horizon 6 / (54)
- Blox Fruits / (54)
- ARK Survival Ascended / (50)
- Path of Exile 2 / (48)
- Adopt Me / (47)
- Monster Hunter Wilds / (46)
- Diablo IV / (45)
- Windrose / (43)
- Path of Exile / (40)
- Battlefield 6 / (34)
- Bee Swarm Simulator / (32)